Instant Checks

The Instant Checks program can be used to create and/or print a single check. It can also be used to print checks that have been created by the A/P Inquiry program (using the Pay Bills function), the Driver Statements program, the Payroll Register program and the COD Payable Register program. The Instant Check program is also used to create invoices and checks 'on the fly', or to record checks that have been manually issued. To print batches of checks, use the check Printing program instead. Note that in the Customer and Vendor Profiles program, you can specify an alternate address for a vendor. When checks are printed for that vendor, the alternate address will be used.
| A database column (INSTANT_CHECK) flags checks created using the Instant Checks program. This flag is used in reports to distinguish checks created by the Instant Checks program from those created in other programs. For any check created by the Instant Checks program, this flag is set to True. The default value for this flag is False. |
The Instant Checks program screen is divided into the following areas: Check Information Header, the Transaction Details Tabs, and a Menu Bar / Toolbar. The bottom of the program window is a status bar that details some information about the database connected to, etc., as well as showing when a specific Instant Check "Out of Balance".
To access Instant Checks:
| From this location | Go to |
|---|---|
TruckMate Menu and TruckMate Task List |
Accounting & Finance > Accounts Payable > Instant Checks |
Windows Start Menu |
TruckMate 20xx > Instant Checks |
Windows Explorer |
C:\Program Files (x86) > TruckMate 20xx > Cheque.exe |
How Do I?
How do I Print a Single Check?
The Instant Checks program can be used to create and/or print a single check. It can also be used to print checks that have been created by the AP Inquiry program (using the Pay Bills function), the Driver Statements program, the Payroll Register program and the COD Payable Register program. The Instant Check program is also used to create invoices and checks "on the fly", or to record checks that have been manually issued. To print batches of checks, use the Check Printing program instead. Note that in the Customer and Vendor Profiles program, you can specify an alternate address for a vendor. When checks are printed for that vendor, the alternate address will be used.
-
Open the Instant Checks program (CHEQUE.EXE).
-
Select the Bank Account the payment is to be deducted from.
-
Select the 'Payee Type'.
-
Enter the 'Pay to the Order of' information, or select the search to the right of the field to find the payee from your listed payees. For a one-time payment, enter the payee name in the address box.
-
Enter the address of the payee or other relevant information.
-
Bypass the check number text field if you wish the system to generate a check number automatically when printed, or enter the check number manually if a check has already been written and you’re entering the information after-the-fact.
-
Tab through the rest of the fields entering information as you go.
-
Enter information in one or more of the five tabs, as necessary.
-
If you will be printing the check- i.e.: entering the information after-the-fact, then select the 'Print Check' checkbox at the bottom part of the screen when you’re ready to print.
Menu Bar / Toolbar
File Menu
Print Reports
 Selecting the Print Reports button will bring up the report selection window, common to many TruckMate applications. Here, you will select a report file from those available in your system and a Crystal Report will be generated.
The Crystal Report template supplied with the TruckMate system is called 'CHEQUE.RPT'. After selecting the desired report (using the Report Selection form) the report will preview to the screen. Click the printer icon at the top of the screen to send the report to the printer that is configured as the default printer for your workstation. See the Basics documentation for more information on report functions. When you close the preview screen, another Report Selection form will be displayed, with the default report 'CHEQUE2.RPT'.
The purpose of the second report is to print any overflow payment details that could not be printed on the check stub. When the 'CHEQUE2.RPT' report preview displays, you will be able to see if any checks fall into this category. If so, you can change the paper in your printer before printing the overflow details. The Print function will generate a check for the selected entry. If the Print Checkbox is not checked, a check number will not be assigned. If the Print Checkbox is checked, you will have the option of accepting the next sequential check number for this bank account, or entering a manual check number.
For more information on Report functionality in TruckMate, see the Crystal Reports Reference.
Exit
 Selecting this option will close the Instant Checks program.
Multi-Company Menu
For more information on the Multi-Company options available from the Menu Bar, see the Multi-Company documentation.
Navigate Menu
The Navigate Menu contains the normal TruckMate Navigation Bar, used to browse through your Database records, and the following options:
Find
 Click this button to open a search form that you can use to find a specific Check record in your system.
Tools Menu
TruckMate Monitor
 Click the down arrow next to this button to access the various functions of the new TruckMate Monitor.
Remember Position / Size
Selecting this option will maintain the program window position and size upon close. When the program is re-opened, it will appear the same.
View GL Report
![]() Clicking this button will generate a Report Preview window that lists the debits and credits for the general ledger transaction will be posted by the Check Register program, so that you can check that the entry is balanced.
Clicking this button will generate a Report Preview window that lists the debits and credits for the general ledger transaction will be posted by the Check Register program, so that you can check that the entry is balanced.
Void Check
 Selecting this button will Delete the check entry, and return any associated bills to their original state. Also, any Driver Deductions entered against the check will be deleted.
Use Default Expenses
![]() Selecting this button will set the currently displayed expense account to the Vendor’s default account, as configured in the Customer & Vendor Profiles program > Vendor > A/P Tab.
Selecting this button will set the currently displayed expense account to the Vendor’s default account, as configured in the Customer & Vendor Profiles program > Vendor > A/P Tab.
Import
 This option launches the Import File window. Select a comma delimited .CSV file and set the correct date format. The feature will then allow you to review cash receipts; also, the user can double click to drill down for more information, which is especially helpful if an entry is giving an error. (The user can drill down two levels.) Click next to review the details, then click Finish to finalize the process.
Record Sorting
This option allows you to select a sort criteria for the printed checks. The available values are listed below.
-
Sort by Account + Check ID
-
Sort by Account + Payee Type + Payee Code
-
Sort by Account + Payee Type + Payee Name
Synergize Indexing
![]() This option is the second step in Image Indexing available for users of TMW-Synergize™ Imaging software. The behavior of the application depends on the selected mode.
This option is the second step in Image Indexing available for users of TMW-Synergize™ Imaging software. The behavior of the application depends on the selected mode.
If the selected mode is 'View Single Document', when selecting this button, the user will have to select a specific Synergize 'Workflow' (as defined in the Codes Maintenance program > Imaging Tab > Microdea > Workflow Tab). Once the 'Workflow' has been determined, the Image Indexing window will appear with one image in the Synergise image viewer window.
For an explanation of how the Image Indexer behaves while in the 'View Single Document' mode, see this User Case Example.
-
Upon selection of a 'Workflow ID' from the Select Workflow window, TruckMate automatically requests the first available imaged document in the Workflow queue.
-
TruckMate automatically causes the document to display in the Synergize viewer window, and returns a 'Document ID' to TruckMate:
-
A document may not be 'available' if it has already been requested by another user, as Synergize will lock documents once they have been retrieved from the Workflow queue. In this case, TruckMate will move to the next available document.
-
If there are no more documents available in the Workflow queue, a non-error notification will be shown to the user, indicating that processing has been completed.
-
TruckMate will attempt to look up the 'Document ID' from step 1 in Customer Service:
-
If none is found, a new, empty bill will be inserted automatically and left in edit-mode. The 'Document ID' from step 1 will be added as a Trace number.
-
If one is found, it will be displayed in the Customer Service window and left in edit-mode.
-
The user will then Post the Freight Bill (to obtain a TruckMate bill number), and the Indexer will complete the following:
-
TruckMate automatically sends this bill number, the customer ID, and any other trace numbers on the bill to Synergize, which causes the document to be indexed with these values.
-
Depending on the Workflow settings in Synergize, this will cause the bill to be removed from the Workflow queue.
-
Finally, TruckMate automatically requests the next available imaged document in the Workflow queue, and returns to step 2.
If the selected mode is 'View List of Documents', when selecting this button, a grid will popup with a list of available documents. The grid will display columns containing information about each listed document. Filters are available to help the user locate the desired documents easily and quickly. This feature is only available if 'Display Columns' checkbox is selected from Codes Maintenance > Imaging > Imaging Vendor Configuration > TMW-Synergize™ Imaging > Workflow Tab. The user can select the document to be indexed individually via manual selection.
|
In both described Indexing modes, when a user opens an image for indexing, a lock for this image will be enforced. As a result, other users cannot open this image for indexing purpose. The lock will be released once the user posts TruckMate information to Synergize, skips the image or exits indexing mode. To monitor image locks and release locks that cannot be auto-released (in case unexpected shutdown or users terminate TruckMate abnormally), users can open the Codes Maintenance program > Imaging > Microdea > Workflow Tab > Locks Tab. Erroneous locks can be removed from the list. If a document is locked by a user, that user can still open the document without requesting removing locks but other users would have to have locks removed. This functionality is only available for Users with TMW - Synergize software installed and correctly configured, and that have checked the 'Workflow Enabled' flag on the Workflow Tab in Codes Maintenance (see above link). |
Window Menu
Customer & Vendor Profiles
![]() Selecting this option will open an instance of the Customer & Vendor Profiles program.
Selecting this option will open an instance of the Customer & Vendor Profiles program.
GL Chart of Accounts
![]() Selecting this option will open an instance of the GL Chart of Accounts program.
Selecting this option will open an instance of the GL Chart of Accounts program.
AP Inquiry
![]() Selecting this option will open an instance of the AP Inquiry program.
Selecting this option will open an instance of the AP Inquiry program.
Driver Statements
![]() Selecting this option will open an instance of the Driver Statements program.
Selecting this option will open an instance of the Driver Statements program.
Payroll Processing
![]() Selecting this option will open an instance of the Payroll Processing program.
Selecting this option will open an instance of the Payroll Processing program.
COD Payables Register
![]() Selecting this option will open an instance of the COD Payable Register program.
Selecting this option will open an instance of the COD Payable Register program.
Help Menu
TruckMate Help
![]() Selecting this button will open the Instant Checks topic in the TruckMate Online Help file (the page you are currently viewing).
Selecting this button will open the Instant Checks topic in the TruckMate Online Help file (the page you are currently viewing).
Service Portal
![]() Selecting this button will open an instance of your default Internet browsing software, with the https://www.tmwcare.com login page displayed.
Selecting this button will open an instance of your default Internet browsing software, with the https://www.tmwcare.com login page displayed.
About
![]() Selecting this button will open the standard TruckMate About window, which contains important information about the application you are currently using, including its version number (important for support calls).
Selecting this button will open the standard TruckMate About window, which contains important information about the application you are currently using, including its version number (important for support calls).
Toolbar
Incl. Posted Chks
When checked, this option displays 'Posted' Checks in the program window.
Synergize Indexing
![]() This option is only available for users of TMW-Synergize™ Imaging software. This option is used in two steps. The first step is selecting the mode. use the drop down list to select one of the available options. The second step would be to perform the indexing by selecting the button (
This option is only available for users of TMW-Synergize™ Imaging software. This option is used in two steps. The first step is selecting the mode. use the drop down list to select one of the available options. The second step would be to perform the indexing by selecting the button (![]() ).
).
Update Synergize Document
This option updates the Synergize database with changes in TruckMate. When you make changes in TruckMate to image information, select this option to reflect the change made in TruckMate in Synergize database.
View Single Document
This option activates the 'View Single Document' mode in Image Indexing. When in this mode and the user selects the indexing button (![]() ), the User will have to select a specific Synergize 'Workflow' (as defined in the Codes Maintenance program > Imaging Tab > Microdea > Workflow Tab). Once the 'Workflow' has been determined, the Image Indexing window will appear with one image in the Synergise image viewer window.
), the User will have to select a specific Synergize 'Workflow' (as defined in the Codes Maintenance program > Imaging Tab > Microdea > Workflow Tab). Once the 'Workflow' has been determined, the Image Indexing window will appear with one image in the Synergise image viewer window.
For an explanation of how the Image Indexer behaves while in the 'View Single Document' mode, see the User Case Example listed under Tools Menu above.
View List of Documents
This option puts the image viewing process in a different mode. In this mode, users can select a specific document from among a list of documents. When the user selects the indexing button (![]() ) while in this mode, a grid will popup with a list of available documents. The grid will display columns containing information about each listed document. Filters are available to help the user located the desired documents easily and quickly. This feature is only available if 'Display Columns' checkbox is selected from Codes Maintenance > Imaging > Imaging Vendor Configuration > TMW-Synergize™ Imaging > Workflow Tab. The user can select the document to be indexed individually via manual selection.
) while in this mode, a grid will popup with a list of available documents. The grid will display columns containing information about each listed document. Filters are available to help the user located the desired documents easily and quickly. This feature is only available if 'Display Columns' checkbox is selected from Codes Maintenance > Imaging > Imaging Vendor Configuration > TMW-Synergize™ Imaging > Workflow Tab. The user can select the document to be indexed individually via manual selection.
After selecting the mode, the second step can be performed. You can select the indexing button (![]() ) to perform the indexing according to the selected mode in the first step. The indexing step can also be performed from an option in the Tools menu.
) to perform the indexing according to the selected mode in the first step. The indexing step can also be performed from an option in the Tools menu.
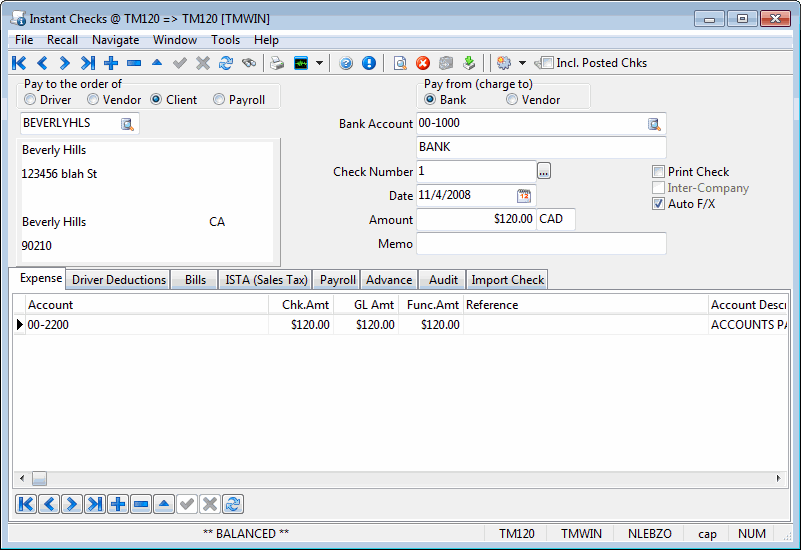
Check Information Header
Check records that have been generated from other programs (such as the A/P Inquiry, Driver Statements or COD Payable Register programs) will display in the header according to the details recorded when they were created. When you add a manual check, you need to fill in the Header Details.
Payee Type
When entering a manual check, click on one of these radio buttons to indicate the payee type. The value selected here will determine the available payees in the Pay to the order of (see below) field. For checks generated by other programs, the payee type indicates the source of the check. To prevent users from viewing or adding certain types of checks, use the Security Setup program. You can remove access rights to specific Payee Types for specific Groups. When a user does not have rights to a specific Payee Type, the radio button will not be displayed in this section of the screen.
| The Application Configurator program > CHEQUE.EXE > Vendor Required config can be used to disable creating checks without a Vendor specified. |
Pay to the order of
When entering a manual check, enter the payee code or click the search button for a search form. Only payees of the type specified in the Payee Type field will be available for selection. You do not have to select a code in this field - instead, you can manually enter the payee name and address details in the field below. If you select a vendor code which has been configured with an Alternate Address in the Customer & Vendor Profiles program, the alternate address will display in the address fields below.
Vendors that have their 'Payment Hold' flag enabled on the Vendor Profiles program > AP Tab will not be available from selection from this edit pick.
Pay From (Charge To)
If you pay for things by a company credit card, you can create a 'check' in the Instant Checks program to represent a charge to the credit card. When posted via the A/P Check Register program, instead of creating a GL Credit to the bank, a GL Credit will go to the specified AP Control Account. This Credit amount will appear in the A/P Inquiry program and be payable to the credit card company, just as though it had been entered via the A/P Invoice Entry program.
For example, if a Driver is out of town and his truck requires an emergency repair at a shop where you do not have 'on-account' terms and you decide to pay by company credit card over-the-phone, you can create a TruckMate vendor ID for the shop, create and post an invoice, and then create an Instant Check, filling the Bills Tab- so as to pay the shop and create a payable to the credit card company.
Bank Account
When entering a manual check, the bank account will default to the lowest number general ledger account (as configured in the GL Chart of Accounts program) of the type 'Bank' that matches the currency specified in the vendor’s profile. You can also manually select an account. Only general ledger accounts of the type 'Bank' will be available for selection. For checks generated by other programs, the bank account is specified at the time the checks were created.
Check Number
If a check has already been printed (either in this program or in the Check Printing program), the check number will be displayed in this field.
Checks created in the AR Inquiry program that have not been printed have the text 'To Be Printed' in this field. Checks created by the Driver Statements or the COD Payable Register programs have a blank in this field. If you are creating a check entry for a check that was issued by hand, you can enter the check number in this field. Click the button to the right of the field to assign the check number. In this case, as the check has already been issued, you should also un-check the 'Print Check' box at the bottom of the screen, as it will not be necessary to generate a check before posting this entry using the Check Register program.
| Depending on the value of the Application Configurator program > CHEQUE.EXE > Allow Duplicate Checks option, you may or may not be able to enter a duplicate check number for a particular Bank Account. |
Date
When entering a manual check, enter the check date in this field. Double click for a calendar selection form.
Amount
When entering a manual check, enter the amount of the check in this field. Depending on the status of the 'AP Invoice Over-Pmt' option in the Application Configurator program > CHEQUE.EXE section, you may or may not be allowed to enter amounts that are greater than the Invoice’s balance in this field.
Currency
When entering a manual check, the currency will default according to the bank account selected.
Memo
You can enter notes that can be formatted to print on the check in this field.
If you wish to prevent foreign exchange being calculated on a check issued from a currency other than your base currency (as configured in the Codes Maintenance program) enter the text 'MANUAL EXCHANGE' in this field. Also, be sure to enter text (any text) in the Reference field on the Expense Tab. This will prevent a foreign exchange conversion from being performed and displayed on the Expense Tab.
| You will have to make a manual journal entry (in the GL Journal Entries program) to account for the exchange. |
Print Check
Click this checkbox to print the selected check when it is finalized.
Inter-Company
If the Inter-Company flag is un-checked, when assigning resources to a check detail line, you will only be able to select from resources (of selected 'Type') from the current company on the Expense Tab > 'Resource ID' field. If Inter-Company is checked, you may select (via double-click) data from other companies for:
-
The 'GL Account' field on the Expense Tab.
-
The 'Bill Number' field on the Bills Tab.
-
Resource IDs on the Expense Tab.
|
If a new Check is being created for a Vendor, and the Vendor has been configured as 'Inter-Company' in the Vendor Profile, the 'Inter-Company' flag will default to checked when the user <Tab>s out of the 'Pay to the Order Of' field. Specific TruckMate Users can be granted the security rights to delete Instant Checks from this program by using the TruckMate Navigation Bar directly above the Check Information Header fields. See the Security Setup program > Security > Misc > Instant Checks Tab for more information. |
Transaction Details Tabs
The transaction for the check can be recorded on the Expense Tab, on the Driver Deductions Tab, or on the Bills Tab (or any combination of the three). Click the Default Expenses button to create entries on the Expense tab that correspond to the vendor’s Invoice Entry defaults (configured in the Customer & Vendor Profiles program).
Multi-Company / Inter-Company Changes
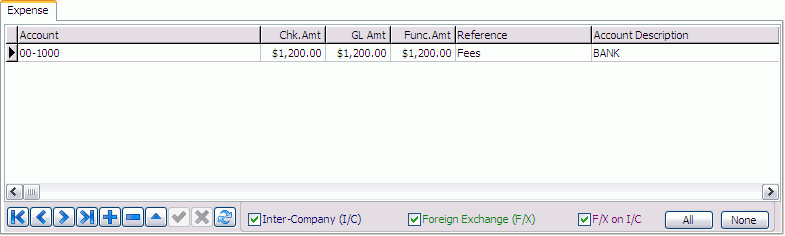
In each of the four Details Tabs (Expenses, Driver Deductions, Bills and Payroll) you will now see three amount fields: 'Chk.Amt', 'GL Amt', and 'Func.Amt' (database columns CHK_AMT, TX_AMT, and FUNCTIONAL_AMT, respectively). You may manually enter either 'Chk.Amt' or 'GL Amt'- the other will be auto-calculated for you.
-
'Chk.Amt' (Check Amount) is in the check’s currency (this is what you previously entered in the 'Amount' field).
-
'GL Amt' (GL Amount) is in the currency of the GL Account (in keeping with other TruckMate accounting applications where the GL Account setup dictates the currency).
-
'Func.Amt' (Functional Amount) is read-only. It is in the base currency of the Company that the GL Account belongs to (not necessarily the same currency as 'GL Amt'). The difference between 'GL Amt' and 'Func.Amt' is the Foreign Exchange amount. If you have the 'Auto F/X' flag checked (either by default based on the Application Configurator program > APNE.EXE > 'Auto F/X Dflt' option or by manually checking it), then the differences between the 'GL Amt' and 'Func.Amt' will be added as a 'read-only' (grey) expense line. You may set the default description on these lines via the Application Configurator program > APNE.EXE > 'Auto F/X Ref' option.
If you have 'Auto F/X’unchecked, then the Foreign Exchange expense rows will not be auto-added. It is up to you to make sure the check "balances" (for example, with it unchecked, you are allowed to create a check for $100 CAD and expense it to a USD GL Account for $100 USD- the check will be flagged as "balanced").
Additionally, there is an Application Configurator program > APNE.EXE option named 'PayCon Exch Rate'. By default it is 'False', but if set to 'True' (and 'Auto F/X' checked), then the Foreign Exchange amounts on foreign currency Driver Deductions Tab amounts will be calculated using exchange rates from the Driver Pay Contract program (rather than the GL Chart of Accounts program). Any difference (between the 2 rates) will be expensed to your Foreign Exchange account.
| If you setup inter-company (I/C) accounts for each currency (in the Company Profiles program), then you will see I/C amounts generated in both related companies in the check currency (with an additional "expense" row for the f/x on the I/C amount where applicable). If you still have only one I/C row, then the 2 amounts (if f/x applicable) will be combined into a single row (converted to the GL account company’s base currency). Either way, if you have set up different exchange rates in different companies, then the exchange rate used in each f/x calculation will now correctly be the one from the given company (previously, all f/x calculations for all rows were done using the rate in the login company, regardless of GL account company). |
Expense Tab
The Expense Tab is used to record the details of the check transaction.
Account
Double click to display and select a general ledger account. General Ledger accounts are configured in the GL Chart of Accounts program.
Chk. Amount / GL Amt / Func. Amt
See above for information on these fields.
Reference
You can enter a free form note about this posting, for informational purposes only.
Account Description
This field will automatically populate with the description of the 'Account' selected in the Expense tab’s 'Account' field.
PPD Acct #
When creating manual checks that will become new Pre-Paid Account records in the Pre-Paid Accounts program, this field will capture the highway tag number which will be used to identify the pre-paid account record. This field must be filled in for the expense record to be processed as an opening balance for a new pre-paid account. The same tag number cannot be entered twice in the same invoice. A tag number cannot be used if it already exists as a pre-paid account for the same vendor.
Resource ID / Resource Type
These fields together will indicate the specific TruckMate resource that the instant check will apply to. If this value is filled in, the new pre-paid account will be assigned to the resource indicated by the 'Resource ID' field (which depends on the value chosen in the 'Resource Type' field). If this value is not filled in, the pre-paid account will be created anyway, but the user must, at some point, assign a resource/type to the account in the Pre-Paid Accounts program. The Editpick button besides the 'Resource ID' field will display available resources based on the value of the 'Select Active Resource Type Only' Configuration Option set in Application Configurator program > APNE.EXE, if the value is 'True' then only active resources will be displayed, if the value is 'False' then all values regardless of their statuses will be displayed, this is useful when you have to in-activate a resource while still expecting AP bills for the resource to arrive at a later stage. An example would be a returned rented trailer (you have to in-activate it when you return it) while the final bill hasn’t arrived yet.
I/C, F/X, and F/X on I/C Checkboxes
These three checkboxes allow you to optionally hide some or all of the auto-generated GL (inter-company and foreign exchange). The (read-only) auto-generated rows are also colored so, if you do display them, it is easier to pick out the "manual" (user-entered) rows (in black). These checkboxes are only visible if the system is set up for multi-company.
All/None Buttons
These two buttons allow you to set all three of the previous checkboxes (I/C, F/X, and F/X on I/C) at once. These checkboxes are only visible if the system is set up for multi-company.
| The user can not edit the 'Reference' or 'Resource' columns in the Expenses Tab grid for Inter-Company rows ('Due To' and 'Due From'). The Inter-Company rows are auto-calculated. For example, if you change the check’s amount, the Inter-Company amounts will update. The application changes the amounts by first deleting the Inter-Company rows and then re-adding them with the new amounts. Any data in the 'Reference' or 'Resource' columns will be lost. |
Driver Deductions Tab
The transaction for the check can be recorded on the Expense Tab, on the Driver Deduction tab, or on the Bills Tab (or any combination of the three). If you enter the transaction on the Driver Deduction Tab, the Check Register will create a deduction for the driver that can be viewed using the Driver Pay Audit program.
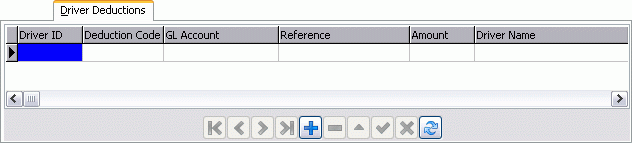
Driver ID
Enter a driver code. Double click for a driver code selection form.
Deduction Code
Double click to select a deduction code. Only deduction codes that are part of this driver’s contract will be available for selection. Deduction codes are configured in the Driver Pay Contract program.
GL Account
<TAB> out of the Deduction Code field to default the GL Account. The lowest - numbered GL account of the 'Driver Payable' type (as configured in the GL Chart of Accounts program) that is the same currency as the deduction code will default in this field. Only accounts of the 'Driver Payable' type that are of the same currency as the deduction code (as configured in the Driver Pay Contract program) can be entered in this field.
Reference
You can add a free form note about this entry, for informational purposes only.
Chk. Amount / GL Amt / Func. Amt
See above for information on these fields.
Driver Name
This field will automatically populate with a Driver name based on the Driver ID selected in the Driver Deductions Tab 'Driver ID' field.
GL Acct Description
This field will automatically populate with a GL Account name based on the GL Account selected in the Driver Deductions Tab 'GL Account' field.
| If the currency of the bank specified in the Instant Checks Header differs from the deduction currency (as specified in the Driver Pay Contracts program), you will need to create an entry on the Expense Tab to account for the currency conversion. |
The Driver Deductions Tab is restricted to codes (Deduction Codes or GL Accounts) from the currently logged in Company only, even if the 'Inter-Company' flag is checked in the header.
Bills Tab
The transaction for the check can be recorded on the Expense Tab, on the Driver Deductions Tab, or on the Bills tab (or any combination of the three). The Bills Tab is used to select for payment outstanding invoices from the vendor account specified in the header.
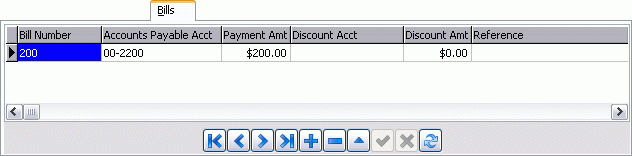
Bill Number
Double click to display a list of outstanding invoices from the vendor specified in the Instant Checks Header. Only invoices of the same currency as the bank account selected in the Instant Checks Header will be available for selection.
To set the other fields to default values, hit the <TAB> key after selecting the invoice.
Accounts Payable Acct
Will default to the A/P Control account for the currency of the bank account specified in the Instant Checks Header. The A/P Control account is determined by finding the lowest - numbered GL Account that is of the 'Accounts Payable' type, is not a sub-account and is of the same currency as the bank account specified in the Instant Checks Header.
Chk. Amount / GL Amt / Func. Amt
See above for information on these fields.
Discount Acct
If you are taking a discount on the selected invoice, enter the GL Account for the discount posting. Double click for a GL Account selection form.
Discount Amt
Enter the amount of the discount that is being taken.
Reference
You can add a free form note about this entry, for informational purposes only.
AP Acct Desc
This field will automatically populate with a AP Account name based on the AP Account selected in the Bills tab’s 'Accounts Payable Acct' field.
Discount Acct Desc
This field will automatically populate with a Discount GL Account name based on the Discount GL Account selected in the Bills tab’s 'Discount Acct' field.
On Account Amt
If you have a Vendor demanding payment, but you don’t have time to validate their Freight Bills and do a proper A/P check, you can now make a partial 'on account' payment. This will not close any A/P bills. Rather, it creates a new 'open' A/P item (with a negative payable amount) that you can close/'pay' (include to reduce your payment amount) on a future Instant or A/P Check.
ISTA (Sales Tax) Tab
Invoices for equipment parts and labour may qualify for ISTA (Inter Provincial Sales Tax Agreement). If you operate in more than one province, you can pro-rate the sales tax paid for equipment parts and labour based on the amount of mileage your fleet travels in each jurisdiction. To configure sales tax percentage splits, use the ISTA Groups option on the right mouse menu in the A/P Inquiry program. ISTA reports are run from the A/P Inquiry program, using the Reporting option on the context menu of the Vendor grid. When you make ISTA entries, you must make an entry for each province where you claim tax rebates. Entries made on the ISTA (Sales Tax) Tab have no effect on general ledger postings made by the Check Register program.
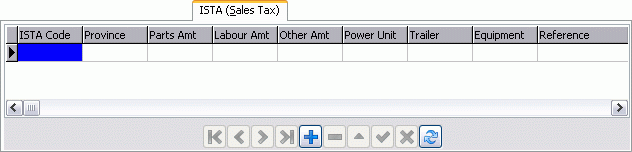
ISTA Code
Double click to select an ISTA Group code. ISTA Group codes are configured in the A/P Inquiry program, using the ISTA Groups option on the right mouse menu in the Vendor grid. Double click to select a code from a form.
Province
Enter the province in which you intend to claim a tax rebate. This two letter code should correspond to the province codes in the ISTA Groups setup (in the A/P Inquiry program).
Parts Amt
Enter the amount that was charged for parts on the invoice.
Labour Amt
Enter the amount that was charged for labour on the invoice.
Other Amt
If there is an amount on the invoice that neither falls into the Parts nor the Labour category, enter the amount in the Other field.
Power Unit
For informational purposes, you can enter a power unit code. Double click for a selection form.
Equipment
For informational purposes, you can enter a miscellaneous equipment code. Double click for a selection form.
Trailer
For informational purposes, you can enter a trailer code. Double click for a selection form.
Reference
For informational purposes, you can enter free format text in the Reference field.
Payroll Details Tab
On the Payroll Details Tab, check entries generated by the Payroll Register program are displayed. You cannot add a manual payroll check. Do not change the details displayed in the grid (or the check will not reflect the transactions entered in the Payroll module).
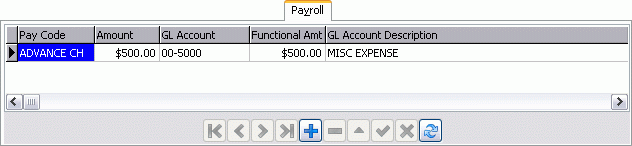
Pay Code
Double-clicking in this column will bring up a 'Select Pay Code' window, or you can simply enter the Pay Code in this field.
GL Account
<Tab> out of the Deduction Code field to default the GL Account. The lowest - numbered GL account of the 'Driver Payable' type (as configured in the GL Chart of Accounts program) that is the same currency as the deduction code will default in this field. Only accounts of the 'Driver Payable' type that are of the same currency as the deduction code (as configured in the Driver Pay Contracts program) can be entered in this field.
Chk. Amount / GL Amt / Func. Amt
See above for information on these fields.
GL Account Description
This field will automatically populate with a GL Account name based on the GL Account selected in the Payroll Tab 'GL Account' field.
Pay Code Description
This field will automatically populate with a Pay Code name based on the Pay Code selected in the Payroll Tab 'Pay Code' field.
User1 - User4
These are user fields that can be used for any current of future business need.
Note: The Payroll Tab is restricted to codes (Payroll Codes or GL Accounts) from the currently logged in Company only, even if the 'Inter-Company' flag is checked in the header.
Advance Tab
The Advance Tab can be used to issue and advance cheque to a vendor.
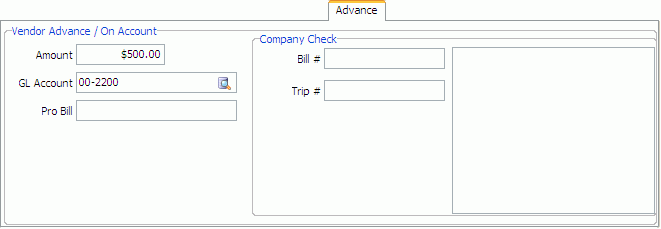
Data will be shown here when an advance is created in the Customer Service or Dispatch programs.
Note: The probill will be used as the bill number in Accounts Payable if it is entered. If there is no probill, the check number is used as the AP bill number.