Configuring Mileage Server Manager - Advanced
The following topics are advanced configuration and setup procedures.
Configuring the Mileage Server for multi-company
In TruckMate Multi-Company implementations, you have the option to define Mileage Server instances specific to each company by setting up separate Mileage Server TruckMate users.
For example, suppose you want two separate Mileage Server instances to handle the data for the Canadian and U.S. companies separately.
-
Define the TruckMate users that will be tied to the Company-specific Mileage Server instances: (This example will create two new users, MILESERV_CDN and MILESERV_US.)
-
Open the Utilities > Security Configuration program > Users tab.
-
Click the
 Insert Record button on the TruckMate Navigation Bar and create a user to represent each specific Mileage Server instance to reflect your multi-company specifics (e.g. ' MILESERV1', 'MILESERV2' or MILESERV_CDN, MILESERV_US, etc.).
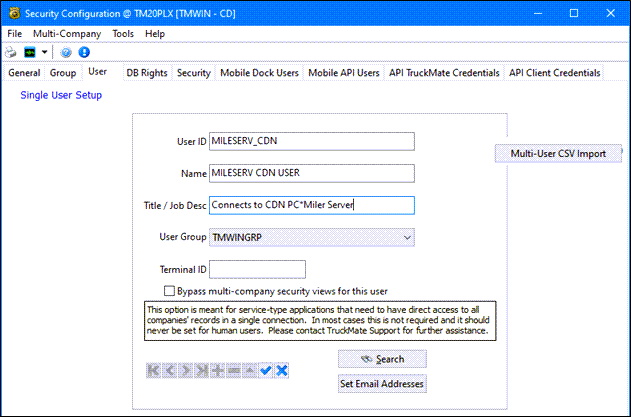
Note: Make sure to set these new users up with corresponding Windows user accounts on the server or workstation being used as the Mileage Servers.
(Windows OS > Control Panel > Administrative Tools > Computer Management > Local User & Groups.). Refer to Security Configuration for more information.
-
-
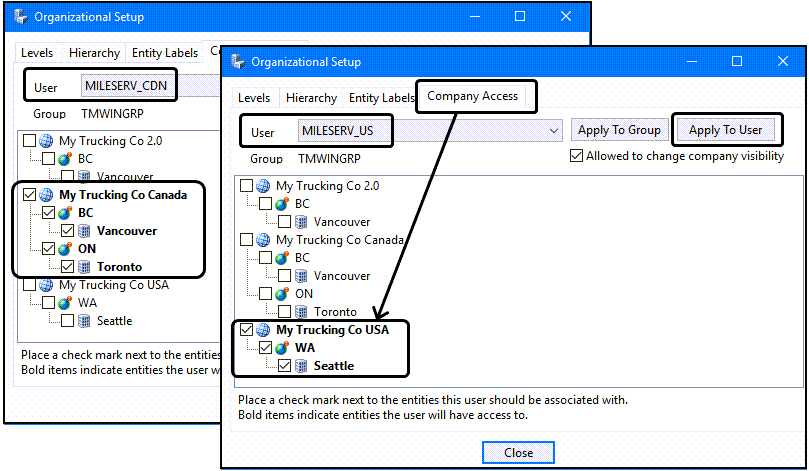
Configure the Company profile Multi-Company hierarchy access to ensure these users can see all the entities within the company:
-
Open the TruckMate > Profiles > Company Profiles program
-
Go to the Window menu > Organizational Setup > Company Access tab.
-
Ensure each of the Mileage Server users has access to the appropriate entities within the Multi-Company hierarchy. (Technically, you could associate each of these users with the entire hierarchy since the configuration within the Mileage Server Manager will restrict them to just the one company.)
Note: the Application Configuration setting for SECURITY.EXE > Apply to User must be set to True if you wish to apply the settings to the individual users.
-
-
Configure the different Mileage Server instances so they are linked to specific companies:
-
Open the Utilities > Mileage Server Manager program.
-
Select the Tools menu > Configure option.
-
The Mileage Server Configuration window will open.
-
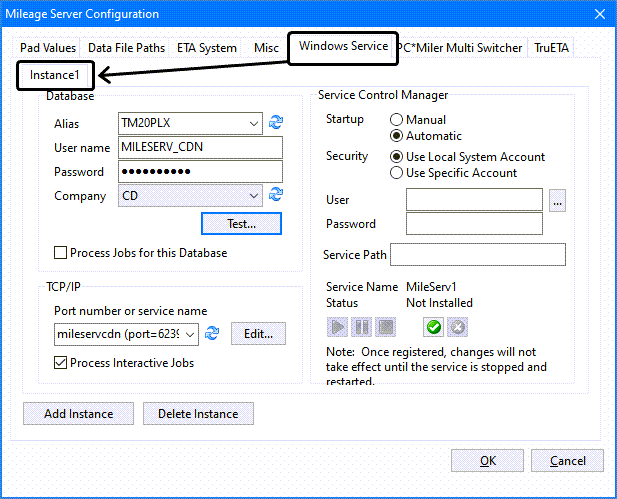
Go to the Windows Service tab.
-
You will be on the Instance1 tab, which by default will already be available for configuration. In the Database section, enter the connection information for your first company.
-
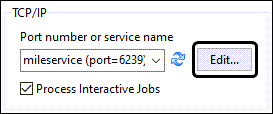
Click the Edit button in the TCP/IP section.
-
Edit the Windows
'services'file to ensure each instance associated with of the new users will use their own unique TCP port.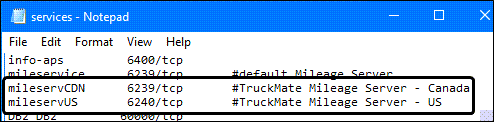
-
Once satisfied with the configuration for the first Mileage Server Instance, click the image:MileServerMngr-Advanced/image8.pngInstall Service button in the Service Control Manager section to update the service information for the first instance. (The button will only be enabled if this is the first time a service has been configured; otherwise you are modifying an existing setup.)
-
Click the
 Add Instance button to begin creating the second instance,
 -
The configuration details for Instance2 will then be available for configuration on its own tab.
-
On the Instance2 tab, enter the connection information for the second company and be sure to select the correct TCP/IP port.

-
Once satisfied with the configuration for the second Mileage Server Instance, click the
 Install Service button in the Service Control Manager section to update the service information for the Instance 2.
 -
Repeat steps as needed to setup your remaining companies.
-
Complete the setup process for the third party mileage software using the other tabs on the Mileage Server Configuration window.
-
Setting up multiple Mileage Servers
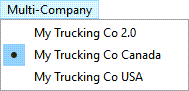
You can setup multiple mileage server instances across any number of computers on your network and configure TruckMate to access them all in specific ways. Mileage profiles (configured in the Customer & Vendor Profiles program > Mileage Profile window) can now involve more than one version of the same mileage service which are hosted on different mileage server machines, or a mixed combination of different mileage providers (i.e. PC*Miler on one server and MileMaker on another). This allows the user to setup one client or vendor to use PC*Miler 31 while other clients/vendors can use MileMaker 19, without any real change to the way the mileage server operates.
In terms of setup, all you need to configure are the Mileage Profiles (as usual) and the Application Configurator program > MILESERV.EXE > Hosts config option. For the 'Hosts' option, the administrator should enter the Machine Name (or IP address) of the mileage server and the port that the mileage service is operating on (default is mileservice or 6239), separated by a colon. Multiple mileage servers are entered with semi-colons between them, as shown in this example:
localhost:mileservice;othermachine:6239;thirdmachine:mileservice
The above value for the 'Hosts' config designates three mileage servers, each running off of the 6239/mileservice port. Once this config is saved and the user opens the Mileage Profile window, they will see only the available mileage services that are running on those three machines appear in the 'Available Services' section of the form. The user can then define their 'Profile Name' entries and configure them to use the specific services.
Once the Mileage Profiles are tied to a specific mileage server and service, the user can then configure their system clients, vendors, drivers, etc. to use a specific mileage profile, and TruckMate will ping the appropriate mileage server machine for mileage tasks without any further user intervention.
When setting up multiple services in Mileage Profiles, Make sure to use the same value for the 'Mile Mode' field for all the services you configure. TruckMate will use the first one for mileage calculations but will ignore all services that have non-matching 'Mile Mode' values.
Example multiple mileage server install
The Mileage Server program can be installed on several different networked server machines to allow you to use a variety of mileage software providers, and TruckMate will be able to use them all independently of one another with little required setup. The below example will be for configuring two different mileage servers, but the process can be done for any number of servers.
-
Configure the Mileage Server program on each of the network machines you will be using as your mileage servers.
This includes:
-
Installing TruckMate on the other mileage server machine.
-
Cataloguing the TruckMate database on each of the networked mileage server machines and ensuring that you can connect to it.
-
Installing the third party mileage software you wish to use on each of the mileage server machines.
-
Configuring each of the Mileage Servers to use their respective mileage provider and to connect to the correct TruckMate database.
-
Open the Application Configurator program and configure the MILESERV.EXE > Hosts option to point to all of the mileage server machines you configured in step 1. For example:
localhost:mileservice;secondserver:mileservice -
Log in to the two mileage server machines and start their mileage services.
-
Open the Customer & Vendor Profiles program > Tools menu > Mileage Profile Maintenance window and configure your mileage profiles.
Assign the available mileage services you are using to a unique mileage profile. be sure to indicate the Default Mileage Server Host and choose which rule-based mileage services you wish to use for the different mileage tasks.
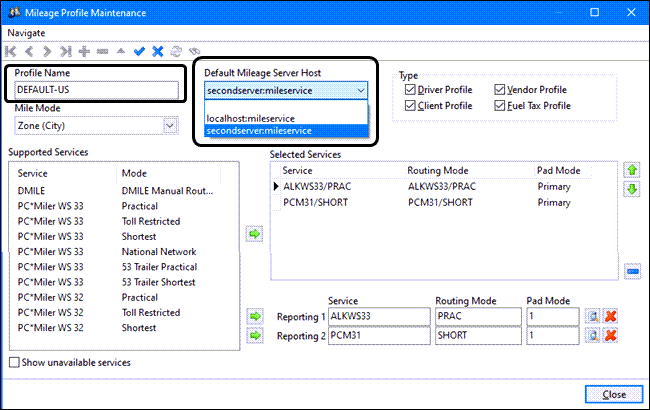
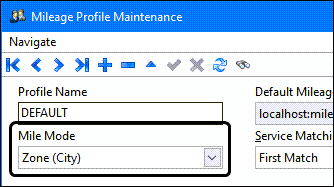
Note: Make sure to use the same value for the Mile Mode field for all the services you configure. TruckMate will use the first one for mileage calculations but will ignore all services that have non-matching Mile Modes.
-
Once this is done, the mileage servers are configured and ready to use. Additional setup will include choosing the Mileage Profile you wish to use for your various Client, Vendor and Driver codes (in their respective Profile module applications). All of these profiles are set to use the 'DEFAULT' Mileage Profile by default, so if you want one of your Carriers to use a different profile, you’ll have to change the value of the 'Mileage Profile' field in the Vendor Profiles program.
Setting up the Mileage Server to start automatically
To configure the workstation on which you run the Mileage Server to automatically start the Mileage Server program whenever the workstation is turned on or rebooted:
-
In Windows Explorer, in the workstation’s 'Startup' group (C:\Documents and Settings\All Users\Start Menu\Programs\Startup), click the right mouse button and select New > Shortcut.
-
In the 'Location' field (where the path to the program executable is located), enter text similar to the following:
"C:\Program Files (x86)\TruckMate2020\Mileserv.exe" "\U:USER" "\P:password" "\C:SCHEMA"` -
Replace the USER value with the user name (in upper case) that you wish to use. Replace the password value with the password for the specified user. Replace the SCHEMA value with the schema name, usually TMWIN.
Note: The path described above is the default path for TruckMate programs. Modify as necessary.