Trip Sheet Entry

With this program you can track a particular Driver’s trip, which Trailer he has, the Mileage estimation and the map he will be taking to complete the trip. You enter the starting Origin, Destination, starting Odometer reading, Leaving Date/Time and estimated Arrival Date/Time. The Trip program can help you calculate the rest. You can even track different legs of a Trip. For example, on a Trip with a single Freight Bill, the first leg of the Trip is the movement of the equipment to the freight pickup location, the second leg is the movement of the equipment and freight to the delivery location. Empty and loaded miles can be calculated for all legs.
| You can use PC*Miler, Inter-Tax or T-Chek software as your primary Fuel Tax Vendor. |
The program screen is divided into the following areas: Dispatch & Fuel Trip Information, Fuel Trip Leg Details, and Fuel Purchase Information.
To access Trip Sheet Entry:
| From this location | Go to |
|---|---|
TruckMate Menu and TruckMate Task List |
Fuel Management > Trip Sheet Entry |
Windows Start Menu |
TruckMate 20xx > Trip Sheet Entry |
Windows Explorer |
C:\Program Files (x86) > TruckMate 20xx > Trip.exe |
Procedures
How do I Track a Driver’s trip, the Trailer used, the Mileage estimation, and the Map being Used?
-
Open the Trip Sheet Entry program (TRIP.EXE).
-
You enter the starting origin, destination, starting odometer reading, leaving date/time and estimated arrival date/time. The Trip program can help you calculate the rest.
Menu Bar / Toolbar
File Menu
Print Reports
![]() Selecting the Print Reports button will bring up the report selection window, common to many TruckMate applications. Here, you will select a report file from those available in your system and a Crystal Report will be generated.
Selecting the Print Reports button will bring up the report selection window, common to many TruckMate applications. Here, you will select a report file from those available in your system and a Crystal Report will be generated.
For more information on Report functionality in TruckMate, see the Crystal Reports Reference.
Exit
![]() Selecting this option will close the Fuel Tax Trip program.
Selecting this option will close the Fuel Tax Trip program.
Multi-Company Menu
For more information on the Multi-Company options available from the Menu Bar, see the Multi-Company documentation.
Navigate Menu
The Navigate Menu contains the standard TruckMate Navigation Bar, used to browse your Database records, as well as the following options:
Find
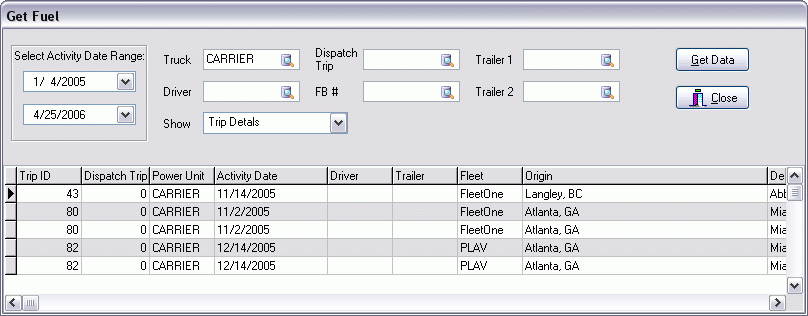
![]() Click this button to open the Get Fuel window.
Click this button to open the Get Fuel window.
| Field | Definition |
|---|---|
Select Activity Date Range |
Use the two drop down date fields to configure a Date Range in which to find Fuel records. |
Truck / Driver / Dispatch Trip / FB # / Trailer 1 / Trailer 2 |
These fields are used to filter the records that will display when you click the 'Get Data' button. If you wish to filter by one of these values, simply click the search icon within the field you’d like to use, and pick one of the available values from your system. |
Show |
There are two different types of data that can be shown in the Search grid. Use this drop-down menu to choose to display either the 'Fuel Purchase Info' or 'Trip Details' associated with your chosen filters. |
Get Data |
Click this button to display the records that match your filtering criteria into the Search Grid at the bottom of this window. |
Search Grid |
This Grid will display the results of your search. |
Tools Menu
TruckMate Monitor
![]() Click the down arrow next to this button to access the various functions of the new TruckMate Monitor.
Click the down arrow next to this button to access the various functions of the new TruckMate Monitor.
Remember Position / Size
Selecting this option will maintain the program window position and size upon close. When the program is re-opened, it will appear the same.
Window Menu
Power Unit Profiles
![]() Select this option to open an instance of the Power Unit Profiles program.
Select this option to open an instance of the Power Unit Profiles program.
Trailer Profiles
![]() Select this option to open an instance of the Trailer Profiles program.
Select this option to open an instance of the Trailer Profiles program.
Dispatch
![]() Select this option to open an instance of the Dispatch program.
Select this option to open an instance of the Dispatch program.
Fuel Card Data Import
![]() Select this option to open an instance of the Fuel Card Data Import program.
Select this option to open an instance of the Fuel Card Data Import program.
Help Menu
TruckMate Help
![]() Selecting this button will open the R&M Stock Adjustments topic in the TruckMate Online Help file (the page you are currently viewing).
Selecting this button will open the R&M Stock Adjustments topic in the TruckMate Online Help file (the page you are currently viewing).
About
![]() Selecting this button will open the standard TruckMate About window, which contains important information about the application you are currently using, including its version number (important for support calls).
Selecting this button will open the standard TruckMate About window, which contains important information about the application you are currently using, including its version number (important for support calls).
Service Portal
![]() (Accessible from 'Help' menu). Selecting this button will open an instance of your default Internet browsing software, with the https://www.tmwcare.com login page displayed.
(Accessible from 'Help' menu). Selecting this button will open an instance of your default Internet browsing software, with the https://www.tmwcare.com login page displayed.
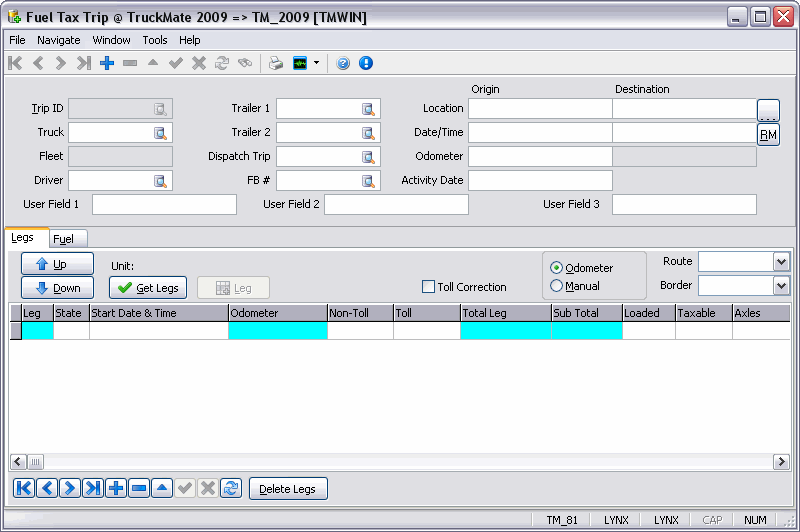
Header Information
The top left of the screen is the Header Section, where you fill in information about the Trip, the Truck being used, the Fleet that particular Truck is attached to, the Trip Driver, and the Trailer Name. The top right-hand side of the screen is Destination Information. You input the starting location, where the Trip is going, the Date/Time it’s leaving and the estimated arrival Date/Time, the starting Odometer reading, and whether this is a round Trip. The middle and lower sections deal with mileage and the best route the Driver will take. Here you can add the individual legs for the route taken. See the Legs Tab on this page for more information.
Trip ID
Click on the add button (plus sign) and a new trip number will be generated automatically. To view an already existing trip, click on the search button beside the field and you will view all trips entered.
Truck
Enter the Truck ID code or select one from your system by clicking the search button.
Fleet
Enter the fleet identifying name. This should pre-populate if you have already attached your truck identifying name to a fleet. If not, refer to Fleet Profile information.
Driver
Enter your Driver ID code, or select one from your system by clicking the search button.
Trailer1
Enter your Trailer 1 ID code, or select one from your system by clicking the search button.
Trailer2
Enter your Trailer 2 ID code, or select one from your system by clicking the search button, if required.
Dispatch Trip
Pre-populates based on your trip information in the Dispatch program which links to the Trip ID in the Fuel Tax Audit program. This allows mileage and fuel to be entered using the actual Trip #, but maintains the functionality of the trip ID.
FB #
Enter your FB number, or select one from your system by clicking the search button, if required.
User Field 1 / User Field 2 / User Field 3
These User Fields may be populated with data from the AP Invoice Entry program’s User Field data, and can be used on the Fuel Tax Trip program’s Filter form to filter on specific records.
The text label of these user fields can be changed by using the three 'Fuel Trip User Field' options in the Application Configurator program > TRIP.EXE section.
Origin Section
Originating Location
Enter your starting location Zone Code.
Start Date/Time
Enter the trip starting date and time.
Starting Odometer
Enter the trip starting Odometer reading.
Activity Date
Enter the date the trip information was entered.
Destination Section
Destination Location
Enter the destination City and Province/State, or click the search button to select a Zone Code from your system..
Destination Date/Time
Enter the estimated arrival date and time
RM Button
Selecting this button opens the R&M Odometer Readings dialog box where you can view the current Odometer reading for the selected power unit. Changes to the Odometer reading can be made by accessing the Power Unit Profiles program, Hub Tab.
Context Menu
Print Reports
Opens a report dialog box where you can specify the desired fuel tax report. View fuel tax reports available.
Fix Odometers
Selecting this option will bring up the Fix Odometers window where you must select a start and end date range. This feature ensures the Odometer amounts in the header and detail line in the Trip program, are accurate and thus eliminating any overlapping or missing miles. Because this feature will 'normalize' odometer gaps and overrides (and may overwrite needed information), use it with caution.

Leg Information Tab
The main section of the Legs Tab is the Leg Information Grid, which displays all the current Legs associated with the Trip selected in the Header section. Right-clicking anywhere within this tab (except in the actual details Grid) will allow access to the same Context Menu options as detailed in the above Header section.
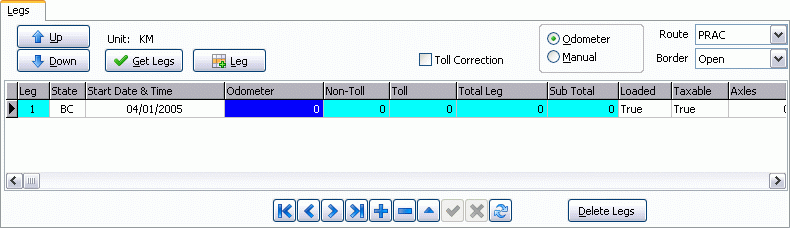
Up / Down
These two buttons move the currently selected detail line either Up or Down in the list of Legs.
Unit
This field is automatically pre-populated by the Unit ('KM' (Kilometers) or 'MI' (Miles) specified for the current Power Unit (as determined in the Power Unit Profiles program).
Get Legs
Once you have completed the starting and ending location, you can use Get Legs to determine the mileage between two or more points. Get Legs must be connected to a third-party software such as PC*Miler, Rand McNally Milemaker 17, and/or ProMiles. Your third party software must be installed and running in order to use the 'Get Legs' button. The MileageServer program, which ships with TruckMate, allows you to access the data from these third-party Mileage providers.. See the Mileage Server Overview for more information.
-
Open the TRIP.EXE program.
-
Open Mileage Server (MILESERV.EXE), which ships with TruckMate.
-
Press the 'Get Legs' button within TRIP.EXE to calculate the 'Starting' and 'Ending' legs of the trip.
Leg
Will allow you to calculate different legs of the trip. Click the 'Leg' button to display the window on the left. A new 'Leg Number' will populate based on the number of records currently assigned to the Trip. You may edit this number, but doing so is not recommended.
Toll Correction
Will allow user to make changes to Toll and Non-Toll if they are entering Odometer readings. If the Toll Correction box is not checked, the Toll column appearing in the grid is coloured blue, and cannot be typed into. If the Toll Correction box has a checkmark in it, the Toll column appearing in the grid will be white in color, and can be typed into. Checking this box would allow users to enter their own toll mileages, or correct/adjust those generated by their mileage program.
Odometer/Manual
Should already be set at Odometer but you can reset it to enter Mileage manually.
Route
Set the route to the most 'Practical' (PRAC), 'Shortest' (SHORT), or 'Toll' (TOLL).
Border
Set the border as 'Open' or 'Closed'- this is for informational purposes only, and does not affect the functioning of your Mileage software.
Delete Legs
Clicking this button will delete the currently highlighted detail line in the Legs Grid.
Leg Information Grid
Leg
Enter the number of legs if there is more than one.
State
Enter the two digit State or Province Zone Code.
Start Date & Time
Enter the start Date and Time.
Odometer
Enter the starting Odometer reading.
Non-Toll
Enter the Non-toll Mileage.
Toll
Enter the Toll Mileage.
Total Leg
Enter the Mileage for the Total Leg of the journey.
Sub-Total
Enter the Sub-total of Mileage.
Loaded
Enter 'True' or 'False' for Loaded Mileage. Double clicking this field makes a pull-down menu appear where you may choose from the two options.
Taxable
Enter either 'True' or 'False' for Taxable Mileage. Double clicking this field makes a pull-down menu appear where you may choose from the two options.
Axles
Enter the number of Axles.
Highway
Enter the Highway name.
Equip Time
Enter the Equip Time needed.
Gross Weight / Empty Weight
Enter the Gross and Empty Weight of the shipment. These values will be used when calculating Fuel Taxes for certain jurisdictions.
Fuel Purchase Information Tab
Right-clicking anywhere within the Fuel Tab (except in the actual details Grid) will allow access to the same Context Menu options as detailed in the above Header section.
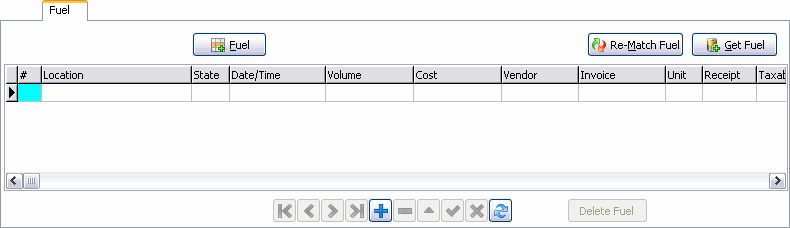
Fuel
Clicking the Fuel button will insert a new record line into the Fuel Grid below. Clicking the button again (before editing the new Fuel record created) will remove the record from the Grid.
Re-Match Fuel
Selecting the Re-Match Fuel button will find any un-matched fuel records that have been imported into your system (via the Card Import program) and rematch the fuel onto Fuel Tax Trips by using the date the Fuel was purchased, then matching that date with the Start & End Dates of the Power Unit’s Trip record. Basically, if an un-matched fuel record’s date falls in the Date Range provided by the Power Unit Trip record, it will be applied to that Power Unit.
| You can use PC*Miler, Rand McNally or ProMiles software as your primary Fuel Tax Vendor. |
Get Fuel
Clicking the 'Get Fuel' button will open the Get Fuel window where you may specify a Date Range to gather Fuel records.
| Field | Definition |
|---|---|
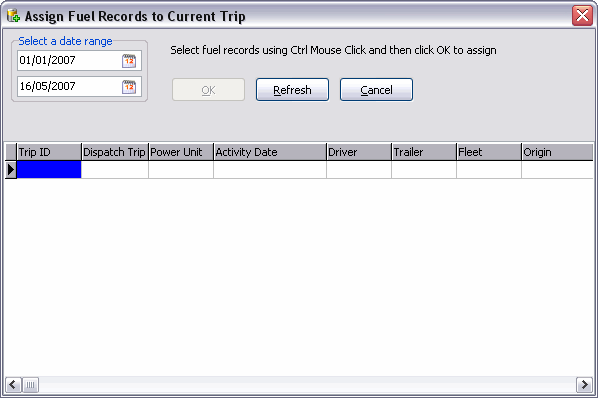
Select a Date Range |
Use the pull-down menus to select a Start Date and End Date for your Date Range. |
Refresh |
Click the 'Refresh' button to display any Fuel Records that fall within your chosen Date Range. |
Assign |
Once some Fuel Records have been displayed within the Grid, you can '<Ctrl> click' to highlight a group of records. Clicking the 'Assign' button will then add those selected records to the main Fuel Purchase Tab’s grid. |
Delete Fuel
Clicking this button will delete the currently highlighted detail line in the Fuel Grid.
Fuel Purchase Grid
This grid will outline the data corresponding to the Fuel Purchase record as it was imported from the Card Import program. You can also use the fields in this grid to manually enter Fuel Purchase Entries.
Location
Displays the city of fuel purchase.
State
Displays the two digit Province or State Zone Code where the fuel purchase was made.
Date/Time
Displays the date/time of fuel purchase.
Volume
Displays the volume of litres or gallons of fuel purchased.
Cost
Displays the cost per litre/gallon of fuel for the fuel purchase record. This value will be multiplied against the 'Volume' value to determine the total cost of the fuel purchase.
Vendor
Displays the fuel Vendor’s name. Double click the field to bring up a search window where you may select a record from your system.
Invoice
Will display the invoice number from the fuel purchase record. If entering the fuel purchase record manually, you may enter the Invoice Number here.
Unit
Displays the unit measurement of the fuel purchase, either 'Litre' or 'Gallon'. Double clicking this field makes a pull-down menu appear where you may choose from the two options.
Receipt
Default is left at 'True' for this item. Double clicking this field makes a pull-down menu appear where you may choose from the two options.
Taxable
Default is left at 'True' for this item. Double clicking this field makes a pull-down menu appear where you may choose from the two options.
Tax Paid
Default is left at 'True' for this item. Double clicking this field makes a pull-down menu appear where you may choose from the two options.
Mode
Default is left at 'Bulk' for this item. Double clicking this field makes a pull-down menu appear where you may choose from either 'Bulk', 'Keylock' or 'Station', depending on the Mode required.
Odometer
Displays the odometer reading for the fuel purchase detail line (if provided by the import file).