Vendor Profiles

View Notes Tool Bar Button
This tool bar button opens the 'Notes for Vendor' window. The window consists of several tabs, the first three are user defined, the user can use the tabs according to business needs. A CRM tab is also available, which is only visible if the TruckMate CRM license is installed.
Vendor Header
| If an administrator has removed your security rights in Security Setup Program > Security > Business Events > Misc to view vendors for which you are not an assigned rep/agent, then you will not be able to find / view any such vendors. |
Code
Can be up to 10 characters in length. This Code is used for selecting Vendors in the Accounts Payable module (although you can frequently select by the Vendor name as well). You can make the system automatically create numeric Codes of a specified length using the Application Configurator program.
Name
Enter the full Company Name of the Vendor.
Status
Note: This field is only visible if the TruckMate CRM license #39000 is installed. If the CRM license is not installed, this field disappears and the 'Terminated' checkbox (described next) appears instead.
This field displays the current status of the selected vendor. Available options are:
-
Don’t Call:* This means that the selected vendor is a verified vendor but prefers not to be contacted for potential business.
-
Lost:* This means that the selected vendor used to be an active verified vendor but was lost and is no longer ready to provide services to us.
-
Terminated:* This means that this vendor has been permanently terminated and is no longer our vendor.
-
Unqualified:* This means that the selected vendor is unqualified to conduct business and provide services.
-
Verified:* This means that the selected vendor is qualified and available to provide services to us.
Terminated
Select this option if the currently selected Vendor has been Terminated.
Note: This option is visible if the system does NOT have the CRM license installed.
Terminated
Select this option if the currently selected Vendor has been Terminated.
Configure Web Services
Clicking the 'Configure Web Services' button opens the Configure Web Services window, where you can setup this Vendor’s Web Services protocols. The 'Save' button at the bottom of the window saves all changes, while the 'Close' button closes the window. The Web Services Setup window is broken into two sections: 'Outbound 204' and 'Inbound 214'.
Outbound 204
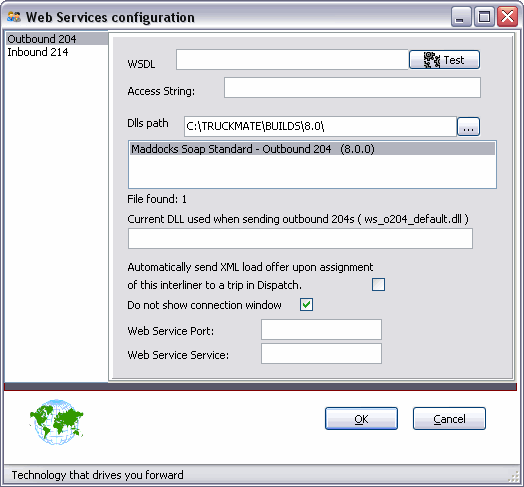
WSDL
Enter the URL of the Web Services site for your Vendor in the space provided. Click the 'Test' button to test the connection to the URL entered.
Access String
If needed, enter the Access String value required to access the URL.
Dlls path
Enter the path to your system’s Web Services '.DLL' file, or click the search button to browser your system for the .dll location. The '.DLL' name will be listed in the fields below.
Automatically send XML load offer…
Check this option to automatically send an XML Load Offer upon assignment when the selected Interliner Vendor Code is chosen in the Dispatch program.
Do not show connection window
Check this option if you do not want to see a window displaying the connection tasks as they are completed.
Web Service Port / Web Service Service
Enter the appropriate information in the spaces provided.
Inbound 214
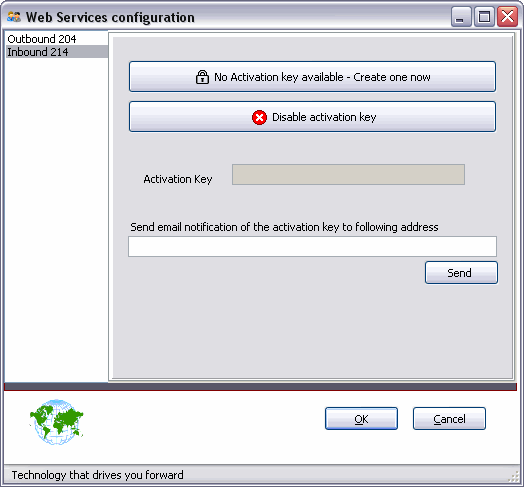
No Activation Key Available
Click this button to generate a SOAP 204 Activation Key into the 'Activation Key' field below.
Disable Activation Key
If there is an email address in the 'Email Notification' field below, clicking the 'Disable Activation Key' button will remove the Activation Key from the field and create an email notifying the Client of it’s disabling.
Activation Key
This field is uneditable, and will generate an Activation Key when the 'No Activation Key Available - Create one now' button is used.
Email Notification / Send
Enter an email address you would like to have notifies upon creation / deletion of the SOAP 204 Activation Key.In the case of additions, you must click the 'Send' button.When deleting an Activation Key, an email is generated automatically and loaded into your email software, ready to send.
Accounts Payable Tab
The Accounts Payable Tab allows you to setup the currently selected Vendor’s AP GL Account options.
Category
Is a free-format field used to group Vendors.In the Pay Bills section of the A/P Inquiry program, you can select bills for payment according to this category.
Distribution Code
Select a General Ledger Distribution Code from the search form.GL Distribution Codes are configured in the GL Distribution Setup program.The GL Distribution Code determines the account to which foreign exchange postings are made (if the Vendor’s currency varies from the default currency specified in the Codes Maintenance program).
Currency
Is the currency in which invoices from this Vendor are issued. Select a currency short description, as configured in the Codes Maintenance program, from the search form. The currency selected here will become the default currency for invoices entered in the A/P Invoice Entry program.
Fuel GL Dist
This field allows you to set the default Fuel GL Distribution account for the selected Vendor. This GL account will be automatically selected for this Vendor when the User checks the 'Use Distributions' option in the Card Import program.
Payment Description
This is a free-format field where you can enter a brief description of the payment.
Payment Terms
Use the drop-down menu to select the 'Payment Terms' option from the four available options. These options will determine the 'Due Date' for Payments in the A/P Invoice Entry program.
-
Transaction Date
The value in the Payment Days field will be added to the invoice date. -
Entry Date
The value in the Payment Days field will be added to the current date. -
Date Next Month
The value in the Day field determines the actual day of the month following the invoice date month. For example, if the invoice date is April 15, and the Day value is 25, the due date is May 25. -
Day of Month
The value in the Day field determines the actual day of the month following the invoice date day. For example, if the invoice date is April 15, and the Day value is 25, the due date is April 25. If the invoice date is April 15, and the Day value is 5, the due date is May 5. -
Day of 2nd Month
The value in the *Day field determines the actual day of the month following the invoice date day for the second month. For example, if the invoice date is April 15, and the Day value is 25, the due date is June 25. If the invoice date is April 15, and the Day value is 5, the due date is June 5.
Payment Days / Day
Is the number of days before invoices from this Vendor become overdue. In the A/P Invoice Entry program, the Due Date for invoices from this Vendor is calculated based on the value specified in this field. (Field label displays as Payment Days or Day depending on the Payment Terms.)
Discount Terms
This field sets the terms for when any applied discount will occur. When choosing from the available four options, you will notice that the field below changes from either 'Disc. Days' to 'Day', which allows you to define when the discount will occur. These options will change the 'Disc. Date' for Payments in the A/P Invoice Entry program.
-
Transaction Date
This option will use the existing 'Disc Days' field and add that number to the 'Invoice Date' field in order to determine the Discount Date in Invoice Entry. -
Entry Date
This option will use the existing 'Disc. Days' field and add that number to the current date to determine the Discount Date in Invoice Entry. -
Date Next Month
A specific date after the end of the current month. This option will use the existing 'Disc. Days' field to determine the actual day of the month that the discount expires. If it is '25' and the invoice date is May, then the calculation will be the 25th of June. -
Day of Month
The next specific day of a month. Uses the 'Disc Days' field to represent the specific day. If today is May 10th and the Disc Days value is '15', the invoice Discount Date should be calculated as the 15th of May. If it is '5' then the invoice Discount Date would become June 5th.
Discount Days / Day
If the Vendor offers an early payment discount, enter the number of days for which this discount applies. In the A/P Invoice Entry program, the Discount Date for invoices from this Vendor is calculated based on the value specified in this field.
If the 'Discount Term' field above is set to either 'Day of Month' or 'Date Next Month', this field name will change to 'Day', where you simply provide an integer value for the specific Day that the discount will apply.
Discount %
If the Vendor offers an early payment discount, enter the percentage of the discount. The contents of this field are displayed in the Terms field of the A/P Invoice Entry program.
Payment Hold
Selecting this flag will set the Vendor Record to Payment Hold status. This will prevent checks from being processed for this Vendor (analogous to the Customer Profiles' 'Credit Hold' option). This flag is also viewable and editable from the AP Inquiry program > Vendor Information Grid. Vendors with this flag enabled will also be excluded from the AP Inquiry program > Pay Bills window.
Note: If there are unposted checks in the system for this Vendor when you check this option, the program will issue a warning.
Invoice Entry Grid
This section is used to configure automatic general ledger postings (including tax calculations) in the A/P Invoice Entry program for invoices from this Vendor.
Default GL Accounts
If this box is checked, the posting references set up in the grid below will be assigned to all invoices from this Vendor.
Inter-Company
When this flag is checked, you will be allowed to include GL accounts that are attached to other Companies (i.e. not only those of the currently logged in Company).
Note: The VENDOR table is a "shared" table, so checking or un-checking the Inter-Company flag affects all companies (for this Vendor record).
GL Account
Enter a GL Account for this Vendor, or double-click for a search form. GL accounts are configured in the GL Chart of Accounts program. Only GL Accounts flagged as 'Active' will be available for selection from the search window; if the User attempts to manually insert an 'Inactive' GL Account into this field, the program will produce an error message.
Note: You do not have to include a GL Account in this field. If you do not include a default GL Account, you must always select one when using this Vendor in other TruckMate applications.
Factor 1
Stores the percentage of the total invoice amount that should be posted to the corresponding G/L Account. For distribution to the Tax Payable general ledger accounts, the 'Factor 1' value is the percentage of tax included in the total amount of the Invoice. If two taxes are included in the total amount of the Invoice, you will generally enter two tax payable accounts in this grid. The 'Factor 1' value for each is the percentage of each tax included in the Invoice. For distribution to a single expense account, the 'Factor 1' value is '100' (meaning 100% of the Invoice after taxes are deducted from the total). You can distribute a percentage of the expense to more than one expense account: for each of the expense accounts, specify the percentage to be posted to that account in the 'Factor 1' field.
Factor 2
Stores the total percentage of all taxes.
Example #1:
The formula for making automatic calculations is: Invoice Total x Factor 1 / (100 + Factor 2). If you entered an invoice with a total of $113.00 for the Vendor shown here into the A/P Invoice Entry program, it would be distributed as follows:
GST Payable (113 * 6) / (100 + 13) = 678 / 113 = $6

PST Payable (113 * 7) / (100 + 13) = 791 / 113 = $7

Misc Expense (113 * 100) / (100 + 13) = 11300 / 113 = $100
Example #2:
The formula for setting up an automatic calculation that will extract the 'GST' amount and expense the rest of the Invoice ('Base' amount + 'PST') is as follows, based on a $150 Invoice:
GST Payable (150 * 6) / (100 + 14) = 7.89

Misc Expense (150 * 108) / (100 + 14) = 142.11
Note: The 'Misc Expense' amount contains the 8% Ontario PST and the 'Base' amount of the Invoice.
Description
This field will automatically populate with the GL Account’s 'Description' value (as configured in the GL Chart of Accounts program).
ACE (CBP) US Customs Compliance Tab
The Customs Tab allows you to set the parameters of your ACE (CBP) US Customs eManifest Compliance data.Enter the appropriate ID codes in their respective fields.
Address Tab
The Address Tab contains address information for the selected Vendor, as well as some other miscellaneous details, such as the Vendor’s primary commodity information.
Address
Enter the Vendor’s address.Note that there are two address fields.The second field can be used, for example, in those cases where a Vendor’s mailing address differs from their street address.You should decide on a standard for using the address fields: if you enter the street address in the first field and the mailing address in the second, be sure to follow this method for all Vendors.
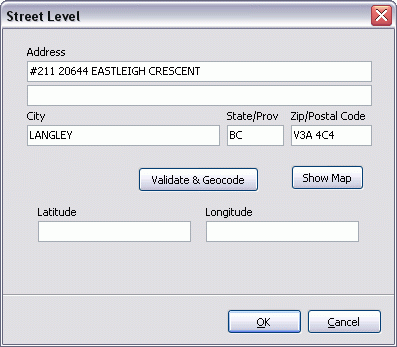
If you have a Street Level license from TMW Systems, clicking the search button next to the second 'Address' field will open the Street Level selection window.
Address
Enter the full Address information in the two spaces provided, just as you would on the main Customer Profiles program form.
City, State, Zip
Enter the City, State and Zip information in the spaces provided.
Validate & Geocode
Click the Validate & Geocode button to check the Address information entered against the Mileage Server program’s information. If found, the 'Latitude' and 'Longitude' fields below will populate with information returned form the Mileage Server.
Profile address validation is a method of geocoding a profile’s street address- placing it at a latitude/longitude coordinate. It uses whatever validation service the Mileage Server program has enabled. In most cases this will be PC*Miler Streets. We also support ProMiles XF for address validation.
When validating an address the system will use the complete street address. Two addresses on the same street will have two different geocodes.
For example:
7000 North Resort Drive, Tucson, AZ, 85750 = 0321936N, 1105110W
7001 North Resort Drive, Tucson, AZ, 85750 = 0321937N, 1105108W
If a profile is missing its address then its validation will fail. Zone codes are not used as a fall-back as they are too broad an area and would throw things off that depend on street-level accuracy.
Show Map
Click the Show Map button to display the current 'Address' using either GoogleMaps or YahooMaps services. GoogleMaps is the default service provider.
Note: To change your system default from GoogleMaps to YahooMaps (or any other mapping service, such as MSN Earth, etc.) you must apply a patch to your database, provided by TMW Systems Inc. Contact Support for more information.
City / State / Zip
These three fields are used for the Vendor’s City, State and Postal / Zip Code respectively.
Phone / Ext / Fax / Cell
Enter the Vendor’s Phone number (an Extension value is optional), Fax number and/or Cellular phone number in these fields.
Fax Notify
Enter the Name of the person that the Fax should be addressed to.
Enter the Vendor’s email address in the space provided.
Web Site
Enter the Vendor’s web site URL, if applicable.
Contact
Enter the name of the primary Contact person at this company.
Default Zone
Enter the Vendor’s Zone, or click the search button for a search form. Enter the starting characters of the Zone’s Code or short description, then click the search button for a search form. If you have PC*Miler’s Zip / Postal Code software installed, you can have the system automatically enter the Zone Code based on the City / State or Postal / Zip Code entered for this Vendor. To do this, do not enter any characters in the Zone field; instead, click on the Create button.
Note: The Mileage Server program must be running in order to use this feature.
Create
Will attempt to determine if an applicable Zone Code already exists for this Vendor, and, if not, will create a Zone Code based on the value entered in the 'Postal / Zip Code' field.
First, the system will compare the values in the 'City' and 'Province / State' fields against the Zone Codes Short Descriptions (as configured in the Codes Maintenance program). If a match is found, the Zone Code will be automatically entered in the Zone field. If a match is not found, the system will process the values in the 'City' and 'Province / State' fields and determine the matching Postal or Zip Code. This value will be automatically entered in the 'Zone' field, and a new Zone Code will be created in the Codes Maintenance program. In order to use the Zone creation aspect of the Create feature, PC*Miler’s Postal or Zip Code add-on software must be installed on your system, and the Mileage Server program must be running.
Note: This button is only available for users with 'Supervisor' rights. You can configure user access rights using the Security Setup program.
Terminal Zone
The Terminal Zone code entered into this field will become the Vendor’s default TM4Web > Vendor > Load Details > OSD > 'Terminal Zone' value.
Hours of Operation
For reference purposes, you can enter the Vendor’s hours of operation in these fields. Enter the opening time in the 'From' field and the closing time in the 'To' field. If this Vendor is chosen as a Shipper or Consignee in the Customer Service program, the 'Pickup By Start / End' and/or 'Deliver By Start / End' fields will default to these values.
Primary Commodity
For informational purposes only, you can specify a Vendor’s primary commodity in this field. Click the search button for a search field. Commodity Codes are configured in the Codes Maintenance program.
Customer Code
If this Vendor is also a Customer, select the Customer Code here. This allows 'contra' A/R and A/P comparisons, so you can compare how much you owe them as a Vendor versus how much they owe you as a customer.
EDI Number
Once the EDI is enabled, you will insert an EDI number into the field provided.
Vendor Since
For informational purposes, you can record the date that this company became a Vendor.
Mileage Profile
The Mileage Profile selected here will determine the method by which Freight Bill distances are calculated in the Customer Service program. Select a pre-configured Mileage Profile by clicking the search button inside the text field. Click the Mileage Profiles button to access the Mileage Profile Maintenance window.
Note: The Mileage Server program must be running in order to use this feature.
EDI Enabled
Check this option to enable EDI functionality for the selected Vendor.
Web Enabled
This field is for informational and reporting purposes only, and is not used elsewhere in the system.
Context Menu
All of the menu options available via right-click from the Address Tab are explained on the Customer & Vendor Profiles program > Tools Menu.
Alternate Address Tab
The Alternate Address Tab is used to store name and address details for the purposes of printing checks (in the Check Printing program or Instant Checks program). If a Vendor requires payment to a name or address that differs from the one configured on the main Vendor Profiles form (on the left), use the fields on this tab. Note that the system will not use a combination of data from this tab and the main Vendor screen; for example, even if you only need to specify an alternate Vendor name, you must also fill in the address fields.
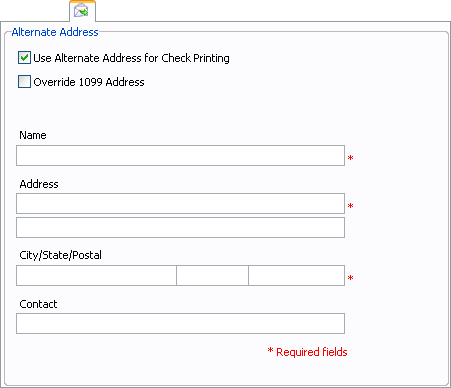
Use Alternate Address for Check Printing
If you wish to supply an Alternate Address for this Vendor you must select this checkbox.
Override 1099 Address
If you wish to override the normal address for this Vendor when generating 1099 forms, select this checkbox. The Payroll and Returns Generator program uses this to determine if it needs to use alternate info when creating 1099 report.
Name
Enter the alternate name that you want to appear on checks issued to this Vendor.
Address
Enter the alternate address that you want to appear on checks issued to this Vendor.
City / State / Postal
Enter the alternate City, Province/State and Postal/Zip Code information that you want to appear on checks issued to this Vendor.
Contact
Enter the alternate contact name that you want to appear on checks issued to this Vendor.
Use Alternate
If this box is checked, the information entered in the fields above will be used when checks are issued to this Vendor. If this box is not checked, the name and address details entered on the main Vendor form will be used.
Audit Tab
Created / By
These fields (at the top right of the screen) display the date and time that the record was created, and the login name of the user who created the record (user login names are configured in the Security Setup program). These are display-only fields, and cannot be changed.
Modified / By
These fields (at the top right of the screen) display the date and time that the record was modified, and the login name of the user who modified the record (user login names are configured in the Security Setup program). These are display-only fields, and cannot be changed.
Carrier Insurance/RMIS Tab
The RMIS tab allows the user to configure vendor integration with Registry Monitoring Insurance Services. Most of the information on this tab will be automatically populated based on the data returned from the Registry Monitoring/RMIS service. Click here for more information on RMIS, including setup details.
RMIS (Registry Monitoring Insurance Update)
This section is used to display and control the information exchanged with RMIS.
Auto Update Insurance
When this flag is checked, and nightly requests have been scheduled in the TMW Windows Services Host application, the program will automatically check for insurance updates. The appropriate fields will be updated on the Interliner tab and existing data will be overwritten.
Get Updates
Clicking this button will send an immediate request for the latest insurance updates. If RMIS has updated information on the vendor/carrier, the insurance information on the Interliner tab will be updated. If RMIS does not have the information, no update will take place. However, RMIS will be alerted to the request and will research and gather the information for a future request.
General Sub-Tab
The 'General Sub-Tab' is used to enter general information about the cargo, the automobile and the safety rating of the carrier, the driver and the vehicle.
The fields on this sub-tab are self explanatory, however, the 'Safety Code' drop down list field has some significance. The 'Safety Code' field allows the user to select a safety code from a list of costume-defined safety codes created in Codes Maintenance program. Selecting a safety code in this field will override the safety rating of the carrier upon selecting a carrier to be assigned to a trip. In other words, TruckMate will use the value of this field to determine whether to allow or dis-allow the user to assign the selected carrier to a trip, and will ignore the actual safety rating of the carrier.
Coverage Limit Description
This section is used to record details about the insurance coverage limit.
Coverage Description
Enter a description of the insurance coverage.
Limit Description
Enter a description of the coverage limit.
Limit Amount
This is the coverage limit amount.
Is Cargo Synonym/Is Auto Synonym
These two 'True/False' fields, allow the user to select whether a Cargo/Automobile is synonym or not.
Note: The RMIS integration service from TruckMate requires TruckMate licence '50000'. For more information on obtaining TruckMate licences, please contact a TruckMate Sales representative.
Check-List Tab
This tab allows the user to define checklist items and assign them to users. This feature is part of TruckMate CRM, and require the TruckMate CRM License to work. The Check-List Tab allows the user to define, view and edit vendor related check-list items.
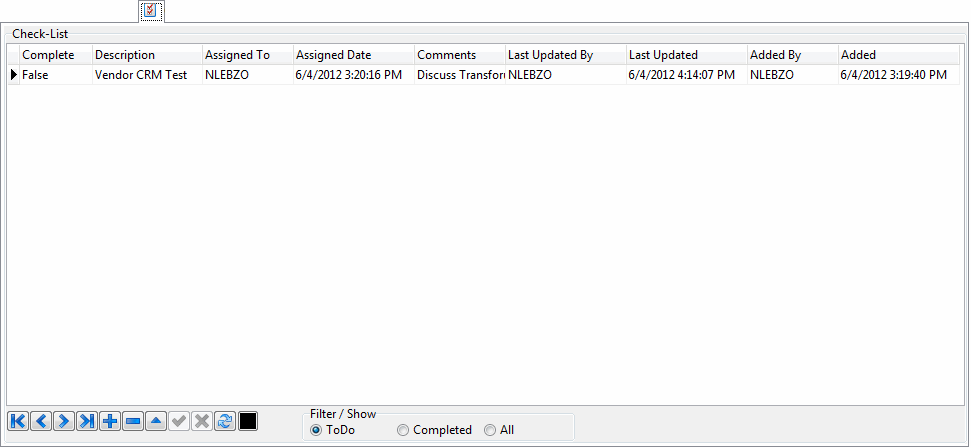
When the checklist window opens, all fields will be blank. If you try to enter any value in the grid, or double click in any field or select the 'Add' (plus sign) at the bottom of the screen will open a selection list of available check list items, select a suitable item, and then conclude the rest of the fields on the grid as described next. If you cant find a suitable checklist item to select, then select the 'Add a Checklist Item in Codes Maintenance' button at the bottom of the screen ![]() . This will open the 'Checklist Items' tab in codes maintenance and will allow you to add new items or edit existing items.
. This will open the 'Checklist Items' tab in codes maintenance and will allow you to add new items or edit existing items.
Complete
This field is to flag the check-list item as 'To Do' or 'Complete'. Double-Clicking the field will toggle between the two values. Logically, this field must only be set once by the user, when the item is completed. However, the system doesn’t prevent the user from toggling between the available values.
Description
This field is a read-only field, to modify the description of a checklist item you must do it from Codes Maintenance program > Checklist Items. Alternatively, you can select the 'Add a Checklist Item in Codes Maintenance' button described later.
Assigned To
Select a user to assign this check-list item to. The selected user will be responsible for performing this item.
Assigned Date
This the date of the assignment. Double-clicking the field will bring up a calendar to select the date from. If no date is selected, this field will default to the system date.
Comments
Include any comments that are needed to make the item more easier to understand, or to draw the attention of whoever is going to see this item in the future to a certain issue that should be handled, or handled differently, or maybe just add a comment for your own reference.
Last Updated By, Last Updated, Added By and Added
These are audit fields populated by the system, to record who created or modified the item and the time stamp of it.
image:CV-Vendor/image7.pngAdd a Checklist Item in Codes Maintenance
This button (with no title), located at the bottom of the screen to the right of the navigation bar, allows the user to add checklist items in Codes Maintenance program. For a checklist item to appear for selection it must be created first in Codes Maintenance program > Checklist Items. If you can’t find a check list item that is suitable to be added, you can just select this button, the 'Checklist Items' tab in codes maintenance program will be launched.
Note: To minimize the need to add checklist items from codes maintenance program it’s recommended that you create at least one generic check list item and flag it as 'Repeated' in Codes Maintenance. This way you can assign this item over and over without having to go to Codes maintenance program for every assignment.
Filter/Show
This radio button group is to filter the displayed Check-List items in the grid. You can display only 'To Do' (not completed) items, 'Completed' items or 'All' items. Select the desired radio button.
Comments Tab
The Comments Tab is used to enter Comments for a variety of Dates, similar to the Notes window (accessed via the Tools Menu).
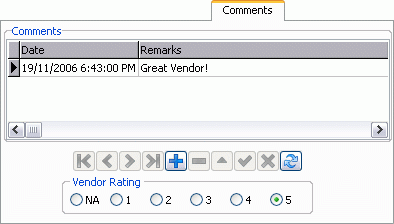
Date
Double click this field to select a Date from a Calendar menu.
Remarks
Enter Free Format Notes in the space provided.
Vendor Rating
This section is used to Rate the Vendor on a scale of 'NA' (Not Applicable for Rating) to '5'.
Contacts Tab
The Contacts Tab allows you to specify additional Contact information for this Vendor.
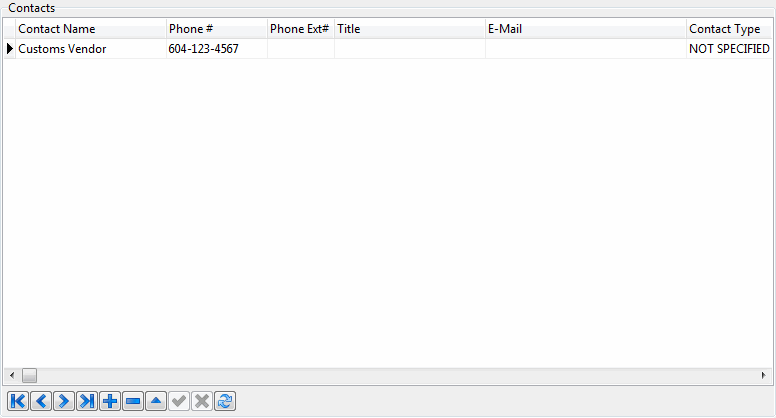
Contact Name
Enter the Contact Name.
Phone #
Enter the Contact’s phone number.
Phone Ext #
Enter the Contact’s phone extension number.
Title
Enter the Contact’s title.
Enter the Contact’s E-Mail address.
Contact Type
Double click this field to select from the available Contact Types in your system.
Use in Email
When set to 'True' (and an 'E-Mail' address is specified), this contact’s e-mail address will be automatically populated by certain automatic e-mailing functions in TruckMate for the selected client or vendor (such as vendor remittance reports from the Direct Deposit program).
Comments
This is a 240 characters field, which allows the user to enter comments about a specific contact. These comments could be any thing that can help make better communications with this contact, preferred calling times could be an example.
User1,…., User10
Those are 10 user defined fields that can be used by TruckMate users for any future purpose. The column headers can be modified to reflect users' needs using the Grid Customizer.
Custom Defined Fields Tab
This tab displays any Custom Defined fields that may be setup in your system for this Vendor. Custom Definitions are setup in the Codes Maintenance program.
Direct Deposit Tab
The fields on the Direct Deposit Tab are used to indicate that Vendor pay will occur via direct deposit to a bank account, and to provide the details of that bank account. When the Payroll Direct Deposit program is run and the export file is generated, the information on this tab is written to the file.
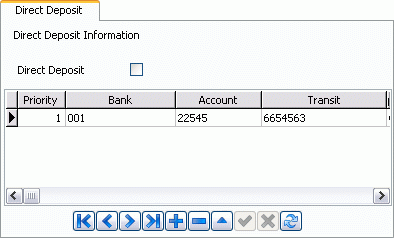
Direct Deposit
Place a checkmark in this box if this Vendor is paid by direct deposit. Users want to have direct deposit for Vendors to save all the costs and work involved with mailing out checks. It also allows greater control over cash flow.
Priority
Enter the type of priority here. Each priority number refers to a particular bank account. For instance, you could prioritize depositing a specific amount to the bank of first preference, and then the remainder of your pay amount to a bank of your second preference. You can vary these items at any time.
Bank
Enter the name of the Vendor’s bank in this field. The bank that handles your direct deposit export file will provide you with a list of formats for bank names. Enter the Vendor’s bank name in the format required by your bank- this might be in a character string (as in the image above), or an integer value. .
Note: If you are using a Canadian Payments Association bank account, click here.
Account
Enter the Vendor’s bank account number in this field.
Transit
In order to process a direct deposit, you must export the transit number from the Vendor’s bank branch. Enter the number in this field.
Note: If you are using a Canadian Payments Association bank account, click here.
Type
Enter 'C' for a chequing account, 'S' for savings account or 'D' to deposit the funds directly to a T-Chek Fuel Card.
Minimim
Enter a minimum dollar amount that must be deposited to that account each pay. Minimum can be whatever dollar amount you specify.
Percent
Enter the percentage paid to the Vendor. This field allows you to divide your pay amount by set percentages. Percentages must equal 100%.
Country
Enter the Country of the selected vendor by double clicking this field and choosing a valid Country value from those available on your system. The value of this field will be used as the 'Destination Country' when making an international direct deposit using IAT (International Automated clearing house Transaction).
Status
An 'A' (Active) will appear automatically once you input your Vendor’s bank account information. You can change the status to 'I' for inactive if need be by double clicking the field.
GL Account
This is a required field when entering Direct Deposit entries for Vendors. The GL Account selected here should be the bank that you pay the Vendor out of. Entering several records with the same GL Account field value allows you to pay Vendors multiple currencies.
RBC Pay Type
This field (and the following fields labelled 'RBC') have been added to allow the use of the Royal Bank of Canada’s A/P LINK service in order to transfer payments to Vendors. A/P LINK allows companies to forward Vendor payment information, including information on Vendor invoices paid, to the bank in one file. They are able to specify different payment options for each Vendor within the file: for example, 'Vendor A' might request that they receive a fax showing the invoices paid by the company, while 'Vendor B' requests an email with remittance information, and 'Vendor C' has arrangements with their bank to receive an electronic file. US and CDN invoices can be paid in one file as well as multiple banks for each currency.
The 'Pay Type' options offered by the Royal Bank are as follows:
-
'A' = FEDI (Financial EDI pay only- no remittance delivery)
-
'B' = FEDI with EDI remittance
-
'C' = FEDI with Fax remittance
-
'D' = FEDI with Email remittance
-
'E' = PDS (ACH Direct Deposit pay only- no remittance delivery)
-
'F' = PDS (ACH Direct Deposit pay with fax remittance)
-
'G' = PDS (ACH Direst Deposit Pay with e-mail remittance)
Note: Due to the nature of the A/P data gathered for this type of file, this is intended to work for A/P records that have been processed through the TruckMate Accounts Payable process only. It will not work for Payroll, Driver Pay or Vendor Driver Pay.
RBC Country
This is the two character country of the Vendor. Most common values will be 'US' and 'CA'.
RBC Contact
This is the contact name to be used by the Royal Bank when remitting to this Vendor.
RBC Fax
This is the fax number to be used by the Royal Bank when remitting to this Vendor ('Pay Type' option 'C'). The format will be '1234567899' (no '-' or '()')
RBC Email
This is the email address to be used by the Royal Bank when remitting by email ('Pay Type' option 'D').
RBC Language
This field designates the language the Royal Bank will use when contacting this Vendor. Acceptable values for this field will either be 'E' for English or 'F' for French.
RBC Trans Code
This is a three character Transaction Code that will be used by Royal Bank. The code might refer to 'Issued Cheque', 'Stop Payment', 'Void Cheque' among others. For the actual codes and more details refer to Royal Bank documentation in this regard.
RBC Trans Type
This three character Transaction Type is used by Royal Bank to refer to different transaction types. Examples might include: 'Inquiry' and 'Inquiry with Photocopy'. For the exact actual codes and types refer to Royal Bank documentation in this regard.
Users with Canadian Payments Association Accounts
The format required for Canadian Payments Association (CPA) Bank Accounts differs somewhat from the standard way of setting up your Users Direct Deposit information. The CPA requires a nine-digit Transit number, which includes the value that normally should be entered in the 'Bank Name' field in the 'Bank Transit #' field.
*Warning:* The 'Bank Transit #' field must be a total of 9 digits for CPA (Bank ID = 4, transit = 5). If a the 'Bank Name' is only 3 characters, prefix it with a '0' (zero).
Once you have setup your 'Bank Transit #' field correctly, you must also delete any information that is in the 'Bank Name' field- it must remain blank.
Equipment Tab
The Equipment Tab is used to enter Notes on a variety of the Vendor’s Equipment.
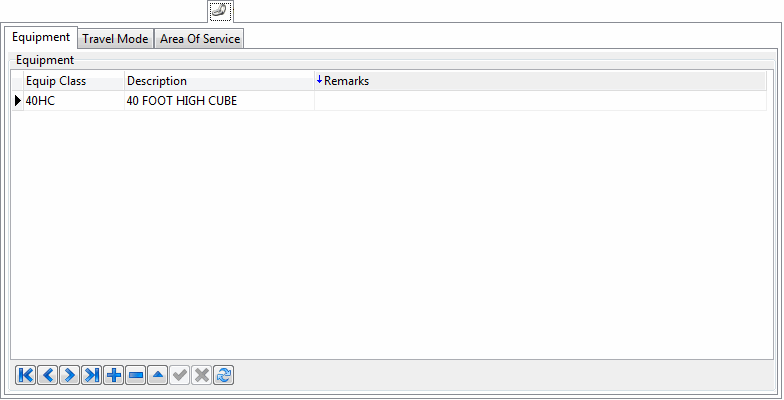
Equipment Sub-Tab
Equip Class
Double click this field to select an Equipment Class from those available on your system.
Description
This is a read-only field to display the description of the selected Equipment Class.
Remarks
Enter Free Format Notes in the space provided.
Travel Mode Sub-Tab
Travel Mode
Double click this field to select a travel mode that can be assigned to Area Of Service (AOS) or a Line Of Service (LOS) covered by the selected vendor.
Remarks
You can add any remarks for reference or clarification.
Area Of Service
You can select Area Of Service (AOS) or Line Of Service (LOS) where the vendor is providing his service. Area Of Service requires you to select a Zone Code which will specify the area of service for the selected vendor, while the Line Of Service requires you to select From Zone and To Zone fields, to define a specific Line Of Service between two points. You can toggle between AOS and LOS options using the 'Change' button.
Zone Code
Double click this field to select a Zone Code to specify the Area Of Service for the selected vendor.
From Zone / To Zone
Double click each of these fields to select From Zone and To Zone values respectively. The two zones will define the two ends of the Line Of Service for the vendor.
Allow Between
This field is a True / False field. Double click this field to toggle between the two values. If Line Of Service is selected, this field will indicate if other points, other than From Zone and To Zone areas, can be serviced.
Preference
Equipment Rental Rates Tab
The Rentals Tab allows you to specify which Rate Types the current Vendor will use (if the Vendor is of 'Rental' Type Vendor Code).
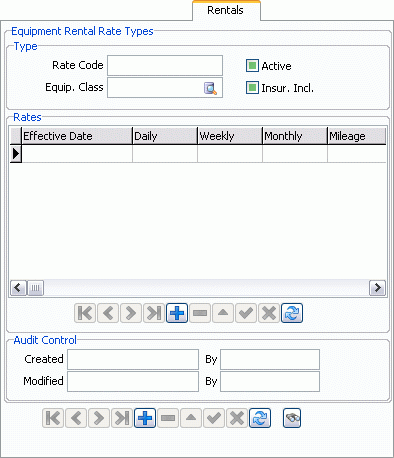
Type
Rate Code
Enter a name for this Rate Code, or double click the field to select a Rate Code from a list of those on your system.
Equipment Class
Click the search button to select the Equipment Class that this Rate Code will apply to.
Active / Insurance Included
Place a checkmark in these options to set the Rate Code to 'Active' Status (available for use) or to specify if the Insurance costs are included in the Rate Code.
Rates Grid
This Grid specifies the usage details of the selected Rate Code.
Effective Date
Double click this field to select the Date in which this Rate Code starts being applied to the specific Vendor.
Daily / Weekly / Monthly
Enter the monetary Rate values for Daily, Weekly and Monthly Rating for this Vendor.
Mileage / Tax
Enter the charge for Mileage based rating in the first field, and the Tax amount in the second space provided.
Maintenance
Enter the Maintenance charge for this Vendor.
Insurance
Enter the Insurance charges for this Vendor.
Insurance Rates Tab
The Insurance Tab is used to setup the Insurance details of the selected Vendor, if the current Vendor has a 'Type' of 'Insurer'.
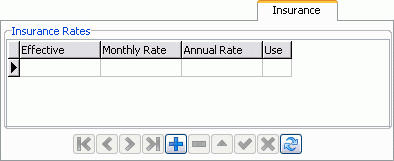
Effective
Double click this field to select a Date from a Calendar menu.
Monthly Rate / Annual Rate
Manually enter the Insurance Rates for both Monthly and Annual Insurance Rating.
Use
Double click the 'Use' field to specify if the Vendor employs Automatic ('A') or Manual ('M') Insurance Rating.
Interliner Tab
The Interliner Tab is used to record information that is specific to Interliners. The information entered here displays in the Interliner grids in the Carrier form, accessed from the context menu in the Dispatch program > Trip Grid. It is for information and reporting purposes only but will appear in the Dispatch program, after a trip has been assigned, and you use your context menu to view Carrier information.
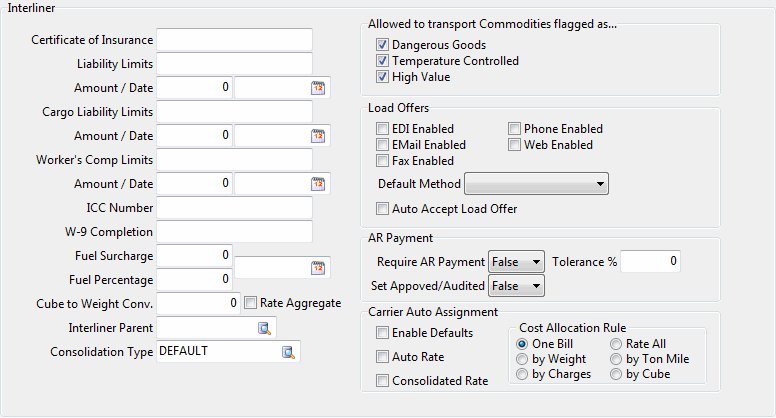
Certificate of Insurance
Enter the identification number here.
Liability Limits / Amount / Date
Enter the insurance certificate Liability Limit’s name, followed by it’s amount and Date below.
Cargo Liability Limits
Enter the cargo Liability Limit’s name, followed by it’s amount and Date below.
Worker’s Comp Limits
Enter the Worker’s Compensation number followed by it’s amount and Date below.
ICC Number
ICC means International Carrier Commission. Enter the ICC number, if applicable.
W-9 Completion
In the United States, you often keep on file a W-9 document on file for this Vendor. It would be used for US Income Tax purposes.
Fuel Surcharge
A charge or tax above the usual or customary charge for fuel. Sometimes this can be by the mile or on a percentage basis. Normally, you would enter this information in the Codes Maintenance program > Accessorial Charges Tab.
Fuel Percentage
Enter the percentage amount that is to be added as a fuel surcharge.
Fuel Date
Enter the effective date of the fuel surcharge.
Cube to Wgt Conversion
The factor used by auto-rating to convert cube measurements to weight.
Rate Aggregate
Check this option to use Aggregate Rating with this Vendor.
Interliner Parent
If the current Vendor is an Interliner Vendor that is part of a larger Interliner Company, you can add this 'Parent' Interliner to the 'Child' Interliner profile using this field. This field functions similar to 3rd party billing as on Client Profile.
Consolidation Type
This field controls which Consolidation Type the selected Interliner will use during IP Consolidation in the IP Audit program > IP Consolidation window. By default, this field will be set to DEFAULT (and any newly added interliner gets assigned to DEFAULT). But once you have created a new Consolidation Type on the Codes Maintenance program > Consolidation Types > Interliner Pay Tab, you may assign it to one or more interliners. Once a consolidation type has been assigned to at least one interliner, it may not be deleted in Codes Maintenance (unless you first un-assign it from all inteliners).
Allow to Transport Commodities flagged as…
Simply check the Commodities that this Interliner Vendor is capable of carrying.
Load Offers
Check the methods available for receiving load offers for this Interliner Vendor, and then use the 'Default Method' drop-down menu to configure their preferred load offer method.
Auto Accept Load Offer
If checked, will auto accept load offers. Default is unchecked.
AR Payment
These settings will apply only when the option in the Application Configurator program > IPIIPM.EXE > 'Require AR Payment Before Approval' is set to True.
Require AR Payment
Check the box if you want this Vendor’s IP records to not be released for payment until enough of the associated AR payment has been received to meet the tolerance percentage you have defined below Uncheck the box if there is no such restriction. Default is unchecked.
Tolerance
Enter a tolerance percentage between 0 and 100%. For example, enter 0 if the associated AR invoice must be fully paid before releasing the IP record for payment; enter 10 if the associated AR invoice’s outstanding balance is 10% or less of the original balance due before releasing the IP record for payment (in other words, at least 90% has been paid). Default is 0.
Set Approved/Audited
Check the box if you want to automatically set this vendor’s IP record to Approved/Audited at time of payment release. Uncheck the box if want to manually set this vendor’s IP record to Approved/Audited. Default is unchecked.
Carrier Auto Assignment
This section is intended to allow users set the options required for Carrier Auto Assignment. The options in this section are only applicable to auto assigned carriers, they have no effect on carrier manual assignment.
Enable Defaults
This checkbox allow the user to enable or disable the usage of the default options for the carrier when an auto assignment takes place. The default value is 'False'.
Auto Rate
This checkbox allows the user to control rating when a carrier is automatically assigned. If this checkbox is checked the system will automatically generate the rating when the carrier is auto assigned. If not checked the rating must be done manually even though the assignment is done automatically. The default value is 'False'
Consolidated Rate
This checkbox compliment’s the 'Auto Rate' checkbox. If the 'Auto Rate' option is set to 'True' (checked) the user can also decide what kind of rating can be done. If this checkbox is checked, a consolidated automatic rating will be done.
Cost Allocation Rule
This option controls how to allocate costs. This option has six possible values:
-
One Bill
Assign all the cost to one bill. The total cost will be one chunk assigned to one bill when the selected carrier is auto assigned. -
By Weight
Use the weight of freights to allocate the cost. The heavier the freight the more cost it will incur. -
By Charges
Allocate the cost based on charges. The more the charges are the more cost will be allocated. -
Rate All
This will create one zero charge record for each freight bill and then call the rating logic to get a rate. -
By Ton Mile
If this radio button is selected the allocation will be based on freight bill weight and leg distance.The more weight and distance are involved the more cost is allocated.The higher the outcome of (weight x distance) the more cost allocation will take place. -
By Cube
This allocation method is based on the volume of the freight.The bigger the volume is the more cost will be allocated.
Notes
In the Notes tab, you can enter detailed information and/or specifications about the vendor.
To display this information automatically when working with carriers in Dispatch or Rates Maintenance, select Pop Up Specification on Carrier Assignment in Dispatch & Rating Simulation.
Rating
The Rating Tab allows the user to view and control Vendor Rate Sheets.If a Rate Sheet is attached to a Vendor it becomes a Vendor Rate Sheet.For a detailed description of the Rating Tab go to Rates Maintenance > Vendor > Rate Sheets.The Rates maintenance application and the Customer and Vendor Profiles application share the same 'Rate Sheets' library component; called from both applications.
Rep/Agents Tab
| If an administrator has removed your security rights to edit the vendor reps/agents grid, you will get an error when you try to edit, delete, or insert. |
The Rep/Agent Tab allows TruckMate users to record and keep track of vendor agents and representatives.
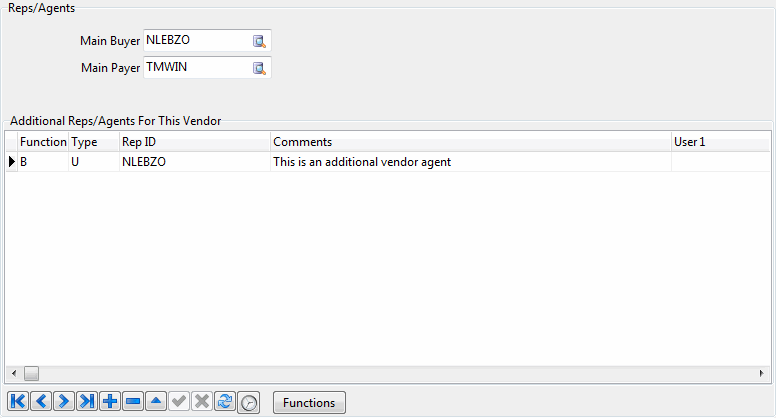
This window allows the user to record and keep track of Vendor Reps and Agents. The upper part of the window is to record the main reps/agents and the grid part is to record additional reps/agents for the selected vendor.
Main Buyer
User the edit pick to select the main buyer for this vendor, this is a person from inside the company who is the key person in selecting to utilize the selected vendors services. The edit pick will list available users from inside the company.
Main Payer
Select the main payer for the selected vendor using the edit pick. This is again a person from inside the company who is responsible of making the payments for the selected vendor. The edit pick will list available users from inside the company.
Additional Reps/Agents For This Vendor
This section is only available for TruckMate systems with TruckMate CRM license. This grid allows the user to define additional Reps/Agents for this vendor.
Function
Double click this field to enter a function for the additional rep you want to define. The user can add to the available unctions or edit them using the 'Function Button' described later in this section.
Type
Select the type of the additional rep/agent. Double click the field to select the desired type. Available values include: Driver, Employee, User Group, Sales Rep (User or Vendor), User and Vendor (Type A).
Rep ID
Double click to select the list of available users.
Comments
Enter a comment you wish to be associated with the new additional rep/agent.
User1,…,User3
These are user defined fields that can be used for future emerging business needs.
Service Calendar Tab
The Service Calendar Tab is used to determine the Weekends and Holidays for your Vendor.
Weekends
Choose the days that will constitute the 'Weekends' for your Vendor Company.
Holidays Closed
Click the '+' button to insert a detail line and double click within the 'Date' field to select a Holiday Date from a Calendar menu. Enter a 'Holiday Name' manually in the space provided, and the 'Day of Week' field will automatically populate based on the 'Date' field.
Types Tab
The Types Tab allows you to specify which kind of Vendor the currently selected Vendor Code is, and setup up some other information.
Vendor Type
Select a specific 'Type' for this Vendor using the drop-down menu. In some cases, the system uses this designation to narrow down the Vendors available for selection in other programs. For example, on the Customer Service program > Interline Payables Tab, only Vendors designated as 'Interliners' can be assigned to a Freight Bill; on the Summary Tab, only Vendors designated as 'Agents' can be added to the Sales Agent field, etc.
You can also allow/disallow users from viewing and assigning Vendor Profile details to a specific Vendor Type using the Security Setup program > Security Tab > Business Events > Vendor Types Tab. The vendor type filter (in toolbar) and vendor type field (in types tab) will only show the vendor types that the user has been allowed per secsetup. If the filter is set to "All", then the user will not really see all vendors in the system - only vendors of the vendor types they are allowed to access.
Vendor Types are recorded as single character codes in the VENDOR.VENDOR_TYPE field, as follows:
| Vendor Type | VENDOR.VENDOR_TYPE Value |
|---|---|
Agent (Carrier) |
G |
Agent (Sales) |
A |
Broker |
B |
Customs Broker |
C |
Insurer |
U |
Interliner |
I |
LineHaul Carrier |
L |
Competitor Carrier |
M |
Other |
O |
Rental |
R |
Supplier |
S |
Vendor |
V |
Note: Keep the VENDOR_TYPE char values in mind when attempting to lookup a Vendor by Vendor Type, as the lookup uses the database field value, not the 'Vendor Type' drop-down name.
Registration Numbers
Can be used to enter the Vendor’s taxation and business numbers as necessary. These fields are for reference and reporting purposes only, and are not used elsewhere in the system.
1099 Form
These settings are used to configure the Vendor for 1099 Taxation purposes. These settings will be used by the Payroll Returns Generator program when running 1099s for the current taxation year.
Type
If you are required to provide US 1099 reporting for this Vendor, select the type of report you need to generate.
Sum
If you are required to provide US 1099 reporting for this Vendor, select the method by which you want to sum the values in the report.
Requires Single Item Chk’s
This field, when checked, will request separate checks for each Invoice for the selected Vendor.
Carrier 411
Docket #
This is the number used by Carrier 411 to identify the selected carrier as a Monitored Carrier.This field must ne 8 characters long and starts with MC or FF.
Skip Safety Check with warning
TruckMate compares the Safety Management System (SMS) scores of carriers against the defined SMS threshold to allow or disallow the assignment of a carrier to a trip.If this checkbox is selected (checked) the system will allow the assignment of the selected carrier to a trip regardless of its SMS rating.However, TruckMate will generate a warning to warn the user of the carrier’s safety score.
User Defined Fields Tab
There are ten user-defined field where you can enter miscellaneous data for each customer.You can change the labels that are assigned to these fields using the Application Configurator program.
R&M Vendor User Fields
Typing the <Ctrl><R> hot key combination will access 10 Vendor User Fields specific to the Repairs & Maintenance module.By using the Application Configurator program > PROFILE.EXE > 'RM Vendor User 1 - 10' options, the user can configure the field labels for these 10 fields.
YTD Tab
The Year to Date Tab has one option, being the 'Enter YTD' button.Clicking it opens the Enter Year to Date Information window where you may enter Yet to Date details for the current Vendor.
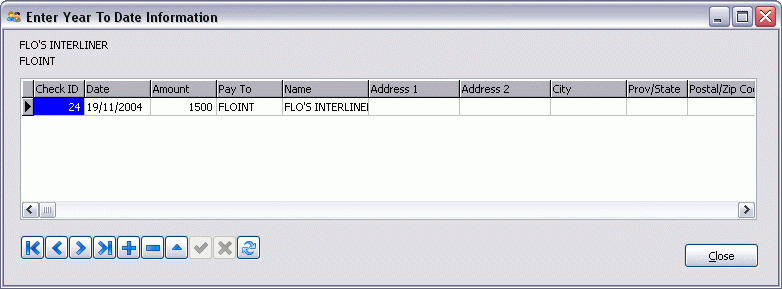
Clicking the '+' button will populate most of the fields automatically. All the User need modify is the 'Amount' field, where they may enter a numerical value.