Accessorial Charges tab
The Codes Maintenance Accessorial Charges tab is used to create and configure Extra Charge Codes for Freight Bills and for Interliners assigned to Freight Bills and Dispatch trips. Extra charges are added to a Freight Bill in the Customer Service program (on the Accessorial Charges tab) and the Quick Bill Entry program (on the Extra Charges tab). Extra Charges for Interliners are entered on the Customer Service program > IP tab of the Customer Service program.
Accessorial Charges can be configured to calculate automatically, (and even to be added automatically) based on a variety of Freight Bill circumstances. They can be configured to apply to all customers, or can be manually applied to the 'Pickup' customer, 'Delivery' customer or both. Use the Rates Maintenance program to configure Accessorial Charges individually for specific customers.
| You cannot delete an Accessorial Charge code once it has been applied to a Freight Bill (the record exists in TLORDER table) or as part of a Carrier/Interliner Assignment (exists in ORDER_INTERLINER table). |
Use the top part of the screen to configure general information about the Accessorial Charge.
(To edit the information in the header section the user must have the 'CODES - Allow Edit of Acc.Codes Header' security setup in Security Setup Program > Allow Changes section checked).
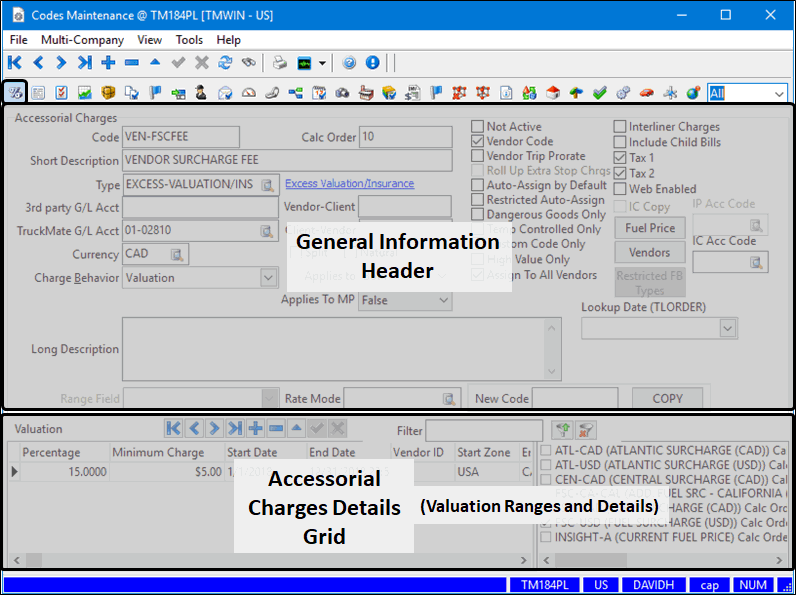
The accessorial charges valuation ranges and details are displayed within the Accessorial Charges Details grid in the lower part of the window. The entries in this grid are used to configure multiple ranges for accessorial charges where you can set up how and when a charge can be used in multiple different scenarios and settings.
Creating a new accessorial charge
Creating a new accessorial charge requires you to enter the header information defining the criteria to determine when the charge can be applied and if it should be applied automatically. The Accessorial Charge Details grid at the bottom of the window can further restrict the criteria determining when the charge can be applied and the values to be used in calculating the charge.
| You must have security permissions to view and edit accessorial charges. |
To create and define a new accessorial charge in Codes Maintenance:
-
Go to Profiles > Codes Maintenance.
-
Go to the Accessorial Charges tab.
-
Click
 Insert from the top left navigation bar.
-
Click
 Post occasionally as you proceed to save your entries.
 -
Make the appropriate entries to these fields in the header section:
Required field: *
Field Definition Code *
An Accessorial Charge Code, (up to 10 characters in length).
Calc Order
Refers to the order in which accessorial charges are assessed on a Freight Bill. Sometimes you want Accessorial Charges to calculate based on the rating total plus other Accessorial Charges; sometims the charge must be calculated on net values, before other Accessorial Charges are assessed. '1', being the lowest, is therefore the first charge to calculate. For 'Valuation' accessorial charges, which are typically based on a percentage of another extra charge, you would enter a 'Calc Order' of '2' (or higher, depending on how many other accessorials you expect to auto-assign).
Note: If you would like to setup 'Valuation' type charges for a Vendor, ensure that you set the Application Configurator program > RATES.EXE > 'Vendor Acc Chg in AccCh' config to 'True'.
More than one Accessorial Charge can have a Calc Order value of '1'. If you want all your Accessorial Charges to calculate based on the details of the Freight Bill, enter '1' for all Accessorial Charge Calc Order values.
Short Description
Enter a description for this Accessorial Charge Code. The Short Description will display on the Customer Service program > Accessorial Charges tab, and on the Quick Bill Entry program > Extra Charges tab.
Type
Click the search button to assign an Accessorial Charge Type to this Accessorial Charge Code.
Once selected, the short description text for this charge type will displayed next to the Type field. Clicking the description will open a small window with more detailed notes about this accessorial charge type.
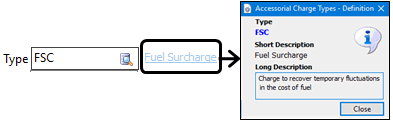
The list of Accessorial Charge Types and their descriptions come from a standard out-of-the box table and are not meant to be edited.
3rd Party G/L Account
If you are exporting billing data to a third party accounting system (such as TruckMate Legacy) enter the G/L Account to which charges from this Accessorial Charge should be posted.
TruckMate G/L Account
Enter the GL account (as configured in the GL Chart of Accounts program) that will be credited with charges generated by this Accessorial Charge when the Billing Register program is run. Click the search button for a selection form. Only those GL Accounts that are set as 'Active' will be available for selection on the search window. If the User attempts to manually enter an 'Inactive' GL Account into this field, the program will produce an error message.
Currency
Select the currency of the charge. Currency Codes are configured on the Codes Maintenance program > Units tab. Note, you cannot add an Accessorial Charge to a Freight Bill if the Code is not of the same currency as the Freight Bill itself. Therefore, if you bill in multiple currencies, you must have Accessorial Charges set up for each currency.
Charge Behavior
Determines the method by which the charge is calculated. The value selected here will cause the grid at the bottom of the screen to display the relevant data associated with this charge behavior.
The field below the long description may also display different data depending on the charge behavior is selected, (e.g., Adjustment field, Declrd.Value Field or Range Field).
See for Charge Behavior > Accessorial Charge Details grid for the description and grid fields associated with each behavior.
Vendor-Client
This field is used together with the Pass to Client charge behavior as a mechanism to pass vendor accessorial charges to a client accessorial charge containing a matching Vendor-Client code.
Note: You can enter values for Vendor-Client or Client-Vendor, but not for both at the same time.
Client-Vendor
This field is used together with the Pass through to Vendor charge behavior as a mechanism to pass vendor accessorial charges to a client accessorial charge containing a matching Client-Vendor code.
The value entered into the 'Client-Vendor' field is used to tie a Client Accessorial Charge to a Vendor Accessorial Charge. For example, a tarp charge is manually added to a freight bill as a Client Accessorial Charge. The customer wanted the tarp charge automatically assigned to the Vendor Accessorial Charges as well, because the Vendor should get a share of the charge. If the Client Accessorial Charge Code and the Vendor Accessorial Charge Code have the same 'Client-Vendor' value, then the Vendor Accessorial is automatically assigned.
Note: You can enter values for Client-Vendor or Vendor-Client, but not for both at the same time.
Split
Select this checkbox, if you want your accessorial charges split into two or more G/L Accounts based on what is defined in the Codes Maintenance program > G/L Splitting Definitions tab.
Natural
Uses the GL Reset Natural Account logic to determine the proper GL Account to post to. For example: if the default revenue account of a Freight Bill is '10-10-4000' and the 'TruckMate G/L Account' for the Accessorial Charge is '20-30-4010'- and assuming the 'Natural' segment of the GL Accounts is the third- the GL Account selected will be '10-10-4010'.
Applies To
These flags control how the displayed Accessorial Charge will apply to Freight Bills.
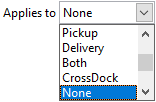
You can allow each Accessorial to apply to 'Pickup' Freight Bills, 'Delivery' Freight Bills or 'Both'. You can also choose the 'CrossDock' option in this section. This option specifies that, when saving a record using this Accessorial Charge, only allow for CrossDock type charges for 'Vendor' type codes. This flag is used by many different aspects of TruckMate. For example, the Driver Pay logic will use this flag when creating percentage acc. charge pay.
'None' means this charge will is generic to all freight bills and can be manually added to any freight bill. It will only be applied automatically if the Auto-Assign by Default checkbox is selected.
Applies To MP
This field allows the user to discern whether this accessorial charge applies to multi point (MP) rating or not. If the value selected for this option is set to 'False', the selected charge will only apply to single point rating (bills with no multi point rating records). If the value selected for this charge is 'True', the charge will only apply to freight bills with multi point rating records, further more they will be applied to every multi point rating record. If the value for the charge is set to 'Both', the accessorial charge will be applied to all bills, but if multi point rating records are available for the freight bill, the accessorial charge is only created once for the entire bill and will NOT be applied to every single multi point rating record.
Not Active
Indicates this Code is no longer used. Codes no longer used cannot be deleted but this checkbox ensures they will not show up on current user lists within the program.
Vendor Code
Selecting this checkbox enables the Vendors button.
Double-click the Vendors button (near the list of checkboxes) to assign a Vendor ID to this Accessorial Charge. Remember to check both the Accessorial Charge and to add the appropriate Interliner(s) for this option to work correctly.
Vendor Trip Prorate
When this field is flagged for an Accessorial Charge, that Accessorial charge will be pro-rated when assigning a Carrier in the Dispatch program. Accessorial charges with this checkbox selected will be pro-rated for all Freight Bills on the Trip based on the 'Cost Allocation Rule' selected on the Carrier Information window > Trip Information tab.
Roll Up Extra Stop Charges
If this flag is checked and Accessorial Charges are applied to a Freight Bill, you get one Accessorial Charge detail line with a quantity of 'X'; if unchecked, you get 'X' number of Accessorial Charge details lines with quantities of '1'.
Auto Assign by Default
Check this box if you want this Code applied automatically to all Freight Bills. If you want to exempt specific customers from an Accessorial Charge that is configured as an Auto Assign by Default Code, or substitute a different Accessorial Charge, you can do so in the Rates Maintenance program > Client tab.
Restricted Auto Assign
This option functions similarly to the 'Auto Assign by Default' option detailed above, but allows you to choose which types of Freight Bills that the Accessorial Charge will be applied to automatically, and which ones to exclude. After flagging this checkbox, click the 'Restricted FB Types' button adjacent to it to choose which freight bills you would like to include, and which to exclude. See below for more information.
Dangerous Goods Only
If you have an extra charge for hauling either dangerous, or temperature controlled goods, placing a checkmark in the checkbox (in either or both of Dangerous, or Temperature Controlled Goods), together with the 'Auto Assign by Default' checkbox, will cause this charge to be added to the Freight Bill.
Note: In the Customer Service detail line of the Freight Bill, the Dangerous Goods, or Temperature Controlled columns (either/or) must display the value 'True'.
Temp Controlled Only
If you have an extra charge for hauling either dangerous, or temperature controlled goods, placing a checkmark in the checkbox (in either or both of Dangerous, or Temperature Controlled Goods), together with the 'Auto Assign by Default' checkbox, will cause this charge to be added to the Freight Bill.
Note: In the Customer Service detail line of the Freight Bill, the Dangerous Goods, or Temperature Controlled columns (either/or) must display the value 'True'.
Custom Code Only
If this Code only applies to specific customers, check this box. If the box is checked, this Code will not be available for manual selection on the Customer Service program > Accessorial Charges tab, Quick Bill Entry program > Extra Charges tab nor on the Rates Maintenance program > Detention tab. To assign a Custom Code Only Accessorial Charge to a customer, use the Rates Maintenance program > Client tab.
High Value Only
If you have an extra charge for hauling High Value materials, selecting this checkbox and selecting the 'Auto Assign by default' option will cause an extra charge to be added to the Freight Bill.
Note: In the Customer Service detail line of the Freight Bill, the High Value column must display the value 'True'.
Assign To All Vendors
This flag allows the user to assign this code to all vendors of type I (Interliner), G (Agent/Carrier) and L (Linehaul Carrier). This flag will only become available if the Vendor Code flag is also checked.
Interliner Charges
Interliner charges are a specific form of vendor accessorial charge. Interliner Charges and the Vendor Code checkboxes cannot be selected at the same time.
Note: Interliner charges (or a percentage of the charges) are charged to the client (not the vendor).
These client charges are setup in the Customer Service program > Accessorial Charges Grid where you have the opportunity to itemize all your Accessorial Charges. In the Codes Maintenance program - Accessorial Charges tab, select the Interline Charges checkbox to make these charges linked to your Rating sheet. Ensure your Rates Maintenance Sheet Type is set to 'Split'.
Include Child Bills
Selecting this option changes the Accessorial Charge auto-assign logic to propagate the Accessorial Charge onto the Child Bills of any Extra Stop Bills.
Tax 1 / Tax 2
These flags control whether or not Taxes will be applied to the currently displayed Accessorial Charge. Selecting 'Tax 1' or 'Tax 2' (or both) will apply these taxes (as defined in the Tax Calculation Configuration program) to the Accessorial Charge when it is applied to a Freight Bill.
Web Enabled
When selected, this option will allow users to apply the accessorial charge in the TM4Web > Order Entry > Pickup Request > Accessorial Charges section. Otherwise, it will not be visible.
IC Copy
This checkbox if selected, allows the selected accessorial charge to be copied from the working company to the billing company in a multi company database setup. When an accessorial charge code is added to a freight bill in the working company, there will be a right-click option enabled that will allow the user to copy the charge to both the IP record and the freight bill in the billing company. In order for this to work, the 'Multi-Company Copy' (this field) must be checked and the "IC Acc Code" must be provided.
IP Acc Code
This field is used when the accessorial charge is copied to the billing company. The value of this field is the accessorial charge code that will be used to create an IP extra charge in the billing company.
IC Acc Code
When setting up an accessorial that is used for a vendor (i.e. a Carrier type vendor), you can specify a 'Client' accessorial charge that will be used whenever that carrier is assigned to an inter-company movement. This is invisible in single company systems. If a value is set for this field, when the new intercompany freight bill is created in the working company, the linked Acc Code (the accessorial code corresponding to the value of this field) is added to the newly created freight bill.
This field is also used when copying the accessorial charge to the billing company. To perform the copying process, you must assign a value to this field ('IC Acc Code') in addition to selecting the 'IC Copy' flag described before.
Long Description
For informational and reporting purposes, you can enter a long description for this Code. The Long Description can be as many characters as you need.
Lookup Date (TLORDER)
The date selected in this drop-down will be used in the accessorial charges calculation. If no value is selected for this field, TruckMate will use the default Lookup Date as set by the application configuration option in Application Configurator program > Billing > CSERV.EXE - RatingLoockupDate. The default value for this configuration option is 'Pick_Up_By'.
Range Field
The value selected in this drop-down represents the Freight Bill field that the 'Range From' and 'Range To' values for the specific Accessorial Charge code will apply to. For example: if 'Weight' is chosen in the Range Field, and the user enters '0' to '1000' in the 'Range From' and 'Range To' fields in an Accessorial Charge’s detail grid, the Accessorial will apply when a Freight Bill’s 'Weight' value is between 0 and 1000.
See the following charge behaviors for details:
Note: This field is only displayed and enabled for certain Charge Behaviors. For other behaviors, this field will be replaced with something else specific to the selected behavior.
Declrd.Value
Enter the declared value to be used by those charge behaviors related to declared values.
See the following charge behaviors for details:
Note: This field is only displayed and enabled for certain Charge Behaviors.
Adjustment Field
Used to indicate which field should be adjusted by the Value Adjustment charge behavior, e.g., weight, area, cube, etc.
See the following for details:
Rate Mode
Rate mode is used for multi-part rating scenarios to provide an additional filter to allow the charge to be associated specifically with a specific (unlimited) user-definable transportation mode (e.g., road, linehaul, rail, ship).
New Code
(Works with Copy button to copy a code)
This option can save you time if you need to create a new code similar to an existing one. With the existing code displaying, enter a new code name in the field and click the Copy button. You can now make changes to the new code as needed.
A new Accessorial Charge Code must have a unique Code (up to 10 characters in length).
-
Click
Post to save your entries. -
Now that you have used the header information to determine when this accessorial charge can be applied, you will need to enter values into the Accessorial Charges Details grid at the bottom of the window. The line entries in this grid are used to define the values used for calculating the charge and to further restrict the criteria determining when the charge can be applied.
Note: Use the Calc Seq value in the grid to ensure the more specific and restrictive charges are always listed ahead of the more generically applied charges. For example, assign the most generic grid line entry a larger Calc Seq number, (e.g., 99 or zzz), to ensure it appears at the bottom of the list.
See Charge Behavior > Accessorial Charge Details grid for the description and grid fields associated with each behavior.
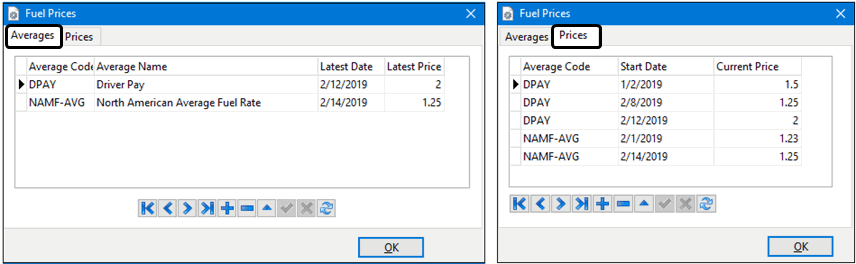
Fuel Price button
The Fuel Prices window is used to define the Fuel Price Average codes and enter up to date fuel price information for each code which will be referenced by the Fuel Average field within the Current Fuel Price charge behavior grid.

Use the Fuel Prices window to create accessorial charge codes intended to be used by specific fuel price calculations. For example, you may have a code used in calculating driver pay for fuel and a separate code used elsewhere for invoicing clients.
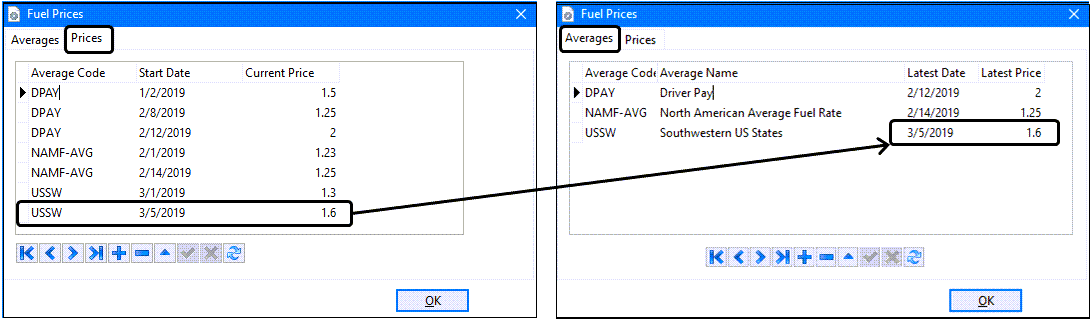
Once these average fuel price codes are established, enter the current average fuel price values (i.e. the National Average), for each code on a regular basis. You enter the current values into the Prices tab and the most current value of this average fuel price will automatically update the information displayed on the Averages tab.
| The Averages tab is not performing any math to come up with an average value. It displays the most recent entry of the average fuel price entered in the Prices tab. Each regional area for which you have defined an average code may require a different source (i.e., a local fuel price web site or the national average), to obtain the fuel pricing information you want to use. |
When calculations within TruckMate reference the average fuel price code (such as the Current Fuel Price charge behavior), it will use the value entered for that fuel price average code which matches the date ranges defined in the Accessorial Charges Details grid for this accessorial charge code.
Creating a Fuel Price Average Code and setting fuel prices
-
Go to Profiles > Codes Maintenance > Accessorial Charges tab.
-
Click the Fuel Price button.
-
Go to the Averages tab.
The Average codes are used to indicate a regional market where you are tracking (average) fuel prices. For example, suppose you are tracking the Southwestern US States (CA, AZ, NM, NV) may be set up as a single fuel market. You could create a code called USSW, to represent the average fuel price assigned this market.
-
Click
Insert. -
Make the appropriate entries to these fields:
Required field: *
Field Definition Average Code *
Average Codes are used to determine Fuel Surcharges for the 'Current Fuel Price' and 'FSC (DOE Average)' Charge Behaviors. Once defined on this tab, entries in the Prices tab will set the current average price to be used for fuel surcharges.
Average Name *
You can use any text for a descriptive name.
Latest Date
This is the date of obtaining the latest fuel prices. This date is updated automatically when a new fuel price is entered into the Prices tab for this code.
Latest Price
This price is updated automatically when a new fuel price is entered into the Prices tab and reflects the most recent entry for this code.
Note: All the prices entered into the Prices tab are kept as reference points. Calculations in the Accessorial Charges Details grid using the average code will use the appropriate price based on the freight bill date. For example, if prices were entered on Jan 5th and Jan 10th and the freight bill is dated Jan 7th, it will use the Jan 5th price.
-
Click
Post to save.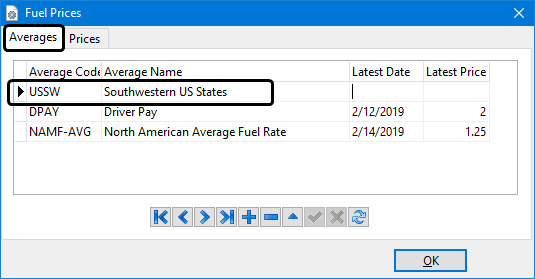
-
Go to the Prices tab.
The Prices tab is used to define the various Fuel Prices for your Fuel Charge Average Codes, based on their Date of entry.
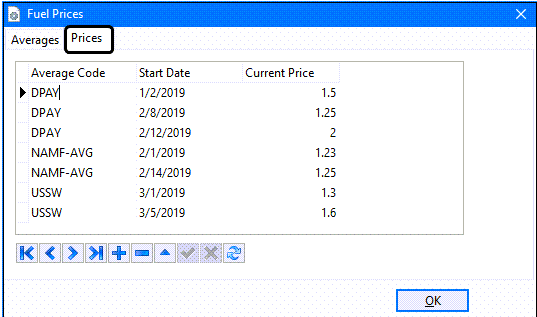
When you choose a specific 'Fuel Average Code' in the Current Fuel Price Percentage grid, the system will automatically use the Fuel Price listed here based on the dates specified in the 'Start Date' and 'End Date' Date Range on the grid.
If the 'Price From' and Price To' Range is also specified on the Current Fuel Price Percentage grid, the system will choose the correct price data for the Average Code based on both the 'Start Date' and 'Price' information within this Prices tab.
-
Click
Insert. -
Make the appropriate entries to these fields:
Required field: *
Field Definition Average Code *
To enter a price manually, double-click and select an Average Code.
Start Date *
Defaults to today’s date. Double-click this field to display the calendar tool and select a different date.
Current Price *
Defaults to zero. Enter the fuel price associated with the Start Date.
Note: All the prices entered into the Prices tab are kept as reference points. Calculations in the Accessorial Charges Details grid using the average code will use the appropriate price based on the freight bill date. For example, if prices were entered on Jan 5th and Jan 10th and the freight bill is dated Jan 7th, it will use the Jan 5th price.
-
Click
Post to save.If you return to the Averages tab, you will see the Latest Date and Latest Price values will reflect the most recent entries from the Prices tab.
-
Click OK to close the window.
Vendors button
The Vendors button is used to assign accessorial charges to specific vendors. The button is only enabled if the Vendor Code checkbox for this accessorial charge is selected.
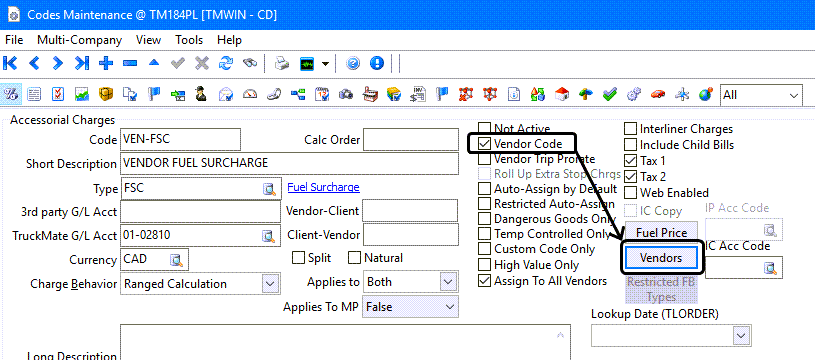
| To be able to access the Vendor button, you need to have the Application Configurator program > RATES.EXE > Vendor Acc Codes option set to True. If set to False, the button is hidden. |
Assigning all vendors to an accessorial charge
-
Go to Profiles > Codes Maintenance > Accessorial Charges tab.
-
Go to the accessorial charge.
-
Select the Auto-Assign by Default checkbox.
-
Ensure the other header settings and the entries in the accessorial charge details grid are set appropriately so that this charge will be associated with an appropriate set of vendors. Even if the Auto-Assign by Default checkbox is selected, you can still setup additional criteria to restrict which vendors this accessorial charge will be associated with based on a variety of criteria such as zone, service level, commodity, client ID, etc…
-
This means you have the option of assigning a charge to everyone and then indicate the exceptions.
| You can override this auto-assigned charge for a specific vendor. Go to the Rates Maintenance program, select a vendor and set the Auto-Assign value from True to False. The Auto-Assign OverRidden column indicates if the Auto-Assign by Default function has been manually overridden. |

Conversely, you can also set the Auto-Assign from False to True for charges that have not been auto-assigned or manually associated already with this charge. For a specific vendor (or client), the charge will be assigned automatically based entirely on this Auto-Assign value.
It may be easier to assign a charge to everyone and indicate the exceptions or it may be easier to assign the charge to the few affected vendors and clients.
Assigning specific vendors to an accessorial charge
-
Go to Profiles > Codes Maintenance > Accessorial Charges tab.
-
Go to the accessorial charge.
-
Click the Vendors button. (For an accessorial charge where the Vendor Code checkbox is selected and indicates this charge is only applied to vendors.)
-
The Acc. Charge for Vendors window will appear and display all the Vendors currently associated with this accessorial charge in the list on the right.
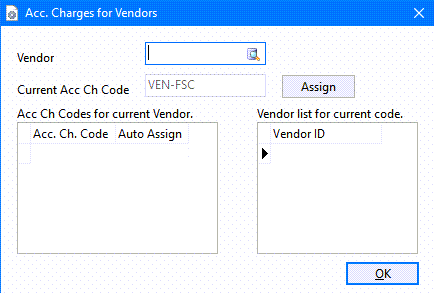
-
Use the
 select pick-list button in the Vendor field to select a vendor from the list.
The Current Acc Ch Code list will display all the accessorial charge codes already associated with this vendor.
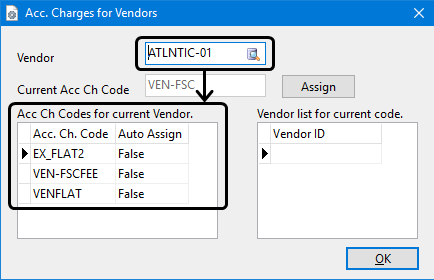
The Vendor list for current code grid displays all the vendors who have been assigned this accessorial charge code. If this is a new charge code, the list would be empty until you use the Assign button.
-
Click the Assign button to assign this accessorial charge code to this vendor.
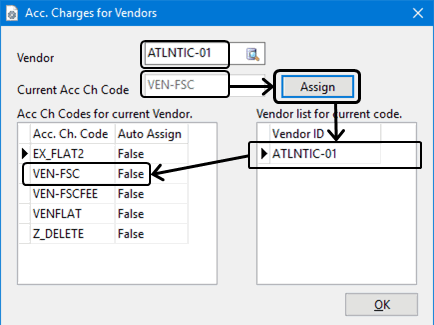
-
Double-click to set the Auto Assign value to True or False to indicate whether this accessorial charge should be added to a freight bill automatically. (It will default to False.)
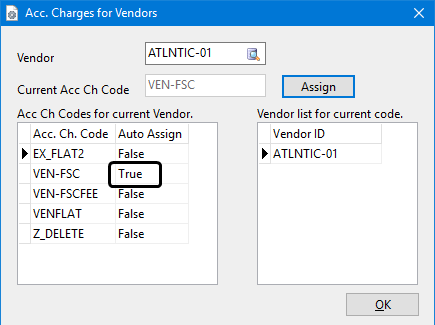
-
Click OK to save your changes and close the window.
When Auto Assign is set to False, the accessorial charge can still be manually added later to a freight bill for this vendor using the
Insert function on the Customer Service program > I/P tab > Extra sub-tab.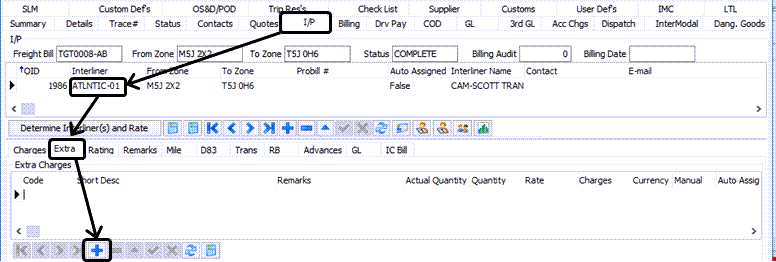
Restricted FB Types button
The Restricted FB Types button is used to determine which types of freight bills will be allowed to use this accessorial charge. The button is only enabled if the Restricted Auto-Assign checkbox for this accessorial charge is selected.
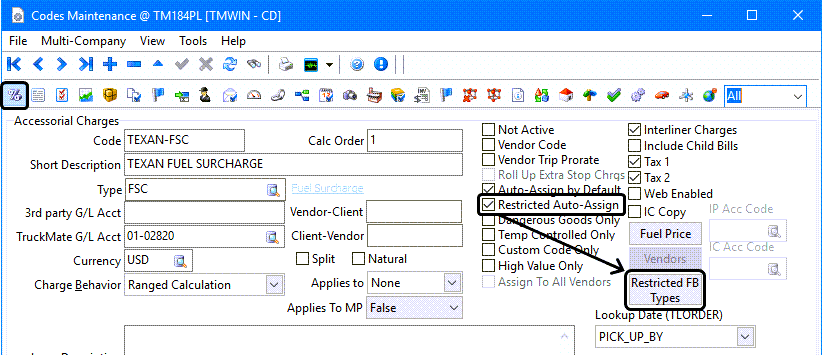
Restricting which freight bills can use a specific accessorial charge
-
Go to Profiles > Codes Maintenance > Accessorial Charges tab.
-
Locate the accessorial charge that should not be applied to all freight bill types.
-
Select the Restricted Auto-Assign checkbox. (The Restricted FB Types button will be enabled.)
-
Click the Restricted FB Types button.
-
The Restricted Auto Assign Accessorial Charges window is displayed listing which freight bills will be allowed to use this accessorial charge in the list on the left.
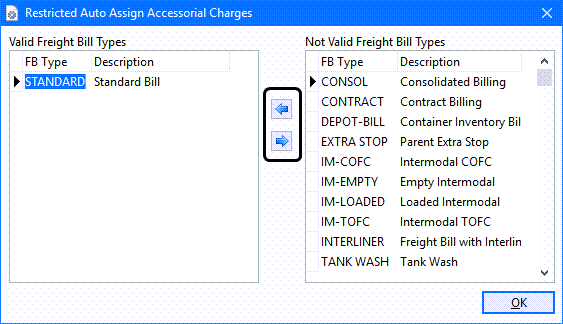
-
Use the 'Right' and 'Left' arrows to determine which freight bill types will appear in the Valid Freight Bill Types grid.
An accessorial charge using the Restricted Auto-Assign checkbox can only be assigned to freight bill types listed the Valid Freight Bill Types grid on the left.
The freight bill types indicate how the freight bill was created. For example, STANDARD indicates a freight bill that was created by clicking Insert on the Customer Service window and TANK WASH freight bill was created by clicking the Create Invoice button on the main window of the Tank Wash program. (These freight bill types are hard coded within the TruckMate programs and are not user configurable.)
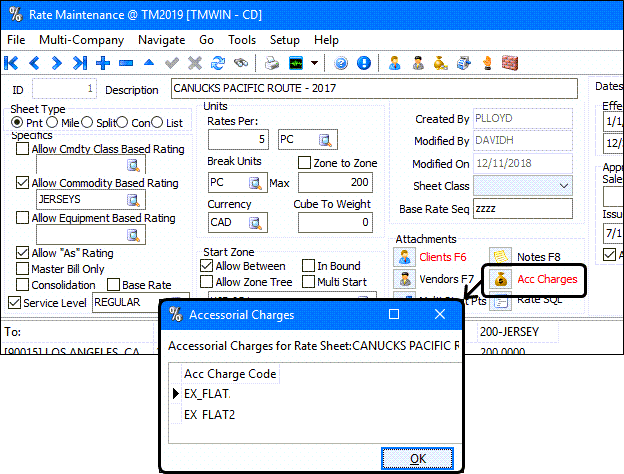
Associating accessorial charges to specific rate sheets
You can set up an accessorial charge so that it only applies when specific rate sheets are being used for the freight bill. You can make this association between one or multiple rate sheets.
-
Go to Profiles > Codes Maintenance > Accessorial Charges tab.
-
Go to the accessorial charge.
-
Double-click the Rate Sheet ID field to display the Rate Sheets entry form where you can add one or more rate sheets.
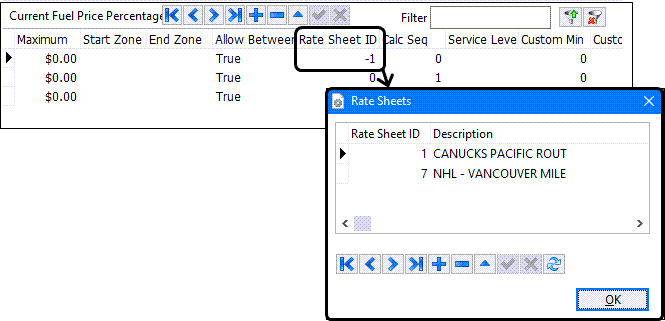
Note: If there are multiple rate sheets assigned, a negative one is displayed in this field.
You can see which accessorial charges are associated with specific rate sheets within the Rates Maintenance program. (Rating > Rates Maintenance program > Go menu > Rate Sheets)
When looking at the Rate Sheet details window, click the Acc Charges button to see a list of accessorial charges liked to this rate sheet. (The button label text will appear in red to indicate there are one or more accessorial charges explicitly associated with this rate sheet.)