AR Cash Receipts Entry

The AR Cash Receipts Entry program is used to record payments from customers (as configured in the Customer & Vendor Profiles program) and from miscellaneous cash sources (who do not require an existing profile). Payments recorded in Cash Receipts are updated into AR and the GL by the Cash Receipts Register program.
The main program screen has two main divisions: The Freight Bill Cash Entry Tab is used to record payments from customers who show outstanding bills in the AR Inquiry program. The Misc Cash Entry Tab is used to record payments from miscellaneous sources. No customer codes or invoices are required to process these payments.
There are four available Tabs in the AR Cash Receipts Entry program. These are: Bills, Applied, GL, and GL Sum. Users will have access to these Tabs depending on their settings in the Security Setup program > Security Tab > Tab Settings section.
A new option has been added to the AR Cash Receipts Entry program for 'Post Dated checks'. For those of you entering post-dated checks, you can enter the amount, and select a new checkbox called 'Post Dated checks'. The next time you open the AR Cash Receipts program, you’ll be offered a reminder notice to deposit any post-dated checks dated today.
To access AR Cash Receipts:
| From this location | Go to |
|---|---|
TruckMate Menu and TruckMate Task List |
Accounting & Finance > Accounts Receivable > AR Cash Receipts |
Windows Start Menu |
TruckMate 20xx > AR Cash Receipts |
Windows Explorer |
C:\Program Files (x86) > TruckMate 20xx > Aratx.exe |
What’s new in Cash Receipts
AR Cash Receipts - Import will convert currency (TM 2021.1)
The AR Cash Receipts (Arrce.exe) program previously notified the user if the currency of the cash receipts being imported did not match the Accounts Receivable summary currency, but it did not convert the amount of payment as a result.
When you drill down on the payments, the 'Payment' column is now displayed in the currency of the AR, and additional columns on the right were added to reflect the AR information converted to the cheque’s currency.
If it is a cash receipt that is being matched to freight bills by the 'Reference on AR Record' (ie. a Trace number on the bill), you will see the individual bills with the AR converted to the cheque’s currency on the right.
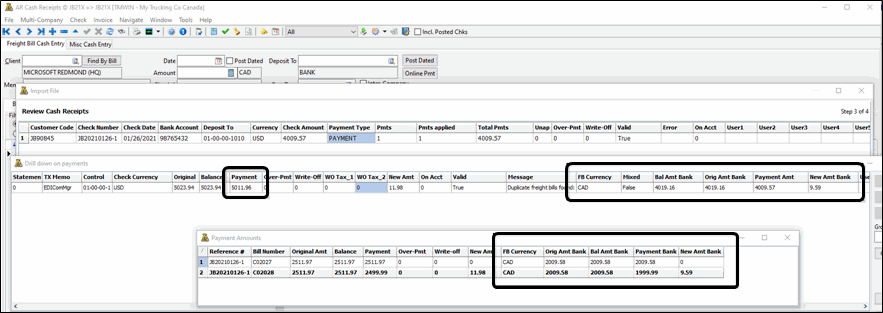
As a result, your imported cash receipts with differing currency should import being balanced.

Document Imaging
Third-Party Document Imaging solutions may be used with the AR Cash Receipts program as long as they are setup correctly for your specific Imaging Vendor in the Codes Maintenance program > Imaging Tab. Once you have enabled document imaging access on a particular field within one of the AR Inquiry program Grids, you can right-click to access the imaging options (as they have been named in the Codes Maintenance program).
| In Image Indexing mode, when users open an image for indexing, a lock for this image will be enforced. As a result, other users cannot open this image for indexing purpose. The lock will be released once users post TruckMate information to Synergize, skip the image or exit indexing mode. To monitor image locks and release locks that cannot be auto-released (in case unexpected shutdown or users terminate TruckMate abnormally), users can open the Codes Maintenance program > Imaging > Microdea > Workflow Tab > Locks Tab. Erroneous locks can be removed from the list. If a document is locked by a user, that user can still open the document without requesting removing locks but other users would have to have locks removed. |
AR Cash Receipts Entry has access to Invoice Imaging, which can also be used with the 'Auto-Indexing' Image Functionality available from the Toolbar.
Auto-Indexing Document Images
Users with Microdea’s Synergize Document Imaging system can select this option to enter into Auto-Index Imaging. The Workflow configured for the AR Cash Receipts program (ARRCE.EXE) will be used, depending on the settings configured in the Codes Maintenance program > Imaging Tab > Microdea > Workflow Tab.
While using Auto-Indexing mode, the Document Images in the Workflow can be navigated through, using the keyboard.
| At any point while using the Synergize Image Indexer, you can use the <Ctrl><W> hot key combination to write the Workflow information to Synergize. When not in Synergize Index mode, <Ctrl><W> will behave as normal, accessing the 'On Account Payments' option. |
EDI 820 In Imports
Users have the ability to import Freight Bill Details into the Cash Receipts program via EDI 820 In messages. When the AR Cash Receipts Entry program is started, it will automatically check the default location for EDI 820 messages, and will notify the User if any are present. Choose to import the file instantly. Step through the required import scenario and make sure that the data contained within the import file is imported as an AR Cash Receipts header, and that payments are applied to the Freight Bills contained within the import file. If you wish to import EDI 820 Ins while working within the AR Cash Receipts program (after it has been loaded), you can do so by using the 'Tools Menu > Import File' option, just like with regular .CSV imports.
AR Cash Receipts will store the EDI 820 Import Reference numbers in the IMP_EDI_REF Table. Make sure to review all the errors encountered, if any, on the Import FB Tab.
| For EDI 820 In messages to be imported correctly by the AR Cash Receipts program, the User must configure the EDI Profile for 820 Ins correctly. See the EDI Communications Manager program > 820 In Tab for more information. |
How Do I?
How do I record a Payment from a Customer?
The AR Cash Receipts program is used to record payments from customers and from miscellaneous cash sources. The AR Cash Receipts Register program is used to update the entries made in the AR Cash Receipts program.
-
Open the AR Cash Receipts program (ARRCE.EXE).
-
Use the "+" button to add a new record.
-
Select the "Freight Bill Cash Entry" tab
-
Under the Customer ID field, select the search to search for your customer name. Once the search field opens, enter the first letter of the customer’s name for faster referencing. For example, if you’re looking for "TMW", enter an 'T' in the filter field. Highlight the correct customer name.
-
Enter any relevant memo information.
-
Select the correct date of payment. Enter the amount of payment and the corresponding check number.
-
Make sure the "Deposit To" account is set up to go to the correct bank account. Select the search for more options.
-
Enter "Payment" in the Payment type field.
-
In the "Invoices" area, select the appropriate radio button to locate the invoice you’re planning on applying payment to. For example, select "Client" to display all outstanding invoices for the customer selected in the header. Or, select "Client All" to display all applied, paid and outstanding invoices for the selected customer. Selecting "Out" will display all unpaid invoices for all clients, and selecting "All" will display all invoices, paid and unpaid, for all clients.
-
If you are seeking an invoice that is date specific, modify the to and from date fields.
-
Select the "Bills" tab, and locate the invoice you’d like to apply this payment to in the grid below. Simply highlight the freight bill number (or other account number), and use your context menu. You can pay the entire outstanding amount, a particular statement, or enter an ON-ACCOUNT payment.
-
Once payment is applied, the bill number information in the grid will become greyed out.
-
Next, run the Cash Receipts Register program, which is used to post cash receipts entered in the AR Cash Receipts program. The posting process generates entries in the GL Journal Entries program. The register also updates the status of invoices to paid, and updates customer account balances.
How do I apply an On-Account Payment?
Open the AR Cash Receipts program (used to record payments from customers and from miscellaneous cash sources). The AR Cash Receipts Register program is used to update the entries made in the AR Cash Receipts program. The program allows for an On Account Payment for when:
-
Payment Amount is greater than the outstanding balance on the invoice;
-
Cheque Amount is greater than the total Payment Amount; and
-
Cheque Amount is an On Account Payment. (Only allowed if the user has checked the Apply On-Account Credits box.)
This is a specialized process of applying an on-account payment from a customer who has over-paid. Here’s how you would deal with this situation.
-
Open the AR Cash Receipts program (ARRCE.EXE).
-
Create a Header record, but enter an imaginary check number. The amount of the check is zero.
-
Double-click on the "On Account" transaction in the Grid.
Note: The "Total to Apply" (in the top right section of the screen) will increase by the amount of the "On Account" transaction. Proceed with invoice selection.
-
You can also apply "On Account" amounts when you process checks from customers. In that circumstance, enter the header information according to the check you received, and then double-click on the "On Account" item in the grid. The "Total to Apply" (in the top right section of the screen) will increase by the amount of the "On Account" transaction. Proceed with invoice selection.
Note: You can enter multiple 'On Account' transactions for a specific payment on the same day, the system will generate a letter sequence for each transaction ('Bill Number') on a specific day. For example suppose that multiple transactions took place on September 13, 2011, first transaction could have 'QA110913A' as the Bill Number so then the second would be 'QA110913B' and the next would be 'QA110913C' and so on and so forth for all 'On Account' transactions on the same day.
How do I adjust my Customer’s account to show it’s Paid in Full?
The AR Cash Receipts program is used to record payments from customers and from miscellaneous cash sources. The AR Cash Receipts Register program is used to update the entries made in the AR Cash Receipts program.
-
Open the AR Cash Receipts program (ARRCE.EXE).
-
Select the "Freight Bill Cash Entry" tab.
-
In the Customer ID field, use the search to locate the customer you wish to apply payment for. For example, if I’m looking for customer information about TMW, I would simply enter an 'T' into the filter and all TMW information would appear in the top grid area.
-
In the memo field, you can record free format notes about the payment in this field. This is for informational purposes only.
-
Enter the Date of payment. This field will default to today’s date. Select a different date from the calendar selection form, invoked by clicking on the down arrow.
-
Enter the total amount of the payment.
-
Enter the check number for the payment.
-
Enter the bank account to which this payment will be deposited, or select a bank account from the drop down list box. Only GL accounts of the type "Bank" are available for selection here. GL accounts are configured in the GL Chart of Accounts program.
-
Enter the payment type. By default, the payment type is the A/R Transaction code that is the default for the Payment category. Transaction codes are configured in the A/R Transaction Types program. You can select other transaction codes of the Payment type from the drop down list box. The GL Code attached to the transaction code is not used, as the bank account is specified in the Bank field.
-
Select the "Bills" tab, and then highlight the invoice you would like to apply payment to, in the grid below. Use your context menu, and select "Pay Outstanding Amount". Double-clicking the invoice in the grid achieves the same outcome.
How do I process an Overpayment or Partial Payment?
Processing an overpayment or partial payment is done in the AR Cash Receipts Entry program.
Processing of a Partial Payment:
-
Open the AR Cash Receipts program (ARRCE.EXE).
-
Enter the Customer code in the "Customer ID" field or select the search button to make a choice from the database.
-
Select the account the money will be deposited into, i.e. different bank accounts, etc.
-
Enter the amount of the check/cash in the "Amount" field.
-
Enter the Check number in the "Check No." field.
-
Select the "Save" button on the navigator bar and the grid will then be populated with the customer’s outstanding invoices.
-
Go to the desired invoice number- where the partial payment is to be applied to- and click once in the "Payment Amt" field.
-
Enter the amount of the partial payment in this field and change lines. The line will then turn grey.
-
The system will then ask if the remainder of the Invoice is to be written off - click "Yes" or "No" and the payment is applied.
Note: Don’t forget that this will not be complete until the AR Cash Receipts Register is run.
Processing an Overpayment:
-
Open the AR Cash Receipts program (ARRCE.EXE).
-
Enter the Customer code in the "Customer ID" field or click on the search button to make a choice from the database.
-
Select the account the money will be deposited into, i.e. different bank accounts, etc.
-
Enter the amount of the check/cash in the "Amount" field.
-
Enter the Check number in the "Check No." field.
-
Select the "Save" button on the navigator bar and the grid will then be populated with the customer’s outstanding invoices.
-
Double click on the Invoice(s) to be paid. This will leave an amount in the "Unapplied" section of the Cash Receipts screen.
-
Use your Context Menu (right-click) and select "On Account Payment." The shortcut key is '<Ctrl>+<A>'.
-
The system will then auto-generate a new bill number. This can be modified, if necessary.
-
Enter the amount in the "Amount" field.
-
Choose the A/R control account this overpayment will be deposited into.
-
Optional-Enter a reference number.
-
Select "Save".
Note: Don’t forget that this will not be complete until the AR Cash Receipts Register is run.
-
How do I Record a Payment from a Miscellaneous cash source?
The AR Cash Receipts program is used to record payments from customers and from miscellaneous cash sources. The AR Cash Receipts Register program is used to update the entries made in the AR Cash Receipts program.
-
Open the AR Cash Receipts program (ARRCE.EXE).
-
Select the 'Miscellaneous Cash Source' Tab.
-
Select the "+" button from the navigation bar and enter the name the payment was received from.
-
Record free format notes about the payment in this field. This is for informational purposes only.
-
Enter the Date of payment. This field will default to today’s date. Select a different date from the calendar selection form, invoked by clicking on the down arrow.
-
Enter the total amount of the payment.
-
Enter the check number for the payment.
-
Enter the bank account to which this payment will be deposited, or select a bank account from the drop down list box. Only GL accounts of the type "Bank" are available for selection here. GL accounts are configured in the GL Chart of Accounts program.
-
Enter the payment type. By default, the payment type is the AR transaction code that is the default for the Payment category. Transaction codes are configured in the AR Transaction Types program. You can select other transaction codes of the Payment type from the drop down list box. The GL Code attached to the transaction code is not used, as the bank account is specified in the Bank field.
-
Next, run the Cash Receipts Register program which is used to post cash receipts entered in the AR Cash Receipts program. The posting process generates entries in the GL Journal Entries program. The register also updates the status of invoices to paid, and updates customer account balances.
How do I Import a Batch of Checks into Cash Receipts Entry?
These steps will take you through the use of the Import File window.
-
Open the AR Cash Receipts program (ARRCE.EXE).
-
Click the
 Import File button on the toolbar. The Import File window will display.
 -
Click the 'Browse' button to display a 'file open' window. Browse to the location of the .CSV file you wish to use and double-click it or click it and select 'Open'. The file will be loaded into the window when you click the 'Next' button. The progress bar will show you the progress of the import process. If there are any errors here, you may have to correct the formatting of your import file. To view the proper formatting of the Import File, see below. (Users can double-click on entries/rows to drill down and see more details. This is particularly useful if an entry is giving you an error, and you need to find out more information about which record in the import file is causing the problem. You can drill down two layers.)
-
The Set Payment Options window will appear. Choose the options that you would like to use when importing. Select 'Next'.
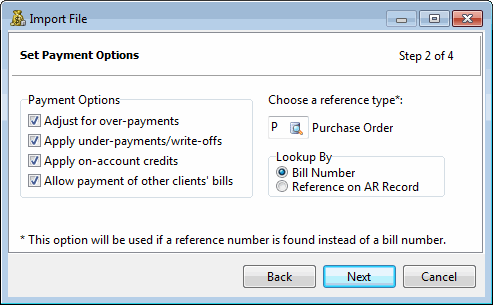
Field Definition Adjust for over-payments
Selecting this option will instruct the system to adjust the values for over-paid bills. This option is used with the 'Apply on-account credits' option. If both options are selected, the excess amounts paid will be recorded in a single on-account transaction.
Apply under-payments/write-offs
This option, if selected, instructs the system to write off the remaining outstanding balances of any underpaid bills.
Apply on-account credits
If selected, this option will record any amounts paid in excess of the outstanding amounts of the bill as an on-account credit. The check number will be used as the on-account credit identifier.
Allow payments of other clients' bills
This option, if selected, allows matching of bill numbers without requiring the client ID to match. This allows having multiple clients' invoices on a single client’s cash receipt.
Choose reference type
If the records in the import file do not identify payments by freight bill number, a reference number and type must be supplied to allow matching to freight bills by looking for trace numbers of the specified type. Use the search button to select the desired type.
Lookup By
These radio buttons allow the user to select whether to use the 'Bill Number' or a 'Reference on AR Record' for looking up payment records.
-
The Review Cash Receipts window will appear. Review the entries that will be added into your system.
-
The Review & Finish window will appear, detailing the number of Checks created, Payments applied, Write Offs and On-Accoutn credits applied (if selected as an 'option' in step 4). Select 'Back' if you want to make any changes or select 'Finish' to complete the import.
Import File Format
The .CSV file that you use to import the batch of checks into Cash Receipts must conform to the following requirements:
-
The file must be comma delimited (.CSV) file format.
-
The file must be a text file containing records stored as one record per row.
-
The record columns are comma delimited.
-
Numeric values do not have quotes. Fractional values should be indicated with a decimal. Null or zero values are indicated as 0.
-
Content: Two types of records may be indicated in the file:
-
Check records, which hold the actual check information. If bill number, reference number, and statement number are blank and payment amount is 0, the wizard will assume the current record indicates a check and not an individual payment.
-
Payment records, which hold the amounts to be distributed from the check to the freight bills. It will be expected by the import that check records will precede their associated payment records. In other words, payment records must follow the check record they are associated with.
-
-
Checks must have associated payment records and vice versa. However, the user will be expected to manually verify that check totals match the payment totals.
Data Fields
| Field | Definition | If the record is a check | If the record is a payment |
|---|---|---|---|
Customer Code |
customer code in TruckMate database |
alphanumeric text up to 10 characters, cannot be blank |
|
Bank Account |
actual bank account number that the funds are deposited to. Whatever’s in this value must match to an 'Account Number' in the GL Chart Of Accounts program > Bank Info tab. This is how the import determines the 'Deposit To' GL Account. |
alphanumeric text up to 50 characters, cannot be blank |
|
Check Number |
check number associated with the deposit |
alphanumeric text up to 15 characters, cannot be blank |
|
Check Date |
date of the deposit, and therefore when the payment is to be applied. Ensure that your system follows the recommended Date Configuration settings. Click here for more information. |
date format is whatever you have set in your Windows > Control Panel > Regional Options. If this option is set for 'English (United States)', date format defaults to mm/dd/yyyy so the date in the import file should match it |
|
Check Memo |
any descriptive text for the check itself |
alphabetic text to 20 characters, blanks allowed |
must be blank |
Check Total |
actual amount on the check itself |
number, may include up to 2 decimal points. Cannot be 0 |
must be 0 |
Freight Bill Number |
TruckMate freight bill number. If provided, the Freight Bill must exist in both AR_SUM and TLORDER tables. |
must be empty |
alphanumeric text up to 10 characters, blanks allowed only if the reference number has a value |
Reference Number |
customer’s reference number to the freight bill. If there is a value here, the user must have selected the 'Trace Type' in 'Choose A Reference Type' in the Set Payment Options window. The import ignores whatever was entered in the 'Freight Bill Number' field and instead looks up the Freight Bill number by the Reference Number. The Freight Bill must exist in both AR_SUM and TLORDER tables. |
must be blank |
alphanumeric text up to 10 characters, blanks allowed only if the bill number has a value |
Statement Number |
billing statement number the customer’s check is to cover. This field will be blank if the customer is not paying by statement. This value is neither validated or used by the import. The Freight Bill Number and/or Reference Number must still be present in the record. |
can be 0 or empty |
number, 0 decimals, 0 allowed |
Payment Amount |
portion of the check amount to be applied to the specified bill number |
can be 0 or empty |
number, may include up to 2 decimal points, cannot be 0 |
Transaction Memo |
any short text specific to the payment of the individual bill |
must be blank |
alphanumeric text up to 40 characters, blanks allowed |
Menu Bar / Toolbar
File Menu
Print Reports
 Selecting the Print Reports button will bring up the report selection window, common to many TruckMate applications. Here, you will select a report file from those available in your system and a Crystal Report will be generated.
For more information on Report functionality in TruckMate, see the Crystal Reports Reference.
Exit
 Selecting this option will close the AR Cash Receipts program.
Multi-Company Menu
For more information on the Multi-Company options available from the Menu Bar, see the Multi-Company documentation.
Navigate Menu
Here you’ll find the standard TruckMate Navigational bar options (also available on the Toolbar), with one other button:
Find
 Click this button to search for a specific Cash Receipt record using a variety of criteria.
Check Menu
Calculate Amount
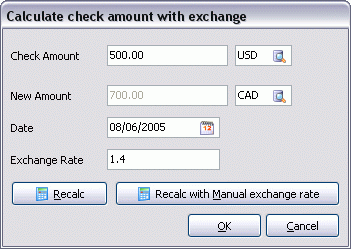
![]() You’ll notice on the toolbar menu above the 'Amount' field, there is a small calculator. Selecting this calculator opens the Calculate check amount with exchange window that helps you convert a check from one currency to another.
You’ll notice on the toolbar menu above the 'Amount' field, there is a small calculator. Selecting this calculator opens the Calculate check amount with exchange window that helps you convert a check from one currency to another.
-
Check Amount / New Amount
The 'Check Amount' field will populate with the value from the Header’s 'Amount' field, but is editable. To change the Currency values to the right of the 'Check Amount' and 'New Amount' fields, click the search buttons.
-
Date
To Choose a 'Date' simply select the calendar button. An 'Exchange Rate' will populate based on the Date selected.
-
Recalc / Recalc with Manual Exchange Rate
Select the 'Recalc' button after changing the 'Check Amount' value to Recalculate the 'New Amount' value. You may enter a manual 'Exchange Rate', but you must then use the 'Recalc with Manual Exchange Rate' button.
Select 'OK' when you are done calculating.
Check Balance
![]() This button is used to see if the current checks are 'Balanced'. When the 'Unapplied' and 'Total to Apply' fields are both at '0', this button will be selected automatically, and will set the 'Balanced' value to 'True'.
This button is used to see if the current checks are 'Balanced'. When the 'Unapplied' and 'Total to Apply' fields are both at '0', this button will be selected automatically, and will set the 'Balanced' value to 'True'.
Validate Applied Checks
![]() Clicking this button will Validate the selected checks in the grid.
Clicking this button will Validate the selected checks in the grid.
Balance Check
![]() Clicking this button will balance any discrepancies that are within '$0.05' difference.
Clicking this button will balance any discrepancies that are within '$0.05' difference.
GL
![]() Is used to generate a report that checks the entry for balance. The report will contain amounts that will be distributed to the selected accounts.
Is used to generate a report that checks the entry for balance. The report will contain amounts that will be distributed to the selected accounts.
Save Bank as Default
![]() Clicking this button when a GL Account is selected in the 'Deposit To' field will cause that GL Account to become the Default Bank.
Clicking this button when a GL Account is selected in the 'Deposit To' field will cause that GL Account to become the Default Bank.
Save Date as Default
![]() Clicking this button when a Date is selected in the Header 'Date' field will cause that Date to become the Default Date for all checks created.
Clicking this button when a Date is selected in the Header 'Date' field will cause that Date to become the Default Date for all checks created.
Invoice Menu
Discount or Write-Off
Selecting this option will open the Discounts and Write-Offs window, which displays the default discount amount for the selected invoice. Default Customer discounts are configured in the Customer & Vendor Profiles program > Credit Info Tab.
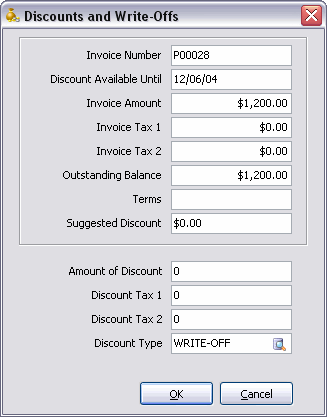
This window can be used to create manual discounts or write-offs. If the User enters an overpayment while using the 'Enter Payment Amount' option, this window will pre-populate with values depending on if the user selects the 'Overpayment' or 'Write-Off' option. See the 'Enter Payment Amount' option for more information.
-
Amount of Discount
Enter the amount that you wish to discount the invoice in the Amount of Discount field. -
Discount Type
Select a Transaction Code (as configured in the A/R Transaction Types program) from the Discount Type drop down list box.
Pay Outstanding Amount
Will pay the outstanding amount of the invoice, as displayed in the Balance column. Notice that the text of the invoice becomes grey, rather than black. You can also pay the outstanding amount by double clicking on the invoice in the grid, or by hitting the space bar on the keyboard when the desired invoice is selected. The amount shown in the Payment Amount column will be updated.
Clear Payment / Discount
Will de-select the invoice, and return the 'Discount Amt' value to zero. You can also double click on a selected invoice to de-select it.
Enter Payment Amount
Enter the payment amount in the field that appears on your screen. Then, select 'OK'. If you are paying an amount in full, you’ll notice the invoice will now be grayed out. If the amount entered is not the same as the amount due on the account, there can be other options, depending on if there is an overpayment or underpayment:
-
Underpayment: the program will check the 'Underpayment Threshold' value (as configured in the Security Setup program). If the amount entered is less than or equal to the threshold amount, the program will automatically create a Write-Off amount.
If the amount is greater than the threshold amount, a prompt will appear asking to Write Off the outstanding balance. If the User selects 'Write Off', the Discounts and Write-Offs window (see above) will appear with 'Write-Off' transaction type defaulted.
-
Overpayment: the program will check the 'Overpayment Threshold' value (as configured in the Security Setup program). If the amount entered is less than or equal to the threshold amount, the program will automatically create a Write-Off with a revenue account defaulted.
If the entered amount is greater than the threshold, the program will bring up the Overpayment form, where user can choose between an 'On-Account' or 'Write-Off' transaction type.
Enter Payment in Check Currency
This is set up for those times when the account may be in one currency, and your accounting system may be in another currency. Using this option will pay the dollar amount in the customer’s currency.
Pay By Statement
-
Client Statements
Select this option to display all statements that have been assigned to the customer’s account. Double click on the statement that you wish to pay. All the invoices assigned to that statement will have their outstanding amount paid. -
By Statement Number
Select this option to display a specific statement. Enter the statement number you wish to pay in the field at the top, then click the button to the right to display information about that statement. Click the Pay Statement button to select that statement for payment.
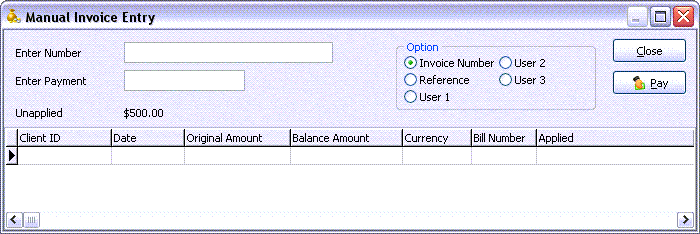
Manual Invoice Entry
To enter a series of payments against Freight Bill numbers that you specify, use the Manual Invoice Entry window. Enter the invoice number you wish to pay in the field at the top, and the amount you wish to pay below (the outstanding invoice amount will default). Use the <Enter> key on the keyboard or the Pay button to pay the invoice, then return to the Enter Invoice Number field and enter another Freight Bill number if desired.
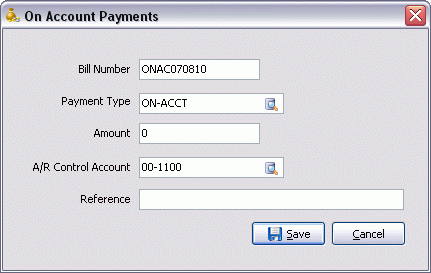
On Account Payments
Use the On Account Payments window to apply an amount to the customer’s account as an 'on account' payment. On account payments are treated as 'negative invoices'. The program allows for an On Account Payment for when:
-
Payment Amount is greater than the outstanding balance on the invoice;
-
Cheque Amount is greater than the total Payment Amount;
-
Cheque Amount is an On Account Payment. (Only allowed if the user has checked the Apply On-Account Credits box.)
| To clear on account payments, you can select them as you would a regular invoice when you next process a check for this customer. Alternatively, you can use the A/R Adjustments program to clear the balance of the on account payments and reduce the balance on one or more outstanding invoices. |
| Field | Definition |
|---|---|
Bill Number |
The default bill number for an on account payment is the text ONAC followed by today’s date. You cannot have two on account payments with the same bill number and check date (the date entered in the header). You can manually change the Bill Number. |
Payment Type |
Defaults to the transaction code (as configured in the A/R Transaction Types program) that is the default category for on account payments. You can select a different transaction code of the On Account Payment type. |
Amount |
Enter the amount of the on account payment. |
A/R Control Account |
Will default to the lowest numbered general ledger account of the type 'Accounts Receivable' that is not a sub-account and is of the same currency as the bank account specified in the header. |
Reference |
You can enter a note about the on account payment in this field. This will be displayed in the Reference columns of the A/R Inquiry and AR Cash Receipts programs. |
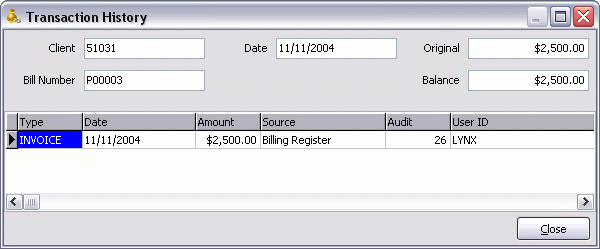
Transaction History
Displays the Transaction History window with the transaction history of the Freight Bill. The fields at the top show details about the transaction from the selected invoice that apply to the selected customer. This grid displays invoices, CODs, COD payments, invoice payments and adjustments.
View FB
This option allows the user to view the selected freight bill. The system will launch the Customer Service program and open the selected freight bill.
Freight Bill Notes
Selecting this option opens the notes form which accesses the notes attached to the Freight Bill, as entered in the Customer Service program > Notes window.
Batch Pay
Selecting this option opens the Batch Select window, where you have additional options for selecting invoices.
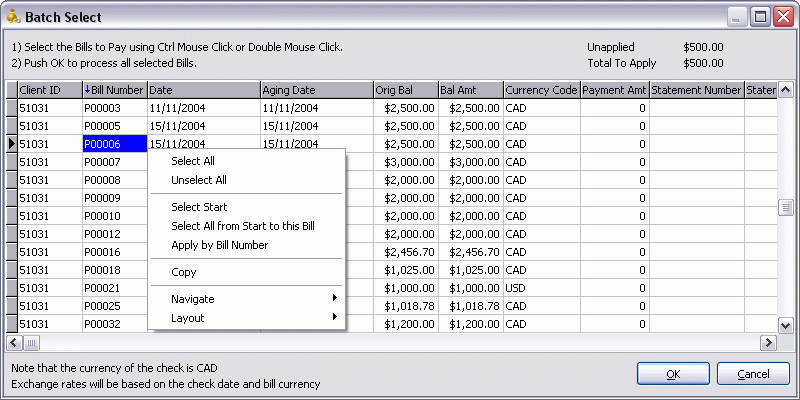
The invoices are sorted in order of invoice number. To pay all outstanding invoices, click the OK button. To select individual invoices you want to pay, hold down the <Ctrl> key and click the invoices with the left mouse button. Click the right mouse button to display a menu of additional options.
Context Menu options:
-
Select All
Will select all outstanding Freight Bills for payment. -
Unselect All
Will de-select all selected Freight Bills, regardless of the method by which they were selected. -
Select Start
To select a range of invoices by invoice number, click on the starting invoice and invoke the Select Start menu option. -
Select All from Start to this Bill
Click on the last bill in the range you wish to pay, then select this menu option to select all bills from the starting invoice to this invoice (inclusively). -
Apply by Bill Number
Select this option to manually enter the invoice numbers you wish to pay. Enter invoice numbers in the Enter Bill Number field. Press <Enter> to select the invoice. The blank form will be re-displayed, so you can enter more invoice numbers.
Tools Menu
TruckMate Monitor
 Click the down arrow next to this button to access the various functions of the new TruckMate Monitor.
Remember Position / Size
Selecting this option will maintain the program window position and size upon close. When the program is re-opened, it will appear the same.
Import File
 Selecting this option will open the Import File window, which will allow you to import a batch of checks (from a .CSV file) into Cash Receipts. For information on completing the Import File process, click here.
Synergize Indexing
 This option is the second step in Image Indexing available for users of TMW-Synergize™ Imaging software. The behavior of the application depends on the selected mode.
If the selected mode is 'View Single Document', when selecting this button, the user will have to select a specific Synergize 'Workflow' (as defined in the Codes Maintenance program > Imaging Tab > Microdea > Workflow Tab). Once the 'Workflow' has been determined, the Image Indexing window will appear with one image in the Synergise image viewer window.
For an explanation of how the Image Indexer behaves while in the 'View Single Document' mode, see this User Case Example.
-
Upon selection of a 'Workflow ID' from the Select Workflow window, TruckMate automatically requests the first available imaged document in the Workflow queue.
-
TruckMate automatically causes the document to display in the Synergize viewer window, and returns a 'Document ID' to TruckMate:
-
A document may not be 'available' if it has already been requested by another user, as Synergize will lock documents once they have been retrieved from the Workflow queue. In this case, TruckMate will move to the next available document.
-
If there are no more documents available in the Workflow queue, a non-error notification will be shown to the user, indicating that processing has been completed.
-
TruckMate will attempt to look up the 'Document ID' from step 1 in Customer Service:
-
If none is found, a new, empty bill will be inserted automatically and left in edit-mode. The 'Document ID' from step 1 will be added as a Trace number.
-
If one is found, it will be displayed in the Customer Service window and left in edit-mode.
-
The user will then Post the Freight Bill (to obtain a TruckMate bill number), and the Indexer will complete the following:
-
TruckMate automatically sends this bill number, the customer ID, and any other trace numbers on the bill to Synergize, which causes the document to be indexed with these values.
-
Depending on the Workflow settings in Synergize, this will cause the bill to be removed from the Workflow queue.
-
Finally, TruckMate automatically requests the next available imaged document in the Workflow queue, and returns to step 2.
If the selected mode is 'View List of Documents', when selecting this button, a grid will popup with a list of available documents. The grid will display columns containing information about each listed document. Filters are available to help the user locate the desired documents easily and quickly. This feature is only available if 'Display Columns' checkbox is selected from Codes Maintenance > Imaging > Imaging Vendor Configuration > TMW-Synergize™ Imaging > Workflow Tab. The user can select the document to be indexed individually via manual selection.
|
In both described Indexing modes, when a user opens an image for indexing, a lock for this image will be enforced. As a result, other users cannot open this image for indexing purpose. The lock will be released once the user posts TruckMate information to Synergize, skips the image or exits indexing mode. To monitor image locks and release locks that cannot be auto-released (in case unexpected shutdown or users terminate TruckMate abnormally), users can open the Codes Maintenance program > Imaging > Microdea > Workflow Tab > Locks Tab. Erroneous locks can be removed from the list. If a document is locked by a user, that user can still open the document without requesting removing locks but other users would have to have locks removed. This functionality is only available for Users with TMW - Synergize software installed and correctly configured, and that have checked the 'Workflow Enabled' flag on the Workflow Tab in Codes Maintenance (see above link). |
Window Menu
Customer & Vendor Profiles
![]() Selecting this option will open an instance of the Customer and Vendor Profiles program.
Selecting this option will open an instance of the Customer and Vendor Profiles program.
AR Cash Receipts Reg
 Selecting this option will open an instance of the AR Cash Receipts Register program.
Help Menu
TruckMate Help
 Selecting this button will open the AR Cash Receipts topic in the TruckMate Online Help file (the page you are currently viewing).
Service Portal
 Selecting this button will open an instance of your default Internet browsing software, with the https://www.tmwcare.com login page displayed.
About
 Selecting this button will open the standard TruckMate About window, which contains important information about the application you are currently using, including its version number (important for support calls).
Toolbar
Synergize Indexing
![]() This option is only available for users of TMW-Synergize™ Imaging software. This option is used in two steps. The first step is selecting the mode. use the drop don list to select one of the available options. The second step would be to perform the indexing by selecting the button (
This option is only available for users of TMW-Synergize™ Imaging software. This option is used in two steps. The first step is selecting the mode. use the drop don list to select one of the available options. The second step would be to perform the indexing by selecting the button (![]() ).
).
The options available in the first step are:
-
Update Synergize Document
This option updates the Synergize database with changes in TruckMate. When you make changes in TruckMate to image information, select this option to reflect the change made in TruckMate in Synergize database.
-
View Single Document
This option activates the 'View Single Document' mode in Image Indexing. When in this mode and the user selects the indexing button (
), the User will have to select a specific Synergize 'Workflow' (as defined in the Codes Maintenance program > Imaging Tab > Microdea > Workflow Tab). Once the 'Workflow' has been determined, the Image Indexing window will appear with one image in the Synergise image viewer window.For an explanation of how the Image Indexer behaves while in the 'View Single Document' mode, see the User Case Example described in Tools Menu above.
-
View List of Documents
This option puts the image viewing process in a different mode. In this mode, users can select a specific document from among a list of documents. When the user selects the indexing button (
) while in this mode, a grid will popup with a list of available documents. The grid will display columns containing information about each listed document. Filters are available to help the user located the desired documents easily and quickly. This feature is only available if 'Display Columns' checkbox is selected from Codes Maintenance > Imaging > Imaging Vendor Configuration > TMW-Synergize™ Imaging > Workflow Tab. The user can select the document to be indexed individually via manual selection.After selecting the mode, the second step can be performed. You can select the indexing button (
) to perform the indexing according to the selected mode in the first step. The indexing step can also be performed from an option in the Tools menu.
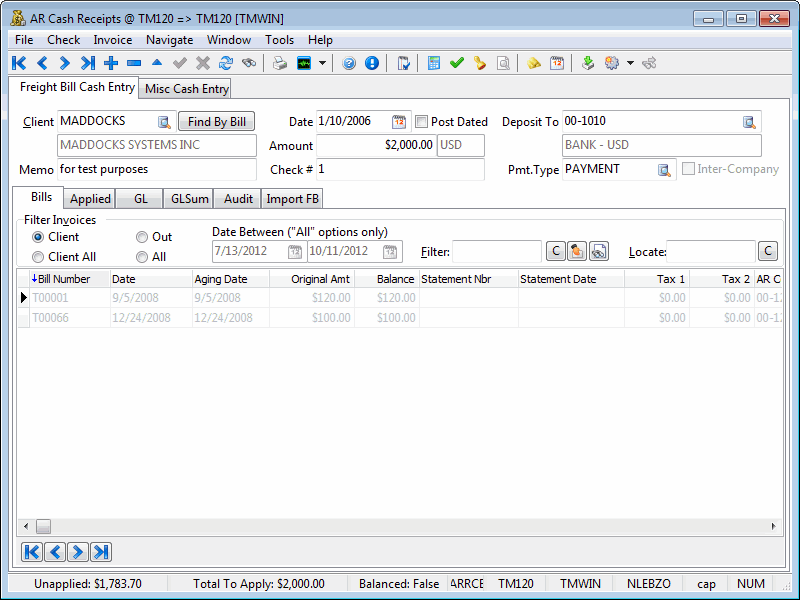
Freight Bill Cash Entry Tab
Payments from customers whom you have billed for transport services are entered in the Freight Bill Cash Entry Tab. This screen is divided into the following areas: cash receipt information and invoice information, which is further divided into these Tabs - available bills to pay, bills where payments have already been applied, GL distribution information, and summary GL information.
Enter information about the check in the top part of the screen. After you have saved your entry, invoices for the selected customer will display in the grid at the bottom of the screen. As you apply invoices to the check, the Unapplied amount displayed in the bottom right corner of the header will decrease.
| The AR Cash Receipts Entry program will automatically generate inter-company records when required. Multiple Inter-Company transactions will be automatically consolidated. |
Header Information
The Header section contains the Client Date, filtering options, and the fields to enter Payments and the GL Accounts that the payments are tied to.
Client
Enter the Customer Code from whom the payment was received. Double click the field or click the search button for a selection form.
The customer name will display below the Customer ID field. Customer codes and names are configured in the Customer & Vendor Profiles program.
Find By Bill
Clicking the 'Find By Bill' button allows you to search for a Customer Code by filtering through Freight Bill numbers. This is useful if you know that a certain Client is associated with a number of Freight Bills in your system. If you select this button when there is no Client ID in the 'Client' field, a pop-up window will appear, asking you to enter a Client ID.
Memo
You can record free format notes about the payment in this field. This is for informational purposes only.
Date
Will default to today’s date. Select a different date from the calendar selection form by clicking the calendar button.
Post Dated
Select this checkbox to track post dated checks. You would enter the deposit amount in the AR Cash Receipts program, and select the checkbox for post-dated checks. The next time you log on to the AR Cash Receipts program, the program will warn you if you have any post-dated checks that are due to be deposited.
| You can also list all 'Post-Dated checks' from the AR Inquiry program, from one of the context menu options. |
Amount
Enter the total amount of the payment. The currency of the Amount will display to in the field to the right.
Check #
Enter the check number for the payment.
Deposit To
Enter the bank account to which this payment will be deposited, or select a bank account by clicking the search button and choosing from a list of GL Accounts on your system. Only GL accounts of the type 'Bank' are available for selection here. GL accounts are configured in the GL Chart of Accounts program.
The name of the GL Account that is selected will appear in the field directly below the 'Deposit To' field.
Payment Type
By default, the payment type is the A/R transaction code that is the default for the Payment category. Transaction codes are configured in the A/R Transaction Types program. You can select other transaction codes of the Payment type by clicking the search button. The GL Code attached to the transaction code is not used, as the bank account is specified in the Bank field.
Inter-Company
Select this flag if the displayed Cash Receipt is an Inter-Company transaction. This flag also allows the user to select Bills (in FB cash entry) or GL accounts (in misc cash entry) from other Companies. If it’s un-checked, the user will be limited to bills and GL accounts in the logged-in Company.
This checkbox will be greyed-out and unavailable for selection if the 'Multi Company' Application Configurator program option is set to 'False' (i.e. you are not working in a Multi-Company environment).
Filter Invoices
Because TruckMate will allow you to apply payments in a number of ways and to more than one customer at a time, the following options are presented.
| Option | Definition |
|---|---|
Client |
Will display all outstanding invoices for the customer the cash receipt is entered against. |
Client All |
Will display all applied, paid and outstanding invoices for the selected customer. Items shown in black text are available for application to this payment, or have already been paid. Items shown in grey have already been applied to the current cash receipt. Items shown in red have been applied to another cash receipt but have not yet been updated through the Cash Receipts Register program. |
Out |
Will display all unpaid invoices for all clients. |
All |
Will display all invoices, paid and unpaid, for all clients. |
Date Between |
If using the 'All' radio button from the previous field, you may specify a Date Range in these two fields to Filter your records. Use the calendar buttons to choose a Start and End Date for your Filter. |
Filter |
The Filter field works in conjunction with the Bill Number column. When you enter a value in the Filter field, only bills that match the data in the Filter field will be displayed. Use the 'C' button to clear information in the filter. Use the 'Filter Fill' button (the middle button) to search for a particular Freight Bill. Selecting 'Filter Fill' will bring up a 'Select Bill Number' dialog box where you can search by bill number, client ID, reference and User 1, 2, or 3. Double-clicking in the filter field will bring up a 'Select Bill Number' dialog box where you can search by bill number, client ID, a reference number, or users 1, 2, or 3 fields. Select the 'Filter by Trace' button to bring up a window that allows the User to search for a Freight Bill by its Trace details. On the Find Freight Bill window that appears, you can select a 'Search By' radio option to limit the Trace search, and if you select the 'Trace Number' radio option, you can select a Trace Number Type from those available in your system (pulled from the TRACE_TYPE Table) as configured on the Codes Maintenance program > Trace Number Types Tab. |
Locate |
The 'Locate' field works in conjunction with the Filter field. That is, you must enter data in the Filter field before you can use the Locate field. To find a specific record, enter characters in the Locate field. As you enter characters, the selection indicator (the black arrow on the left grid margin) will move to the first invoice that matches the data entered in the Locate field. Use the 'C' button to clear any information entered into the 'Locate' field. |
Unapplied
As you apply invoices to the check, the 'Unapplied' amount displayed in the bottom left corner of the main program screen will decrease.
| When the unapplied amount equals '0', the system will automatically select the 'Balanced' button to check for any imbalances. |
Total to Apply
The amount you wish to apply as payment. Displayed next to the 'Unapplied' value at the bottom of your program screen.
Balance
After the Unapplied amount is reduced to '0', the text 'True' or' False' will appear next to this text indicating if the total payments applied balance against the cash receipt amount. If they do not balance, the cash receipt cannot be posted through the Cash Receipts Register program.
| You may receive an error message and be unable to save a cash receipt record if, when attempting to save a cash receipt record, the check number, client ID, and date all match a previous entry. If only the check number and client ID match and not the date, you will only receive a warning message but the cash receipt record will still be saved. |
Outstanding Bills Tab
Use the Outstanding Bills Tab to select invoices or statements for payment, record discounts and write-offs, make On-Acct payments, and view an invoice’s transactions history or Freight Bill notes. Use the right-mouse button to invoke a menu of functions. Filter invoices by selecting a radio button at the top. To select an invoice for payment, you can double click on the invoice entry in the grid, or use the space bar on the keyboard. Double click again to de-select the invoice for payment. To enter a payment different than the balance of the invoice, enter the amount of the payment in the 'Payment Amt' column, then double click to select the invoice. You will be prompted whether you wish to write off the remainder, or whether the invoice should be left open with an outstanding balance. You can enter a discount against an invoice directly into the Discount column. These functions can also be performed using the context menu. For information on handling multiple currencies, see the Foreign Exchange section below.
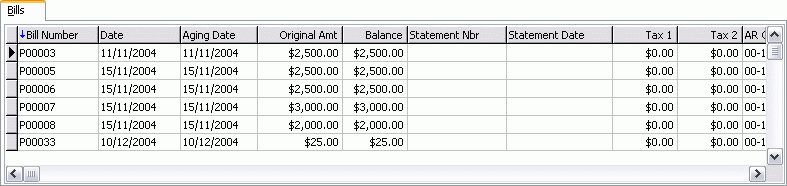
Bill Number
Usually pre-populated from the Customer Service program Freight Bill information. This would be either a manual or system assigned Freight Bill number.
Date
This refers to the Billing Date, and the information is taken from the Customer Service program Freight Bill.
Aging Date
Pre-populated from the A/R billing process. The Aging Date is the date used in any of the aging reports.
Original Amt
Of the Freight Bill, pre-populated from the A/R billing process.
Balance
Calculated based on payment received, and any outstanding adjustments, or write-offs.
Reference
You may enter a Reference value by double clicking within this field.
Customer PO #
You may enter a Customer Purchase Order number by double clicking within this field.
Statement Number
Would pre-populate if you created a statement using the AR Inquiry program.
Statement Date
Would pre-populate if you created a statement using the AR Inquiry program.
Tax 1
Pre-populated from the A/R billing process. This information comes from the original Freight Bill.
Tax 2
Pre-populated from the A/R billing process. This information comes from the original Freight Bill.
A/R Control Acct
Pre-populated from the Customer Service GL Tab.
Currency Code
Pre-populated from the Customer Service program Freight Bill information.
Client ID
Pre-populated from the Customer Service program Freight Bill information.
Reference
Reference information can be manually entered in the AR Inquiry program. Simply double-click on the Reference column and enter in your information.
User fields 1, 2, 3
These are free-form text fields which can be accessed in the AR Inquiry program.
Applied
When you are working in the AR Cash Receipts program, and you apply a payment to an invoice, the amount applied will appear in this column.
A/R Cash ID
When a payment is applied, a system generated ID number is given to this particular check.
Enter Payment
Clicking in the 'Enter Payment' column will bring up a dialog box where you can enter your payment amount to be applied to your selected bill number.
Applied Payments Tab
The Applied Payments Tab in the AR Cash Receipts program allows you to show all transactions that have been applied- even if they are write-offs. The 'Applied' Tab has a 'Manual GL' column. Double-click to change this to 'True' if you want to change the posting of the GL entries for that transaction on the GL Tab. The default setting is 'False'.

Client ID
Pre-populated from the Customer Service Freight Bill information.
Bill Number
Usually pre-populated from the Customer Service Freight Bill information. This would be either a manual or system assigned Freight Bill number.
Trans Type
Describes the type of transaction (i.e., payment, write off, etc.,) using the 'Types' set up in the A/R Transaction Types program.
Date
Refers to the check Payment date, as taken from the header record in the AR Cash Receipts program.
Amount
Payment amount as specified.
User ID
Refers to the User that entered the A/R Cash Receipt payment. User names are configured in the Security Setup program.
Reference
Reference information can be manually entered in the AR Inquiry program. Simply double-click on the Reference column and enter in your information.
Tax 1
Pre-populated from the A/R billing process. This information comes from the original Freight Bill.
Tax 2
Pre-populated from the A/R billing process. This information comes from the original Freight Bill.
A/R Control Acct
Pre-populated from the Customer Service GL Tab.
Functional Amount
The amount of the transaction converted to base currency (i.e., where CDN is base, US = 1.5. The Payment/Adjustment is $100 US, and this will calculate and display as $150.00 CDN).
Currency
Pre-populated from the Customer Service Freight Bill information.
Manual GL
On the GL Tab, a user can override the GL information and change it from an automatically setup account to a manually entered account. If this is set at 'True', then they have been changed, and if set at 'False', then they have not.
General Ledger Tab
The General Ledger Tab in the AR Cash Receipts programs allow you to view every journal entry created with every transaction. Scroll through the these entries by using the left navigation bar, or by going back to the Applied Tab and selecting another transaction line.
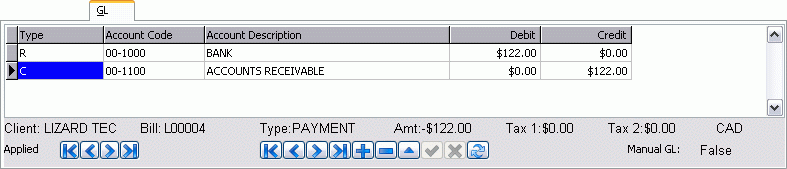
Type
Enter R=Revenue, C=A/R Control Account, F=Foreign Exchange account, 1=Tax 1, 2=Tax 2. These values are generated by the procedure, thus making it easier for a user to see what part of the entry is being generated automatically by the procedure.
Account Code
Pre-populated from the Customer Service GL Tab. This column can be manually edited.
Account Description
Pre-populated from the Customer Service GL Tab.
Debit
As per your debit entry specifics.
Credit
As per your credit entry specifics.
![]()
I/C, F/X, and F/X on I/C Checkboxes
These three checkboxes allow you to optionally hide some or all of the auto-generated GL (inter-company and foreign exchange). The (read-only) auto-generated rows are also colored so, if you do display them, it is easier to pick out the "manual" (user-entered) rows (in black). These checkboxes are only visible if the system is set up for multi-company.
All/None Buttons
These two buttons allow you to set all three of the previous checkboxes (I/C, F/X, and F/X on I/C) at once. These checkboxes are only visible if the system is set up for multi-company.
GL Summary Tab
The GL Summary Tab in the AR Cash Receipts program allows you to review the summary entries that will be posted for this cash receipt by the Cash Receipts Register program. It shows totals by account for all accounts referenced on all payments in the GL Tab.
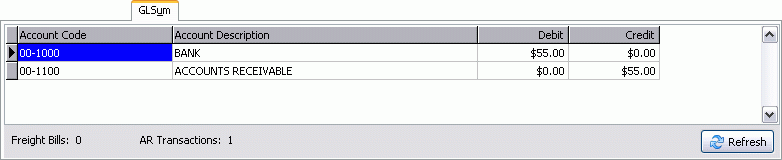
Account Code
Pre-populated from the Customer Service GL Tab. This column can be manually edited.
Account Description
Pre-populated from the Customer Service GL Tab.
Debit
As per your debit entry specifics.
Credit
As per your credit entry specifics.
Freight Bills
Displays the number of Freight Bills in the grid.
AR Transactions
Displays the number of A/R Transactions in the grid.
Refresh
When changes are made in other Tabs, clicking the 'Refresh' button will populate any new GL entries into this grid.
![]()
I/C, F/X, and F/X on I/C Checkboxes
These three checkboxes allow you to optionally hide some or all of the auto-generated GL (inter-company and foreign exchange). The (read-only) auto-generated rows are also colored so, if you do display them, it is easier to pick out the "manual" (user-entered) rows (in black). These checkboxes are only visible if the system is set up for multi-company.
All/None Buttons
These two buttons allow you to set all three of the previous checkboxes (I/C, F/X, and F/X on I/C) at once. These checkboxes are only visible if the system is set up for multi-company.
Foreign Exchange
When the currency of the Bank account specified in the header differs from the currency of the Invoice, a Foreign Exchange calculation is performed. The factor for the foreign exchange calculation is determined by the Currency Rates entered on the GL Chart of Accounts > Currency Tab. The exchange rate entered for the date that most closely precedes the check date will be used. There are three methods of performing the currency conversion, depending on the method by which you select invoices for payment.
For a description of the GL postings created from foreign exchange transactions, see the AR Cash Receipts Register documentation.
| If you setup inter-company (I/C) accounts for each currency (in the Company Profiles program), then you will see I/C amounts generated in both related companies in the cash receipt currency (with an additional GL row for the f/x on the I/C amount where applicable). If you still have only one I/C row, then the 2 amounts (if f/x applicable) will be combined into a single row (converted to the GL account company’s base currency). Either way, if you have set up different exchange rates in different companies, then the exchange rate used in each f/x calculation will now correctly be the one from the given company (previously, all f/x calculations for all rows were done using the rate in the login company, regardless of GL account company). |
Selecting invoices by double-clicking or using the Pay Outstanding Amount menu option
When you select an invoice whose currency differs from the header currency, you will be prompted whether you wish to write off the difference between the converted payment amount and the outstanding invoice amount. If you choose not to write off the difference, the payment amount from the header (for the same amount as the invoice) will be converted to the invoice currency. The invoice will remain open with an outstanding balance equal to the difference. For example:
Invoice: $100 CDN, Payment $100 US, exchange rate 1.32
$100 US * 1.32 = $132 CDN |
Payment amount * exchange factor = payment converted to invoice currency |
$132 CDN - $100 CDN = $32 CDN |
Converted payment amount - invoice amount = exchange differential, outstanding positive balance on invoice, that is, an overpayment in CDN funds |
If you choose to write off the difference, the invoice amount is converted to the header currency, the payment amount from the header is applied, and the difference is treated as a write off.
Invoice: $100 CDN, Payment $100 US, exchange rate 1.32
$100 CDN / 1.32 = $75.76 US |
Invoice amount / exchange factor = invoice converted to check currency |
$100 US - $75.76 US = $24.24 US |
Payment amount - converted invoice amount = write off amount in check currency, a positive write off, that is, an overpayment in US funds |
Selecting invoices by Batch Pay or Pay by Statement methods
When you pay invoices by the Batch Pay or the Pay by Statement methods, if there are invoices included that are of a different currency than the check currency, the invoice amount is converted to the check currency, the payment is applied, and the difference is left as an Unapplied amount. For example:
Invoice: $100 CDN, Payment $100 US, exchange rate 1.32
$100 CDN / 1.32 = $75.76 US |
Invoice amount / exchange factor = invoice converted to check currency |
$100 US - $75.76 US = $24.24 US |
Payment amount - converted invoice amount = unapplied check amount |
Audit and Import FB Tabs
The Audit Tab is read-only and displays the User and Date information for informational purposes. There are four fields, detailing the 'Created By' and 'Last Modified By' User, along with the respective Dates for these two fields.
The Import FB Tab lists the details (and any errors) associated with Freight Bills that have been imported using the Tools Menu > 'Import File' process. The details are pulled directly from the IMP_FB Table in the TruckMate database.
Miscellaneous Cash Entry Tab
The Misc Cash Entry Tab is used to enter cash receipts that are not tied to outstanding Accounts Receivables accounts.
Header Information
The Header section contains the Client Date, filtering options, and the fields to enter Payments and the GL Accounts that the payments are tied to.

ID
Enter a Customer ID or select one by clicking the search button.
Name
The Customer Name field will automatically populate based on the 'Customer ID' selected above.
Date
Enter the Date of the cash receipt, or click the calendar button to select a Date from a menu.
Amount
Enter the amount of the cash receipt. The current currency selected will display to the right.
Check #
Enter the check number of the cash receipt.
Deposit To
Select a bank account to which you will deposit the check by clicking the search button. Only GL accounts of the type 'Bank' will be available for selection. The Name of the selected account will populate in the field below.
Payment Type
By default, the payment type is the A/R transaction code that is the default for the Payment category. Transaction codes are configured in the A/R Transaction Types program. You can select other transaction codes of the Payment type by clicking the search button. The GL Code attached to the transaction code is not used, as the bank account is specified in the Bank field.
Memo
Enter any free format Notes regarding this Cash Receipt.
GL Tab
Account Code
Enter the account that you want to credit with the payment amount. Double click for an account selection form.
Amount
The amount will default to the check amount. Enter the amount that you wish to credit to the selected Account Code.
Account Name
Will populate with the GL Account Name after an Account Code is provided.
I/C, F/X, and F/X on I/C Checkboxes
These three checkboxes allow you to optionally hide some or all of the auto-generated GL (inter-company and foreign exchange). The (read-only) auto-generated rows are also colored so, if you do display them, it is easier to pick out the "manual" (user-entered) rows (in black). These checkboxes are only visible if the system is set up for multi-company.
All/None Buttons
These two buttons allow you to set all three of the previous checkboxes (I/C, F/X, and F/X on I/C) at once. These checkboxes are only visible if the system is set up for multi-company.