Working with crude orders
If your login allows it, you can use these pages to manage crude loads and enter crude ticket readings.
-
Crude Planning Worksheet
This page displays any loads currently assigned to you. Use it to:-
Accept or reject a load assignment
-
View and manage trip information, ticket readings, and pay details
-
-
Crude Ticket Readings
This page displays freight information and run ticket data. Use it to view, enter, and edit run ticket readings for each type of equipment on a trip. -
Crude Ticket Import
This page displays all ticket import batches. Use it to:-
Import ticket batch files
-
View errors and orders associated with imported ticket file
-
Access the Crude Ticket Management page to edit the information in ticket import batch files
-
Using the Crude Planning Worksheet
You use the features on the Crude Planning Worksheet page to manage your assigned loads, ticket readings, and run ticket import data. The page displays:
-
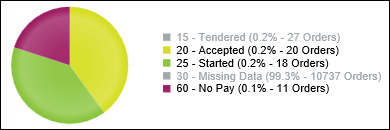
A pie chart representing the information shown in the Assigned Loads grid
It shows the number of loads in each status, including Tendered, Accepted, Started, Missing Data, and No Pay. Statuses are color-coded. The chart updates as load statuses change. The chart’s appearance changes when you select/deselect a status in the legend.
This illustration shows load quantities for the Tendered, Accepted, and Started statuses in the Assigned Loads grid.

This illustration shows load quantities for the Accepted, Started, and No Pay statuses.
-
Loads to which the carriers linked to your login are assigned
-
Command buttons for managing crude order information

Working with assigned loads
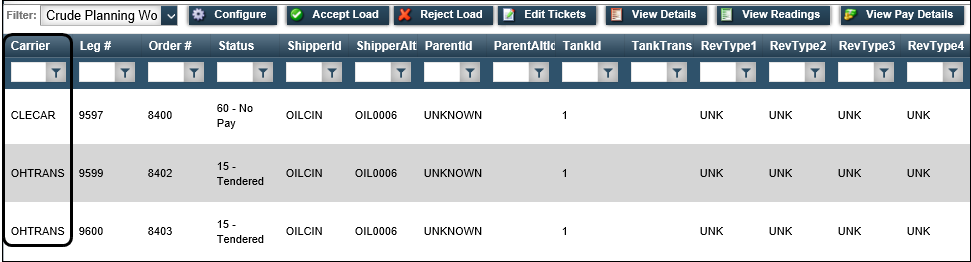
The Crude Planning Worksheet displays the loads currently assigned to carriers linked to your login. An assigned load has a status of Tendered. The company hosting the website assigns carriers to loads in its dispatch system.
To view, accept, or reject your assigned loads from the Crude Planning Worksheet, follow these steps.
-
Go to Menu > Carrier > Crude > Crude Planning Worksheet.
The Crude Planning Worksheet opens.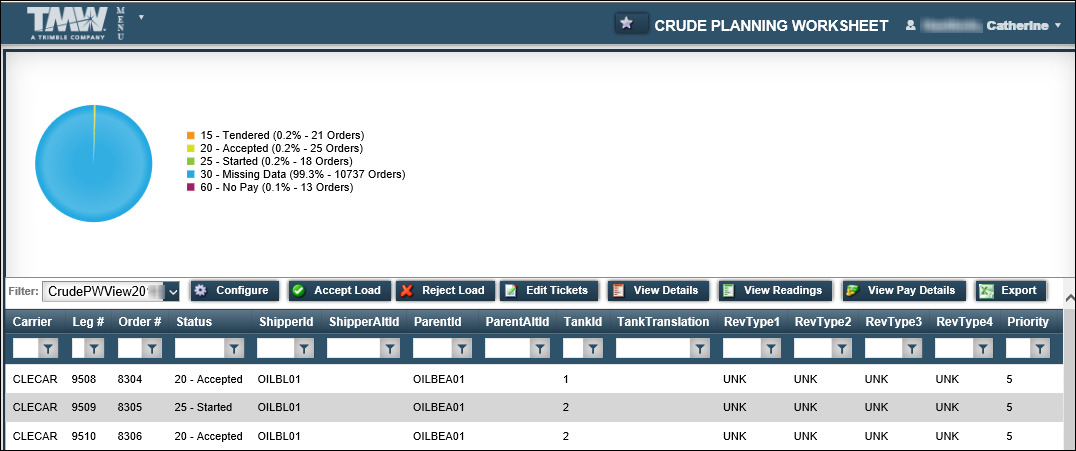
Note: If multiple views have been set up for your login, you can select a different view in the Filter field.
A view is a set of restrictions that the hosting company defines to specify which loads you see when you view trips. The hosting company links these views to your login.
-
Do one of the following:
-
Accept a load
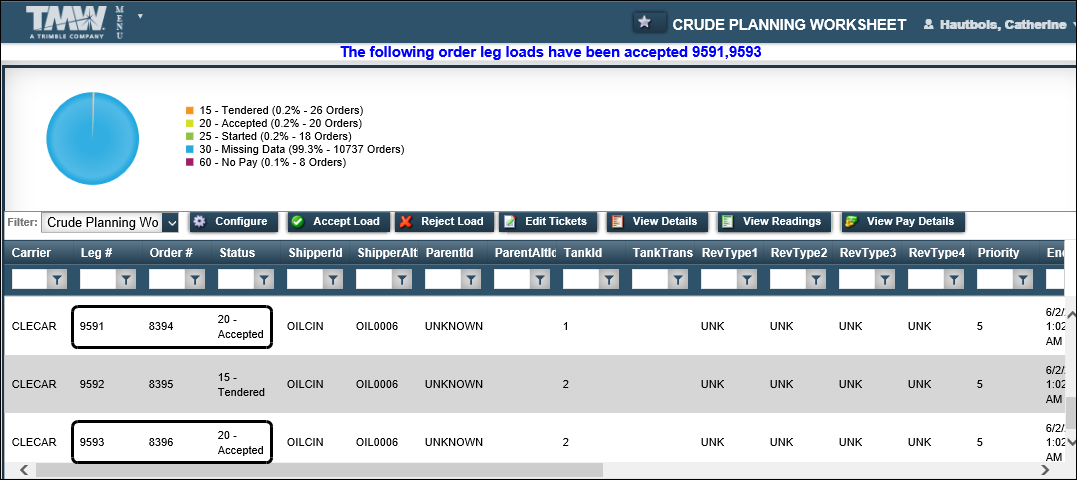
To accept load assignments, select each load you want to accept and click Accept Load. To select multiple loads, hold the SHIFT or CTRL keys while selecting.When you accept a load:
-
A message at the top of the page confirms that you accepted the load.
-
The order status changes to Accepted
In this illustration, the order status and confirmation message indicate that loads 9591 and 9593 were accepted.
-
-
Reject a load
To reject load assignments, select each load you want to reject and click Reject Load. To select multiple trips, hold the SHIFT or CTRL keys while selecting.When you reject a load:
-
A message at the top of the page confirms that you rejected the load. It lists the leg number of the load(s) you rejected.
-
The system removes the carrier assignment from the order.
-
The order status changes to Available.
The system sends an e-mail notification for each load that you accept or reject.
-
Accessing load, ticket, and pay information from the Crude Planning Worksheet
From the Crude Planning Worksheet, you can manage and view your trip information, ticket readings, and pay details.
| To use the command buttons, you must first select a load. |
-
Edit Tickets
Opens the Crude Ticket Management page, which displays ticket reading data. You can update ticket information or make corrections to an import file.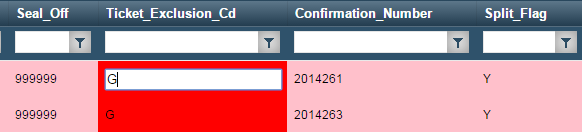
-
View Details
Access order, stop, and freight information for the selected order on the Crude Load Details page -
View Readings
Access ticket readings for an order on the Crude Ticket Readings page -
View Pay Details
View carrier pay information on the Load Pay Details page.
Entering crude ticket readings
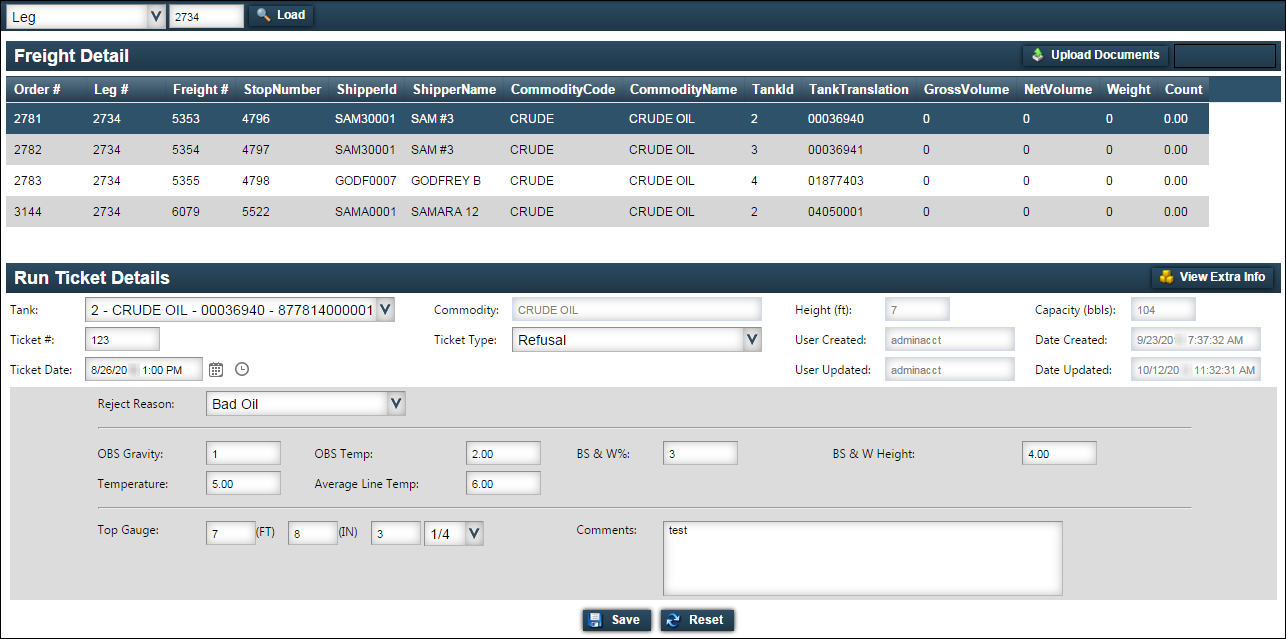
The Crude Ticket Readings page includes the Freight Detail grid, which shows orders assigned to carriers linked to your login. Using the Run Ticket Details section you can view and enter run ticket readings for each tank on an order.
From this page you can upload documents, calculate load volume, and view extra information about the trip.
-
Upload Documents
For details, see Uploading paperwork for a load.Use this feature to select, process, and upload documents with the .tif or .tiff file extension. Note: You cannot upload any other document type.
-
Calculate Volume
When entering readings, calculate the volume between the upper and lower measurements without saving. The system then updates the volume. -
View Extra Info
View additional information associated with a tripClick View Extra Info to see additional information associated with the retrieved order.
If your login allows it, you can enter tank readings in the Run Ticket Details section. To enter run ticket readings, follow these steps.
-
Go to Carrier > Crude > Crude Ticket Readings.
-
In the first Load field, select Order, Leg or Move.
-
In the second Load field, enter an order, leg, or move number.
-
Click Load.
The page displays orders that meet your criteria in the Freight Detail grid. -
In the Freight Detail grid, select the order to which you want to add readings.
-
In the Run Ticket Details section, enter ticket information as needed.
The fields that appear on the page are determined by the entry in the Ticket Type field.
Required field: *
Field Definition APIGravity
Corrected gravity, based on temperature and BSW values
Note: This field is informational only. It can be used in custom reports.
AvgLineTemp
First available in: Fuel Dispatch V.15.40
Average temperature of the line
BottomGaugeFt
Number of feet in the bottom gauge reading taken after the commodity is pulled from the tank
BottomGaugeIn
Number of inches in the bottom gauge reading taken after the commodity is pulled from the tank
BottomGauge
MeasurementTotal bottom gauge reading taken after the commodity is pulled from the tank
BottomGaugeQt
Number of quarter inches in the bottom gauge reading taken after the commodity is pulled from the tank
BottomTemp
Temperature taken after the load is pulled from the tank
BSW *
Percentage of materials other than oil and water in the tank
BSWHeight
Height at which the oil sample is taken, measured in feet and inches
Close Date/Time
Date/time the gauge or meter was turned off
CommodityCode
Unique ID assigned to the product that was loaded at the pickup
Commodity
DescriptionDescription of the product for the code specified in the Commodity Code field
This field is read-only.
CompanyID *
Shipper’s unique ID
Note: This field contains a drop-down list of company IDs. The list allows Oil Field Order Entry users who are not using the PeopleNet Crude Oil Workflow to enter readings manually.
CreatedBy
First available in: Fuel Dispatch V.15.40
ID of the user who entered the reading
This field is read-only.
CreatedDateTime
First available in: Fuel Dispatch V.15.40
Date/time the reading was entered
This field is read-only.
DeliveryEndMeter
First available in: Fuel Dispatch V.15.40
Meter reading after the delivery or unload
DeliveryStartMeter
First available in: Fuel Dispatch V.15.40
Meter reading before the delivery or unload
FgtNumber
System-assigned numeric ID that links the tank reading to the corresponding freight detail on the order
Gravity
Density of the oil
MeterEnd
Meter reading taken after the product is loaded
MeterFactor
First available in: Fuel Dispatch 16.20
Custom field that indicates a correction factor for metered tickets
MeterStart
Meter reading taken before the product is loaded
Observed
TemperatureTemperature at the tank level from which the oil sample is pulled
Note: The sample is used for the grind-out test to obtain the Gravity and BSW values.
Open Date/Time
Date/time the gauge or meter was turned on
OrderHdrNumber
Unique identifier assigned to an order
ReadingDate
Date/time the driver entered for the reading
RunTicket *
ID of the run ticket the driver submitted
SealOn *
ID number on the seal put on the tank after the product was picked up
SealOnDate *
Date/time a new seal was put on the tank after the product was picked up
SealOff *
ID number on the seal removed from the tank before the product was picked up
SealOffDate *
Date/time the old seal was removed from the tank before the product was picked up
TankID
Identifier recorded for the tank in the shipper’s tank setup records
TankProducing
Options are Yes or No
Updates the corresponding tank profile in the shipper’s company relationships profile.
Temperature
Temperature taken before the load is pulled from the tank
TopGaugeFt
Number of feet in the top gauge reading taken before the commodity is pulled from the tank
TopGaugeIn
Number of inches in the top gauge reading taken before the commodity is pulled from the tank
TopGauge
MeasurementTotal top gauge reading value taken before the commodity is pulled from the tank
TopGaugeQt
Number of quarter inches in the top gauge reading taken before the commodity is pulled from the tank
UpdatedBy
First available in: Fuel Dispatch V.15.40
ID of the user who updated the reading
This field is read-only.
UpdatedDateTime
First available in: Fuel Dispatch V.15.40
Date/time the reading was updated
This field is read-only.
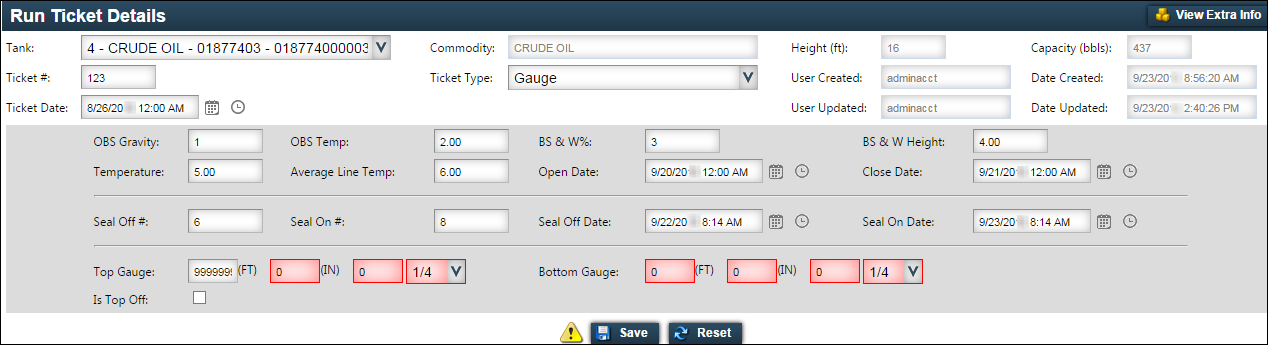
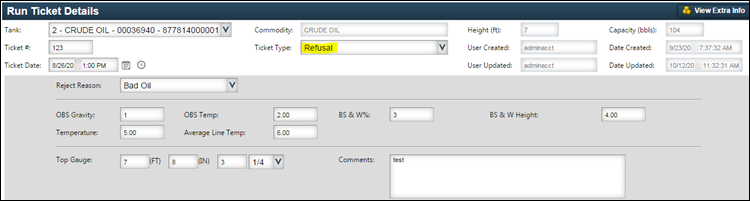
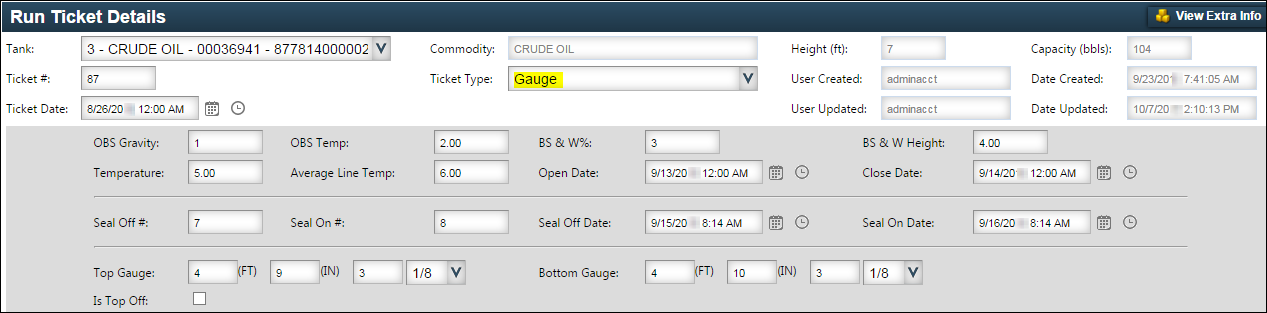
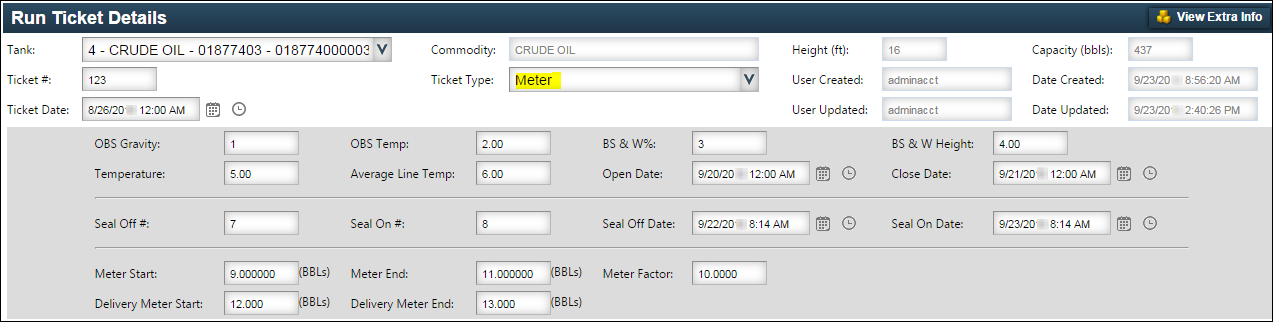
In the Crude Ticket Readings page, these options appear in the Ticket Type field. This illustration shows how the Ticket Type and Reject Reason fields might appear in the Run Ticket Details section.
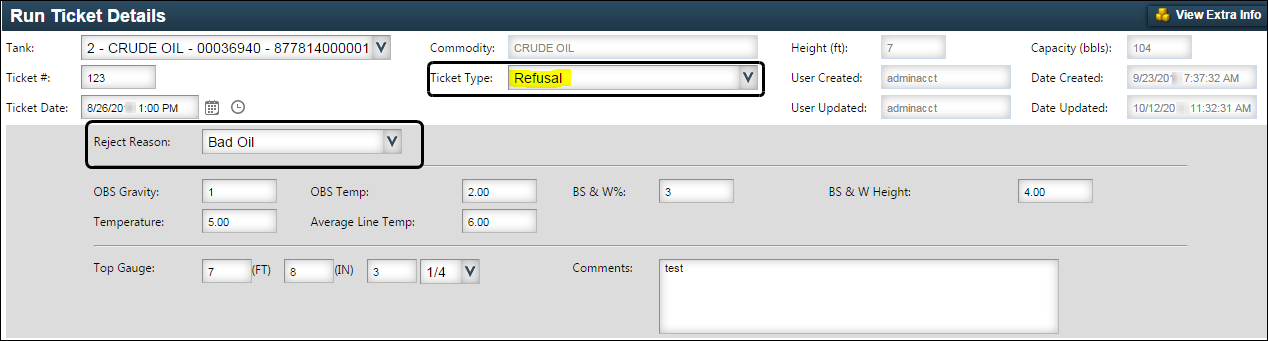
The fields in the Run Ticket Details section vary by ticket type.
-
Refusal ticket
When you select Refusal as the Ticket Type, the page displays the Reject Reason field.
-
Gauge ticket
-
Meter ticket
-
All other ticket types
-
-
Click Save.
Note: When you make a change to a ticket reading, the Warning icon indicates that you must save your entries.

Importing crude ticket readings
If your login permits, you can import crude ticket readings on the Crude Ticket Import page. The page accepts comma-delimited (.CSV) files that follow a predefined file format.
The Crude Ticket Import page displays all ticket import batches. It also shows:
-
The number of errors in the batch
-
The orders linked to the tickets in the batch
You can view imported readings and correct any field errors on the Crude Ticket Management page.
Importing a ticket readings file
Your hosting company determines the file format you should use. To import a file, follow these steps.
-
Go to Menu > Carrier > Crude > Crude Ticket Import.
The Crude Ticket Import page opens. -
Click in the Import File field, or click Select.
A window opens, prompting you to select a file to import. -
Locate and select the file.
-
Click Open.
The file name displays at the top of the page.
-
Do one of the following:
-
To import a different file, click Remove and repeat Steps 2-4.
-
To import the file you selected, click Import Ticket File.
If the import is successful and there are no data errors, a message appears. It states that the file upload is complete.
If the import is successful, but there are data errors, a message appears. It states that the upload completed with errors.
-
-
To view the import results, click Edit.
The Crude Ticket Management window opens. -
Do one of the following:
-
Use the Crude Ticket Management window to review and edit the file information.
-
Click OK to close the window.
The Crude Ticket Import page opens. A new row shows the batch import results.
-
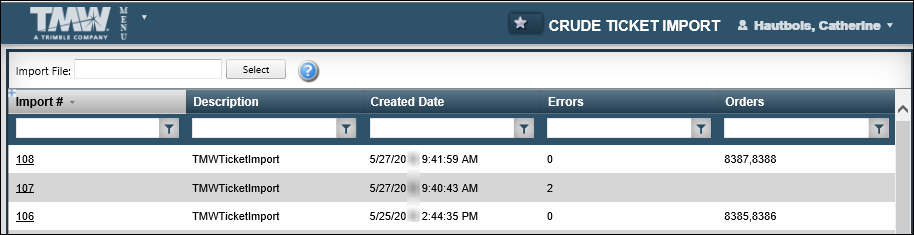
Viewing and editing an imported readings file
To view the contents of an imported file in the Crude Ticket Import page, follow these steps.
-
Go to Menu > Carrier > Crude > Crude Ticket Import.
The Crude Ticket Import page opens.Field Definition Import #
System-generated number representing the imported file
Description
File format as determined by your hosting company
Created Date
Date the file was imported
Errors
Number of data errors in the imported file
Orders
Original order numbers as specified in the import file
-
In the grid, do one of the following:
-
Click the import number for the file you want to view.
-
Right-click on the row for the file you want to view and click Edit.
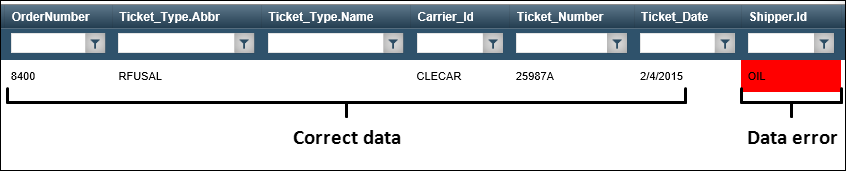
The Crude Ticket Management page displays each line in the imported reading.
Fields with missing or incorrect data are highlighted in red.
This illustration shows a field error. When you position your mouse over the field, a ToolTip displays the error.

Rows with missing or incorrect data are highlighted in pink.
This illustration shows row errors. When you position your mouse over the row, a Tool Tip identifies the error.

-
-
Make the necessary changes:
-
Click in the field for the reading you want to edit.
-
Make your changes.
Notes:
-
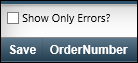
To display only rows containing data errors, select the Show Only Errors? checkbox.
-
If a reading contains data errors, you must correct them before the system can import them.
-
If you make a change that may result in a data error, a red triangle appears in the field’s top left corner. Position your mouse over the field to view a ToolTip.

-
-
-
Repeat Step 3 for each reading you want to edit.
-
To save your changes, do the following:
-
Click the Save check box next to each reading you want to save.
-
Click Save Changes at the bottom of the page.
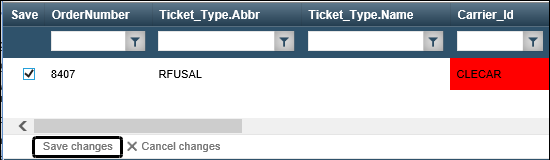
The Crude Ticket Management page redisplays with the changes made.
-
-
To go back to the Crude Ticket Import page, click Return twice.
If the system accepts your changes, the Orders field displays the number of each order updated with ticket readings. The status of each order changes to Completed.

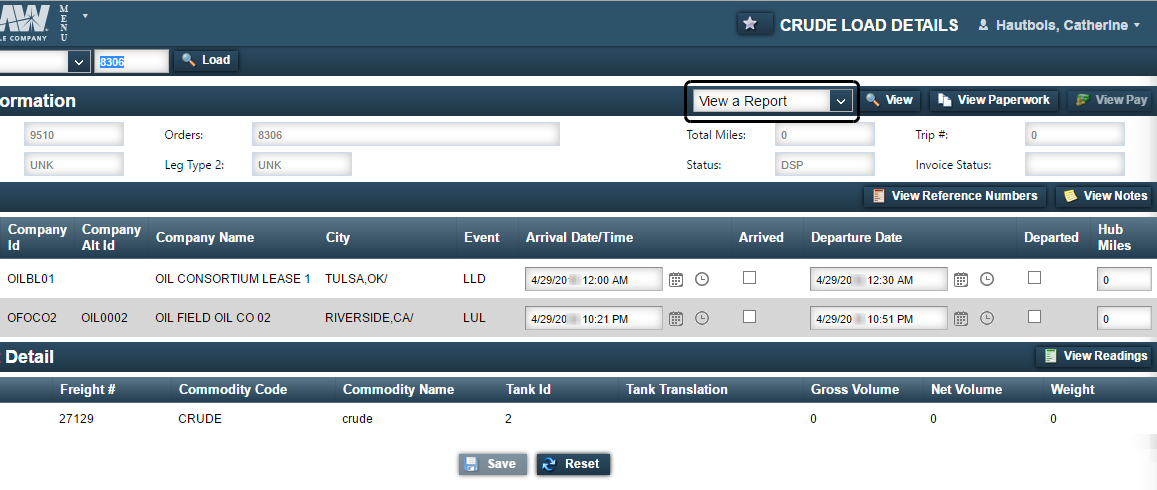
Updating load details for crude orders
You can display crude loads for updating from the Crude Planning Worksheet page or Crude Load Details page.
-
The Crude Planning Worksheet page lists outbound and inbound trips
-
The Crude Load Details page displays order, stop, and freight information for specific trips
When viewing load details and updating load information from either page, you can do the following:
-
Record arrival and departure dates/times for a stop and set the status to Completed
-
View and print a trip sheet for the load
-
View, add, edit, remove, and approve pay for completed trips
-
Add and view reference numbers
-
Add and view notes
-
View paperwork
-
Add and view tank readings
-
Add a stop to an existing trip
Accessing the load you want to update
To access a load for updating, do one of the following.
-
Go to Menu > Carrier > Crude > Crude Load Details.
In the Order field at the top of the page, enter an order number and click Load.
-
Go to Menu > Carrier > Crude > Crude Planning Worksheet
Select a load and click View Details..
The Crude Load Detail page shows the selected order.
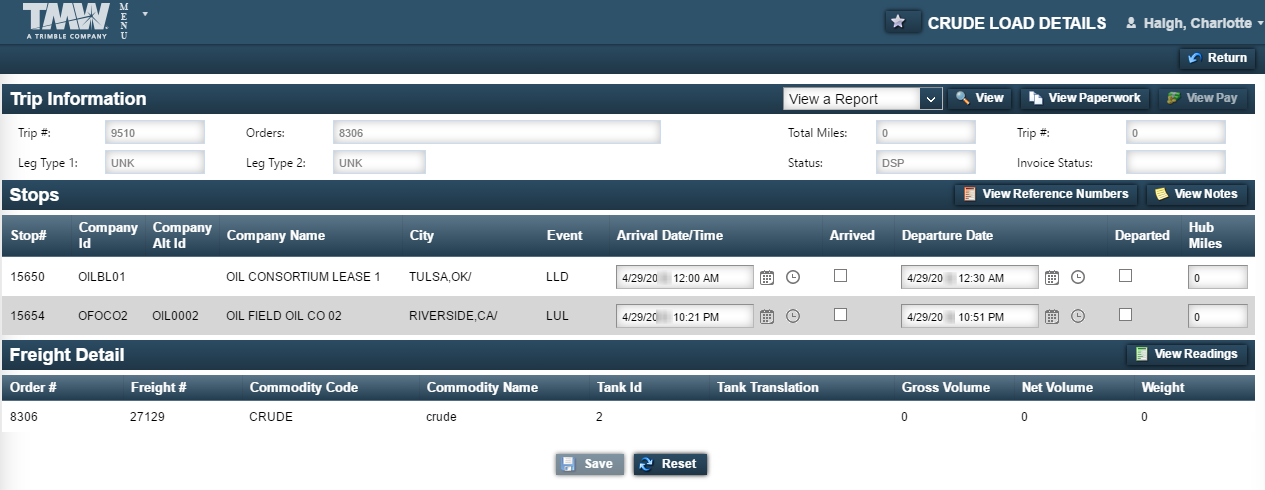
Recording arrivals, departures, and hub miles
You can update stop information by:
-
Recording the date/time of the arrival and/or departure.
-
Marking the arrival and/or departure as completed.
-
Recording the miles traveled for each stop
To record arrivals and departures, follow these steps.
-
Access the load you want to update.
The Stops section displays the arrival and departure date/time recorded for each stop on the load. The Hub Miles field displays the miles traveled for each stop.

-
If needed, you can change the date and enter the time the arrival/departure was completed.
-
Select the Arrived or Departed check box to mark the arrival or departure as completed.
Notes:
-
Selecting the Departed check box for a commodity sets the arrival to Completed as well.
-
Once you select a check box, the corresponding date field is no longer editable.
-
-
If needed, enter the number of miles traveled in the Hub Miles field.
-
Click Save.
A message at the top of the page states that your update was successful.
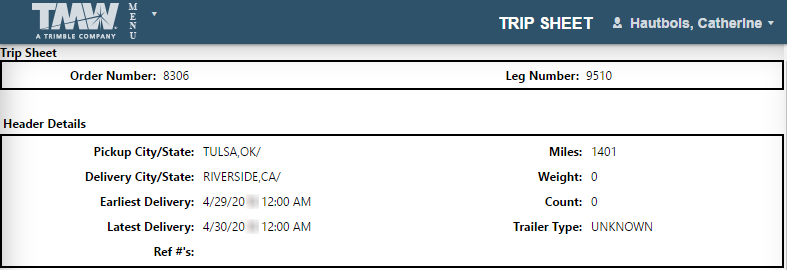
Viewing and printing a trip sheet
If your login allows you to print trip sheets, you can do so on the Crude Load Details page.
To print a trip sheet for a load, follow these steps.
-
At the top of the Crude Load Details page, click in the View a Report field.
-
From the drop-down list, select the trip sheet you want to view and print.
-
Click View.
The trip sheet opens in a separate window.This illustration shows how a trip sheet might look.
-
Print as you usually do from your browser.
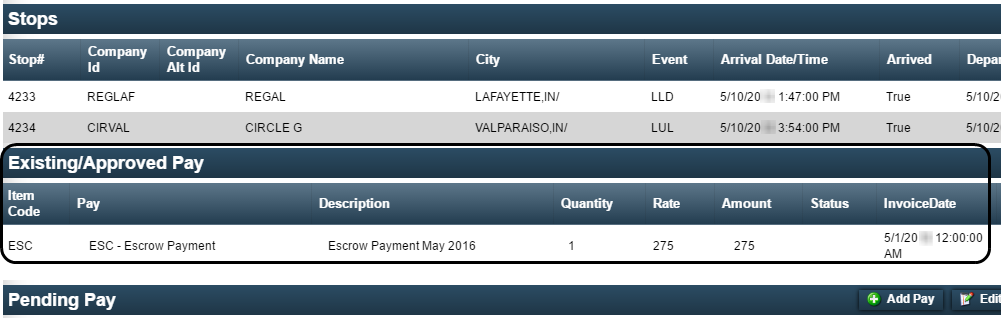
Viewing pay details for a completed trip
If your login allows you to view pay information, you can do so from the Crude Load Details page.
To review pay details for a completed trip, follow these steps.
-
In the Trip Information header bar, click View Pay.
-
Pay details for the trip are displayed in the Existing/Approved Pay section of the Load Pay Details page.
-
To go back to the Crude Load Details page, click Return at the top of the page.
Adding and viewing reference numbers
If your login allows it, you can add and view reference numbers for a load.
To add reference numbers for a load, follow these steps.
-
In the Stops header bar, click View Reference Numbers.
The Reference Number window opens.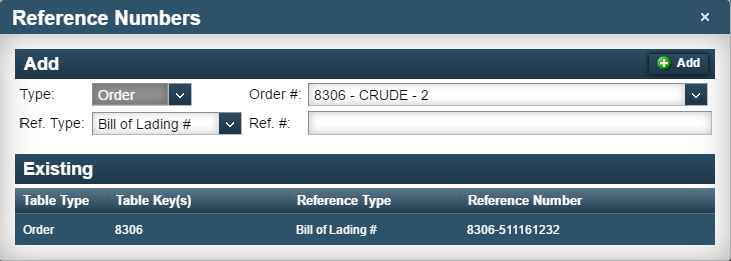
-
In the Add section of the window, enter the reference number information.
Field Definition Type
Displays the default reference number location.
Order #
Displays the current order number and crude order type.
Ref. Type
Displays the default reference number type. If necessary, select another type.
Ref. #
Enter the reference number.
-
Click
 Add.
Add.
The reference number information is added to the Existing section. -
Close the window.
-
In the Crude Load Details page, click Save.
A message at the top of the page states that your update was successful.
Adding and viewing notes
To add a new note to a load or view notes you have already added, follow these steps.
| You cannot view or create notes for trips with the Available status. |
To add notes for a load, follow these steps.
-
In the Stops header bar, click View Notes.
The Notes window opens.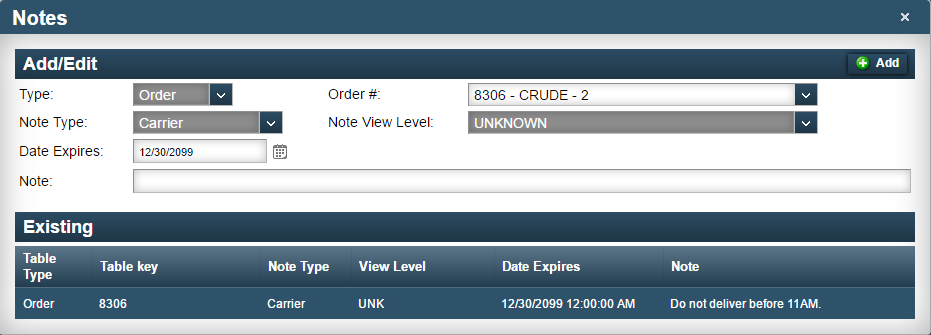
-
In the Add/Edit section of the window, enter the note information.
Field Definition Type
Displays the default note location.
Order #
Displays the current order number and crude order type.
Note Type
Displays the default note category.
Note View Level
Displays the default classification, which provides a way to classify notes for internal use.
Date Expires
Enter the date the note expires; defaults to 12/30/2099.
Note
Enter the note text.
-
Click
Add.
The note is added to the Existing section. -
Close the window.
-
In the Crude Load Details page, click Save.
A message at the top of the page states that your update was successful.
Uploading paperwork for a load
If your login allows it, you can upload paperwork for a load. Paperwork can be uploaded from the Crude Load Details page that you access for a load.
| When uploading paperwork, Trimble Web Products supports files in the .TIF or .TIFF format. You cannot upload files in the PDF format. |
To upload paperwork, follow these steps.
-
Access the load you want to update.
Note: You cannot upload paperwork for a load with the Available status.
-
In the Trip Information header bar, click Upload Documents.
The Upload Document window opens.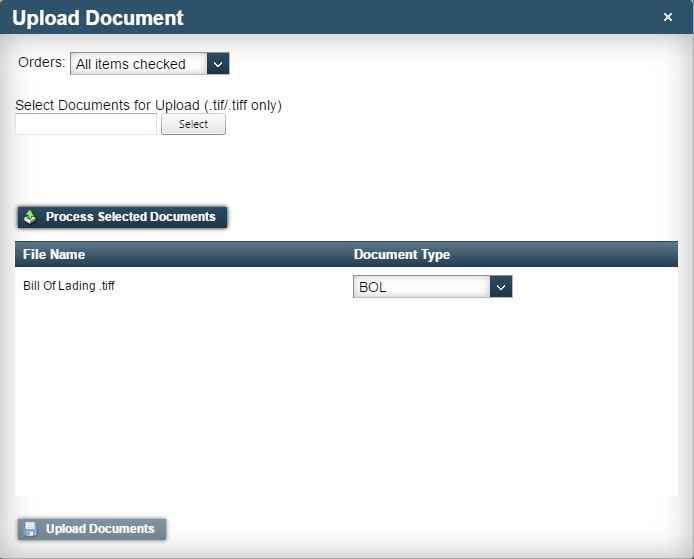
-
Click in the Orders field and make a selection:
-
To upload the document for all orders, select the Check All check box.
-
To upload the document only for the order in the Crude Load Details page, select the check box for the order number.
-
-
In the Select Documents for Upload field, click Select and locate the paperwork file you want to upload.
The file name appears below the Select Documents to Upload field.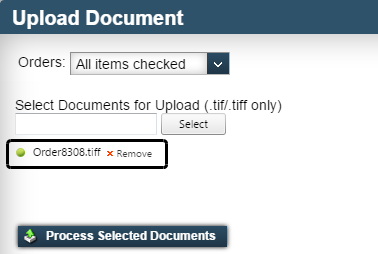
Note: If you upload the wrong document, click Remove to delete it.
-
To process the paperwork file, click Process Selected Documents.
The file is added to the File Name column.
-
In the Document Type field, select a paperwork category.
Note: The document type is required.
-
Click Upload Documents at the bottom of the window.
The top of the page displays a confirmation that the document was successfully uploaded to a batch. -
Close the window.
-
In the Crude Load Details page, click Save.
A message at the top of the page states that your update was successful.
Viewing paperwork for a load
If the hosting company has set up the application to allow it, you can view the paperwork attached to a load.
To view the paperwork from the Crude Load Details page, follow these steps.
-
In the Trip Information header bar, click View Paperwork.
The Paperwork window opens.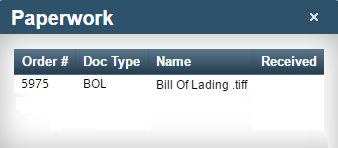
Field Definition Order #
Current order number and crude order type
Doc Type
Paperwork category
Name
Document file name
Received
Date the file was attached to the order
-
Close the window.
Adding and viewing ticket readings
The Crude Ticket Readings page allows entering ticket readings for each equipment on the movement. Using the search controls at the top of the page, moves can be retrieved by order, leg, move number.
To add a ticket reading to a load or to view readings you have already added, follow these steps.
| You cannot view or create ticket readings for trips with the Available status. |
To add notes for a load, follow these steps.
-
In the Freight Detail section, click on a row.
The Run Ticket Details section displays run ticket information for the selected order, leg, or move.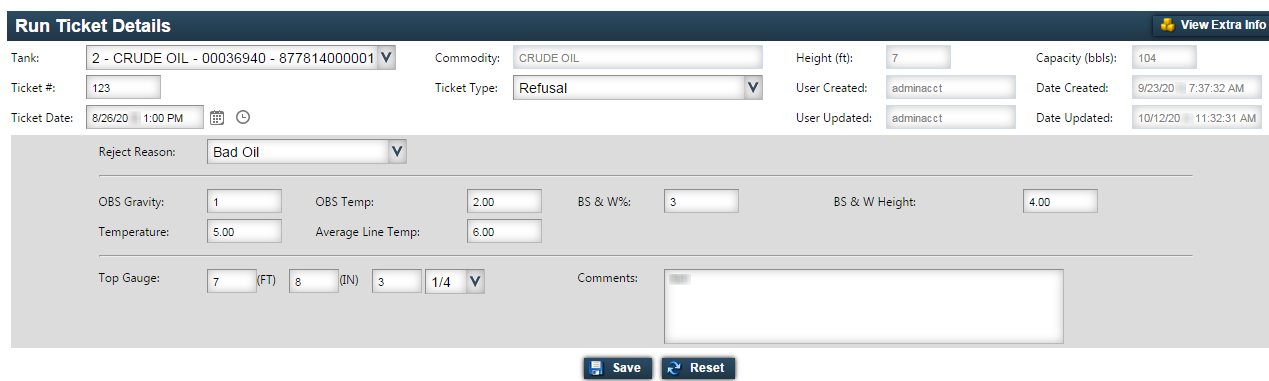
The top of the page displays information about the run ticket.
Field Definition Tank
Tank number and commodity type
Ticket #
Run ticket number
Ticket Date
Date and time the run ticket was created
Commodity
Commodity stored in the tank
Ticket Type
Status of the commodity on the load
Height (ft)
Tank height in feet
Capacity (bbls)
Tank capacity in barrels
User Created
ID of the user who created the run ticket
User Updated
ID of the user who updated the run ticket
Date Created
Date and time the run ticket was created
Date Updated
Date and time the run ticket was updated
The bottom of the page displays information about the tank.
Field Definition Reject Reason
If the Ticket Type field is set to Refusal, select the reason the load was rejected.
OBS Gravity
Observed gravity of the tank commodity, based on a sample
Temperature
Temperature of the tank commodity
OBS Temp
Observed temperature of the tank commodity, based on a sample
Average Line Temp
Average temperature of the commodity in the line
BS & W%
Percent of basic sediment and water in the tank
BS & W Height
Height, in inches, of the basic sediment and water in the tank
Top Gauge
Reading from the tank’s top gauge
Comments
Additional information about the tank or commodity
-
Click Save.
A message at the top of the page states that your update was successful.