Installation overview
This guide provides details to assist you with the installation, setup, and configuration processes required to use Trimble Web Products. Trimble Web Products is the umbrella name given to the different web-based modules/applications.
| The instructions in this guide represent a typical installation. Deviating from these instructions can produce unexpected results. |
Trimble Web Applications
-
Core modules
-
CarrierHub® allows a trucking company or brokerage to post available loads for third-party carriers on the Internet. The carriers use CarrierHub to submit requests for the loads they want to haul, and to track and update the progress of assigned loads.
-
eStat® enables your customers or agents to submit orders on a secure Internet site. It provides a private network for viewing tendered loads and tracking their progress through your dispatch system.
-
DriverSeat® allows your drivers to review their load assignments and request available loads. They can also view their pay, request time off, and view their Compliance Safety Accountability (CSA) scores.
-
FreightAgent enables your remote freight agents to submit orders on a secure Internet site, while limiting their views within your larger TMWSuite® system. It provides a private network for viewing tendered loads and tracking their progress through your dispatch system.
-
TripAlert® works with and ExpertFuel® to help improve route efficiency by providing a variety of alerts in real time.
-
Data Warehouse Explorer is a report building environment for the creation of reports used for analyzing your business activities.
-
TMW.Suite Go mobile apps enable users to access core application data through a smartphone.
-
-
Add-on modules
-
The Carrier Auction Exporter allows you to create a task for the CarrierHub Auction Export in Microsoft® Windows® Task Scheduler, and to specify when and how frequently the task is run.
-
The Report Scheduler allows you to create a task for SSRS reports in Windows Task Scheduler, and to specify when and how frequently the reports will be run.
-
YourWay provides a base framework with which you can create custom pages that appear within the Trimble Web Products website.
-
Reporting
SQL Server Reporting Services (SSRS) reports for the following products are available:
-
Microsoft Dynamics™ GP
-
TMWSuite
-
TotalMail®
Database, server configuration, and licensing
The following sections describe the Web Products Framework database, how licensing works with the Trimble Web Products, and the recommended server configuration. If you have questions related to these topics, please contact your Support representative before continuing with the installation process.
Web Framework database
During the installation process, the system installs the Web Products Framework database. This database stores all user information, module licenses information, and module configurations. It is possible to have multiple Web Products Framework databases with different configurations connected to different TMWSuite databases.
Server configuration
You can install the Trimble Web Products to a single server or to a two-server setup.
-
Single server
This configuration requires you to install the web applications, the web services, and the Web Framework database onto the same machine. Trimble Transportation does not recommend this method because it requires you to expose some web services to the internet. It requires complex firewall configurations.
-
Two-server
This configuration allows you to install the Web Applications and the Web Framework database on one machine and the Web Services on a different machine. Trimble Transportation recommends this method because it allows you to put your web services behind a firewall. It does not require complex firewall configurations.
Recommended server configuration
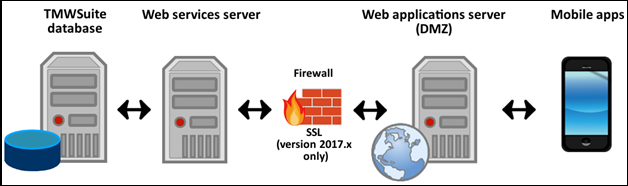
This image shows an example of a typical installation using the recommended configuration.
-
Web applications server
You would install your web applications (such as Data Warehouse Explorer, eStat, or CarrierHub) on this server. These web applications would connect to your web services (such as SystemsLink) through your company’s firewall. If your company owns mobile licenses, those devices would connect to this server.
-
Web services server
You would install your web services (such as SystemsLink, Imaging services, or Data Warehouse services) on this server. This server connects to your SQL server running your TMWSuite database(s) and to the web application databases. It connects to your web application server through your company’s firewall.
|
Understanding Trimble Web Products licensing
During the installation process, the system authenticates your ClientCenter information and then returns a list of available web services and web applications for you to install. This process is known as Trimble Web Products licensing.
When you install the Trimble Web Products, you can choose from the following environments:
-
Development (D)
-
Test (T)
-
Quality assurance (QA)
-
Production (P)
During the installation process, the installer activates licenses for each selected module in that environment.
Web application licensing on a single server configuration example
Suppose that you installed eStat in the Production environment. A short time later, you want to install a newer version of eStat to experiment with settings. To do this, you would need to install another instance of the Trimble Web Products on your server.
During the installation process, you accidentally installed eStat to the Production environment on the new instance. If you did this, the system would deactivate your eStat license in the Production environment on the first instance and apply it to the Production environment on the second instance. This is considered one license change. You are allowed a maximum of five licensing changes in a single month. If you need to make additional changes, contact your Support representative. To fix this mistake, follow the steps listed in Fixing licensing mistakes.
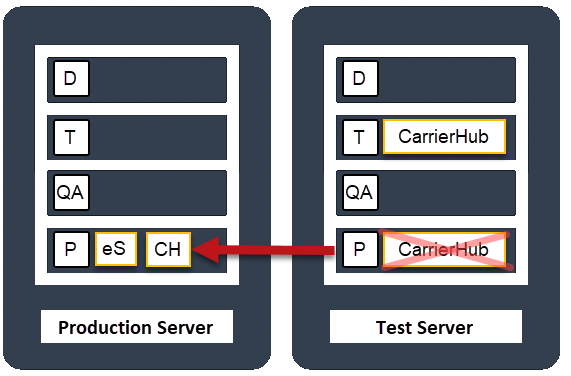
Web application licensing on a two-server configuration example
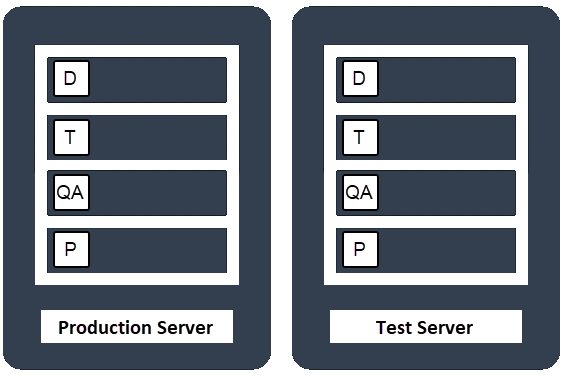
This illustration shows a two-server configuration without web applications installed/licensed. Each server has four environments: Development (D), Test (T), Quality Assurance (QA), and Production (P).
Suppose that you installed eStat in the Production (P) environment on your production server and CarrierHub in the Test (T) environment on your test server.
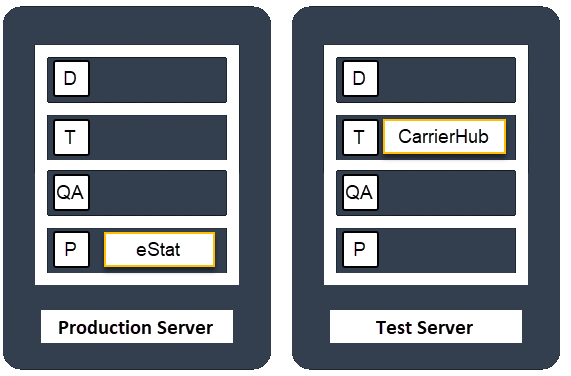
Then after some testing, you want to run CarrierHub in the Production environment on your production server. You would activate the CarrierHub license for that environment on your production server.

| The CarrierHub license is still active on your test server. |
Suppose that you want to install a newer version of CarrierHub to test new features. You download the latest installation files and "quickly" click through the installation process. However, you accidentally install the new version of CarrierHub to your Production environment on your test server.
In this scenario, the system deactivates your CarrierHub license in the Production environment on your production server and then activates it in the Production environment on the Test server.
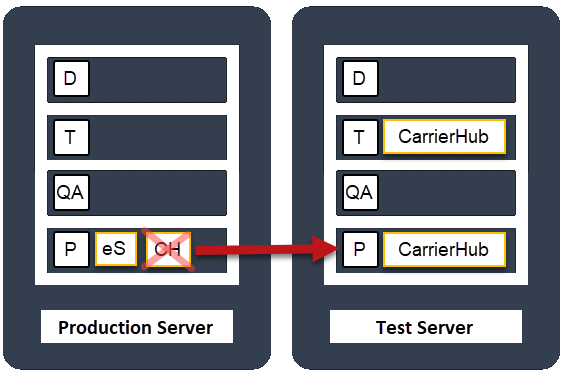
In this scenario, you have two CarrierHub licenses on your Test server and none on your production server.
| This example represents one of the biggest mistakes made by administrators during the installation process. This mistake would cause your real production environment to go down. Your users will not be able to access the real environment._ |
To fix this mistake in this scenario, you would follow the steps listed in Fixing licensing mistakes.
Once you have fixed this mistake, the system deactivates the CarrierHub license in your Production environment on your Test server and enables it in your Production environment on the Production server.
This is considered one license change. You are allowed a maximum of five licensing changes in a single month. If you need to make additional changes, contact your Support representative.
Fixing licensing mistakes
To fix licensing mistakes:
-
Log into the needed environment on the needed server.
The License Activation page opens.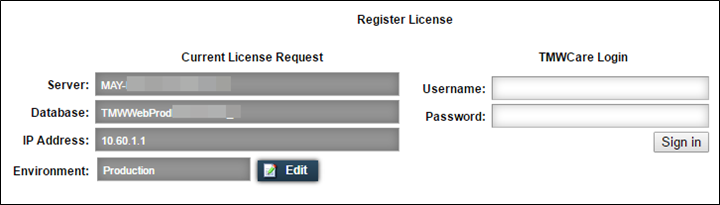
-
Click Edit.
The Edit Environment window opens.
-
Select the correct environment and click Save.
-
If needed, authenticate and select the web application(s) that you want to license on this server.
This process switches an application’s license from one server to another server.
|
After you have installed Trimble Web Products, the following additional activation rules apply:
|
Trimble Web Products applications
The following table lists the core applications and services delivered under the Trimble Web Products umbrella and their required licenses. It also identifies the:
-
Database that is updated by SQL statements during the installation
-
Web service the application uses
| Core application/service | Required licenses | Database updated by applying SQL statement | Web service used/created |
|---|---|---|---|
CarrierHub* |
CARRIERHUB |
TMWSuite Note: If using CarrierHub with FuelTMS, the TMWSuite - Fuel database is also installed. |
TMW Services Note: If you are using CarrierHub with FuelTMS, you must also install the Fuel Services web service. |
Note: If you use CarrierHub with Fuel Dispatch and/or Inventory Services, it is assumed you are also licensed for those applications, and that your TMWSuite database has all the appropriate modifications (DBMods) for FuelTMS applications. |
|||
Data Warehouse Explorer |
DATAWAREHOUSE |
Datawarehouse |
Data Warehouse |
DriverSeat* |
DRIVERSEAT |
TMWSuite |
TMW Services |
eStat |
ESTAT (if not using FuelTMS) Note: This license is for hosting companies. |
TMWSuite |
TMW Services Note: If you are using eStat with FuelTMS, you must also install the Fuel Services web service. |
Note: If you use eStat with Fuel Dispatch and/or Inventory Services, it is assumed you are also licensed for those applications and that your TMWSuite database has all the appropriate modifications (DBMods and EstatFuel) for FuelTMS applications. |
|||
FreightAgent * |
FREIGHTAGENT |
TMWSuite |
TMW Services |
* If you use TMW Operations as your dispatch system, it is assumed you are also license for that application and that your TMWSuite database has all the appropriate DB Mods for that application. |
|||
Reporting |
n/a |
Optional |
Optional |
TripAlert |
TRIPALERT |
Databases identified during installation process. Note: The application requires READ access to the MySQL OORETA database. |
TripAlertMap |
Web Products Add-Ons |
|||
Carrier Auction Exporter |
CARRIERHUB and BIDAWARDMODULE |
n/a |
No service used, but creates and schedules a Windows task to handle exporting auctioned loads to CarrierHub. |
Imaging |
n/a |
n/a |
Imaging |
Report Scheduler |
n/a |
n/a |
No service used, but creates and schedules a Windows task run report. |
YourWay |
n/a |
n/a |
n/a |
Barcode Font |
n/a |
n/a |
n/a |
Installation requirements
Microsoft has developed a variety of applications and services designed to:
-
Improve the performance of your applications
-
Provide support for a broad array of browsers and devices
-
Allow you to manage the web server where your applications have been installed remotely.
These applications and services must be installed or set up on the web servers where you plan to install Trimble Web Products.
TMWSuite requirements
The core applications in Trimble Web Products provide a web-based interface with your TMWSuite dispatch system. Make sure you have the correct version of TMWSuite for your version of Trimble Web Products.
| Trimble Web Products version | Minimum core TMWSuite version required |
|---|---|
2017.2 through current |
2016.15_07.0311 |
2016.3 through 2017.1 |
2013.12_08.0891 |
Consult your Support team before upgrading older versions.
TMW Operations/Fuel TMS/LTL Operations requirements
Trimble Web Products uses components that are based on versions of TMW Operations, Fuel TMS, and LTL Operations. Make sure you have the correct version of these applications for your version of Trimble Web Products.
| The Operations and Web Products versions should match. For example, if you are installing a 20XX.x version of Web Products, you should be running the 20XX.x version of Operations. |
| Trimble Web Products version | Minimum core TMW Operations/ Fuel TMS/LTL Operations version required |
|---|---|
2017.2 through current |
16.20 |
2016.3 through 2017.1 |
16.10 |
Web services server requirements
When you use the recommended two-server configuration, you will install the Trimble web services and imaging services on the web services server.
If you are using 3G integration with eStat, you must install Microsoft ASP .NET MVC Security Update MS14-059 on this server and the web applications server.
The following hardware, applications, and browsers are required for the web services server.
Hardware requirements
-
Quad core processor, 2.4 GHz or faster with 16GB RAM
-
250GB Serial ATA (SATA) drive
Software requirements
All versions of Trimble Web Products require the following:
-
Internet Information Services (IIS) version 7 or later
-
Microsoft Windows 2008 R2 Server or later with IIS 7.0
-
Microsoft .NET Framework
Make sure you have the correct version for your version of Trimble Web Products.
Trimble Web Products version Minimum Microsoft .NET Framework version required 2017.2 through current
4.6.2
2016.3 through 2017.1
4.5
-
Microsoft SQL Server or SQL Server Express
Make sure you have the correct version for your version of Trimble Web Products.
Trimble Web Products version Minimum Microsoft SQL Server (Express) version required 2017.5 through current
2012
2017.2 through 2017.4
2008 R2
2016.3 through 2017.1
2008
Notes:
-
You must install SQL Server in mixed mode to enable both Windows authentication and SQL Server authentication.
-
If you are installing version 2017.3 of Trimble Web Products or later, and you do not have SQL Server2012 or later, install the server or the corresponding CLR Types and Shared Management Objects (SMO).
-
Additional requirements
-
Copies of your TTS50.ini and TTSLocal.ini files, installed in a folder in the root directory
-
TMWSuite account to be used by Trimble Web Products
|
Web applications server requirements
When you use the recommended two-server configuration, you will install the Trimble web applications and any add-on modules on the web applications server.
If you are using 3G integration with eStat, you must install Microsoft ASP .NET MVC Security Update MS14-059 on this server and the web services server.
If you are using DriverSeat, you must install the web framework services on this server. If you are not using DriverSeat, you have the option of installing the web framework services on the web services server. However, Trimble Transportation strongly recommends that you install them on the web applications server.
| Trimble Web Products supports Secure Sockets Layer (SSL) connections between the web applications server and the Internet. However, versions 2016.3 through 2016.6 do not support SSL connections between the web applications and web services servers. For assistance with other security options, contact Support. |
The following hardware, applications, and browsers are required for the web applications server.
Hardware requirements
-
Quad core processor, 2.4 GHz or faster with 16GB RAM
-
Minimum of four 146GB hard drives (using the RAID configuration, for backups)
-
Port 1433 (for database access)
-
Port 80 (for all web page traffic) or 443 (if using SSL)
Software requirements
All versions of Trimble Web Products must have the following:
-
Internet Information Services (IIS) Version 7 or later
-
SQL Server System Administrator rights to the server to install Trimble Web Products
-
Microsoft Windows 2008 R2 Server or later with IIS 7.0
-
Microsoft .NET Framework
Make sure you have the correct version for your version of Trimble Web Products.
Trimble Web Products version Minimum Microsoft .NET Framework version required 2017.2 through current
4.6.2
2016.3 through 2017.1
4.5
-
Microsoft SQL Server or SQL Server Express
Make sure you have the correct version for your version of Trimble Web Products.
Trimble Web Products version Minimum Microsoft SQL Server (Express) version required 2017.5 through current
2012
2017.2 through 2017.4
2008 R2
2016.3 through 2017.1
2008
Notes:
-
You must install SQL Server in mixed mode to enable both Windows authentication and SQL Server authentication.
-
If you are installing version 2017.3 of Trimble Web Products or later, and you do not have the minimum version of SQL Server installed, you will be prompted to install the SQL Server 2008 R2 CLR Types and Shared Management Objects (SMO). They are included in the installer.
-
-
SQL Server Management Studio 2008 (Express) or later
-
Static IP address
Note: If your environment is load-balanced?that is, if the applications and databases are housed on more than one web server to achieve optimal performance?all the web servers must share the same static outbound IP address.
Browser requirements
Internet access using one of the following:
-
Microsoft Internet Explorer® version 10 and after
-
Google Chrome™ versions 22 and after
-
Microsoft Edge
-
Apple Safari®
On the server, browse to https://www.example.com/. If you cannot access the website, your firewall settings will prevent you from using Trimble Web Products. Contact your System administrator for assistance.
Imaging requirements
If you are using imaging, your Imaging application must be version 4.1-20140930 or earlier. If you need to upgrade your application to use Content Management Interoperability Services (CMIS), contact your Support representative.
Reporting requirements
To use SSRS reports in Trimble Web Products, you must have SSRS installed and configured to run. Your report server must be version 2008R2 or newer. Consult the Microsoft SSRS help for more information.
Adding Internet Information Services
Internet Information Services (IIS) enables administrators to manage the web server where your Trimble Web Products applications have been installed remotely. You must add IIS to the web services server and the web applications server. In Windows Control Panel, select Programs and select Turn Windows features on or off.
Installing or upgrading to the latest version of the Microsoft .NET Framework
The Microsoft .NET Framework improves application performance by providing caching, application deployment, and support for a broad array of browsers and devices. It is available from the Microsoft Download Center website.
Make sure you have the correct version for your version of Trimble Web Products.
| Trimble Web Products version | Minimum Microsoft .NET Framework version required |
|---|---|
2017.2 through current |
4.6.2 |
2016.3 through 2017.1 |
4.5 |
|
To run the Trimble Web Products installation program, you must have .NET Framework version 3.5 installed on your machine. This is in addition to a .NET Framework version that meets the requirements in the table above. You can download .NET Framework version 3.5 from the Microsoft website. |
Installing SQL Server
Microsoft SQL Server is the database management system where Trimble Web Products data will be stored. This connection allows Trimble Web Products to access the TMWSuite database and the Web Products framework database. You must install SQL Server on both the web services and web applications servers.
Both SQL Server and SQL Server Express are supported. Make sure you have the correct version for your version of Trimble Web Products.
| Trimble Web Products version | Minimum Microsoft SQL Server (Express) version required |
|---|---|
2017.5 through current |
2012 |
2017.2 through 2017.4 |
2008 R2 |
2016.3 through 2017.1 |
2008 |
For information on installing SQL Server, refer to the documentation provided with your SQL Server software.
|
Downloading the Trimble Web Products installation file
You download the installation file from the Build Delivery section of the ClientCenter.
-
In ClientCenter, you can use the Line of Business, Product, and Build lists to locate the build that you want to download. The build files appear at the bottom of the page.
-
Select the build you want and click View Details to open a page containing a list of files.
-
After you select the I have reviewed the notes above provided by Trimble for this download check box, a Download link appears next to each file in the list.

The installer (.EXE) is stored in a .ZIP file. After you download the file, extract its contents to a location on the root directory of your server.
|
You must install components in this order:
-
Install the Trimble web services on the web services server.
-
Install the Trimble web applications, framework services, and add-ons (if using) on the web applications server.
Note: If you are not using DriverSeat, you have the option of installing the framework web services on the web services server. However, Trimble Transportation strongly recommends that you install them on the web applications server.
-
If you are installing the SSRS Report Library, install it on the web applications server.
Hints for a successful installation
-
Trimble Transportation strongly recommends that you install Trimble Web Products on servers that do not house other Trimble Transportation applications. For more information, contact your Support representative.
-
Before beginning the installation, make sure you assign a TMWSuite account that will be used by Trimble Web Products. If necessary, create the account in the TMWSuite System Administration application. All of the following must be true:
-
The user ID must be in all capital letters and contain no numbers or special characters.
-
The user ID must not belong to any groups.
-
The user ID must have access to the appropriate applications.
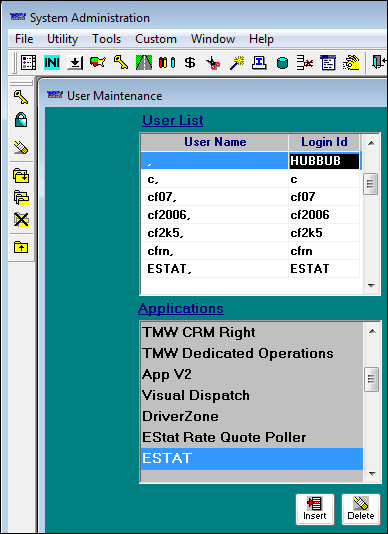
During the installation, you will be prompted to specify the account’s user ID and password. You will also be prompted to enter the locations of the appropriate TTS50 and TTSLocal.
-
-
Make sure you know the following values before beginning the installation:
-
Web Service URL
-
Imaging Web Service URL
-
Fuel Web Service URL (if you are using Trimble Web Products in Fuel mode)
If necessary, you can copy them from the Windows Registry. You must enter these values during the installation.
-
-
Do not use the same name for your website and your virtual directory. Doing this may cause the entire website to be uninstalled during an upgrade. If you want to use the same name for both, change them manually after the installation is complete.
Trimble Web Products installer home page
When you run the installer, the home page is the first window that opens.
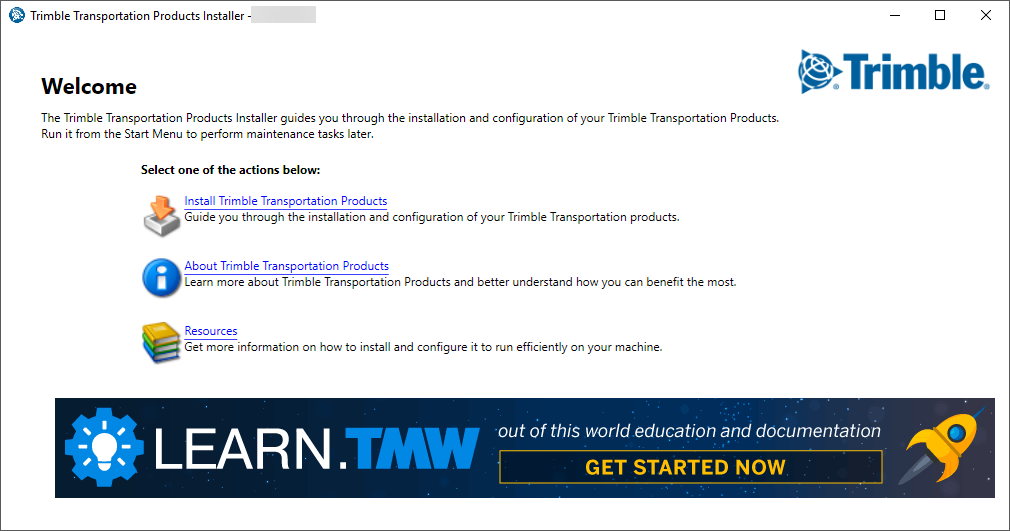
From this window, you begin the installation process by clicking Install Trimble Transportation Products.
| You must have system administrator rights to the machine on which you install Trimble Web Products. If you do not have these rights, the Install Trimble Transportation Products option is not available. |
You can also:
-
Learn about other products offered by Trimble Transportation
Click About Trimble Transportation Products. A window opens with an About Trimble Transportation link to the Trimble Transportation web site.
-
Access additional installation and configuration resources
Click Resources. A window opens with the following links:
-
Installer Guide
Clicking this link opens this guide as a PDF file. You need Adobe Acrobat Reader to read the file. -
Release Notes
Clicking this link opens the Release Notes Viewer in a browser window. -
Trimble Transportation Web Site
Clicking this link opens the Trimble Transportation web site in a browser window. -
Learning Center
Clicking this link opens the Learning Center in a browser window. You may be prompted to log into ClientCenter first. After logging in, access the Learning Center by going to Menu > Communications > Learning Center.
-
Adding another instance of Trimble Web Products
You can install multiple instances of Trimble Web Products on a single server. This may be useful in the following situations:
-
If your company is a hosting company with multiple customers, you may want the ability to keep different instances of Trimble Web Products for each of your customers. Using this setup allows your customers to use the version(s) that best suits their needs.
-
You may want to create test and production environments on the same server.
Follow these steps.
-
Run the .EXE for the currently installed version of Trimble Web Products.
-
Click Install Trimble Transportation Products.
-
On the License Information window, enter your license information. If desired, select a different environment in the Environment field.
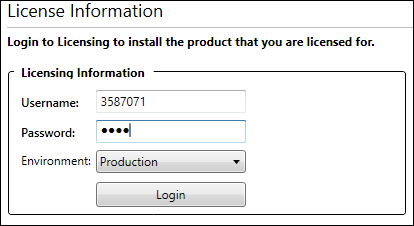
-
Click Login.
-
Click Next.
-
On the Installation Type window, do the following:
-
In the Available Instances field, select a new instance number.
-
In the Name field, enter a unique name.
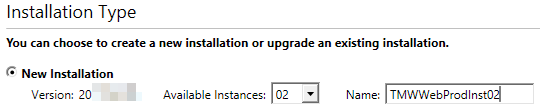
-
Press TAB.
-
Click Next.
-
-
Proceed with the installation as described in Installing components on the web services server and Installing components on the web applications server.
Modifying, upgrading, or removing an existing Trimble Web Products instance
The same installer that you used to install Trimble Web Products can be used to:
-
Add features to or remove features from an existing instance
-
Upgrade currently-installed features for an existing instance
-
Uninstall an instance
Follow these steps.
-
Run the .EXE for the currently installed version of Trimble Web Products.
-
Click Install Trimble Transportation Products.
-
In the License Information window, enter your license information and the environment containing the instance you want to change.
-
Click Login.
-
Click Next.
-
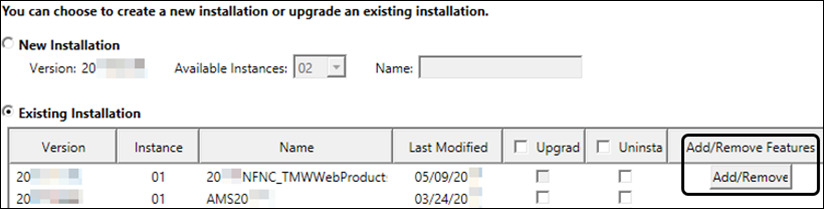
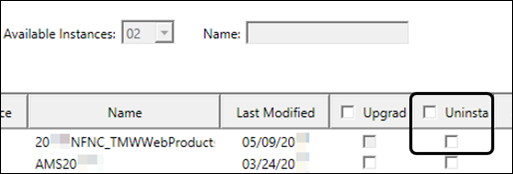
In the Installation Type window, select Existing Installation.
-
Do one of the following:
-
If your instance can be modified with this installer, an Add/Remove button appears in the Add/Remove Features column. To add and/or remove features to this instance, click this button.
Proceed with the modification, adding and/or removing features as needed. For details on the windows displayed, refer to Chapters 2 and/or 3.
-
If you want to upgrade currently-installed features for an instance, follow these steps:
-
Select the Upgrade check box for the instance.
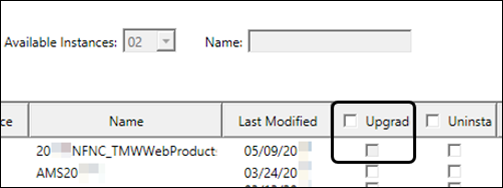
-
Click Next.
The SQL Setup window opens. In this window, enter your database information. For more information on the SQL Setup window, refer to Specifying database locations. -
Click Next.
-
-
If you want to uninstall an instance, select the Uninstall check box for the instance.
Click Next.
The Installation Review window opens.
When the Installation Review window opens, the Install Type column value indicates the change.
-
Modify
-
Upgrade
-
Uninstall
-
-
Click Begin Installation.
When the process completes, the Installation Complete window opens. The Success field indicates whether the process is successful.-
If the process is not successful, an
 error icon is displayed. Contact Support. Be prepared to provide a copy the log file, which will reside on the machine’s desktop. You can view the file by clicking
  Open Log. This will display the file in a text editor.
 -
If the process is successful, a
 confirmation icon is displayed. Click Finish to close the installer.
-