Configuring the Freight Agent Find Order page
When agents want to go directly to the details page of a specific order, they can use the Freight Agent Find Order page. They can limit the search for the order by selecting filters to display only those orders that meet the restrictions they selected. You can set up the functionality of this page as follows:
-
You can determine the types of search criteria available.
-
You can limit the types of reference numbers the agent can use to search.
-
You can set the default date range allowed for searching.
-
You can create status groups that allow the agent to narrow their search to orders with a particular status.
The Freight Agent Find Order page is not available to the Agent role by default. To give users access, you must assign it to the role.
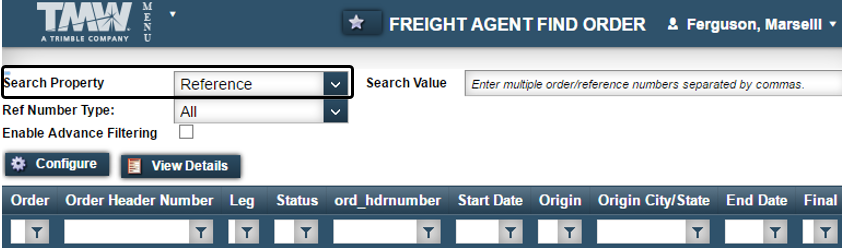
Selecting available search criteria
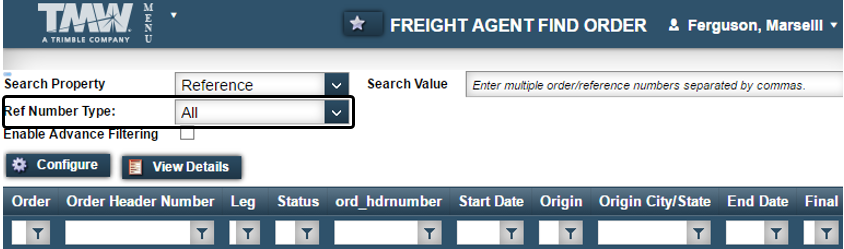
By default, the Search Property field allows users to search for orders by reference number or order number. If users select Reference, they can specify the type of reference number to search for in the Ref Number Type field.
If you want, you can edit the list of criteria that appears in the Search Property field. Follow these steps.
-
Go to Menu > Configuration > Settings Manager.
The Settings Manager page opens. -
Do one of the following:
-
If you want the setting change to apply to all roles, verify the Role field is set to [Global Settings].
-
If you want the setting change to apply to a specific role, select it in the Role field.
A message asks you to verify that you want to change the role. Click OK to continue.
Note: If the setting has already been changed for at least one role, its text label is bold and italic.
-
-
On the Modules tab, in the Module Selection field, select Agent.
-
Click the Quick Find Order tab.
-
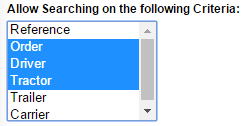
In the Allow Searching on the following Criteria field, select the criterion you want to include in the list. To include multiple criteria, press and hold CTRL or SHIFT when selecting.
Note: If you exclude Reference, the Ref Number Type field is not needed. It does not appear on the Freight Agent Find Order page.
The selections shown in this illustration allows users to search by order number, driver ID, or tractor ID.
-
Click Save.
A message appears at the top of the page, stating your settings were saved successfully. If you are making changes to a specific role and this is the first time the setting has been changed for any role, the text label style changes to bold and italic.If you do not want to save, click Revert. The application cancels any unsaved changes and reverts to the last saved settings.
Selecting available reference number types
By default, when searching by reference number, users can do either of the following:
-
Search all reference number types
-
Choose to search on one reference number type
The list of available reference number types appears in the Ref Number Type field on the Freight Agent Find Order page.
If you want, you can restrict the list of reference number types. Follow these steps.
-
Go to Menu > Configuration > Settings Manager.
The Settings Manager page opens. -
Do one of the following:
-
If you want the setting change to apply to all roles, verify the Role field is set to [Global Settings].
-
If you want the setting change to apply to a specific role, select it in the Role field.
A message asks you to verify that you want to change the role. Click OK to continue.
Note: If the setting has already been changed for at least one role, its text label is bold and italic.
-
-
On the Modules tab, in the Module Selection field, select Agent.
-
Click the Quick Find Order tab.
-
Select the reference number types on which the user can search.
-
Select the User can only search on these selected Reference Number Types check box.
-
In the Available Ref Types list, select the reference type. To select multiple reference types, press and hold CTRL or SHIFT while selecting.
Note: The reference number types in this list are defined in the Reference Numbers label in your database. The list is restricted to codes that are not retired. For more information on modifying this list, see:
Guide: System Administration Guide | Chapter: Using the label file to customize fields | Section: How to edit a label
-
Click
 Move Left to move it to the Selected Ref Types list.
 -
Repeat Steps b-c as needed.
If you do not want the user to search on a particular reference type, select it in the Selected Ref Types list and click
 Move Right to move it to the Available Ref Types list.
-
-
Click Save.
A message appears at the top of the page, stating your settings were saved successfully. If you are making changes to a specific role and this is the first time the setting has been changed for any role, the text label style changes to bold and italic.If you do not want to save, click Revert. The application cancels any unsaved changes and reverts to the last saved settings.
Defining the default date range
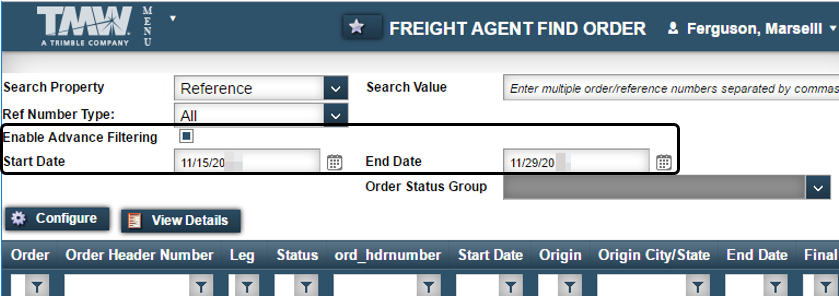
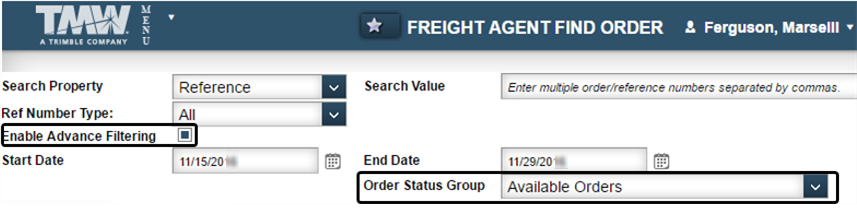
Users can choose to restrict their search to orders that started and ended within a specific date range. They do this by selecting the Enable Advance Filtering check box and choosing dates in the Start Date and End Date fields.
By default, the values in these fields span a range that starts seven days before and ends seven days after the current date. In this illustration, the Freight Agent Find Order page was opened on November 22. The date range spans from November 15 to November 29. Searches on this range retrieve orders with pickup arrival dates on or after November 15 and delivery departure dates on or before November 29.
If you want, you can change the default date range. Follow these steps.
-
Go to Menu > Configuration > Settings Manager.
The Settings Manager page opens. -
Do one of the following:
-
If you want the setting change to apply to all roles, verify the Role field is set to [Global Settings].
-
If you want the setting change to apply to a specific role, select it in the Role field.
A message asks you to verify that you want to change the role. Click OK to continue.
Note: If the setting has already been changed for at least one role, its text label is bold and italic.
-
-
On the Modules tab, in the Module Selection field, select Agent.
-
Click the Quick Find Order tab.
-
In the Default Date Range section, define the date range.
-
In the Days Back field, select the number of days prior to the current day that will appear in the Start Date field.
-
In the Days Forward field, select the number of days after the current day that will appear in the End Date field.
-
-
Click Save.
A message appears at the top of the page, stating your settings were saved successfully. If you are making changes to a specific role and this is the first time the setting has been changed for any role, the text label style changes to bold and italic.If you do not want to save, click Revert. The application cancels any unsaved changes and reverts to the last saved settings.
Creating status groups
To assist users in locating the correct order, especially when the same reference number could refer to multiple orders, you can provide a filter by order status.
Since users may not be familiar with the exact meanings of statuses, you can group statuses together into more familiar terms. For example, you might want to identify these statuses in a group called "In Progress": Tendered, Pending, Available, Planned, Dispatched, and Started.
Users can choose to restrict their search to orders that reside within a status group. They do this by selecting the Enable Advance Filtering check box and selecting a status group in the Order Status Group field.
To create a new status group, follow these steps.
-
Go to Menu > Configuration > Settings Manager.
The Settings Manager page opens. -
Do one of the following:
-
If you want the setting change to apply to all roles, verify the Role field is set to [Global Settings].
-
If you want the setting change to apply to a specific role, select it in the Role field.
A message asks you to verify that you want to change the role. Click OK to continue.
Note: If the setting has already been changed for at least one role, its text label is bold and italic.
-
-
On the Modules tab, in the Module Selection field, select Agent.
-
Click the Quick Find Order tab.
In the Manage Status Groups section, existing status groups appear in the Existing Groups field.
-
Add a new, empty group.
-
Click Add New Group.
-
In the New Group field, enter the name of the group.
-
Click Save.
-
Repeat Steps b and c for each group you want to create.
-
When you are finished, click Cancel.
-
-
Select the statuses to put in the new group.
-
In the Existing Groups field, select the group if it is not already selected.
-
In the Available Statuses list, select the status. To select multiple statuses, press and hold CTRL or SHIFT while selecting.
Note: The statuses in this list are defined in the DispStatus label in your database. For more information on modifying this list, see:
Guide: System Administration Guide | Chapter: Using the label file to customize fields | Section: How to edit a label
-
Click
Move Left to move it to the status group list. -
Repeat Steps b-c as needed.
If you do not want a status to be included in the group, select it in the status group list and click
Move Right to move it to the Available Statuses list.
-
-
Click Save.
A message appears at the top of the page, stating your settings were saved successfully. If you are making changes to a specific role and this is the first time the setting has been changed for any role, the text label style changes to bold and italic.If you do not want to save, click Revert. The application cancels any unsaved changes and reverts to the last saved settings.
To delete a status group, select it in the Existing Groups field and click Delete Group. A message appears at the top of the page, stating the group was deleted successfully.