Managing the Report Palette
Before Trimble Web Products V.2016.6
When you build reports in Data Warehouse Explorer, you select report entities from the Report Palette. Data Warehouse sorts the Report Palette into different content groups:
-
Subject Areas
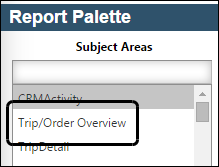
Subject Areas are organized collections of Facts. They provide the primary content for a report.Examples of Subject Areas are:
-
TripDetail
-
TripOperations
-
GeneralLedger
-
RepairOrder
-
-
Dimensions
Dimensions organize Attributes into functional groups. Dimensions are associated with Subject Areas. When you change the Subject Area, the Dimensions change. -
Attributes
Attributes are data descriptors. They identify the data type and provide context to the Facts in the report. They represent the columns in your source database. Attributes are associated with Dimensions. When you change the Dimension, the Attributes change. -
Facts
Facts are measurable, numeric portion of the data. They represent the numeric values in a report. Facts are associated with the Subject Area. When you change the Subject Area, the Facts change. -
Filters
Filters are conditions that reduce the amount of data retrieved from the Data Warehouse Explorer database each time you run your report.
In Data Warehouse, you use the Metadata Settings page to manage these entities.
Setting up the Report Palette
Before Trimble Web Products V.2016.6
When you build reports in Data Warehouse Explorer, you select entity types from these categories:
-
Subject Areas
-
Dimensions
-
Attributes
-
Facts
On the Metadata Settings page, you can:
-
Rename an entity
-
Change the display order
-
Hide the entity from all users
-
Change an entity’s description
To modify Report Palette entities, follow these steps:
-
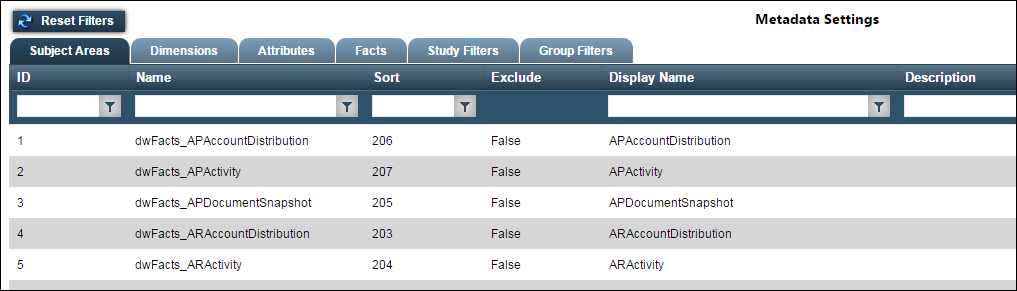
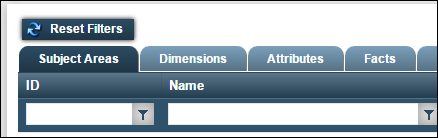
Go to Menu > Data Warehouse > Data Warehouse Admin > Edit Metadata.
The Metadata Settings page opens. -
Click on the tab you want to edit.
The page shows a list of available entities. Information is shown in the following fields:
Tab(s) Field Definition Subject Areas, Dimensions
ID
Sequence number assigned to the entity by Data Warehouse
Name
Entity name in your source database(s)
Sort
Determines the display order in the Report Palette
Exclude
Determines if an entity displays in the Report Palette
The options are:
-
N
The entity is available to all roles.Note: This is the default value for a Subject Area entity.
-
Y
The entity is excluded from the Report Palette.
Note: If you exclude an entity from Data Warehouse Explorer, the system removes it for all users. If you want to exclude an entity from a specific role, see Linking Report Palette entities to roles.
Display Name
Name used for the entity in the Report Palette
Description
Text that appears in a ToolTip when you point to that entity in the Report Palette
Attributes
ID
Sequence number assigned to the entity by Data Warehouse
Name
Entity name in your source database(s)
Sort
Determines the display order in the Report Palette
Exclude
Determines if an entity displays in the Report Palette
The options are:
-
N
The entity is available to all roles.Note: This is the default value for a Subject Area entity.
-
Y
The entity is excluded from the Report Palette.
Note: If you exclude an entity from Data Warehouse Explorer, the system removes it for all users. If you want to exclude an entity from a specific role, see Linking Report Palette entities to roles.
Count
Displays the estimated count of distinct values for that attribute
Display Name
Name used for the entity in the Report Palette
Description
Text that appears in a ToolTip when you point to that entity in the Report Palette
Facts
ID
Sequence number assigned to the entity by Data Warehouse
Name
Entity name in your source database(s)
Sort
Determines the display order in the Report Palette
Exclude
Determines if an entity displays in the Report Palette
The options are:
-
N
The entity is available to all roles.Note: This is the default value for a Subject Area entity.
-
Y
The entity is excluded from the Report Palette.
Note: If you exclude an entity from Data Warehouse Explorer, the system removes it for all users. If you want to exclude an entity from a specific role, see Linking Report Palette entities to roles.
Decimal Places
Number of decimal places the column displays
Note: This column displays only on the Fact sub tab.
Display Name
Name used for the entity in the Report Palette
Description
Text that appears in a ToolTip when you point to that entity in the Report Palette
Format
Displays the calculated fact format
Calculated columns can be one of the following:
-
Currency
-
Numeric
-
Percent
-
-
Select the row of the entity you want to modify.
-
Under the page navigation, click Edit Selected Row.
A pop-up window opens for the selected entity.
-
Make changes as needed.
Note: You cannot change the ID and Name fields.
-
Click Update.
A message appears at the top of the page, stating your settings were save successfully.If you do not want to save, click Cancel instead. The application cancels any unsaved changes and reverts to the last saved settings.
-
Repeat Steps 3-6 as needed.
How it looks in the Report Palette:
Reviewing Data Warehouse filters
Before Trimble Web Products V.2016.6
Filters are restrictions. In Data Warehouse Explorer, you apply filters to limit the amount of data in a report.
There are two types of filters associated with dimensions:
-
Study Filters
Study filters are report filters associated with Dimensions. They are created using SQL Table Value Functions. You cannot modify study filters in Data Warehouse. Once you have created the filter in SQL, click Refresh Available Study Filters to reload the list of available study filters.
Note: Not every dimension is associated with a study filter.
-
Group Filters
Group filters are report filters created in Data Warehouse Admin or in Data Warehouse Explorer.Note: Not every dimension is associated with a group filter.
Study Filters
To view a list of study filters associated with a dimension, follow these steps:
-
Go to Menu > Data Warehouse > Data Warehouse Admin > Edit Metadata.
The Metadata Settings page opens. -
Click the Study Filters tab.
-
In the Select a Dimension field, select the dimension.
The page shows the available study filters.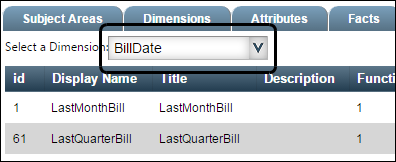
Information for each study filter associated with the dimension is shown in the following fields:
Field Definition id
Sequence number assigned to the filter by Data Warehouse
Display Name
Name that appears in the Report Palette
Title
Name of the filter that appears in your source database
Description
Text that appears in a ToolTip in the Report Palette
Function Parameter Count
Number of parameters this filter accepts
Function Parameter Names
Names of the SQL parameters this filter accepts
Group Filters
To view the group filters associated with a dimension, follow these steps:
-
Go to Menu > Data Warehouse > Data Warehouse Admin > Edit Metadata.
The Metadata Settings page opens. -
Click the Group Filters tab.
-
In the Select a Dimension field, select the dimension.
The page shows the available group filters.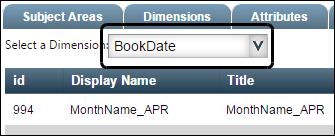
Information for each group filter is shown in the following fields:
Field Definition id
Sequence number assigned to the filter by Data Warehouse
Display Name
Name that displays in the Report Palette
Title
Name of the filter that displays in your source database
Description
Text that appears in a ToolTip in the Report Palette
Linking Report Palette entities to roles
Available in Trimble Web Products V.2015.2 through Trimble Web Products V.2016.6
When Data Warehouse Explorer users build reports, they select the needed fields from the Report Palette. These fields are called entities. Data Warehouse uses roles to determine which users have access to the report entities.
| In Trimble Web Products 2015.2, roles replace the user groups for setting the security of Report Palette entities. If your company used user groups to manage Report Palette entities, you can convert these groups to roles. To convert groups into roles, contact your Data Warehouse customer service representative. |
By default, only the Administrator role has access to report entities in Data Warehouse Explorer. However, you can use the Data Warehouse Security page to link entities to other roles.
Each entity type is presented on its own sub tab:
-
Subject Area
Subject Areas are organized collections of Facts. They provide the primary content for a report. -
Dimensions
Dimensions organize Attributes into functional groups. They are the source for the textual descriptions used to characterize and classify measureable facts in reports. -
Attributes
Attributes are data descriptors. They identify the data type and provide context to the Facts in the report. -
Facts
Facts are the measurable, numeric portion of the data. They represent the numeric values in a report.
To link Report Palette entities to other roles, follow these steps:
-
Go to Menu > Data Warehouse > Data Warehouse Admin > Security.
The Data Warehouse Security page opens.This page displays the following tabs:
-
Subject Areas
-
Dimensions
-
Attributes
-
Facts
Note: Each tab represents an entity type used in the Report Palette.
-
-
Link Report Palette entities to roles.
Subject Areas
To grant access to Subject Area entities, follow these steps:
-
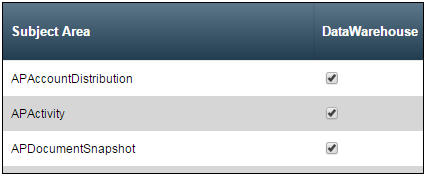
Click the Subject Areas tab.
Information is shown in a grid. Subject areas are the rows, and roles are the columns. -
In the role’s column, select the check box for each entity you want that role to access in the Report Palette.
-
Click Save.
When you select a subject area entity, Data Warehouse automatically selects the associated facts. After you finish granting access to Subject Areas, grant access to Dimension entities.
Dimensions
To grant access to Dimension entities, follow these steps:
-
Click the Dimensions tab.
Information is shown in a grid. Dimensions are the rows, and roles are the columns. -
In the role’s column, select the check box for each entity you want that role to access in the Report Palette.
-
Click Save.
When you select a dimension entity, Data Warehouse automatically selects the associated Attribute entities.
Attributes
When you link Dimension entities to a role, Data Warehouse links all associated Attribute entities to that role. You might have Attribute entities that roles should not use in the Report Palette. If this is the case, you can remove these entities from that role.
To remove access to Attribute entities, follow these steps:
-
Click the Attributes tab.
Information is shown in a grid. Attributes are the rows, and roles are the columns. -
In the Select a Dimension field, select the needed dimension.
The list updates to display all attributes associated with the dimension. -
Clear attribute check boxes as needed.
-
Click Save.
This illustration shows attribute entities the DataWarehouse role will not have access to in the Report Palette.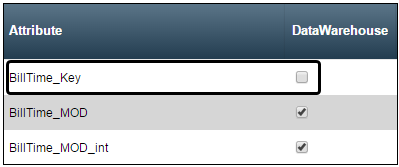
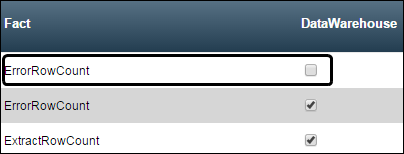
Facts
When you link Subject Area entities to a role, Data Warehouse links all associated Fact entities to that role. You might have Fact entities that roles should not use in the Report Palette. If this is the case, you can remove these entities from that role.
To remove access to a Fact entity, follow these steps:
-
Click the Facts tab.
Information is shown in a grid. Facts are the rows, and roles are the columns. -
In the Select a Subject Area field, select the needed subject area.
The list updates to display all facts associated with the subject area. -
Clear fact check boxes for roles as needed.
-
Click Save.
This illustration shows the fact entity the DataWarehouse role will not have access to in the Report Palette.