Setting up shipment tracking behavior
Users track shipments on these boards:
-
View Available Loads
-
View Completed Orders
-
View Tendered Loads
You can control the shipments a user can see by filtering the shipments by the role of the user’s profile company on the order and setting default date ranges.
You can also specify the behavior and contents of the load boards and allow access to maps from the load boards.
Specifying load boards defaults
eStat allows users to track shipments on load boards. To set the shipment filters and default tracking date range, follow these steps:
-
Go to Menu > Configuration > Settings Manager.
The Settings Manager page opens. -
Do one of the following:
-
If you want the setting change to apply to all roles, verify the Role field is set to [Global Settings].
-
If you want the setting change to apply to a specific role, select it in the Role field.
A message asks you to verify that you want to change the role. Click OK to continue.Note: If the setting has already been changed for at least one role, its text label is bold and italic.
-
-
On the Modules tab, in the Module Selection field, select Customer.
-
Click these tabs: Application Settings > Shipment Tracking and Reports > Shipment Tracking - 1.
-
In the For this user to view a shipment, the user’s profile company must be list, select a profile type. The user will be able to view orders only if the user’s profile companies are of the selected type.

Field Definition Bill To, Order By, Consignee or Shipper
User will see all orders for which one of its profile companies is the Bill To, ordering company, consignee, or shipper
Consignee or Shipper
User will see all orders for which one of its profile companies is the consignee or shipper
Bill To
User will see all orders for which one of its profile companies is the Bill To
Consignee
User will see all orders for which one of its profile companies is the consignee
Order By
User will see all orders for which one of its profile companies is the company that placed the order
Shipper
User will see all orders for which one of its profile companies is the shipper
(No restriction - user can view any shipment)
User will see all orders
For example, suppose a user’s profile companies are ABC Inc. and XYZ Co. If you select Shipper from the list, the user will see orders only where the shipper is ABC Inc. or XYZ Co.
-
In the Default Date Range section, set the default dates as needed. These settings affect the Available or Completed load boards. Each board has its own date fields.
Note: The maximum default for each field is 30 days.
Field Definition Available Days Back
Default number of days before today’s date for which records appear
Available Days Forward
Default number of days after today’s date for which records appear
Historical Days Back
Default number of days before today’s date for which invoiced or completed orders appear
Historical Days Forward
Default number of days after today’s date for which invoiced or completed orders appear
Tendered Days Forward
Default number of days before today’s date for which tendered orders appear
Tendered Days Back
Default number of days after today’s date for which tendered orders appear
-
In the Shipment Detail Dates section, set options as needed.
Field Definition Show Earliest/ Latest Dates
Select this check box to include the value recorded in the Tender Shipment page’s Early Date and Late Date time and date fields for each event on the order.
Show Arrival/ Departure Dates
Select this check box to include the value recorded in the Tender Shipment page’s Early Date and Late Date and time fields for each event on the order.
Show Arrival/Departure Times For Completed Stops
Works with the Show Arrival/Departure Dates field. These fields will only appear if the stop is completed.
-
In the Other Settings section, set options as needed.
Field Definition Show Stop Location Information
Name and entire address for the stop location when viewing the order on the Shipment Details page
Show Non-Billable Events
All billable and non-billable stops on the Shipment Details page
Show Entire Movement
All activity involved with the movement on the Tender Shipment page
-
Click Save.
A message appears at the top of the page, stating your settings were saved successfully.
If you are making changes for a specific role and this is the first time the setting has been changed for any role, the text label style changes to bold and italic.If you do not want to save, click Revert instead. The application cancels any unsaved changes and reverts to the last saved settings.
Allowing access to maps for active loads
When viewing available loads, users can view a map for any order. Map icons show locations of resources, stops, and companies. Users can view a map for a single order or multiple orders. They can view current traffic and a radar map of the weather. Users can also view a map that shows check call breadcrumbs for an order.
By default, users cannot view maps for active loads. You must enable the mapping feature for the View Available Loads page and select which information will appear on maps.
For more information about the mapping feature and general map settings, see Managing the mapping feature.
To enable the mapping feature for active loads and to select map settings, follow these steps:
-
Go to Menu > Configuration > Settings Manager.
The Settings Manager page opens. -
Do one of the following:
-
If you want the setting change to apply to all roles, verify the Role field is set to [Global Settings].
-
If you want the setting change to apply to a specific role, select it in the Role field.
A message asks you to verify that you want to change the role. Click OK to continue.Note: If the setting has already been changed for at least one role, its text label is bold and italic.
-
-
On the Modules tab, in the Module Selection field, select Customer.
-
Click these tabs: Application Settings > Shipment Tracking and Reports > Map.
The map settings for the View Available Loads page appear.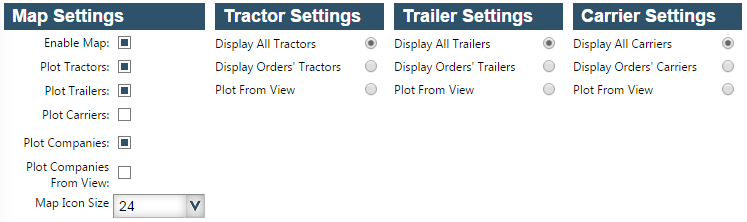
-
Specify settings.
Setting type Field Definition Map
Enable Map
Enable users to view maps for available loads
Plot Tractors
Show tractor icons on maps
Plot Trailers
Show trailer icons on maps
Plot Carriers
Show carrier icons on maps
Plot Companies
Show company icons on maps
Plot Companies From View
Plot company information on maps based on a custom SQL view
Map Icon Size
Select the pixel height and width for map icons
Tractor
Display All Tractors
Show icons for all tractors in your TMWSuite database on maps
Display Orders' Tractors
Show tractor icons only for the selected order(s) on maps
Plot From View
Plot tractor information on maps based on a custom SQL view
Trailer
Display All Trailers
Show icons for all trailers in your TMWSuite database on maps
Display Orders' Trailers
Show trailer icons only for the selected order(s) on maps
Plot From View
Plot trailer information on maps based on a custom SQL view
Carrier
Display All Carriers
Show icons on maps for all carriers in your TMWSuite database
Display Orders' Carriers
Show carrier icons on maps only for the selected order(s)
Plot From View
Plot carrier information on maps based on a custom SQL view
-
Click Save.
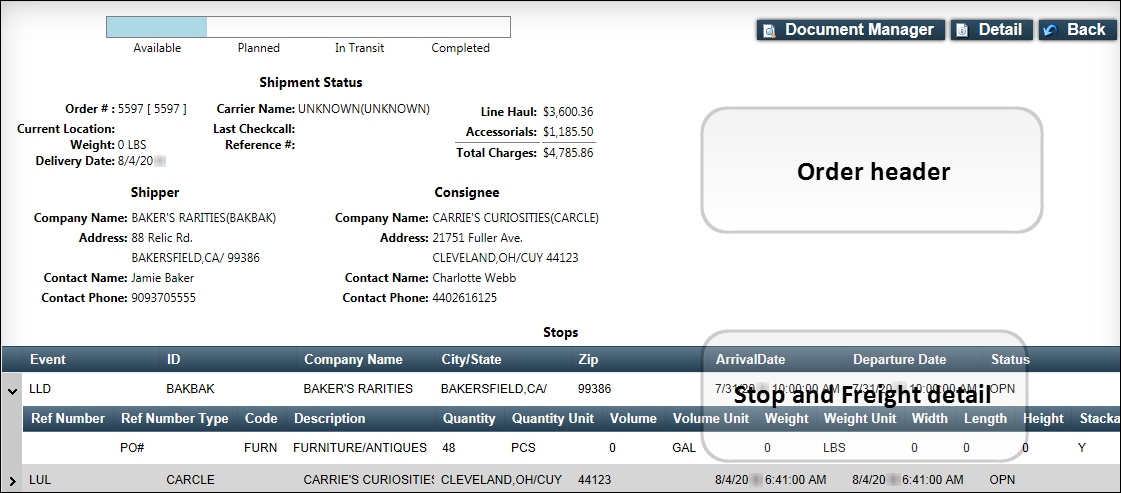
Displaying stop and freight details in a grid
By default, users view their orders on the Shipment Detail page, which shows orders in the same form used to enter them. Users must scroll to view the stops and freight information. You can activate the Shipment Detail Lite page to display shipment details in a format that eliminates having to scroll to view stop and freight details.
The Shipment Detail Lite page replaces the default Shipment Detail page when a user accesses shipment details from these pages:
-
View Available Loads
-
View Completed Orders
-
Quick Find Order
The top section of the page contains order header information. Detailed stop and freight information is displayed in a horizontal grid with expandable rows.
Activating the Shipment Detail Lite view
You can activate the Shipment Detail Lite page to display shipment details in a format that eliminates having to scroll to view stop and freight details. The Shipment Detail Lite page replaces the default Shipment Detail page when a user accesses shipment details from the View Available Loads, View Completed Orders, and Quick Find Order pages.
|
To enable the Shipment Detail Lite page, follow these steps:
-
Go to Menu > Configuration > Settings Manager.
The Settings Manager page opens. -
Do one of the following:
-
If you want the setting change to apply to all roles, verify the Role field is set to [Global Settings].
-
If you want the setting change to apply to a specific role, select it in the Role field.
A message asks you to verify that you want to change the role. Click OK to continue.Note: If the setting has already been changed for at least one role, its text label is bold and italic.
-
-
On the Modules tab, in the Module Selection field, select Customer.
-
Click these tabs: Application Settings > Shipment Tracking and Reports > Lite View.
-
Select the Use a 'Lite' Version of Shipment Details with a Simplified/Hierarchical View check box.
-
Click Save.
A message appears at the top of the page, stating your settings were saved successfully.
If you are making changes for a specific role and this is the first time the setting has been changed for any role, the text label style changes to bold and italic.If you do not want to save, click Revert instead. The application cancels any unsaved changes and reverts to the last saved settings.
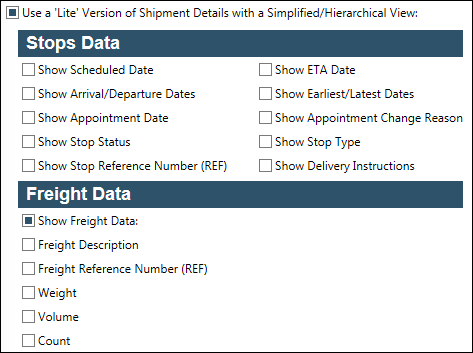
Specifying the information included in the grid
The Shipment Detail Lite page will display every event in a row on the detail grid. By default, the row displays the event number followed by the company name in the Customer column. To display additional information in the grid, select the options in the Stops Data and Freight Data sections of the Lite View tab.
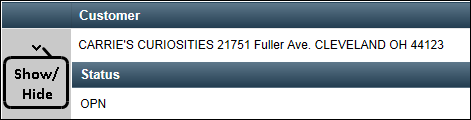
For example, if you want users to see the stop status, select the Show Stop Status check box. The resulting grid will show a top-level row with the event number and customer name. Clicking ![]() Show will display the Stop Status. Clicking
Show will display the Stop Status. Clicking ![]() Hide will close the expanded row.
Hide will close the expanded row.
To specify the information included in the grid, follow these steps:
-
In the Stops Data section, select the check boxes for the stop details you want to display in the grid.
Field Definition Show Scheduled Date
Date/time the stop is scheduled to occur
Show Arrival / Departure Dates
Date/time recorded in the Tender Shipment page’s Early Date and Time and the Late Date and Time fields for each event on the order
Show Appointment Date
Date/time of a scheduled appointment
Show Stop Status
Current status of each stop
Show Stop Reference Number ()*
First reference number of the default type recorded for the stop
Notes:
-
You specify the default reference number type for stops on the Shipment Tender tab’s Defaults sub tab.
-
The check box name includes the abbreviation for the default reference number type in parentheses.

-
Reference numbers of types other than the default are not shown.
Show ETA Date
Estimated date/time for arrival at the stop
Show Earliest/Latest Dates
Date/time recorded in the Tender Shipment page’s Early Date and Time and the Late Date and Time fields for each event on the order
Show Appointment Change Reason
Change reason recorded when a scheduled appointment is changed
Show Stop Type
Stop event type
Show Delivery Instructions
Any delivery instructions recorded for the stop
-
-
In the Freight Data section, select the check boxes for the freight details you want to display in the grid.
* The unit type for weight, volume, and count is selected when the order is entered. The freight detail grid will show the type selected on the order.
Field Definition Show Freight Data
You must select this check box to display freight information.
Freight Description
Commodity description of the freight on the stop
Freight Reference Number *
Reference number of the default type recorded for the freight
Notes:
-
You specify the default reference number type for freight on the Shipment Tender tab’s Defaults sub tab.
-
The check box name includes the abbreviation for the default reference number type in parentheses.

-
Reference numbers of types other than the default are not shown.
Weight *
Value entered in the Weight field
Volume *
Value entered in the Volume field
Count *
Value entered in the Quantity field
-
-
Click Save.
A message appears at the top of the page, stating your settings were saved successfully.If you do not want to save, click Revert instead. The application cancels any unsaved changes and reverts to the last saved settings.