Configuring load board functionality
You can customize the load board settings for each role. These settings control such things as the display of data and whether carriers can self-assign a load, request a load, update load status, and other options.
Preserving the display of data on load boards
While working in load boards, carriers can change the data grid display according to their liking. If the carrier role allows it, the carrier can move through multiple pages and change the grid display by sorting, reordering columns, or grouping. By default, this display setting is lost when they switch to another board and then return.
To save in memory each load board display for the current session, follow these steps:
|
-
Go to Menu > Configuration > Settings Manager.
The Settings Manager page opens. -
Do one of the following:
-
If you want the setting change to apply to all roles, verify the Role field is set to [Global Settings].
-
If you want the setting change to apply to a specific role, select it in the Role field. A message asks you to verify that you want to change the role. Click OK to continue.
If the setting has already been changed for at least one role, its text label is bold and italic.
-
-
On the Modules tab, in the Module Selection field, select Carrier.
-
Click these tabs: Application Settings > General.
-
Do one of the following:
-
To preserve the display of all load boards, select the Preserve Load Board Display check box.
-
To reset the default display for all load boards each time a user opens a load board, clear the Preserve Load Board Display check box.
-
-
Click Save.
A message appears at the top of the page, stating your settings were saved successfully.If you are making changes for a specific role and this is the first time the setting has been changed for any role, the text label style changes to bold and italic.
If you do not want to save, click Revert. The application cancels any unsaved changes and reverts to the last saved settings.
Customizing the Available Loads board
Follow these steps to:
-
Set the maximum number of trips that can appear on the Available Loads board
-
Allow carriers to request available loads
-
Allow carriers to self-assign themselves to loads
-
Allow carriers to group the data on the grid
-
Go to Menu > Configuration > Settings Manager.
The Settings Manager page opens. -
Do one of the following:
-
If you want the setting change to apply to all roles, verify the Role field is set to [Global Settings].
-
If you want the setting change to apply to a specific role, select it in the Role field. A message asks you to verify that you want to change the role. Click OK to continue.
If the setting has already been changed for at least one role, its text label is bold and italic.
-
-
On the Modules tab, in the Module Selection field, select Carrier.
-
Click these tabs: Application Settings > Load Boards > Available Loads.
-
In the General section, make your selections.
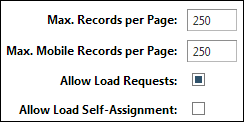
Field Definition Max. Records per Page
To control the use of your system’s bandwidth, set the maximum number of rows allowed per page. The carrier can select any number less than or equal to this number on their My Profile page.
Allow Load Requests
Determines whether you allow carriers to request a load that is posted on their Available Loads board
The request form contains five fields with which you can collect (and store in the database) any desired pieces of information.
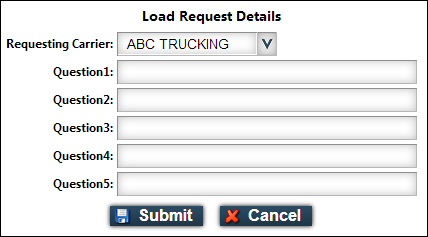
The request is sent by e-mail to an e-mail address you identify. These fields can be used as variables in the notification e-mail.
You can use the Customize feature to change the field names to reflect the type of information you want to collect.
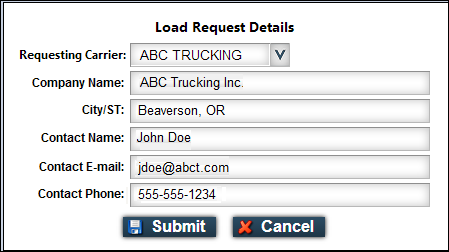
Note: In TMWSuite, the request information is added as a note on the order.
Allow Load Self-Assignment
Determines whether carriers can assign themselves to a load
Notices are sent by e-mail to an identified e-mail address. In TMWSuite, the load status is set to Dispatched.
-
Click Save.
A message appears at the top of the page, stating your settings were saved successfully.If you are making changes for a specific role and this is the first time the setting has been changed for any role, the text label style changes to bold and italic.
If you do not want to save, click Revert. The application cancels any unsaved changes and reverts to the last saved settings.
-
Customizing the Assigned Loads board
Follow these steps to:
-
Set the maximum number of records that appear on the Assigned Loads board
-
Allow carriers to accept or reject load assignments
-
Allow carriers to upload proof of delivery, detention documents or other required paperwork
-
Go to Menu > Configuration > Settings Manager.
The Settings Manager page opens. -
Do one of the following:
-
If you want the setting change to apply to all roles, verify the Role field is set to [Global Settings].
-
If you want the setting change to apply to a specific role, select it in the Role field. A message asks you to verify that you want to change the role. Click OK to continue.
If the setting has already been changed for at least one role, its text label is bold and italic.
-
-
On the Modules tab, in the Module Selection field, select Carrier.
-
Click these tabs: Application Settings > Load Boards > Assigned Loads.
-
Make your selections as needed.
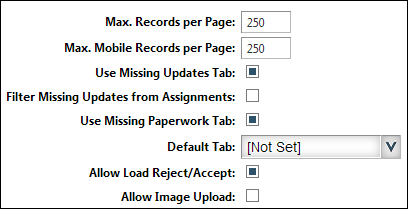
Field Definition Max. Records per Page
To control the utilization of your system’s bandwidth, set the maximum number of rows allowed per page. The carrier can select any number less than or equal to this number on their My Profile page.
Default Tab
The Assigned Loads page includes four tabs. Select the tab you want to appear on top when the carrier opens this page.
-
[Not Set]
If the Pending tab is used, it will appear on top. -
Assigned
Displays the load assignments. -
Missing Updates
Displays loads that are missing load updates. -
Missing Paperwork
Displays loads that are missing paperwork. -
Pending
Displays the load assignments the carrier can accept or reject. Pending loads are those that have been tendered via the Dispatch System using EDI204 status updates. The carrier uses this tab to review a grid of tendered loads that are pending approval or rejection.
Allow Image Upload
If using an imaging solution, determines whether to allow carriers to upload proof of delivery and detention documentation.
During installation, your imaging interface is configured to upload files to a specified location, such as to the Trimble Imaging Server via FTP.
-
-
-
Click Save.
A message appears at the top of the page, stating your settings were saved successfully.If you are making changes for a specific role and this is the first time the setting has been changed for any role, the text label style changes to bold and italic.
If you do not want to save, click Revert. The application cancels any unsaved changes and reverts to the last saved settings.
Customizing the Historical Loads board
You can set the maximum number of records that appear on the Historical Loads board, and the date range used when the page opens. Historical loads are loads that have been completed.
To customize the Historical Loads board, follow these steps:
-
Go to Menu > Configuration > Settings Manager.
The Settings Manager page opens. -
Do one of the following:
-
If you want the setting change to apply to all roles, verify the Role field is set to [Global Settings].
-
If you want the setting change to apply to a specific role, select it in the Role field. A message asks you to verify that you want to change the role. Click OK to continue.
If the setting has already been changed for at least one role, its text label is bold and italic.
-
-
On the Modules tab, in the Module Selection field, select Carrier.
-
Click these tabs: Application Settings > Load Boards > Historical Loads.
-
Make your selections.
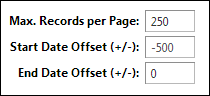
Field Definition Max. Records per Page
To control the utilization of your system’s bandwidth, set the maximum number of rows allowed per page. The carrier can select any number less than or equal to this number on their My Profile page.
Start Date Offset (+/-)
End Date Offset (+/-)
The Start and End Date Offsets work together to retrieve historical data, where the dates recorded as the departure from the last stop, fall within a defined date range. Both offsets are based on the current date and are used as the default date range on the Historical Loads board. The carrier can change the displayed Start and End Dates when working in a Historical Loads board.
In the Start Date Offset (+/-) field, enter a default number of days back from the current date you want matching data retrieved. For example, an offset of -14 will display records between the current date and the past two weeks.
Dates shown on the Historical Loads board:
This sample shows the dates that would appear if the current date is 7/31 and the Start Date Offset is set to -30.

In the End Date Offset (+/-) field, enter the number of days past the current date you want the date rage to end. For example, an offset of 0 will display records up to the current date. An offset of +2 will include records that have a future date two days after the current date.
-
Click Save.
A message appears at the top of the page, stating your settings were saved successfully.If you are making changes for a specific role and this is the first time the setting has been changed for any role, the text label style changes to bold and italic.
If you do not want to save, click Revert. The application cancels any unsaved changes and reverts to the last saved settings.
Determining when carriers can update a stop’s status
You can control when a carrier can update a stop’s status.
-
By default, the application allows changes to completed stops. However, you can prevent updates to completed stops.
-
By default, the application actualizes all previous arrivals and departures on a load when a user actualizes the arrival or departure at a later stop. However, you can prevent a user from saving the update to a stop if a previous stop remains un-actualized.
-
By default, the application displays the
 Update Status icon for all stops on a trip on the pages used to update load information. However, you can limit the icon display to just the current stop.
To specify how the system handles updates to a stop, follow these steps:
-
Go to Menu > Configuration > Settings Manager.
The Settings Manager page opens. -
Do one of the following:
-
If you want the setting change to apply to all roles, verify the Role field is set to [Global Settings].
-
If you want the setting change to apply to a specific role, select it in the Role field. A message asks you to verify that you want to change the role. Click OK to continue.
If the setting has already been changed for at least one role, its text label is bold and italic.
-
-
On the Modules tab, in the Module Selection field, select Carrier.
-
Click these tabs: Application Settings > Load Details > Stop Updates.
-
Make your selections.
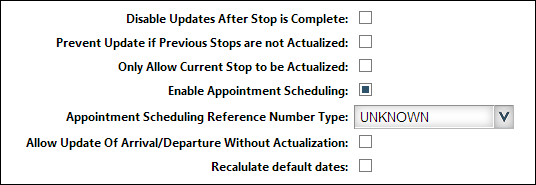
Field Definition Disable Updates After Stop is Complete
By default, a user can change the trailer used on a stop or upload paperwork after a stop is completed.
Use this option to prevent access to actualized stops. When this option is used, the
Update Status icon does not appear for actualized stops.
Notes:
-
If a user realizes later that information was entered incorrectly when actualizing a stop, the information cannot be changed. The user must notify your dispatcher of the error and provide the correct information so that the dispatcher can make the needed change.
-
When this option is used, a user cannot upload paperwork for a completed stop. However, they can upload paperwork on the order level.
Prevent Update if Previous Stops are not Actualized
By default, if a user actualizes a stop before it is completed, the system will actualize all incomplete previous stops.
When this option is selected, the system will not save updates to a stop if previous stops are not actualized.
Notes:
-
By default, the
Update Status icon appears for all stops on a trip in the pages used to update load information and a user can access any stop to perform an update. However if a previous stop is un-actualized, when the user attempts to save the entry of arrival or departure dates/times and/or the actualization of the arrival or departure, an error message appears.
-
When this option is used with the Only Allow Current Stop to be Actualized option, that option takes precedence. The
Update Status icon appears only for the current stop.
Only Allow Current Stop to be Actualized
By default, the
Update Status icon appears for all stops on a trip in the pages used to update load information.When this option is selected, the icon appears for the current stop only. It does not appear for previously actualized stops or subsequent un-actualized stops.

Enable Appointment Scheduling
By default, the
 Schedule Appointment icon appears for all stops on a trip in the pages used to updated load information.
-
-
Click Save.
A message appears at the top of the page, stating your settings were saved successfully.If you are making changes for a specific role and this is the first time the setting has been changed for any role, the text label style changes to bold and italic.
If you do not want to save, click Revert. The application cancels any unsaved changes and reverts to the last saved settings.
Determining how CarrierHub will handle carriers' updates to a stop’s status
By default, carriers can update a stop’s status by:
-
Recording the date/time for the arrival at or the departure from the stop
-
Marking the arrival and/or departure as completed
You can have stop updates trigger check calls that notify your dispatchers of the update.
To specify how the system handles updates to a stop, follow these steps:
-
Go to Menu > Configuration > Settings Manager.
The Settings Manager page opens. -
Do one of the following:
-
If you want the setting change to apply to all roles, verify the Role field is set to [Global Settings].
-
If you want the setting change to apply to a specific role, select it in the Role field. A message asks you to verify that you want to change the role. Click OK to continue.
If the setting has already been changed for at least one role, its text label is bold and italic.
-
-
On the Modules tab, in the Module Selection field, select Carrier.
-
Click these tabs: Application Settings > Load Details > Check Calls.
-
Select the Process Status Updates as Check Calls check box.

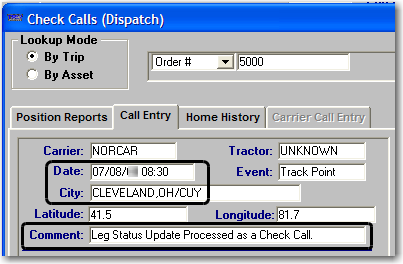
When the dispatcher receives e-mail notification that a check call has been recorded for a load, he/she can look up the check call in the TMWSuite Dispatch application’s Check Calls (Dispatch) window. The window shows the following information for a status update:
-
The date/time recorded for the arrival or departure in the Date field.
-
The location of the stop in the City field.
-
The text Leg Status Update Processed as a Check Call appears in the Comment field.
Note: When you use this option:
-
You must set up e-mail notifications for the stop update events to be sent to your dispatchers.
-
You must tell your dispatchers to use the information from the check call e-mail to update the stop information for the identified trip manually.
-
Use of this option and reliance on manual updates in TMWSuite can interfere with how the system works if you have used the Disable Updates After Stop is Completed option on the Stop Updates tab.
-
Carriers will not receive confirmation messages when they record dates/times or actualize arrivals and departures, or when they record the trailer used on a load.
-
If you allow carriers to create check calls for position reports, be aware that status update and position report check calls all appear in the Dispatch application’s Check Call window. Your dispatchers will need to be trained to identify status update check calls so that they can manually update the database correctly.
-
-
Click Save.
A message appears at the top of the page, stating your settings were saved successfully.If you are making changes for a specific role and this is the first time the setting has been changed for any role, the text label style changes to bold and italic.
If you do not want to save, click Revert. The application cancels any unsaved changes and reverts to the last saved settings.
Disabling mileage calculation when loads are updated in CarrierHub
By default, when carriers are updating a stop’s status, your mileage interface attempts to calculate the mileage. The Web Server for CarrierHub must have the mileage application installed or the miles on the leg will not be updated correctly.
To disable mileage calculation in CarrierHub, follow these steps:
-
Go to Menu > Configuration > Settings Manager.
The Settings Manager page opens. -
Do one of the following:
-
If you want the setting change to apply to all roles, verify the Role field is set to [Global Settings].
-
If you want the setting change to apply to a specific role, select it in the Role field. A message asks you to verify that you want to change the role. Click OK to continue.
If the setting has already been changed for at least one role, its text label is bold and italic.
-
-
On the Modules tab, in the Module Selection field, select Carrier.
-
Click these tabs: Application Settings > Load Details > General.
-
In the Enable Mileage Calculation check box, do one of the following:
-
To disable mileage calculation, clear the check box.
-
To enable mileage calculation, select the check box.
-
-
Click Save.
A message appears at the top of the page, stating your settings were saved successfully.If you are making changes for a specific role and this is the first time the setting has been changed for any role, the text label style changes to bold and italic.
If you do not want to save, click Revert. The application cancels any unsaved changes and reverts to the last saved settings.
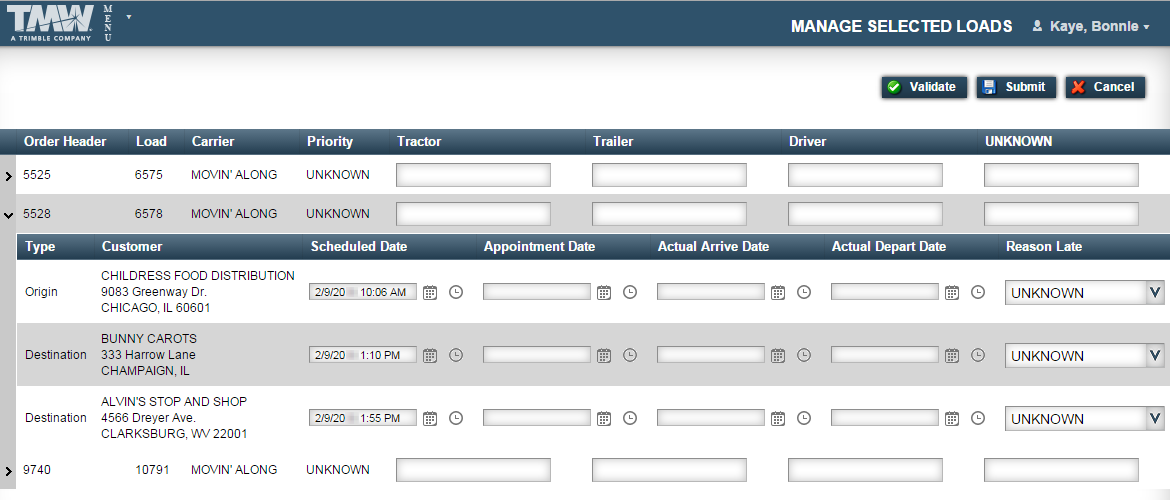
Specifying tolerance levels for appointment times, departure times, and MPH
The Manage Selected Loads feature allows your carriers to update and finalize the scheduled and actual dates/times for pickups and drops for multiple loads simultaneously. For each load, a carrier can:
-
Update the reference number(s) assigned on the load
-
Identify the tractor, trailer(s), and driver(s) assigned to the load
-
Update the arrival and departure times for the trip’s stops
Notes:
-
The Manage Selected Loads feature is not available in the fuel version of CarrierHub.
-
The Scheduled Date field displays the latest date/time for the stop.
By default, the Scheduled Date field does not display. It is activated by a setting on the Load Management tab of the Settings Manager for the Carrier module. -
The Appointment Date date/time populates the Stop ETA field for the stop in the Dispatch Trip Folder’s Stop Detail grid. If the date/time is changed in the Stop Detail grid, those changes appear here.
By default, the Appointment Date field does not display. It is activated by a setting on the Load Management tab of the Settings Manager for the Carrier module. -
The Actual Arrive Date date/time populates the Arrival date/time for the stop in the Trip Folder’s Stop Detail grid.
If the Arrival date/time has been actualized for the stop in the Stop Detail grid, that date/time appears here. Actualized dates/times are read-only and cannot be changed by the carrier. -
The Actual Depart Date date/time populates the Departure date/time for the stop in the Trip Folder’s Stop Detail grid.
If the Departure date/time has been actualized for the stop in the Stop Detail grid, that date/time appears here. Actualized dates/times are read-only and cannot be changed by the carrier.
-
To determine whether carriers are completing stops efficiently, you define tolerance levels for:
-
The minimum time spent at each stop
-
Early and late appointment dates/times
-
Maximum allowable average miles per hour between stops
You do this on the Load Management tab on the Settings Manager page for the Carrier module.
When a carrier enters a date/time in the Manage Selected Loads page, the system compares it with the Load Management settings. If an entry does not meet a tolerance level, an error message appears. The carrier must correct the error before updating the information.
To set the tolerance levels, follow these steps:
-
Go to Menu > Configuration > Settings Manager.
The Settings Manager page opens. -
Do one of the following:
-
If you want the setting change to apply to all roles, verify the Role field is set to [Global Settings].
-
If you want the setting change to apply to a specific role, select it in the Role field. A message asks you to verify that you want to change the role. Click OK to continue.
If the setting has already been changed for at least one role, its text label is bold and italic.
-
-
On the Modules tab, in the Module Selection field, select Carrier.
-
Click these tabs: Application Settings > Load Management.
-
Make entries in the following fields as needed.
Field Definition At a stop, Departure time must be at least this many minutes after arrival
Enter the minimum number of minutes allowed at a stop.
When the carrier validates the Manage Selected Loads page, the system compares the amount of time between the entries in the Actual Arrive Date and Actual Depart Date fields. If it is less than the number of minutes entered here, an error message appears.
Appointment times cannot be later than this number of days
Enter the maximum number of days after the system date that the Appointment Date in the Manage Selected Loads page can be scheduled.
When the carrier validates the Manage Selected Loads page and the Appointment Date is after the system date, the number of days between the dates cannot exceed the number specified here. If it does, an error message appears.
Appointment times cannot be earlier than this number of days
Enter the maximum number of days before the system date that the Appointment Date in the Manage Selected Loads page can be scheduled.
When the carrier validates the Manage Selected Loads page and the Appointment Date is before the system date, the number of days between the dates cannot exceed the number specified here. If it does, an error message appears.
Speed Limit: Maximum MPH between departure from one stop and arrival at the next
Enter the maximum allowable average miles per hour when traveling from the origin to the destination.
When the carrier validates the Manage Selected Loads page, the system calculates the average MPH between stops by comparing the origin’s Actual Depart Date to the destination’s Actual Arrive Date. If it exceeds the maximum allowable MPH, an error message appears.
Show Load Header Columns
By default, the load header for each trip displays the leg header number and carrier name.
Select the check box to also display these columns in the load header: Priority, Tractor, Trailer, Driver, and reference number.
Show Order Header Column
Display the Order Header column. It displays the order number for the stop.
Show Appointment Date Column
Display the Appointment Date column.
This date/time populates the Stop ETA field for the stop in the Dispatch Trip Folder’s Stop Detail grid. If the date/time is changed in the Stop Detail grid, those changes appear here.
Enable Scheduled Date Column
Display the Scheduled Date column. It displays the latest date/time for the stop.
Scheduled Date Updates Arrival/ Departure Date
Becomes active when you select the Enable Scheduled Date Column check box.
When the carrier updates the Scheduled Date fields on the Manage Selected Loads and validates the page, the system updates the Arrival Date/Time and Departure Date/Time fields on the Load Details page.
Enable Custom Stop RefNumber Column
For each stop, display the default reference number as defined in the Load Details tab in Settings Manager. The column header displays the default reference number type. If no default was specified, the bill of lading number is used.
Allow Same Stop Update
Combine multiple stops with the same event type and location into a single line. When you update that line, all stops are updated with the new information.
-
Click Save.
A message appears at the top of the page, stating your settings were saved successfully.If you are making changes for a specific role and this is the first time the setting has been changed for any role, the text label style changes to bold and italic.
If you do not want to save, click Revert. The application cancels any unsaved changes and reverts to the last saved settings.
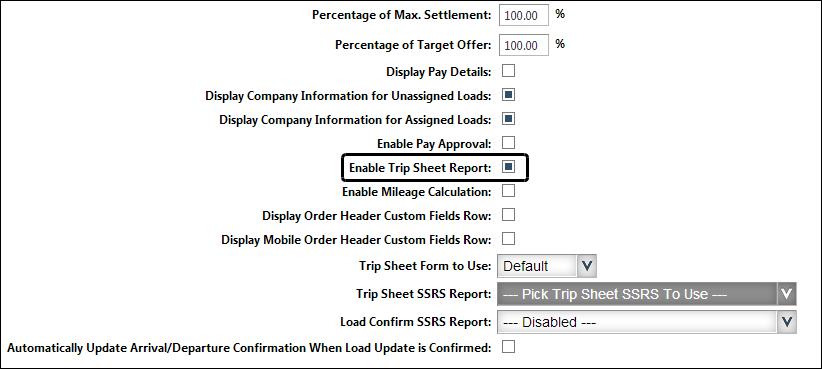
Allowing carriers to print a trip sheet report
Trip sheets can be printed from these pages:
-
View Load Details
Note: Trip sheet printing is available whether the View Load Details page is accessed from the Available Loads or the Historical Loads pages. -
Update Load Details
CarrierHub provides one default trip sheet format, as shown in this illustration.
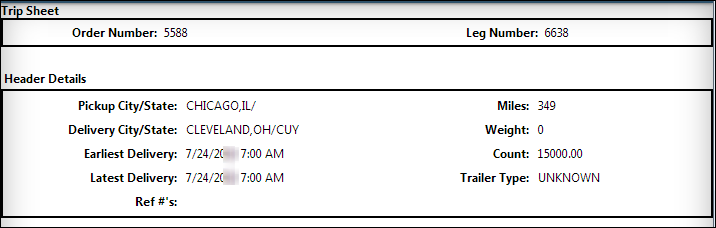
| Your company can create its own customized trip sheet by grouping SQL reports together in an HTML form, and specifying the form will replace the standard trip sheet. |
To allow carriers to print trip sheets for loads in CarrierHub, follow these steps:
-
Go to Menu > Configuration > Settings Manager.
The Settings Manager page opens. -
Do one of the following:
-
If you want the setting change to apply to all roles, verify the Role field is set to [Global Settings].
-
If you want the setting change to apply to a specific role, select it in the Role field. A message asks you to verify that you want to change the role. Click OK to continue.
If the setting has already been changed for at least one role, its text label is bold and italic.
-
-
On the Modules tab, in the Module Selection field, select Carrier.
-
Click these tabs: Application Settings > Load Details > General.
-
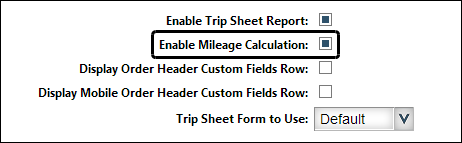
Select the Enable Trip Sheet Report check box.
-
Click Save.
A message appears at the top of the page, stating your settings were saved successfully.If you are making changes for a specific role and this is the first time the setting has been changed for any role, the text label style changes to bold and italic.
If you do not want to save, click Revert. The application cancels any unsaved changes and reverts to the last saved settings.
Allowing carriers to create check calls
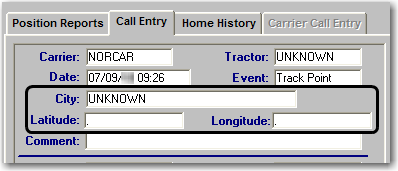
You can give carriers the ability to create check calls to submit position reports. Check call position reports allow you to know the current location of the equipment performing a load.
A check call position report updates the TMWSuite database.
-
By default, the position report is identified as a Track Point event.
-
The check call identifies the load (order #) and the carrier assigned to the load.
-
The Date field shows the date/time the carrier clicked
 Save Check Call.
 -
The carrier’s city/state/Zip Code entries are used to populate the Latitude and Longitude fields.
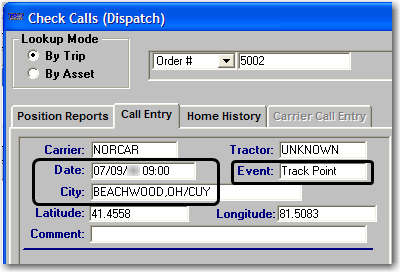
When you grant carriers the ability to create check calls, you should configure e-mail notifications for check call events to be sent to your dispatchers so that they are aware of the update to the database.
|
To allow carriers to create check calls, follow these steps:
-
Go to Menu > Configuration > Settings Manager.
The Settings Manager page opens. -
Do one of the following:
-
If you want the setting change to apply to all roles, verify the Role field is set to [Global Settings].
-
If you want the setting change to apply to a specific role, select it in the Role field. A message asks you to verify that you want to change the role. Click OK to continue.
If the setting has already been changed for at least one role, its text label is bold and italic.
-
-
On the Modules tab, in the Module Selection field, select Carrier.
-
Click these tabs: Application Settings > Load Details > Check Calls.
-
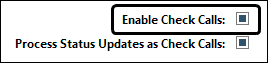
Select the Enable Check Calls check box.
-
Click Save.
A message appears at the top of the page, stating your settings were saved successfully.If you are making changes for a specific role and this is the first time the setting has been changed for any role, the text label style changes to bold and italic.
If you do not want to save, click Revert. The application cancels any unsaved changes and reverts to the last saved settings.
Allowing carriers to record trailer information for a load
You can set up CarrierHub to allow carriers to record the ID of the trailer used on a load when they are updating stop information. To do so, you must enable the display of the trailer ID fields in the Update Load Details page.
You may also want to allow a carrier access to a list of the trailer IDs from your dispatch database. Such access may be helpful in ensuring that accurate IDs are recorded. It can also save time for the user, since attempting to save an invalid ID produces an error and the user must make the entry again. To provide such access, you must enable the trailer lookup feature.
| If you allow users to update your dispatch database directly, valid trailer IDs are added to the stop detail for the order. If you have CarrierHub set up to create check calls when a carrier updates load information, the trailer ID will be available to your dispatchers in the system’s check call window. |
To allow carriers to record trailer information for a load, follow these steps:
-
Go to Menu > Configuration > Settings Manager.
The Settings Manager page opens. -
Do one of the following:
-
If you want the setting change to apply to all roles, verify the Role field is set to [Global Settings].
-
If you want the setting change to apply to a specific role, select it in the Role field. A message asks you to verify that you want to change the role. Click OK to continue.
If the setting has already been changed for at least one role, its text label is bold and italic.
-
-
On the Modules tab, in the Module Selection field, select Carrier.
-
Click these tabs: Application Settings > Load Details > Trailers.
-
Make your selections.
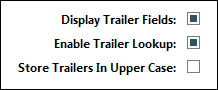
Field Definition Display Trailer Fields
Use this option to provide the fields in which a user may record the ID of the trailer used on a load.
Enable Trailer Lookup
Use this option to provide users access to the Trailer Lookup window, which is used to look up trailer IDs from your TMWSuite database.
Notes:
-
Using this option requires that you have also selected the Display Trailer Fields check box.
-
Allowing users to select a trailer ID from your TMWSuite database can result in conflicts in Dispatch if they select the wrong trailer.
Store Trailers in Upper Case
Use this option to force a Trailer ID that is entered in lower case text during updating to be saved to the dispatch system database in capital letters.
-
-
Click Save.
A message appears at the top of the page, stating your settings were saved successfully.If you are making changes for a specific role and this is the first time the setting has been changed for any role, the text label style changes to bold and italic.
If you do not want to save, click Revert. The application cancels any unsaved changes and reverts to the last saved settings.
Allowing carriers to update reference numbers, commodity quantities, and notes
You can allow carriers to perform all of these tasks when they update an order status.
-
Update the quantity of a commodity on the drop

-
Add reference numbers
-
Add trip Notes associated with the order

Carriers can then view other notes they entered.

-
By default, any notes entered in TMWSuite as attached to the Order and regarding the Carrier, can be viewed by the carrier in CarrierHub on the View Load Details page. The carrier accesses them by clicking
 Carrier Notes. If the carrier added a note through CarrierHub, it will also be listed.
In TMWSuite:

In CarrierHub:
This sample lists the note from TMWSuite, and the note added by the carrier.

-
You can see any notes, entered by a carrier through CarrierHub, in TMWSuite as attached to the Order and regarding the Carrier. The note text includes the Trip number.

-
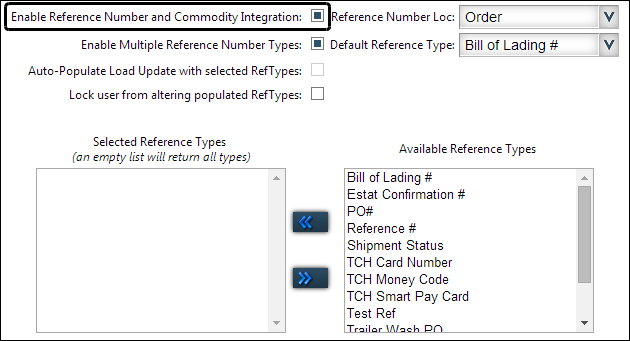
You grant carriers the ability to perform all of these tasks using the Enable Reference Number and Commodity Integration check box.
| You grant carriers the ability to perform all of these tasks. CarrierHub cannot be set up to activate some tasks but not others. If you do not want to allow carriers to perform all these tasks, you can use the field customizer to hide the fields you do not want them to update. However, you cannot hide the tabs on which the fields are located. |
To allow carriers to update reference numbers, quantities, and notes, follow these steps:
-
Go to Menu > Configuration > Settings Manager.
The Settings Manager page opens. -
Do one of the following:
-
If you want the setting change to apply to all roles, verify the Role field is set to [Global Settings].
-
If you want the setting change to apply to a specific role, select it in the Role field. A message asks you to verify that you want to change the role. Click OK to continue.
If the setting has already been changed for at least one role, its text label is bold and italic.
-
-
On the Modules tab, in the Module Selection field, select Carrier.
-
Click these tabs: Application Settings > Load Details > Reference Numbers.
-
Select the Enable Reference Number and Commodity Integration check box.
The Freight Commodities, Reference Numbers, Add Note, and View Notes tabs will appear when a carrier clicks
 Update Status on the load details pages. Carriers use these tabs to perform those tasks.
 -
Click Save.
A message appears at the top of the page, stating your settings were saved successfully.If you are making changes for a specific role and this is the first time the setting has been changed for any role, the text label style changes to bold and italic.
If you do not want to save, click Revert. The application cancels any unsaved changes and reverts to the last saved settings.
Specifying how CarrierHub handles reference numbers
If you allow carriers to enter and update reference numbers on the Update Load Details page and the Manage Selected Loads page, you must determine how CarrierHub handles reference numbers.
You can:
-
Specify whether reference numbers are associated with the order as a whole, with stops, or with commodities.
-
Identify which reference number types carriers may enter.
Note: Your company defined its reference number types in the ReferenceNumbers label, accessed in TMWSuite’s System Administration application.
-
Make reference number types appear automatically on a load’s Reference Number tab and the Manage Selected Loads page.
-
Specify a default reference number type.
-
Prevent carriers from changing reference number types.
On the Manage Selected Loads page, carriers must record a reference number for each type that appears when updating a load.
-
If the Enable Multiple Reference Number Types check box is cleared, the default reference type will be the only type of reference number that must be entered.

-
If both the Enable Multiple Reference Number Types and Auto-Populate Load Update with selected RefTypes check boxes are selected, the types from the Selected Reference Types list appear and must be entered.

A maximum of five reference number types can appear on the Manage Selected Loads page.
-
If fewer than five types have been added to the Selected Reference Types list, all appear on the Manage Selected Loads page.
-
If more than five types have been added to the Selected Reference Types list, only the first five appear.
-
If no reference number types appear in the Selected Reference Types list, the first five active types from the ReferenceNumbers label appear. For more information, see Using the label file to customize fields.
-
You perform reference number setup on the Settings Manager page. The controls are found on the Load Details tab’s Reference Numbers tab.
To specify how reference numbers are handled, follow these steps:
-
Go to Menu > Configuration > Settings Manager.
The Settings Manager page opens. -
Do one of the following:
-
If you want the setting change to apply to all roles, verify the Role field is set to [Global Settings].
-
If you want the setting change to apply to a specific role, select it in the Role field. A message asks you to verify that you want to change the role. Click OK to continue.
If the setting has already been changed for at least one role, its text label is bold and italic.
-
-
On the Modules tab, in the Module Selection field, select Carrier.
-
Click these tabs: Application Settings > Load Details > Reference Numbers.
-
Set your reference number preferences. These include:
-
Ability to specify multiple types of reference numbers
-
Preventing changing of reference number types
-
Click Save.
A message appears at the top of the page, stating your settings were saved successfully.If you are making changes for a specific role and this is the first time the setting has been changed for any role, the text label style changes to bold and italic.
If you do not want to save, click Revert. The application cancels any unsaved changes and reverts to the last saved settings.
Specifying the reference number location
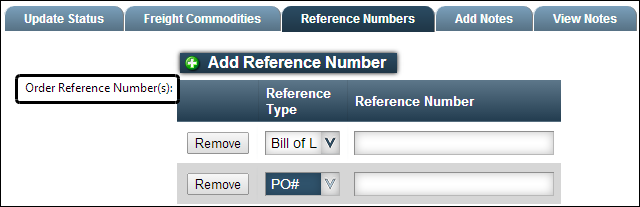
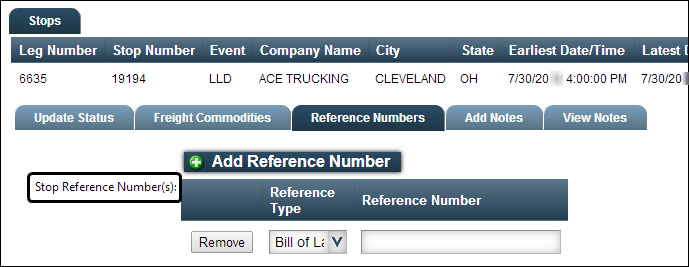
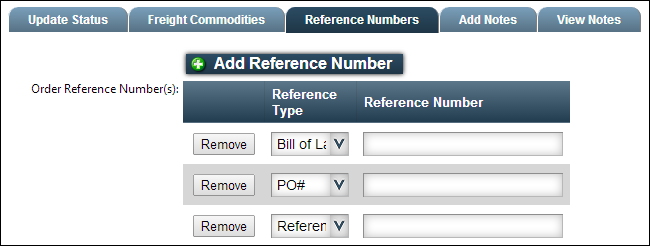
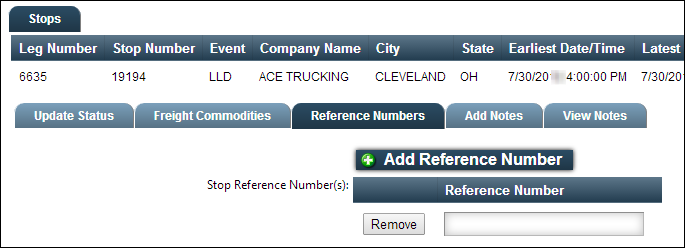
Use the Reference Number Loc list to specify whether reference numbers are for the order as a whole, stops, or commodities. The option you select affects where reference number fields appear on the Update Load Details page.
-
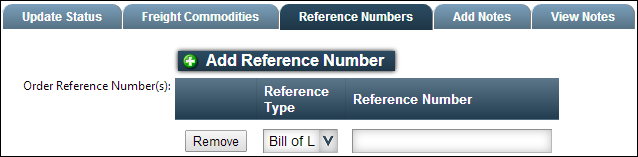
When reference numbers are associated with the order as a whole, the carrier enters them on the Reference Numbers tab in the Update Load Details page.
-
When reference numbers are associated with stops, the carrier enters them on the Reference Numbers tab for the stop.
-
When reference numbers are associated with commodities, the carrier enters them on the Freight Commodities tab.

Specifying that carriers may enter multiple types of reference numbers
Select the Enable Multiple Reference Number Types check box.
When a carrier updates a load’s details, the reference number types from the Selected Reference Types list are available on the Reference Numbers tab or Freight Commodities tab:

If no types appear in the Selected Reference Types list, all reference number types your company has defined are available on the Reference Numbers tab or Freight Commodities tab when a carrier updates a load’s details.
Identifying which reference number types carriers may enter
If you do not want carriers to enter every type of reference number, you can limit the types available on the Update Load Details page. To do so, select the types you want in the Available Reference Types list and click ![]() Add to move them to the Selected Reference Types list.
Add to move them to the Selected Reference Types list.
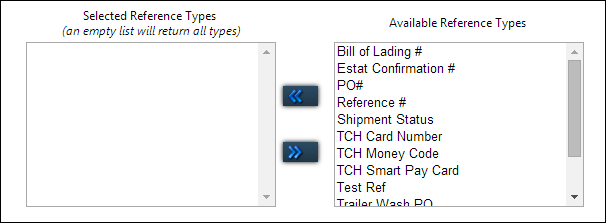
Note: This option is available only when the Enable Multiple Reference Number Types check box is selected.
Showing all available reference number types automatically
By default, when you allow carriers to enter multiple types of reference numbers, they must select the type on the Reference Numbers tab or Freight Commodities tab for each reference number they record.
If you want, you can display a row for each available reference number type. To do so, select the Auto-Populate Load Update with selected RefTypes check box.
Note: This setting also affects the Manage Selected Loads page.
Specifying a default reference number type
You can specify a default reference number type. It will be associated automatically with reference numbers in the Order Ref Num field on load details pages and in reference number type selection lists.
-
If the Enable Multiple Reference Number Types check box is cleared, the default reference number type will be the only kind that can be entered on the Load Details page.
-
If the Enable Multiple Reference Number Types check box is selected, any available reference number type can be entered on the Load Details page.
Preventing users from changing reference number types
Select the Lock user from altering populated RefTypes check box to prevent carriers from changing the reference number type for order reference numbers and stop reference numbers displayed in the Reference Type field on load details pages.
-
If the Enable Multiple Reference Number Types check box is cleared, the default reference type will be the only type of reference number that can be entered on the Load Details page.

-
If both the Enable Multiple Reference Number Types and Auto-Populate Load Update with selected RefTypes check boxes are selected, the types from the Selected Reference Types list are available on the Reference Numbers tab, but the type cannot be changed.
Note: If no reference number types appear in the Selected Reference Types list, the first five active types from the ReferenceNumbers label appear. For more information, see Using the label file to customize fields.
Specifying the year format for entering dates
In fields where dates/times must be entered, year numbers default to four digits. To display these year numbers in two-digit format, follow these steps:
-
Go to Menu > Configuration > Settings Manager.
The Settings Manager page opens. -
Do one of the following:
-
If you want the setting change to apply to all roles, verify the Role field is set to [Global Settings].
-
If you want the setting change to apply to a specific role, select it in the Role field. A message asks you to verify that you want to change the role. Click OK to continue.
If the setting has already been changed for at least one role, its text label is bold and italic.
-
-
On the Modules tab, in the Module Selection field, select Carrier.
-
Click these tabs: Application Settings > General.
-
To display year numbers in two-digit format, select the Use 2 digit year entry (default is 4) check box.
Note: This setting applies only to fields where dates are entered. It does not apply to read-only date fields.
-
Click Save.
A message appears at the top of the page, stating your settings were saved successfully.If you are making changes for a specific role and this is the first time the setting has been changed for any role, the text label style changes to bold and italic.
If you do not want to save, click Revert. The application cancels any unsaved changes and reverts to the last saved settings.
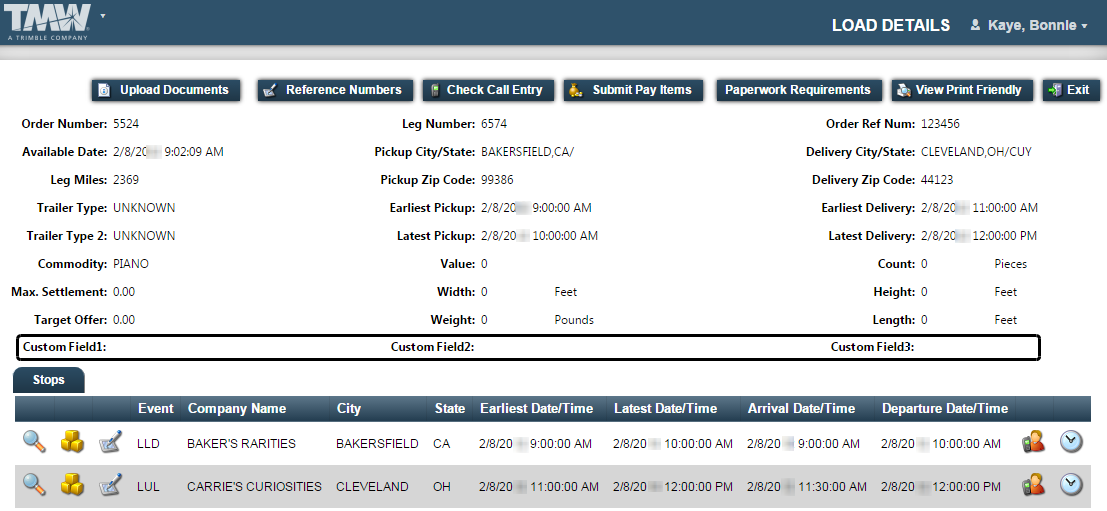
Adding customizable fields to the Load Details page
If you want, you can add three customizable fields to the Load Details page. You do this by customizing the SQL view for the Load Details page and applying it to your database.
By default, the fields are named Custom Field1, Custom Field2, and Custom Field3. You can use the Customizer pane to change the field names and visibility.
Setting up the Load Details page to display the customizable fields
To permit the Load Details page to display the customizable fields, follow these steps.
-
Go to Menu > Configuration > Settings Manager.
The Settings Manager page opens. -
Do one of the following:
-
If you want the setting change to apply to all roles, verify the Role field is set to [Global Settings].
-
If you want the setting change to apply to a specific role, select it in the Role field. A message asks you to verify that you want to change the role. Click OK to continue.
If the setting has already been changed for at least one role, its text label is bold and italic.
-
-
On the Modules tab, in the Module Selection field, select Carrier.
-
Click these tabs: Application Settings > Load Details > General.
-
Select the Display Order Header Custom Fields Row check box.
-
Click Save.
A message appears at the top of the page, stating your settings were saved successfully.If you are making changes for a specific role and this is the first time the setting has been changed for any role, the text label style changes to bold and italic.
If you do not want to save, click Revert. The application cancels any unsaved changes and reverts to the last saved settings.
Linking a custom view to the Load Details page
To customize the SQL view, you modify the default view and apply it to your TMWSuite database. Although you can add any column you wish, the first column of the custom view must include the leg (trip segment) number. For information about custom views, see Assigning custom SQL views to data grids.
To display the customizable fields, you link the custom SQL view to the Load Details page. To do so, follow these steps.
-
Go to Menu > Configuration > Settings Manager.
The Settings Manager page opens. -
Do one of the following:
-
If you want the setting change to apply to all roles, verify the Role field is set to [Global Settings].
-
If you want the setting change to apply to a specific role, select it in the Role field. A message asks you to verify that you want to change the role. Click OK to continue.
If the setting has already been changed for at least one role, its text label is bold and italic.
-
-
On the Modules tab, in the Module Selection field, select Carrier.
-
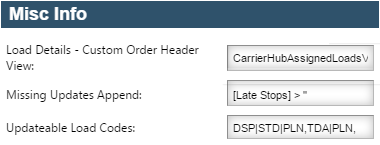
Click the TMWSuite tab.
-
In the Misc Info section, enter the name of the custom view.
-
Click Save.
A message appears at the top of the page, stating your settings were saved successfully.If you are making changes for a specific role and this is the first time the setting has been changed for any role, the text label style changes to bold and italic.
If you do not want to save, click Revert. The application cancels any unsaved changes and reverts to the last saved settings.