Setting up data grids
Data grids can be set up to show only the data you want to see. You also can set up a grid so the data appears in the format most useful to you.
When setting up a grid, you can specify:
-
Which columns are included and how they are titled
-
Column filters
-
Column sort order
-
Special formatting for cells or rows that meet certain conditions
-
Which user roles may access the grid configuration
Only the user who created the grid configuration can overwrite it. If other users want to modify a grid configuration they did not create, they must save the configuration with a new name.
By default, all users can create grid configurations for their own use. Users may want to tailor grid configurations to their work routines. Grid configurations set up by non-administrators are not available to other users.
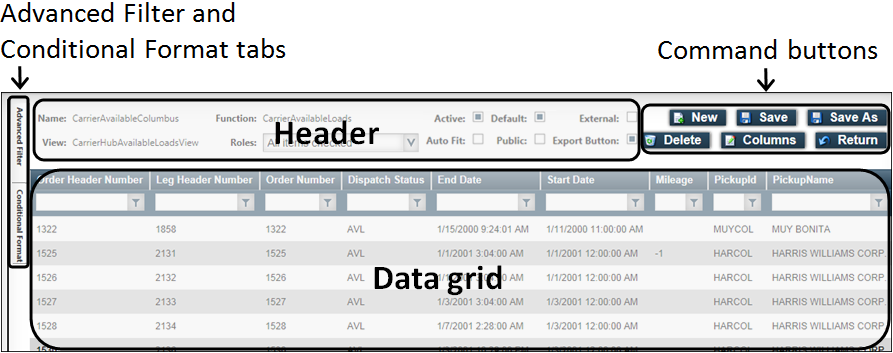
The Grid Configuration page contains four main sections.
-
Header
The header contains informational fields that identify the page, view, and configuration names for the grid.
Other options in the header control:
-
Who can access the grid configuration
-
The default configuration for the grid
-
If a button to export the data grid to Excel appears
-
-
Data grid
Live records for the grid you are setting up appear on the Grid Configuration page. The grid refreshes when you apply any filters or formats.
-
Advanced Filter and Conditional Format tabs
These tabs provide access to advanced filtering and conditional formatting functions. Create advanced filters to restrict the number of records that appear in the grid. Use conditional formatting to customize how data appears in the grid when it meets certain conditions.
-
Command buttons
Use command buttons to create, save, and delete grid configurations.
Use the Columns button to show or hide columns and overwrite their default headings. Use the Return button to leave the Grid Configuration page and return to the grid’s page.
Creating a new grid configuration
To set up a grid configuration to meet your needs, you can modify an existing configuration or create a new one. If you want to change only a few things about an existing grid configuration, you can modify and save it with a new name.
You may want to create a new grid configuration to:
-
Assign it to a custom SQL view
-
Begin your configuration with system defaults
When you create a new grid configuration, only you can save changes to it. Other users can modify your grid configuration, but they must save it with a new name.
Grid configurations set up by non-administrators are not available to other users.
To create a new grid configuration, follow these steps:
-
Go to the page for the grid you want to set up.
-
Click Configure.
The Grid Configuration page for that grid opens.Note: If the Configure button does not appear on the page, you may not have permission to configure grids.
-
Click New.
The New Configuration pop-up window opens. -
Select the SQL view name for the page to which to apply the new grid configuration.
-
Click Create.
The Grid Configuration page opens with a new grid configuration. -
Select the appropriate options for the new grid configuration.
Field Definition Name
This field displays a space for the name of the grid configuration and is read-only. You will enter a name for the grid configuration when you save it.
Function
This field displays the grid’s ASPX page name and is read-only.
View
This field displays the name of the view for the page that contains the grid and is read-only.
Roles
Select the roles to assign to the grid.
Note: Users who do not have an administrator role do not have the option to assign roles to a grid configuration.
Active
Select to make the grid configuration available to users.
Disabling this option will hide the configuration for all users, including the user who created it. You can reactivate the configuration by going to Menu > Configuration > Grid Configuration Maintenance and selecting the page name, then the configuration.
Default
Select to make the grid configuration the default configuration for the grid.
External
Select to make the grid configuration available to unauthenticated users.
Notes:
-
Providing data access to unauthenticated users requires advanced customization.
-
Users who do not have an administrator role do not have this option.
Auto Fit
Select to have the column size adjust to fit the width of the column data.
Notes:
-
This setting will override any column widths you set on the Grid Configuration page. Columns will automatically widen to accommodate data.
-
When Auto Fit is enabled, columns will not automatically widen while you are still on the Grid Configuration page. You must save your grid configuration and return to the grid’s page to see Auto Fit in effect.
Public
Select to make the grid configuration available in the Filter list for all users.
Notes:
-
If you disable this option, the configuration will appear in the Filter list only for your user account.
-
Users who do not have an administrator role do not have this option.
Export Button
Select to enable the
 Export to Excel button.
Note: You must also enable this option in Settings Manager. Follow these steps:
-
Go to Menu > Configuration > Settings Manager.
The Settings Manager page opens. -
Verify that [Global Settings] is the value in the Role field. You must be in Global Settings mode to edit this setting.
-
Click these tabs: General > Core > Misc Info.
-
In the Misc Info 2 section, select the Show Export Button (Boards) check box.
-
Click Save.
A message appears at the top of the page, stating your settings were saved successfully.
Enabling this option makes this button available by default for all grids. To disable the button for a specific grid, open the grid on the Grid Configuration page, clear the check box, and save the grid configuration.
-
-
Select columns to include in the grid.
-
Click Columns.
The Save Grid Setup pop-up window opens.
-
Select the check boxes of the columns you want to include.
Note: Grids must include certain columns to populate properly. Required columns vary for different grids, but the first four to six columns of any grid should not be removed.
-
If needed, use the corresponding text field to rename a column.
-
Click Return to return to the Grid Configuration page.
The columns and column names appear according to your designations.
-
-
Notes:
-
If you set ad hoc column filters on the Grid Configuration page, they will be in effect every time the grid is accessed with this configuration. By default, users can set ad hoc columns filters while they are viewing a grid. Any ad hoc filters a user sets are in effect only until the user leaves the page.
-
You can disable ad hoc column filtering and make only the filters you set and save apply to that grid configuration.
-
-
When you are ready to save your grid configuration, click Save As.
The Save Grid Setup pop-up window opens.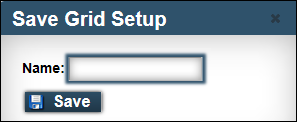
-
Enter a name for the new grid configuration and click Save.
A message confirms the new grid configuration was saved successfully.
Modifying an existing grid configuration
Only the user who created the grid configuration can overwrite it. If you modify a grid configuration created by another user, you must save it with a new name.
Grid configurations set up by non-administrators are not available to other users.
To modify a grid configuration, follow these steps:
-
Go to the page with the grid configuration you want to modify.
-
In the Filter list, select the grid configuration you want to modify.
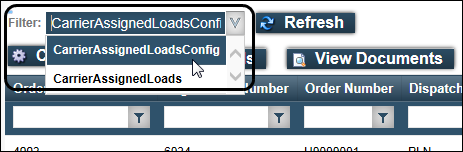
Note: Every grid has a system-default configuration. It has Config at the end of its name. If the system-default configuration is the only one that exists for the grid, the Filter list does not appear. This configuration cannot be overwritten. You can modify it, but you must save it with a different name.
-
Click Configure.
The Grid Configuration page for the selected grid configuration opens.Note: If the Configure button does not appear on the page, you may not have permission to configure grids.
-
Modify the grid configuration as appropriate.
Note: For definitions of grid configuration options, see Creating a new grid configuration. -
Save the grid configuration.
-
If you are modifying an existing grid configuration you did not create, save it with a new name.
-
Click Save As.
The Save Grid Setup pop-up window opens. -
Enter a name for the new grid configuration and click Save.
A message confirms the new grid configuration was saved successfully.
-
-
If you are saving changes to a grid configuration you created, click Save.
A message confirms the grid configuration was saved successfully.
-
Deleting a grid configuration
You can delete only grid configurations you have created.
To delete a grid configuration, follow these steps:
-
Go to the page with the grid configuration you want to delete.
-
In the Filter list, select the grid configuration you want to delete.
-
Click Configure.
The Grid Configuration page for the selected grid configuration opens. -
Click Delete.
A message appears asking you to confirm the deletion. -
Click OK.
You are returned to the grid for which you deleted the configuration.