Applying advanced filtering to data grids
You can use advanced filtering to limit the number of records that appear by default in a data grid. Setting restrictions to hide records that users do not need to view can help them perform tasks more efficiently.
Advanced filters are saved to a grid’s configuration. The advanced filters you define will be in effect each time the grid is accessed with that configuration. These filters cannot be viewed or altered by users. If users have permission to create advanced filters for grids, they can apply and save their own advanced filters.
Creating a simple advanced filter
You can use a simple advanced filter to limit the number of records that appear by default in a data grid. Advanced filters are saved to a grid’s configuration.
A simple advanced filter has one or more expressions. These expressions are used as conditions to restrict the data that appear in a grid. Use the logical operators AND, OR, NOT AND, or NOT OR that join expressions to restrict the data further.
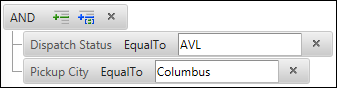
For example, you may want to restrict the Carrier Available Loads grid to show only the following records: The Dispatch Status is AVL and the Pickup City is Columbus.
To create a simple advanced filter for a grid configuration, follow these steps:
-
Go to the grid to which you want to apply an advanced filter.
-
Click Configure.
Note: If the Configure button does not appear on the page, you may not have permission to configure grids. -
Click the Advanced Filter tab.
The Advanced Filter pane opens.Notes:
-
The Advanced Filter pane is docked by default, until you collapse it by clicking
 Undock.
 -
If the Advanced Filter tab does not appear on the Grid Configuration page, you may not have permission to add advanced filters to a grid.

-
-
Add a new expression.
-
Click
 Add Expression to add a line for a new expression.
-
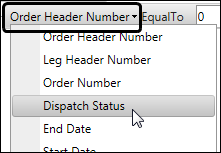
Click the column list to select the column containing the data you want to restrict.
-
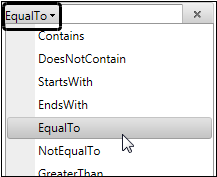
Click the operator list to select an arithmetic operator that is appropriate for your restriction.
-
In the text box, enter the restriction variable.

-
Repeat this process to add additional expressions.
-
-
If you have created multiple expressions, you can change the logical operator that combines them.
-
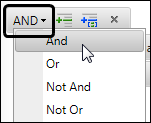
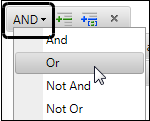
Click AND above the related expressions to display the list of logical operators.
-
Select a different logical operator.
-
-
Click Apply Filter.
The grid refreshes to display only those records that meet the advanced filter restrictions. -
Click
Undock to collapse the Advanced Filter pane. -
Save the grid configuration.
-
If you are modifying an existing grid configuration you did not create, save it with a new name.
-
Click Save As.
The Save Grid Setup pop-up window opens.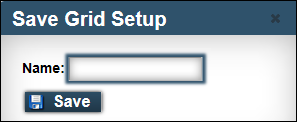
-
Enter a name for the new grid configuration and click Save.
A message confirms the new grid configuration was saved successfully.
-
-
If you are saving changes to a grid configuration you created, click Save.
A message confirms the grid configuration was saved successfully.
-
Creating a complex advanced filter
You can use a complex advanced filter to limit the number of records that appear by default in a data grid. Advanced filters are saved to a grid’s configuration.
A simple advanced filter consists of one or more expressions to restrict the data that appear in a grid. You can create a complex advanced filter by adding a group to an expression. Use the logical operators AND, OR, NOT AND, or NOT OR that join expressions to restrict the data further.
For example, you may want to restrict the Carrier Available Loads grid to show only the following records: The Dispatch Status is AVL and the Pickup City is Columbus or Cleveland.
To create a complex advanced filter, follow these steps:
-
Go to the grid to which you want to apply an advanced filter.
-
Click Configure.
Note: If the Configure button does not appear on the page, you may not have permission to configure grids. -
Click the Advanced Filter tab.
The Advanced Filter pane opens.Notes:
-
The Advanced Filter pane is docked by default, until you collapse it by clicking
Undock. -
If the Advanced Filter tab does not appear on the Grid Configuration page, you may not have permission to add advanced filters to a grid.
-
-
Add a new expression.
-
Click
Add Expression to add a line for a new expression. -
Click the column list to select the column containing the data you want to restrict.
-
Click the operator list to select an arithmetic operator that is appropriate for your restriction.
-
In the text box, enter the value upon which to base the advanced filter.
-
Repeat this process to add additional expressions.
-
-
Click
 Add Group to add a line for the group.
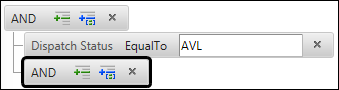
-
Add expressions to the group, as you did in Step 4.
-
If you want, change the logical operator that combines the expressions in the group.
-
Click AND above the related expressions to display the list of logical operators.
-
Select a different logical operator.
-
-
Click Apply Filter.
The grid refreshes to display only those records that meet the advanced filter restrictions. -
Click
Undock to collapse the Advanced Filter pane. -
Save the grid configuration.
-
If you are modifying an existing grid configuration you did not create, save it with a new name.
-
Click Save As.
The Save Grid Setup pop-up window opens. -
Enter a name for the new grid configuration and click Save.
A message confirms the new grid configuration was saved successfully.
-
-
If you are saving changes to a grid configuration you created, click Save.
A message confirms the grid configuration was saved successfully.
-
Modifying an advanced filter
You can modify any existing advanced filter that has been saved to a grid configuration.
To modify an advanced filter, follow these steps:
-
Go to the grid that contains the advanced filter you want to modify.
-
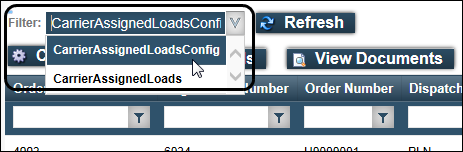
In the Filter list, select the grid configuration to which the advanced filter was saved.
-
Click Configure.
Note: If the Configure button does not appear on the page, you may not have permission to configure grids. -
Click the Advanced Filter tab.
The Advanced Filter pane opens.Notes:
-
The Advanced Filter pane is docked by default, until you collapse it by clicking
Undock. -
If the Advanced Filter tab does not appear on the Grid Configuration page, you may not have permission to add advanced filters to a grid.
-
-
Modify the advanced filter as appropriate.
For definitions of advanced filter options, see Creating a simple advanced filter or Creating a complex advanced filter.
-
Click
Undock to collapse the Advanced Filter pane. -
Save the grid configuration.
-
If you are modifying an existing grid configuration you did not create, save it with a new name.
-
Click Save As.
The Save Grid Setup pop-up window opens. -
Enter a name for the new grid configuration and click Save.
A message confirms the new grid configuration was saved successfully.
-
-
If you are saving changes to a grid configuration you created, click Save.
A message confirms the grid configuration was saved successfully.
-
Deleting an advanced filter
You can delete an advanced filter when you no longer want it to apply to a grid configuration.
To delete an advanced filter, follow these steps:
-
Go to the grid that contains the advanced filter you want to delete.
-
In the Filter list, select the grid configuration to which the advanced filter was saved.
-
Click Configure.
Note: If the Configure button does not appear on the page, you may not have permission to configure grids. -
Click the Advanced Filter tab.
The Advanced Filter pane opens.Notes:
-
The Advanced Filter pane is docked by default, until you collapse it by clicking
Undock. -
If the Advanced Filter tab does not appear on the Grid Configuration page, you may not have permission to add advanced filters to a grid.
-
-
Click X for each expression or logical operator that you want to delete.
The selected components are removed from the Advanced Filter pane.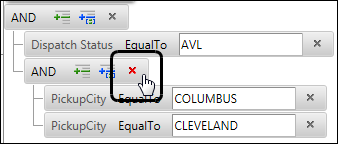
-
Click
Undock to collapse the Advanced Filter pane. -
Save the grid configuration.
-
If you are modifying an existing grid configuration you did not create, save it with a new name.
-
Click Save As.
The Save Grid Setup pop-up window opens. -
Enter a name for the new grid configuration and click Save.
A message confirms the new grid configuration was saved successfully.
-
-
If you are saving changes to a grid configuration you created, click Save.
A message confirms the grid configuration was saved successfully.
-