Setting up how eStat displays check calls
As shipments tendered through eStat are carried out, your company will most likely receive check calls associated with the orders for the shipments. Check call data can be transmitted by TotalMail mobile communications application, or your company’s dispatchers can manually record check calls for a shipment in the Dispatch application.
By default, users can access the Check Calls page from the Tracking menu. However, you can also set up the application to allow users to:
-
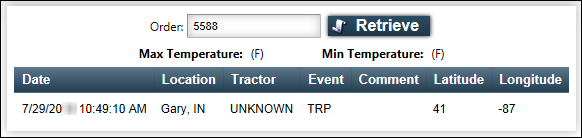
View the latest check call associated with their orders from the shipment details page.
Note: Only the latest check call associated with the order is viewable on the shipment details page.
-
Access the Check Calls page from the shipment details page.
Notes:
-
All check calls associated with the order are viewable on the Check Calls page.
-
The Check Calls page also displays GPS data (latitude/longitude readings) for the asset at the time the check call was transmitted. GPS data is shown only on the Check Calls page.
-
-
View information for the next stop.
Identifying the types of check calls users can view
By default, users can look at the check calls recorded for their shipments on the Check Calls page. Check calls can be associated with the various resources assigned to an order:
-
Driver
-
Tractor
-
Trailer
-
Carrier
You must identify the types of check calls that are shown on the Check Calls page. If you allow users to view check calls on the shipment details page, your entries are applied there as well as on the Check Calls page.
To specify which check call types will be shown, follow these steps.
-
Go to Menu > Configuration > Settings Manager.
The Settings Manager page opens. -
Do one of the following:
-
If you want the setting change to apply to all roles, verify the Role field is set to [Global Settings].
-
If you want the setting change to apply to a specific role, select it in the Role field.
A message asks you to verify that you want to change the role. Click OK to continue.Note: If the setting has already been changed for at least one role, its text label is bold and italic.
-
-
On the Modules tab, in the Module Selection field, select Customer.
-
Click these tabs: Application Settings > Shipment Tracking and Reports > Check Calls.
-
Select the check boxes that define which check calls you want users to view.
For example, if you want users to see only check calls recorded for the tractor assigned to the order, select just the Include Tractor Check Calls check box. To ensure that users can see any check calls recorded for their shipments, select all of the check boxes.
Note: The check boxes you select here also control which check calls the user can see on the shipment details page.-
Include Tractor Check Calls
Display check calls recorded for the tractor assigned to the trip. -
Include Driver Check Calls
Display check calls recorded for the driver assigned to the trip. -
Include Carrier Check Calls
Display check calls recorded for the carrier assigned to the trip. -
Include Trailer Check Calls
Display check calls recorded for the trailer assigned to the trip.
-
-
Click Save.
A message appears at the top of the page, stating your settings were saved successfully.
If you are making changes for a specific role and this is the first time the setting has been changed for any role, the text label style changes to bold and italic.If you do not want to save, click Revert instead. The application cancels any unsaved changes and reverts to the last saved settings.
Allowing check calls to include next stop information
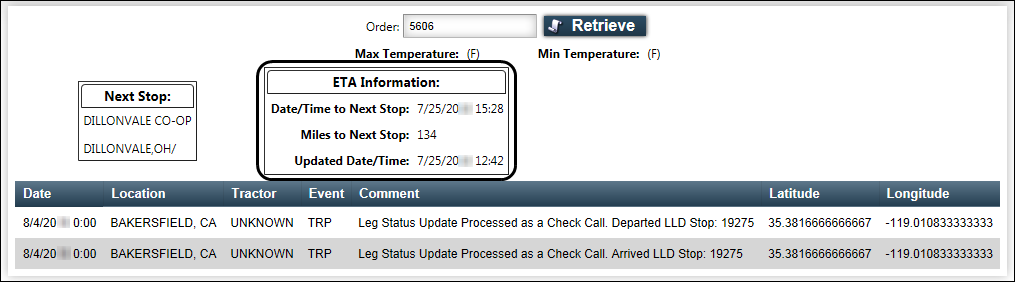
By default, check calls display the order number assigned to a shipment by your dispatch system and information about the check call itself.
If you want, check call data can include information about the next stop, including the expected time of arrival and number of miles to the stop location from the location at which the check call was entered.
|
To allow check calls to include next stop information, follow these steps:
-
Go to Menu > Configuration > Settings Manager.
The Settings Manager page opens. -
Do one of the following:
-
If you want the setting change to apply to all roles, verify the Role field is set to [Global Settings].
-
If you want the setting change to apply to a specific role, select it in the Role field.
A message asks you to verify that you want to change the role. Click OK to continue.Note: If the setting has already been changed for at least one role, its text label is bold and italic.
-
-
On the Modules tab, in the Module Selection field, select Customer.
-
Click these tabs: Application Settings > Shipment Tracking and Reports > Check Calls.
-
Select the Show Next Stop information check box.
-
Click Save.
A message appears at the top of the page, stating your settings were saved successfully.
If you are making changes for a specific role and this is the first time the setting has been changed for any role, the text label style changes to bold and italic.If you do not want to save, click Revert instead. The application cancels any unsaved changes and reverts to the last saved settings.
Displaying check calls with shipment details
You can set up the application to allow your customers to view the latest check call for an order when they view the order’s shipment details. When this feature is active, the bottom of the shipment details page displays the latest check call recorded for the order.

To display check calls with shipment details, follow these steps:
-
Go to Menu > Configuration > Settings Manager.
The Settings Manager page opens. -
Do one of the following:
-
If you want the setting change to apply to all roles, verify the Role field is set to [Global Settings].
-
If you want the setting change to apply to a specific role, select it in the Role field.
A message asks you to verify that you want to change the role. Click OK to continue.Note: If the setting has already been changed for at least one role, its text label is bold and italic.
-
-
On the Modules tab, in the Module Selection field, select Customer.
-
Click these tabs: Application Settings > Shipment Tracking and Reports > Check Calls.
-
Select the Display Latest Check Call Information check box.
-
Click Save.
A message appears at the top of the page, stating your settings were saved successfully.
If you are making changes for a specific role and this is the first time the setting has been changed for any role, the text label style changes to bold and italic.If you do not want to save, click Revert instead. The application cancels any unsaved changes and reverts to the last saved settings.
Allowing users to access the Check Calls page when viewing shipment details
By default, users can access the Check Calls page from the Tracking menu. However, you can also allow users to access it from an order’s shipment details page. When you do, the bottom of the shipment details page displays the ![]() Check Calls icon.
Check Calls icon.
|
To allow users to access the Check Call page when viewing shipment details, follow these steps:
-
Go to Menu > Configuration > Settings Manager.
The Settings Manager page opens. -
Do one of the following:
-
If you want the setting change to apply to all roles, verify the Role field is set to [Global Settings].
-
If you want the setting change to apply to a specific role, select it in the Role field.
A message asks you to verify that you want to change the role. Click OK to continue.Note: If the setting has already been changed for at least one role, its text label is bold and italic.
-
-
On the Modules tab, in the Module Selection field, select Customer.
-
Click these tabs: Application Settings > Shipment Tracking and Reports > Check Calls.
-
Select the Allow Check Call History Search check box.
-
Click Save.
A message appears at the top of the page, stating your settings were saved successfully.
If you are making changes for a specific role and this is the first time the setting has been changed for any role, the text label style changes to bold and italic.If you do not want to save, click Revert instead. The application cancels any unsaved changes and reverts to the last saved settings.