Working in your calendar
DriverSeat lets you request time off and schedule private appointments from a personal schedule or calendar. You can refer to your calendar at anytime to view your scheduled events.
-
Time-off Request
Use a time off request to schedule time when you are unavailable for trip assignments. When you schedule a time off request in your calendar, the system sends the request to an administrator for approval.
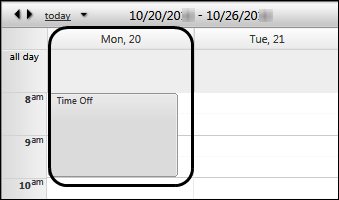
Once approved, the time-off request appears in your calendar with a description that includes an approval notice and an administrator’s ID for you to review.
-
Private Appointment
A private appointment appears on your calendar for viewing purposes only. An appointment does not require approval from an administrator.
Notes:
-
When a calendar entry is not marked private, the system processes it as a time-off request.
-
You mark an appointment as private by selecting the Private Appointment check box in the New Appointment window.
-
Navigating through the Time Off Scheduler
Use the scheduler to select a calendar, find a date, schedule an appointment, and enter a time-off request.
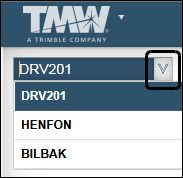
Accessing a driver’s calendar
The Time Off Scheduler provides the following options for accessing a driver’s calendar.
-
By default, when you access the scheduler, the system shows your calendar.
-
When permissions allow, a user can access the calendars of other drivers. For example, a team leader who supervises other drivers can access his drivers' calendars to check their availability for trip assignments.
When your login allows, use this procedure to view calendars for multiple drivers.
-
Go to Menu > Driver > Time Off > Time Off Scheduler.
The Time Off Scheduler opens and shows the Driver ID drop-down list.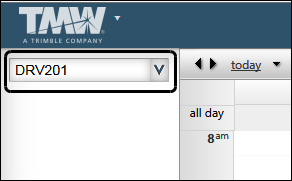
-
Select a username from the list to view that driver’s calendar.
Selecting a calendar
Use the Month or Multi-day calendar to schedule appointments and time off requests. You can view all of your scheduled activities in either calendar, regardless of which calendar you use to create them.
Click Month or Multi-day to open a calendar.
![]()
-
Month
Use this calendar to quickly view your appointments for the month.
-
Multi-day Calendar
Use the Multi-day calendar to quickly view the events or appointments that you schedule within a seven-day period.
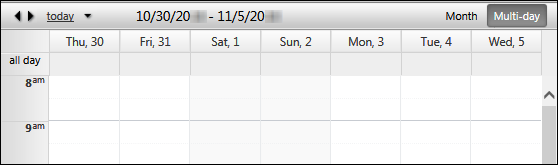
By default the Multi-day calendar opens:
-
When you access the Time Off Scheduler
-
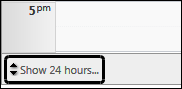
With Business hours (8:00 AM to 5:00 PM) in view.
You can use the up and down arrows at the bottom of the calendar to show Business hours or 24 hours.
-
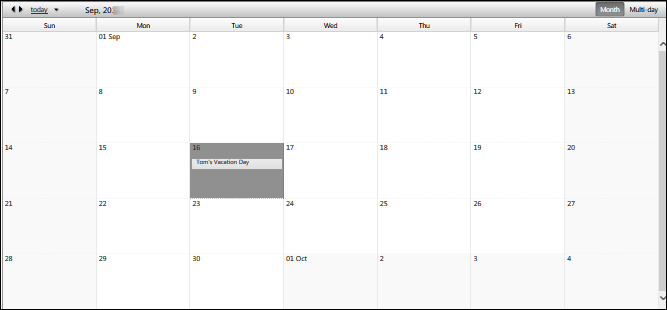
Navigating to a date
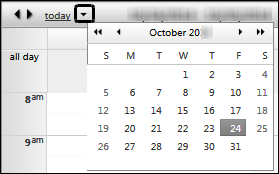
The scheduler’s navigation tools appear at the top of the calendar. Use these options to locate a date in a calendar.
![]()
|
Month Overview To open the calendar, click the single drop-down arrow on the toolbar.
The month overview calendar allows you to:
When you open the Multi-day calendar and select a date from the overview calendar, the scheduler shows the date as the first day of a seven-day period.
For more information about selecting dates from a calendar, see Selecting a date and time. |
|
Left and Right Arrows Use the left and right arrows to navigate through a calendar, backward or forward, on a weekly or monthly basis. |
|
Today Click today to view today’s date in a calendar. In the Multi-day calendar, the date appears in the first column of a seven-day period. |
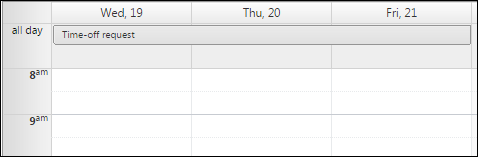
Selecting an all day activity
Use these procedures to schedule an all day (24 hour) activity.
-
Select a calendar.
-
Navigate to a date.
-
Do one of the following:
-
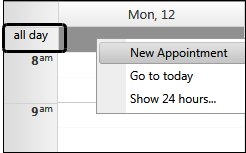
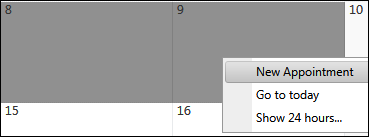
In the Multi-day calendar, right-click a date in the all day row and select New Appointment.
-
In the Month calendar, right-click a date and select New Appointment.
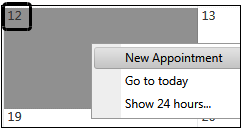
The quick appointment window opens.
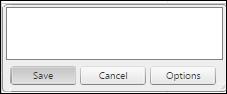
Note: You can also double-click a date or time period to open the window.
-
-
Click Options.
The New Appointment window opens with the All day check box selected.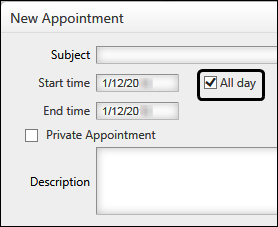
Selecting a half-hour activity
Use this procedure to schedule a half-hour activity in the Multi-day calendar.
| The system defaults to showing time in this calendar in half-hour increments. |
-
Select the calendar.
-
Navigate to a date.
-
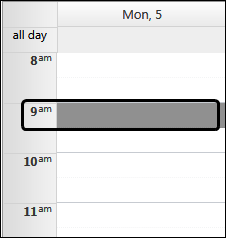
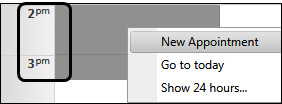
Right-click in the calendar box for the half hour you want to schedule and select New Appointment.
The quick appointment window opens. -
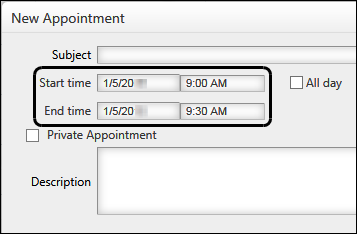
Click Options.
The New Appointment window shows the start and end times you selected.
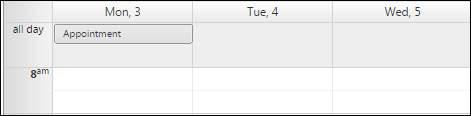
Selecting multiple dates for an activity
You can use either the Multi-day or Month calendar to select a date range when scheduling an activity.
-
Multi-day calendar
-
Select the calendar.
-
Navigate to a date.
-
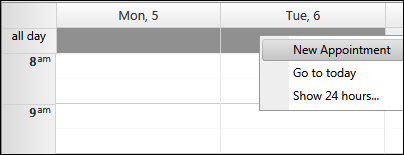
In the all day row, click and hold down the left mouse button to highlight the days you want to schedule.
-
Right-click and select New Appointment from the drop-down menu to schedule the highlighted days.
-
Click Options in the quick appointment window.
The New Appointment window opens showing the days you selected.
-
-
Month calendar
-
Select your calendar.
-
Navigate to a date.
-
Click and hold down the left mouse button to highlight the days you want to schedule.
-
Right-click and select New Appointment from the drop-down menu to schedule the highlighted days.
-
Click Options in the quick appointment window.
The New Appointment window opens showing the days you selected.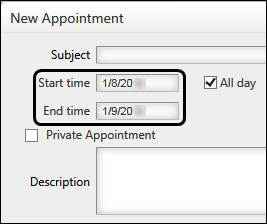
-
Selecting an extended time period for an activity
You can use either the Multi-day or Month calendar to select a time period when scheduling an activity.
-
Multi-day calendar
-
Select the calendar.
-
Navigate to a date.
-
Click and hold down the left mouse button to highlight the time period you want to schedule.
-
Right-click and select New Appointment from the drop-down menu to schedule the highlighted hours.
-
Click Options in the quick appointment window.
The New Appointment window opens showing the time period you selected.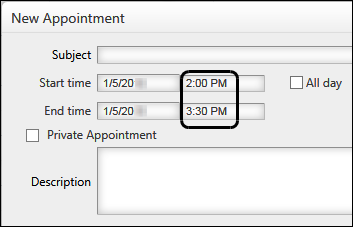
-
-
Month calendar
-
Select the calendar.
-
Navigate to a date.
-
Right-click the date and select New Appointment from the drop-down menu.
-
Click Options in the quick appointment window.
-
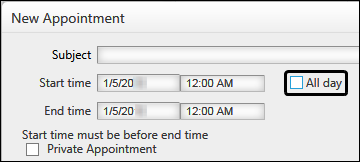
Clear the All Day check box.
Note: The system defaults both the start time and the end time to 12:00 AM.
-
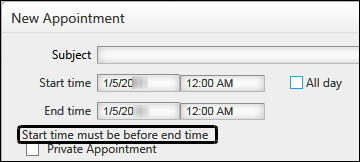
Define a time period using the Start time and End time drop-down lists.
Note: The system requires you to enter a start time that occurs earlier than the end time.
-
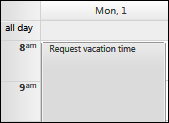
Requesting time off
Use this procedure to request time off through your personal calendar. You can use a time-off request to schedule activities for time when you are unavailable for trip assignments, such as vacations, physicals, and training.
-
Go to Menu > Driver > Time Off > Time Off Scheduler.
-
Select a calendar.
-
Navigate to a date.
-
Right click on a date and select New Appointment.
The quick appointment window opens. -
Click Options.
The New Appointment window opens.The window opens with either the All day check box selected or cleared, depending on which calendar you use to enter your time-off request.
By default, when you use the:
-
Month calendar, the system selects the check box
-
Multi-day calendar, the system clears the check box
-
-
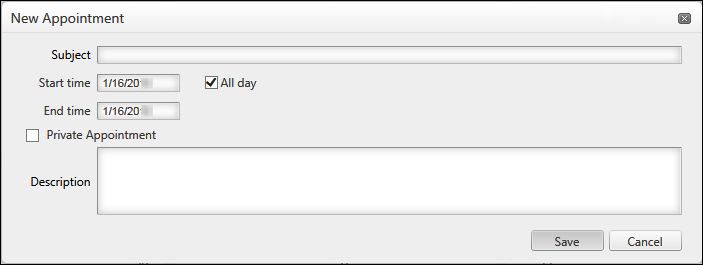
Enter the appropriate information in the fields.
Required: *
Field Definition Subject *
Enter a brief title for the event.
Start Time
The Start Time fields show the date and time that you selected. If needed, you can change the date and time. Click on the drop-down arrow next to the date or time.
End Time
The End Time fields show the date and time that you selected. If needed, you can change the date and time to span more than one day or time period. Click on the drop-down arrow next to the date or time.
All day
To set an all-day event, select the All day check box.
Private Appointment
Do not select the Private Appointment check box.
Description
Describe the reason for the request.
Note: To cancel adding the appointment, click Cancel or
 Close.
 -
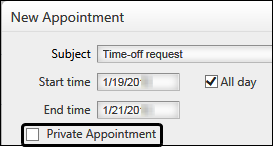
Verify that you cleared the Private Appointment check box.
You cannot use a private appointment as a time off request. If you select this check box, a request for time off is NOT made.
-
Click Save.
When the New Appointment window closes, the requested time off appears in your calendar.
Notes:
-
The system sends the request to your administrator for approval.
-
When approved, the request appears in your calendar with:
-
The label Vacation, even if you made the request for a reason other than vacation
-
A description that includes an approval notice and an administrator’s ID for you to review

-
-
Scheduling a private appointment
| This procedure is the same as making a time off request; however, it is important to note that you must check the Private Appointment check box. Otherwise, the scheduler routes the request through to your administrator for approval. |
To enter or track a personal appointment or event, follow these steps.
-
Go to Menu > Driver > Time Off > Time Off Scheduler.
-
Select a calendar.
-
Navigate to a date.
-
Right-click a date and select New Appointment.
The quick appointment window opens. -
Click Options.
The New Appointment window opens.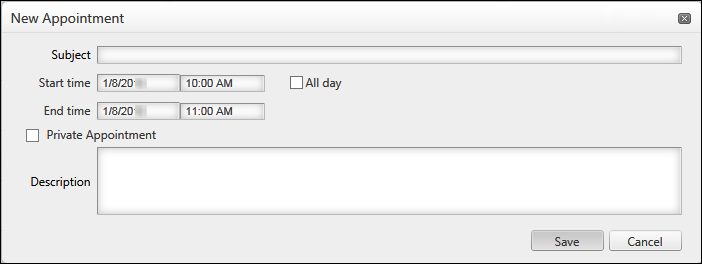
-
Enter the appropriate information in the fields.
Required: *
Field Definition Subject *
Enter a brief title for the event.
Start Time
The Start Time fields show the date and time that you selected. If needed, you can change the date and time. Click the drop-down arrow next to the date or time.
End Time
The End Time fields show the date and time that you selected. If needed, you can change the date and time to span more than one day or time period. Click the drop-down arrow next to the date or time.
All day
To set an all-day event, select the All day check box.
Description
Describe the reason for the request.
Note: To cancel adding the appointment, click Cancel or
Close. -
Select the Private Appointment check box to indicate that the appointment is private.

Note: When you leave the check box cleared, the appointment becomes a time-off request.
To request time off, see Requesting time off for details.
-
Click Save.
When the New Appointment window closes, the appointment appears in your calendar.
Deleting a calendar entry
You can delete a personal appointment or a time-off request before the administrator approves or declines the request.
| You cannot delete a time off request that has been approved by an administrator. |
-
Go to Menu > Driver > Time Off > Time Off Scheduler.
-
Locate your appointment or time off request in the calendar.
-
Do one of the following:
-
Right-click on the calendar entry and select Delete from the menu.
-
Click
Cancel in the calendar box.
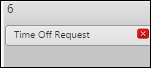
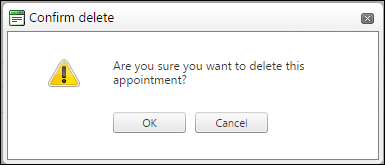
The Confirm delete window opens.
-
-
Click OK to delete the appointment.
Viewing the status of all time-off requests
When you request time off through DriverSeat, use these procedures to view a list of your requests, along with any responses from the administrator who approved or declined your request.
-
Go to Menu > Driver > Time Off > Time Off Summary.
The Time Off Summary page opens.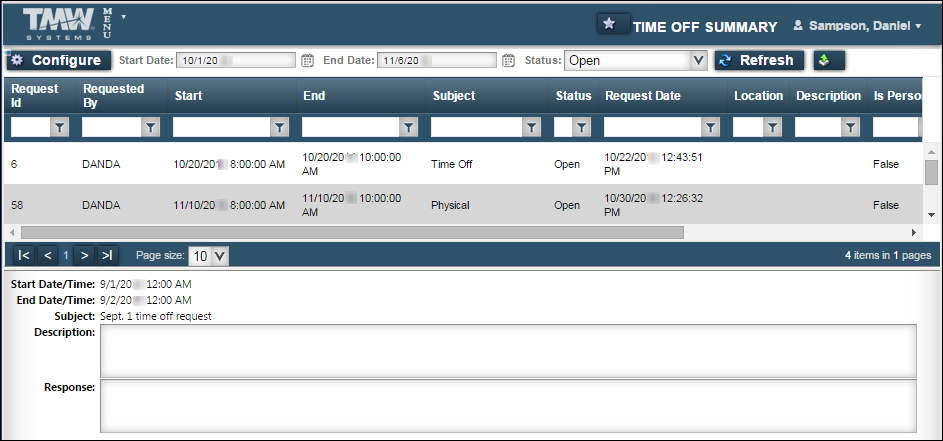
-
If needed, restrict the list by date.

Field Definition Start Date
By default, the system shows a date in this field that is 30 days prior to the current date.
Use the Start Date filter to include requests based on the date you created the request. Another name for this date is the Request Date.
-
Select
 Calendar next to the Start Date field.
 -
Click a date.
For more information about selecting dates from a calendar, see Selecting a date and time.
End Date
By default, the system shows a date in this field that is 30 days after the current date.
Use the End Date filter to restrict requests based on a status change date such as the date an administrator approves or rejects the request. Another name for this date is the Action Date.
-
Select
Calendar next to the Start Date field. -
Click a date.
For more information about selecting dates from a calendar, see Selecting a date and time.
-
-
If needed, restrict the list by status.
Note: By default, the system opens the Time Off Summary page with the Status field set to Open.
To choose a status, select one of the following from the Status drop-down list.
-
[All]
Requests of all statuses within the specified date range -
Open
Requests awaiting an administrator’s approval or rejection -
Declined
Requests rejected by an administrator -
Approved
Requests approved by an administrator
-
-
Click Refresh to retrieve the list.
The summary displays a list of requests based on your filtering selections.If necessary, use the paging bar to locate a request.
-
View Approved or Declined time-off request information in the data grid and detail pane.
Approved request:
-
Data grid
The Status and Admin Description fields in the data grid indicate that the administrator approved this time-off request.
-
Detail pane
The response section shows the name of the individual who approved the request and the response provided for the approval.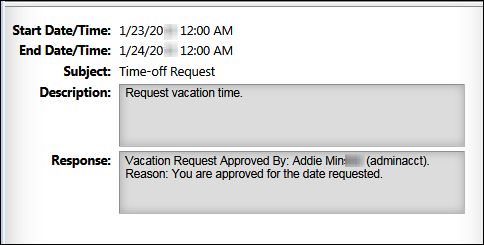
Declined request:
-
Data grid
The Status and Admin Description fields in the data grid indicate that the administrator declined this time-off request.
-
Detail pane
The response section shows the name of the individual who denied the request and the reason provided for the rejection.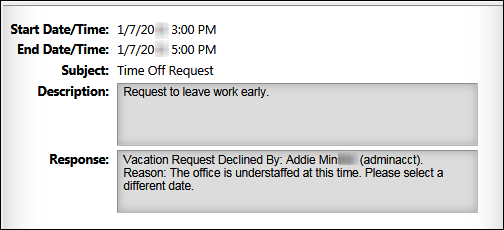
-
Viewing approved and open requests in a calendar
Open a calendar and navigate to a date to determine whether requested time off has been approved or is awaiting review. The status information appears in calendars as follows:
-
Approved request
The request appears with a message indicating the request status and the individual who approved the request.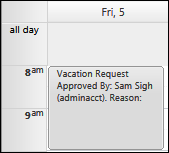
-
Open request
The request appears the same as when it was created.