Restricting the order notes a user can enter
Users can include notes about each crude order. Your dispatchers can also create notes for these orders in TMWSuite’s Notes window.
By default, when a carrier enters a note in CarrierHub, it has a note type of Carrier and a note level of UNKNOWN. In Settings Manager, you can select multiple note types and note levels that can be used when creating notes for an order in Crude Load Details.
| Users cannot view or create notes for trips with the Available status. |
Specifying the note types
By default, notes entered in the application have a note type of Carrier. In Settings Manager, you can select multiple note types that can be used when creating notes for an order on the Crude Load Details page.
To specify the types of notes that users can assign to notes, follow these steps:
-
Go to Menu > Configuration > Settings Manager.
The Settings Manager page opens. -
Do one of the following:
-
To apply the setting change to all roles, verify the Role field is set to [Global Settings].
-
To apply the setting change to a specific role, select it in the Role field.
A message asks you to verify that you want to change the role. Click OK to continue.If the setting has already been changed for at least one role, its text label is bold and italic.
-
-
On the Modules tab, in the Module Selection field, select CarrierCrude.
-
Click these tabs: Core > Notes.
Note: The settings in the Notes tab can be changed only when you have selected the Override Carrier Module Settings setting. For details, see Overriding the Carrier module settings.
-
In the Allow User to View With these Note Types section, specify each note type users can assign to notes in the Notes window.
-
Select each note type you want in the Available Roles for Notes list.
Notes:
-
Your company defines the options using the NotesType label in the TMWSuite System Administration application.
-
To select and move multiple note types, use the CTRL or SHIFT key when clicking items.
-
-
Click
 to move your selections to the Selected Roles for Notes list.
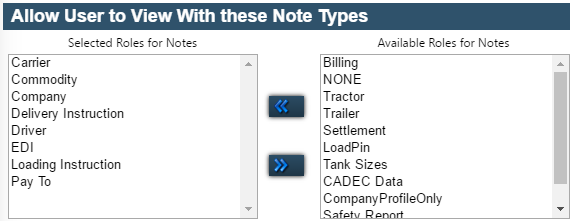
-
-
To save your changes, click
 Save.
Save.
A message indicates that your changes were saved successfully.If you are making changes for a specific role, and this is the first time the setting has been changed for any role, the text label style changes to bold and italic.
Specifying the note levels
By default, notes entered in the application have a note level of UNKNOWN. In Settings Manager, you can select multiple note levels that can be used when creating notes for an order in Crude Load Details.
To specify the levels that users can assign to notes, follow these steps:
-
Go to Menu > Configuration > Settings Manager.
The Settings Manager page opens. -
Do one of the following:
-
To apply the setting change to all roles, verify the Role field is set to [Global Settings].
-
To apply the setting change to a specific role, select it in the Role field.
A message asks you to verify that you want to change the role. Click OK to continue.If the setting has already been changed for at least one role, its text label is bold and italic.
-
-
On the Modules tab, in the Module Selection field, select CarrierCrude.
-
Click these tabs: Core > Notes.
Note: The settings in the Notes tab can be changed only when you have selected the Override Carrier Module Settings setting. For details, see Overriding the Carrier module settings.
-
In the Allow User to View Order Notes with these View Levels section, specify each note level users can assign to notes in the Notes window.
-
Select each note level you want in the Available Roles for Notes list.
Notes:
-
Your company defines the options using the NotesLevel label in the TMWSuite System Administration application.
-
To select and move multiple note level, use the CTRL or SHIFT key when clicking items.
-
-
Click
to move your selections to the Selected Roles for Notes list.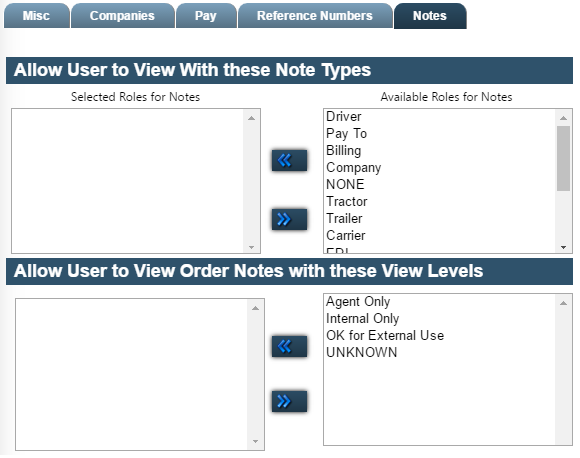
-
-
To save your changes, click
Save.
A message indicates that your changes were saved successfully.If you are making changes for a specific role, and this is the first time the setting has been changed for any role, the text label style changes to bold and italic.