Managing Data Warehouse features
Before Trimble Web Products V.2016.6
Before users build reports in Data Warehouse Explorer, you must configure the Data Warehouse settings.
Adding a Data Warehouse datasource
You must add at least one datasource to Data Warehouse before you build a report.
To add a Data Warehouse datasource, follow these steps:
-
Go to Menu > Data Warehouse > Data Warehouse Admin > Data Warehouse Selection.
The Data Warehouse Admin page opens.
-
Click Add New Datasource.
The DW Database Selection section expands to display fields for identifying the new datasource.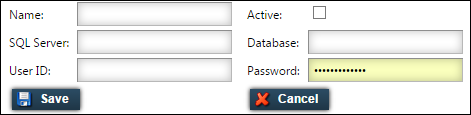
-
Make entries in the following fields.
Required field: *
Field Definition Name *
Enter a name for the connection.
SQL Server *
Enter the name of the server where the datasource database resides.
User ID *
Enter the login used to access the SQL server.
Notes:
-
The User ID provided must have the dwex_execute role on the database.
-
You cannot use Windows Authentication to log into Data Warehouse.
Active
Select the Active check box to make the source database active in Data Warehouse. Clear the check box to make the datasource inactive.
Database *
Enter the name of the SQL database.
Password *
Enter the password for the User ID.
-
-
Click Save.
A message at the top of the page, states that your settings saved successfully.If you do not want to save, click Cancel. The application cancels any unsaved changes and reverts to the last saved settings.
-
To add additional datasources to Data Warehouse, repeat Steps 2-4.
Editing a Data Warehouse datasource
To edit an existing Data Warehouse datasource, follow these steps:
-
Go to Menu > Data Warehouse > Data Warehouse Admin > Data Warehouse Selection.
The Data Warehouse Admin page opens. -
In the row of the datasource to which you want to make changes, click Edit.
The Edit Properties section expands to display fields for editing.
-
Make changes as needed.
For a list of field descriptions, see Adding a Data Warehouse datasource.
-
Click Update.
A message appears at the top of the page. It states the settings were saved successfully.If you do not want to save, click Cancel instead. The application cancels any unsaved changes and reverts to the last saved settings.
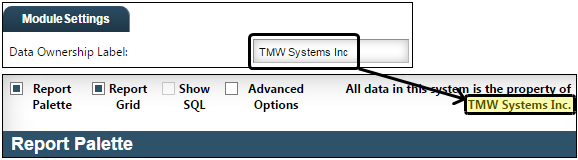
Changing data ownership
The name of the data owner displays at the top of the Data Warehouse Explorer page. CompanyName is the default data owner.

To change the data ownership name, follow these steps:
-
Go to Menu > Configuration > Settings Manager.
The Settings Manager page opens. -
Verify [Global Settings] is in the Role field.
-
Click the Modules tab.
-
In the Module Selection field, select Data Warehouse.
The Data Warehouse settings appear on the Module Settings tab. -
In the Data Ownership Label field, replace CompanyName with the name of the company who owns the data.
-
Click Save.
A message appears at the top of the page. It states the settings were saved successfullyIf you do not want to save, click Revert instead. The application cancels any unsaved changes and reverts to the last saved settings.
This illustration shows the updated data ownership name in Data Warehouse Explorer.
Specifying the default report publication location
Available in Trimble Web Products V.2015.4 through Trimble Web Products V.2016.6
When users publish reports, they can choose where they are published. If you want, you can specify a default location for publishing reports. Users will have the choice to use the default location, or select another.
To set the default location for published reports, follow these steps:
-
Go to Menu > Configuration Manager > Settings.
The Settings Manager page opens. -
Verify [Global Settings] is in the Role field.
-
Click the Modules tab.
-
In the Module Selection field, select Data Warehouse.
The Data Warehouse settings appear on the Module Settings tab. -
In the Default Publish Location field, select the default menu location.
Notes:
-
Locations with a circle before their names are sub-menu locations.
-
The default location is Menu > Data Warehouse > Saved Reports.
-
-
Click Save.
A message at the topic of the page states that your settings saved successfully.Click Revert to cancel unsaved changes.
Setting threshold warning limits
Available in Trimble Web Products V.2015.4 through Trimble Web Products V.2016.6
Some Data Warehouse Explorer reports return a very large number of rows. The more results a report returns, the longer it takes to run. By default, the system threshold is 10,000 rows. When a user runs a report that exceeds the threshold, a warning appears. You can set the warning threshold value for reports with and without maps/charts.
To set the warning threshold values, follow these steps:
-
Go to Menu > Configuration Manager > Settings.
The Settings Manager page opens. -
Verify [Global Settings] is in the Role field.
-
Click the Modules tab.
-
In the Module Selection field, select Data Warehouse.
The Data Warehouse settings appear on the Module Settings tab. -
Set the warning threshold values.
-
Set the threshold for reports without charts
In the Warning Threshold Grid field, enter the threshold value. This value affects only reports without maps or charts.
The default limit is 10000 rows.
-
Set the threshold for reports with charts or grids
In the Warning Threshold Charts and Maps field, enter the threshold value. This value affects only reports that contain a chart or a map.
The default limit is 100 rows.
-
-
Click Save.
A message at the topic of the page states that your settings saved successfully.
Click Revert to cancel unsaved changes.
Comparing your current system with minimum recommendations
Available in Trimble Web Products V.2015.4 through Trimble Web Products V.2016.6
Data Warehouse Explorer is an application intended to create dynamic and complex reports. It can consume large amounts of system resources, such as RAM or processor power. If your company experiences performance issues, verify that your system meets the minimum Data Warehouse requirements.
To compare your system with the minimum requirements, follow these steps:
-
Go to Menu > Data Warehouse Admin > System Overview.
The System Overview page opens.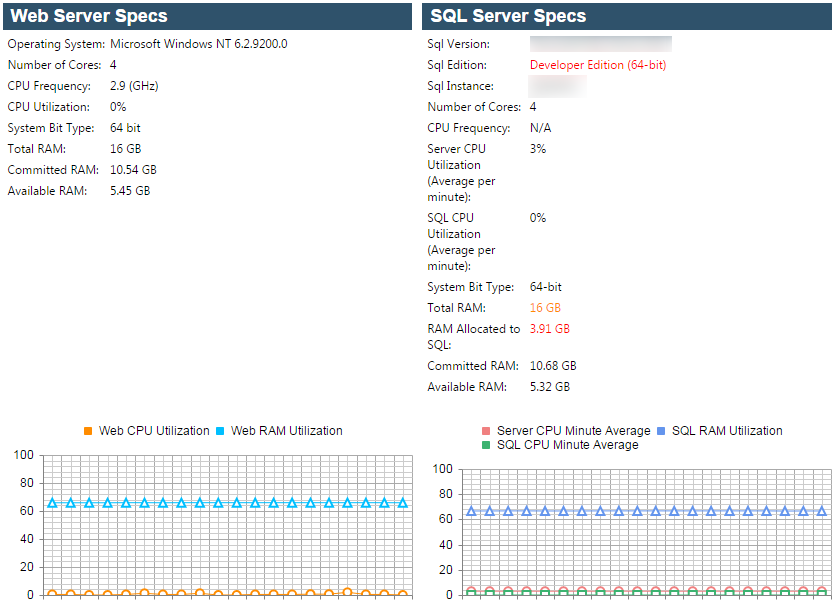
Note: If you receive an error message stating "Access is denied," you must set up the Data Warehouse Explorer Overview feature.
-
Compare your current system with the minimum recommended specifications.
This page has two sections:
-
Web Server Specs
Compares your system with the recommended specifications for the Web Products. -
SQL Server Specs
Compares your system with the recommended specifications for your SQL server.
If your system does not meet a recommendation, it highlights that specification with a color.
-
Red text
Your system specification does not meet the recommendations. -
Orange text
Your system specification meets the recommendations. -
Black text
Your system specification exceeds the recommendations or there is no recommendation.
-