Assigning resources to orders
You assign resources to orders on the Freight Agent Order Entry page or on the Planning Worksheet page. You can make assignments for drivers, tractors, trailers, or carriers.
Freight Agent Order Entry page
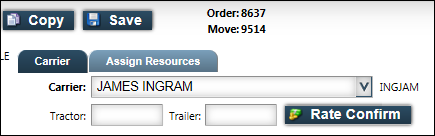
You assign a carrier on the Carrier tab.
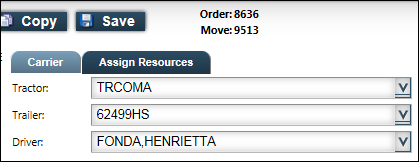
You assign a tractor, trailer, and driver on the Assign Resources tab.
Planning Worksheet
When you select an order and click Assign Carrier, a window opens in which you can record additional information for the assignment.
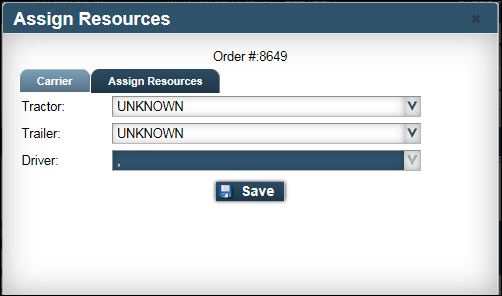
When you select an order and click Assign Resources, the Assign Resources window opens.
-
On the Carrier tab, you can assign a carrier. If you know which tractor and trailer will be used, you can enter that information.
-
On the Assign Resources tab, you record the tractor, trailer, and driver that will perform the trip.
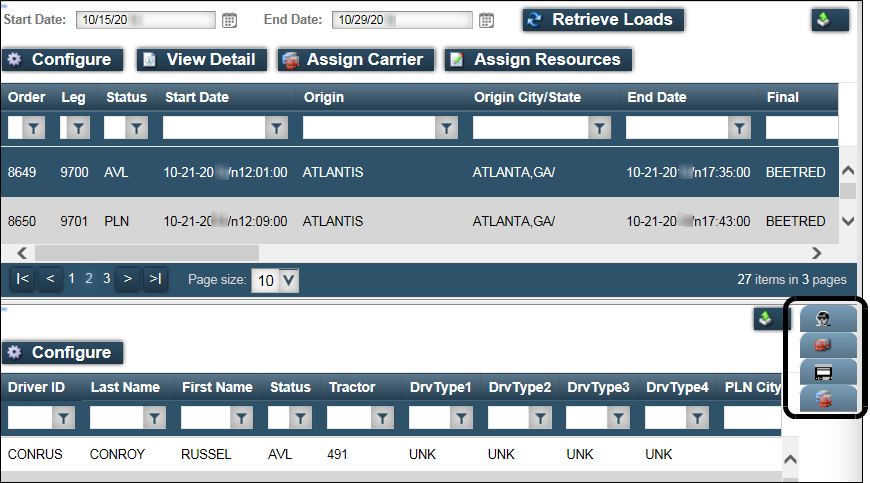
In the Planning Worksheet, you can view information about resources' availability by clicking one of the resource tabs to the right of the Resources grid.
Assigning a carrier
If your login allows it, you can assign a carrier to an order. You can do this in several locations:
-
Freight Agent Order Entry page, on the Carrier tab
-
Planning Worksheet, Assign Carrier window
-
Planning Worksheet, Assign Resources window, Carrier tab
The Carrier tab contains fields where you can specify the carrier name and, if desired, a tractor and/or trailer ID.
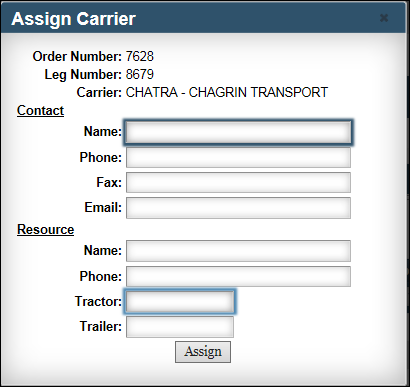
When you select an order and a carrier in the Planning Worksheet, the Assign Carrier window allows you to specify contact information for the carrier and driver.
Assigning a carrier in the Freight Agent Order Entry page
To assign a carrier to a new or existing order, follow these steps.
-
Go to Menu > Agent > Freight Agent Order Entry.
-
Do one of the following:
-
Complete the fields on the Carrier tab.
Required: *
Field Definition Carrier *
The carrier’s name
Note: Only available carriers will appear in the drop-down list.
Tractor
If you know the ID of the tractor the carrier will use on the trip, you can enter it here.
Trailer
If you know the ID of the trailer the carrier will use on the trip, you can enter it here.
If your website is set up to allow you to view SSRS reports, you can click Rate Confirm to view a rate confirmation report. You can then print or save the report.
Assigning a carrier in the Planning Worksheet
To assign a carrier to an existing order, follow these steps.
-
Go to Menu > Agent > Planning Worksheet.
-
Retrieve a list of your orders.
You can make assignments only for orders that have AVL (Available) in the Status column. -
In the Orders grid, select the order to which you want to assign a carrier.
Note: You can assign a carrier to only one order at a time. You cannot select multiple orders.
-
Assign the carrier. You can do this in either of these windows:
-
Click Save.
-
If the assignment is completed successfully, the Status column for the order shows PLN (Planned).
-
If the assignment is unsuccessful, an error message appears. Contact the hosting company for details.
-
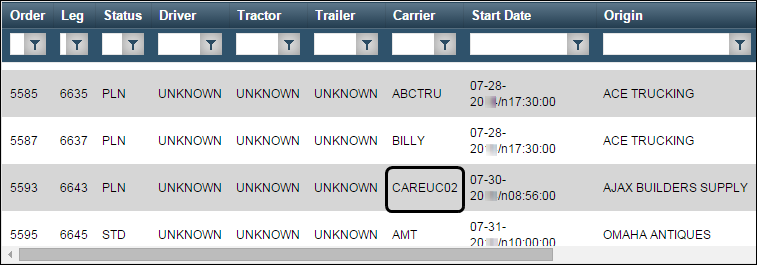
To view which carrier is assigned to an order, do one of the following:
-
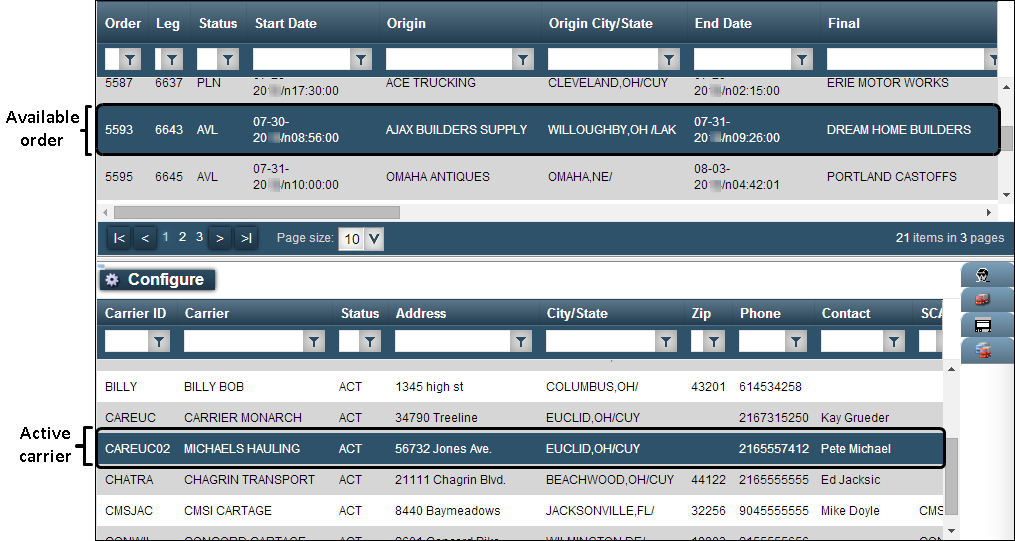
Scroll to the Carrier column in the Orders grid. In the illustration below, the resources columns have been moved to the right of the Status column.
-
With the order selected, click View Details at the top of the page. The order opens on the Freight Agent Order Entry page. The Carrier field shows the name of the carrier. If you entered a tractor and/or trailer ID, they appear in the Tractor and Trailer fields.
Assign Carrier window
-
Click the Carrier tab on the right of the Resources grid.
The Carriers grid opens.Carriers that are available for assignment will have ACT (Active) in the Status column.You cannot assign a carrier that has a status of OUT (Out of service).
-
In the Carriers grid, select the carrier you want to assign to the selected order.
-
Click Assign Carrier.
The Assign Carrier page opens. -
Enter the appropriate information in the Contact and Resource sections of the page.
Notes:
-
The information you enter on the Assign Carrier page is associated with this order.
-
When you view order details on the Freight Agent Order Entry page, only the tractor and trailer IDs you entered appear in the Carrier tab.
-
-
Click Assign.
-
If the assignment is completed successfully, the Status column for the order shows PLN (Planned).
-
If the assignment is unsuccessful, an error message appears.Contact the hosting company for details.
-
Assign Resources window
-
Click Assign Resources.
The Assign Resources window appears. -
Complete the fields in the Carrier tab.
Required: *
Field Definition Carrier *
The carrier’s name
Note: Only available carriers appear in the drop-down list.
Tractor
If you know the ID of the tractor the carrier will be using on the trip, you can enter it here.
Trailer
If you know the ID of the trailer the carrier will be using on the trip, you can enter it here.
Assigning resources
If your login allows it, you can assign a driver, tractor, and/or trailer to an order. You can do this on the Assign Resources tab, on the Freight Agent Order Entry page and in the Assign Resources window in the Planning Worksheet.
Assigning resources in the Freight Agent Order Entry page
To assign resources to a new or existing order, follow these steps:
-
Go to Menu > Agent > Freight Agent Order Entry.
-
Do one of the following:
-
In the Assign Resources tab, make entries in the following fields.
Field Definition Tractor
Tractor ID
Trailer
Trailer ID
Driver
Driver name
Assigning resources in the Planning Worksheet
To assign resources to an existing order, follow these steps:
-
Go to Menu > Agent > Planning Worksheet.
-
Retrieve a list of your orders.
You can make assignments only for orders that have AVL (Available) in the Status column.
-
In the Orders grid, select the order.
Note: You can assign resources to only one order at a time. You cannot select multiple orders.
-
Click Assign Resources.
The Assign Resources window appears. -
Click the Assign Resources tab.
-
In the Assign Resources tab, make entries in the following fields.
Field Definition Tractor
Tractor ID
Trailer
Trailer ID
Driver
Driver name
-
Click Save.
-
If the assignment is completed successfully, the Status column for the order shows PLN (Planned).
-
If the assignment is unsuccessful, an error message appears. Contact the hosting company for details.
-
To view the order’s assigned resources, do one of the following:
-
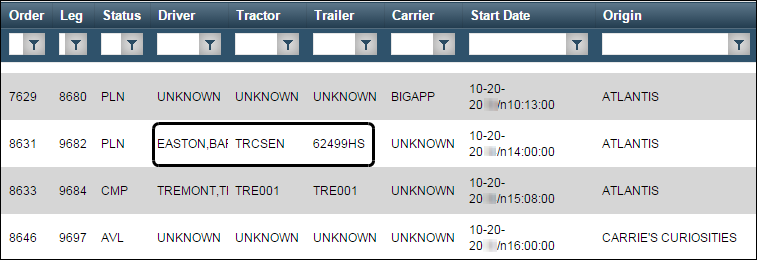
Scroll to the Driver, Tractor, and Trailer columns in the Orders grid. In the illustration below, the resources columns have been moved to the right of the Status column.
-
With the order selected, click View Details at the top of the page. The order opens on the Freight Agent Order Entry page. Clicking the Assign Resources tab displays the resources you entered.