Setting up e-mail addresses for event notification
You can set up the system to send your employees event notifications. Once you record an employee’s e-mail address, you can associate it with one or more groups.
As needed, you can manage e-mail addresses by:
-
Modifying them
-
Assigning them to different groups
-
Removing them from the system
Adding an e-mail address
To record the e-mail addresses of employees who are to receive event notifications, follow these steps.
-
Go to one of the following:
-
CarrierHub
Menu > Configuration > Carrier Configuration > Configure Email Notifications
The Configure Email Notifications page opens.Note: The e-mail identifies the load, carrier, and any comments the carrier recorded for the load request.
-
eStat
Menu > Configuration > Customer Configuration > Email Notifications
The Email Notifications page opens.
-
-
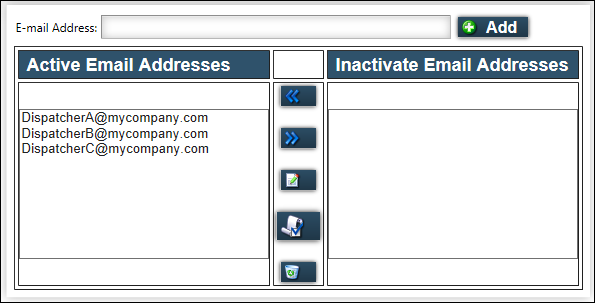
In the E-Mail Address field at the top of the page, enter the person’s e-mail address.
-
Click Add.
A message appears at the top of the page, stating your changes were saved successfully. -
Continue with Adding an e-mail address to a group.
Adding an e-mail address to a group
You can send a single notification e-mail to a group of addresses simultaneously. Groups are defined on these pages:
-
CarrierHub: Group Definition page
-
eStat: Define Groups page
An e-mail address can belong to more than one group. A user whose e-mail address belongs to more than one group may receive more than one notification e-mail.
To assign e-mail addresses to a group, follow these steps:
-
Go to one of the following:
-
CarrierHub
Menu > Configuration > Carrier Configuration > Configure Email Notifications
The Configure Email Notifications page opens. -
eStat
Menu > Configuration > Customer Configuration > Email Notifications
The Email Notifications page opens.
-
-
In the Active Email Addresses list, click on the e-mail address that you want to add to a group.
Note: You can select only one e-mail address at a time. -
Click
 Assign Groups in eStat or
  Assign Groups in CarrierHub.
The available groups appear at the bottom of the page.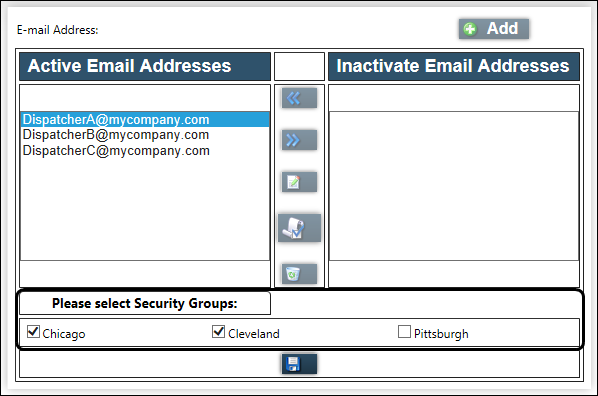
-
Select the check box for each group to which the e-mail address should belong.
Each dispatcher whose e-mail address is assigned to a specific group will see the notifications only for orders specified for that group. -
Click
 Save Group Assignments.
A message indicates that the group assignment was successful.
Removing an e-mail address from a group
You define groups on these pages:
-
CarrierHub: Group Definition page
-
eStat: Define Groups page
To remove e-mail addresses from a group, follow these steps.
-
Go to one of the following:
-
CarrierHub
Menu > Configuration > Carrier Configuration > Configure Email Notifications
The Configure Email Notifications page opens. -
eStat
Menu > Configuration > Customer Configuration > Email Notifications
The Email Notifications page opens.
-
-
In the Active Email Addresses list, click on an e-mail address that you want to remove from a group.
-
Click
Assign Groups in eStat or Assign Groups in CarrierHub.
The available groups appear at the bottom of the page. -
Clear the check box for each group from which the e-mail address should be removed.
-
Click
Save Group Assignments.
A message indicates that the group assignment was successful.
Modifying an e-mail address
To change an e-mail address for event notifications, follow these steps.
-
Go to one of the following:
-
CarrierHub
Menu > Configuration > Carrier Configuration > Configure Email Notifications
The Configure Email Notifications page opens. -
eStat
Menu > Configuration > Customer Configuration > Email Notifications
The Email Notifications page opens.
-
-
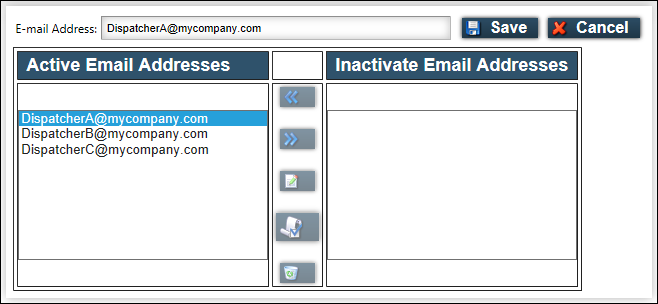
In the Active Email Addresses list, click on an e-mail address that you want to modify.
-
Click
 Modify Address.
 -
Enter the new e-mail address at the top of the page.
-
Click
Save.
A message indicates that the change was successful.
Deactivating an e-mail address
To remove an e-mail address from the Active Email Addresses notification list, follow these steps.
-
Go to one of the following:
-
CarrierHub
Menu > Configuration > Carrier Configuration > Configure Email Notifications
The Configure Email Notifications page opens. -
eStat
Menu > Configuration > Customer Configuration > Email Notifications
The Email Notifications page opens.
-
-
In the Active Email Addresses list, click the e-mail address that you want to deactivate.
-
Click
 Deactivate.
The e-mail address is moved to the Inactive Email Addresses list.
Reactivating an inactive e-mail address
To reinstate inactive e-mail addresses, follow these steps.
-
Go to one of the following:
-
CarrierHub
Menu > Configuration > Carrier Configuration > Configure Email Notifications.
The Configure Email Notifications page opens. -
eStat
Menu > Configuration > Customer Configuration > Email Notifications.
The Email Notifications page opens.
-
-
In the Inactive Email Addresses list, click on the e-mail address that you want to return to the Active Email Addresses notification list.
-
Click
 Activate.
The e-mail address is moved to the Active Email Addresses list.
Deleting an e-mail address
To remove an inactive e-mail address permanently, follow these steps. Only inactive e-mail addresses can be deleted.
-
Go to one of the following:
-
CarrierHub
Menu > Configuration > Carrier Configuration > Configure Email Notifications
The Configure Email Notifications page opens. -
eStat
Menu > Configuration > Customer Configuration > Email Notifications
The Email Notifications page opens.
-
-
In the Inactive Email Addresses list, click on the e-mail address that you want to delete.
-
Click
 Delete.
A message indicates that the e-mail address was successfully deleted.