Managing the mapping feature
Trimble Maps is a JavaScript Application Programming Interface (API) designed for the transportation industry. Trimble Maps can be used within Trimble Web Products to generate trip information on an interactive graphical map.
With the mapping feature, you can:
-
Track resources and freight
-
View a history of recorded check calls
-
Review origin and destination details
-
Check estimated arrival and departure times
-
Overlay current traffic and weather for enhanced planning
|
Trimble Maps is built into Trimble Web Products and available for use at no extra cost. To use it, you will need a unique API key value for one of three map interfaces:
Contact Trimble support to obtain your Trimble key value. |
For detailed information about what appears on maps, see Viewing maps.
You can access the mapping feature from several locations:
-
View Available Loads page
In eStat, you can view a map for any order on the View Available Loads page. You can view a map for a single order or multiple orders. You also can view a map that shows check call breadcrumbs for an order. Settings control the icons that appear on the maps accessed from this page.
Note: If you want users to be able to view maps for active loads, you must enable access to maps for the View Available Loads page. By default, users cannot view maps for active loads. For more information, see Allowing access to maps for active loads.
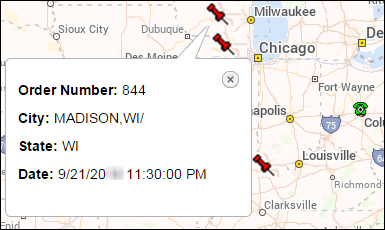
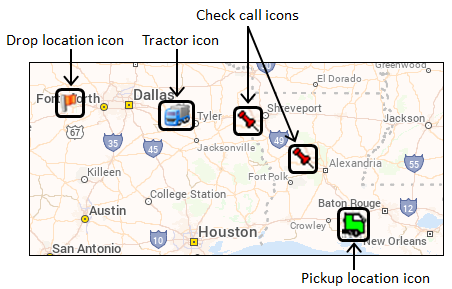
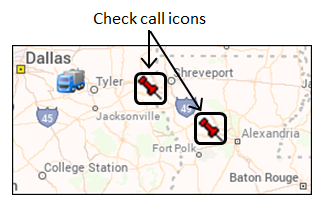
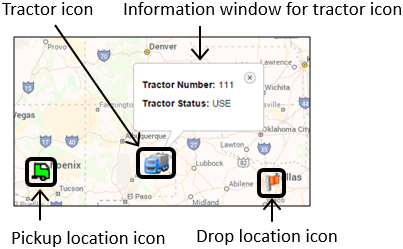
The map below displays an order with mapped check call breadcrumbs. When you click a check call icon, an information window provides details of the check call.
-
Customer and Carrier landing details pages
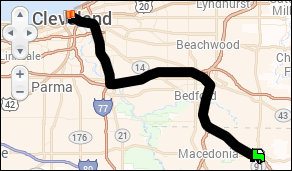
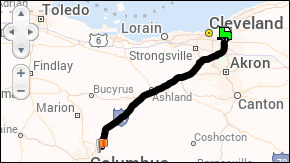
Clicking an order number on the Customer or Carrier landing pages opens the order on a shipment or trip details page that shows a map of the route for the order. Maps displayed on these pages show routes with an origin and a destination only. These maps do not show tractor locations, check calls, or other details.
-
Driver assigned and available trips
When drivers click an order number on the Assigned Trips or Available Trips pages, a map of the route for the order appears in the details pane. Maps displayed on these pages show routes with an origin and a destination only. These maps do not show tractor locations, check calls, or other details.
Specifying basic map settings
To use the mapping feature, you must specify basic map settings. These settings activate the mapping feature and determine the basic appearance of maps in the application. With these settings, you can change the base appearance of a map and the center point of a map when it opens.
| If you want users to be able to view maps for active loads, you must enable access to maps for the View Available Loads page. By default, users cannot view maps for active loads. For more information, see Allowing access to maps for active loads. |
To specify basic map settings, follow these steps.
-
Go to Menu > Configuration > Settings Manager.
The Settings Manager page opens. -
Do one of the following:
-
If you want the setting change to apply to all roles, verify the Role field is set to [Global Settings].
-
If you want the setting change to apply to a specific role, select it in the Role field.
A message asks you to verify that you want to change the role. Click OK to continue.
Note: If a setting has already been changed for at least one role, its text label is bold and italic.
-
-
Click these tabs: General > Map.
The general maps settings appear.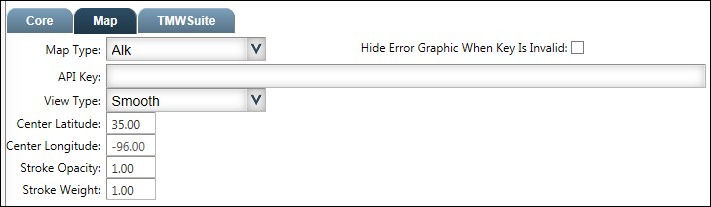
-
Define the default map settings.
Field Definition Map Type
Default map type is Trimble
Note: Trimble Maps is built into Trimble Web Products and available for use at no extra cost. No other mapping option is supported by this application.
Hide Error Graphic When Key Is Invalid
If the value in the API Key field is incorrect, or the field is blank, the following message will appear when a user attempts to use the mapping feature:
"Mapping not activated; please supply valid key to activate."
Select the check box to hide the error message when the key value is invalid.
API Key
If your system was configured correctly, a valid API Key value should appear automatically in this field. If it does not, contact Trimble Support.
View Type
Select a basic style for how maps will appear.
Center Latitude
Enter a latitude to which to center maps when they are opened from the View Available Loads page.
By default, maps open with the continental United States at the center.
Center Longitude
Enter a longitude to which to center maps when they are opened from the View Available Loads page.
By default, maps open with the continental United States at the center.
Stroke Opacity
Not functional
Stroke Weight
Not functional
-
Click Save.
A message appears at the top of the page, stating your settings were saved successfully. If you are making changes for a specific role and this is the first time a setting has been changed for any role, the text label style changes to bold and italic.
Selecting map icons
Maps feature icons that identify resources, stops, companies, and check calls.
You can select which icons appear on maps and the image used for each icon.
To select map icons, follow these steps:
-
Go to Menu > Configuration > Settings Manager.
The Settings Manager page opens. -
Do one of the following:
-
If you want the setting changes to apply to all roles, verify the Role field is set to [Global Settings]. All but one of these settings (Carrier Icon) can only be edited in Global Settings mode.
-
If you want to choose a carrier icon for a specific role, select that role in the Role field.
A message asks you to verify that you want to change the role. Click OK to continue.
Note: If a setting has already been changed for at least one role, its text label is bold and italic.
-
-
Click these tabs: General > Map.
The general map icon settings appear.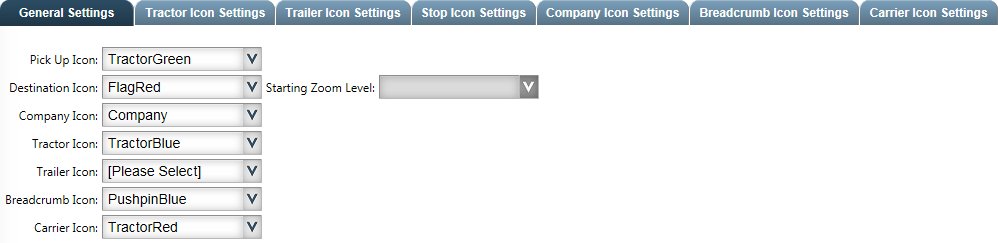
-
Select map icons.
Note: If the Role field contains any value other than [Global Settings], only the Carrier Icon setting can be changed. All other settings appear in read-only mode.Field Definition Pick Up Icon
Select the icon to appear for pickup locations.
Destination Icon
Select the icon to appear for drop locations.
Company Icon
Select the icon to appear for company locations.
Tractor Icon
Select the icon to appear for tractor locations.
Trailer Icon
Select the icon to appear for trailer locations.
Breadcrumb Icon
Select the icon to appear for check call locations.
Carrier Icon
Select the icon to appear for carrier locations.
Starting Zoom Level
Not functional
-
Click Save.
A message appears at the top of the page, stating your settings were saved successfully. If this is the first time you have made changes to the Carrier Icon setting for a specific role, the text label style changes to bold and italic.
Enabling check call locations on maps
You can view the recorded check call locations for an order on a map.
Icons for check call locations do not appear on maps by default. You must enable check call breadcrumbs to view check call locations on maps.
To enable check call breadcrumbs, follow these steps:
-
Go to Menu > Configuration > Settings Manager.
The Settings Manager page opens. -
Do one of the following:
-
If you want the setting change to apply to all roles, verify the Role field is set to [Global Settings].
-
If you want the setting change to apply to a specific role, select it in the Role field.
A message asks you to verify that you want to change the role. Click OK to continue.
Note: If a setting has already been changed for at least one role, its text label is bold and italic.
-
-
Click these tabs: General > Map.
The general map icon setttings appear. -
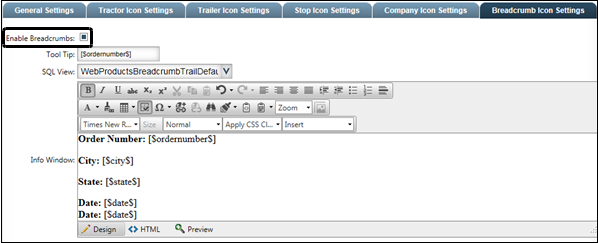
Click the Breadcrumb Icon Settings tab.
The breadcrumb icon settings appear. -
Select the Enable Breadcrumbs check box.
-
Click Save.
A message appears at the top of the page, stating your settings were saved successfully. If you are making changes for a specific role and this is the first time the setting has been changed for any role, the text label style changes to bold italic. -
This tab also provides access to the information window text that appears when you click on a check call breadcrumb icon. For more information about using this tab to modify information text, see Modifying map icon information window text.
Modifying map icon information window text
Map icons have data associated with them. When you hover the cursor over an icon, a ToolTip displays related information, such as resource number or company name. If you click an icon, an information window displays more detailed information, such as resource status, stop information, or check call details.
To modify the information that appears in an icon information window, follow these steps.
-
Go to Menu > Configuration > Settings Manager.
The Settings Manager page opens. -
Do one of the following:
-
If you want the setting changes to apply to all roles, verify the Role field is set to [Global Settings]. All but one of these groups of settings (Carrier Icon Settings) can only be edited in Global Settings mode.
-
If you want to define carrier icon settings for a specific role, select that role in the Role field.
A message asks you to verify that you want to change the role. Click OK to continue.
Note: If a setting has already been changed for at least one role, its text label is bold and italic.
-
-
Click these tabs: General > Map.
The general map icon settings appear. -
Click on the tab for the icon with the information window text you want to modify.
Notes:
-
If the Role field contains any value other than [Global Settings], only the settings in the Carrier Icon Settings tab can be changed. All other setting groups appear in read-only mode.
-
The Breadcrumb Icon Settings tab provides access to information text for check call icons.
-
While ToolTip fields are available for editing, ToolTip text cannot be changed.
-
-
On the Tractor Icon Settings, Breadcrumb Icon Settings, and Carrier Icon Settings tabs:
-
Select the Use SQL View check box to be able to select a view that contains custom information window descriptions.
-
In the SQL View field, select the SQL view name containing the custom information window descriptions.
-
-
In the text box, use the inline editing tools to type and format the text that will appear in the information window when you click the icon.
-
Tractor icon variables
[$number$][$status$][$terminal$][$thirdparty$][$trailer1$][$trailer2$][$turndown$][$avldate$][$avlcity/state$][$avllgh$][$plndate$][$plncity/state$][$plnlgh$][$priorcity/state$][$nextcity/state$] -
Trailer icon variables
[$number$][$status$][$terminal$][$avldate$][$avlcity/state$][$schdate$][$schcity/state$][$priorcity/state$][$nextcity/state$] -
Stop icon variables
[$address$][$order_number$][$city/state$][$hasarrived$][$hascompleted$][$estarrivaldate$][$estdeparture$][$arrivaldate$][$departuredate$][$freight$][$carrier$][$shipper$][$consignee$][$linehaulcharge$][$billto$][$reasonlatearrival$][$reasonlatedepart$][$earliestdate$][$latestdate$][$eventcode$][$mileage$][$route$][$supplier$][$revtype1$][$revtype2$][$revtype3$][$revtype4$][$startdate$][$completiondate$][$availabledate$][$invoicestatus$] -
Company icon variables
[$name$][$address$][$city/state$][$phone$][$active$][$consignee$][$shipper$][$billto$][$invoicetype$][$mastercompany$][$mincharges$][$subcompany$][$slacktime$][$splc$][$countyname$][$revtype1$][$revtype2$][$revtype3$][$revtype4$] -
Breadcrumb icon variables
Breadcrumb icon information window text is based on a customizable SQL view. No standard variables can be added to this text box.
-
Carrier icon variables
[$number$][$ordernumber$][$carrier$][$status$][$date$][$city/state$][$legnumber$]
-
-
Click Save.
A message appears at the top of the page, stating your settings were saved successfully. If this is the first time you have made changes to any setting in the Carrier Icon Settings tab for a specific role, the text label style changes to bold and italic.