Configuring carrier invoice/pay review
In CarrierHub, the terms invoice and pay are used interchangeably to mean the cost incurred when a third-party carrier hauls a load. If you want, you can allow carriers to:
-
View estimated pay for trips listed on the Available Loads page or the Assigned Loads page. Estimates give carriers an idea of what to expect regarding future payment.
-
View pay details recorded for the trips listed on the Historical Loads page or the Invoice Review page.
-
Submit approval of pay for a trip listed on the Invoice Review page.
| A carrier’s approval of pay does not affect the settlement process in TMWSuite. By default, even if pay is not approved, you will be able to finalize it in Settlements. However, you can set up TMWSuite to require the creation of an invoice before payment. If this setup is in place, you can institute a manual process that involves delaying billing for orders until carriers have submitted pay approval. |
Specifying maximum percentages for estimated pay
If your company uses a standard percentage of revenue calculation to determine how much carriers are paid, you can set up CarrierHub to show estimated pay for trips automatically. Carriers will see these pay estimates when they view details for a specific trip on the Available Loads page or the Assigned Loads page.
| Only trips that have been pre-rated in TMWSuite will show estimated pay. |
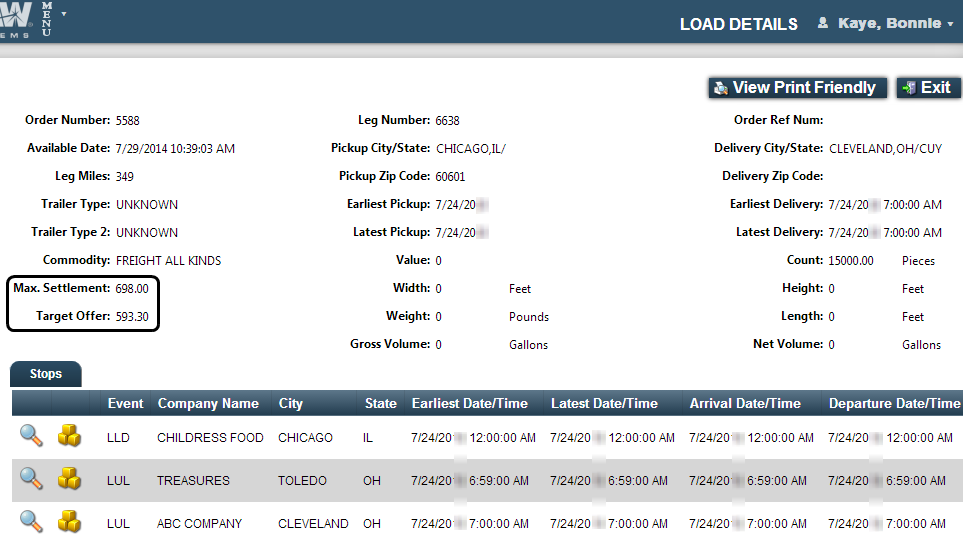
When carriers select a trip on either of the boards and go to the Load Details page, they will see two pay-related fields:
-
Max. Settlement: Shows the maximum line haul pay that the carrier will receive.
-
Target Offer: Shows the maximum total pay (line haul plus accessorials) that the carrier will receive.
|
To set the percentages used to estimate pay, follow these steps.
-
Go to Menu > Configuration > Settings Manager.
The Settings Manager page opens. -
Do one of the following:
-
If you want the setting change to apply to all roles, verify the Role field is set to [Global Settings].
-
If you want the setting change to apply to a specific role, select it in the Role field.
A message asks you to verify that you want to change the role. Click OK to continue.Note: If the setting has already been changed for at least one role, its text label is bold and italic.
-
-
On the Modules tab, in the Module Selection field, select Carrier.
-
Click these tabs: Application Settings > Load Details > General.
-
Make your entries.
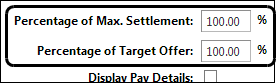
Field Definition Percentage of Max. Settlement
Enter the percent of revenue that is to be used to calculate carriers' estimated line haul pay. The percent you enter will be multiplied by an order’s billed line haul charge; the product will appear in the Max. Settlement field on the Load Details page.
Notes:
-
In the order header in TMWSuite, you can use the Pay Revenue field to record a revenue value for settlement that is different from the actual billing revenue. If a dollar amount has been entered in this field, CarrierHub will base estimated pay on that amount. The Pay Revenue field is hidden by default. To have it appear, you must have the
[Order]ShowPayRevenue=Ysetting in your TTS50. -
If an order has not been pre-rated, the Max. Settlement field displays a value of 0.00.
Percentage of Target Offer
Enter the percent of revenue that is to be used to calculate a carrier’s estimated total pay for a trip. The percent you enter is multiplied by an order’s total charge (line haul plus accessorials); the product appears in the Target Offer field on the Load Details page.
Notes:
-
If an order has not been pre-rated, the Max. Settlement field displays a value of 0.00.
-
In the order header, if a line haul revenue value for settlement was entered in the Pay Revenue field, CarrierHub bases estimated pay on that amount plus billed accessorial charges.
-
-
Click Save.
A message indicates that your changes were saved successfully.If you are making changes for a specific role and this is the first time the setting has been changed for any role, the text label style changes to bold and italic.
If you do not want to save, click Revert instead. The application cancels any unsaved changes and reverts to the last saved settings.
Configuring retrieval of trips for pay review
Sometimes the scope of a load may change between when you issue a load confirmation to a carrier and when the load is performed. The carrier may need to add charges. In such cases, your company may delay billing for an order until the carrier has approved pay details for the trip. Carriers can use the Invoice Review page to approve their pay.
| To delay billing, the dispatcher sets the order’s invoice status to Do Not Invoice. Only orders with that invoice status are available for invoice review. When the carrier approves the pay details for a trip, the order becomes available for invoicing. |
To specify how trips are to be retrieved on the Invoice Review page, follow these steps.
-
Go to Menu > Configuration > Settings Manager.
The Settings Manager page opens. -
Do one of the following:
-
If you want the setting change to apply to all roles, verify the Role field is set to [Global Settings].
-
If you want the setting change to apply to a specific role, select it in the Role field.
A message asks you to verify that you want to change the role. Click OK to continue.Note: If the setting has already been changed for at least one role, its text label is bold and italic.
-
-
On the Modules tab, in the Module Selection field, select Carrier.
-
Click these tabs: Application Settings > Load Boards > Invoice Review.
-
Make your selections.
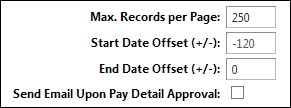
Field Definition Max. Records per Page
To conserve use of your system’s bandwidth, set the maximum number of rows allowed per page. The user can select any number less than or equal to this number on their My Profile page.
Start Date Offset (+/-)
Default number of days back indicating when the date range will begin
For example, an offset of -30 will display records between the End Date Offset and 30 days before it.
End Date Offset (+/-)
Default number of days from today indicating when the date range will end
Send Email Upon Pay Detail Approval
Select this check box to send a notification e-mail when a pay detail is approved.
-
Click Save.
A message indicates that your changes were saved successfully.If you are making changes for a specific role and this is the first time the setting has been changed for any role, the text label style changes to bold and italic.
If you do not want to save, click Revert instead. The application cancels any unsaved changes and reverts to the last saved settings.
Allowing carriers to view pay details
You can grant carriers the ability to view the pay details that have been created for their assigned loads. To see them, carriers can go to Menu > Carrier > Assigned Loads, Menu > Carrier > Historical Loads or Menu > Carrier > Invoice Review.
When they select a trip and click View Details, the Load Details page opens. When users click Pay Details in the upper right of the page, they will see pay detail(s) listed at the bottom.
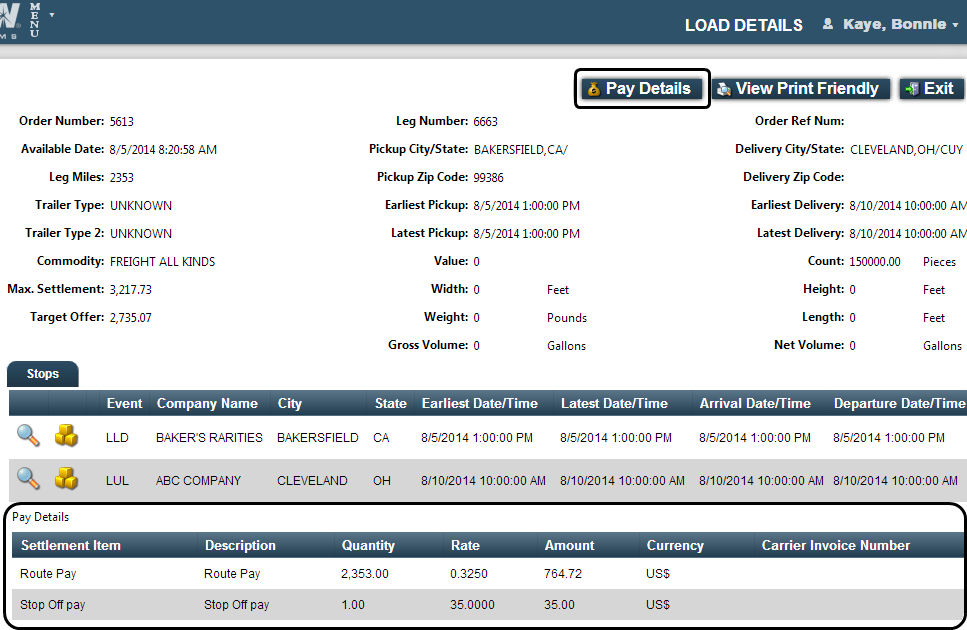
| A pay detail’s status does not affect the carrier’s ability to see it. If pay has not yet been run through the Close process, the amount is not final. |
To give carriers the ability to view pay, follow these steps.
-
Go to Menu > Configuration > Settings Manager.
The Settings Manager page opens. -
Do one of the following:
-
If you want the setting change to apply to all roles, verify the Role field is set to [Global Settings].
-
If you want the setting change to apply to a specific role, select it in the Role field.
A message asks you to verify that you want to change the role. Click OK to continue.Note: If the setting has already been changed for at least one role, its text label is bold and italic.
-
-
On the Modules tab, in the Module Selection field, select Carrier.
-
Click these tabs: Application Settings > Load Details > General.
-
Select the Display Pay Details check box.
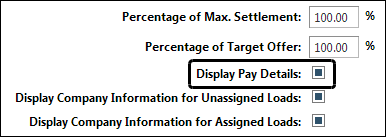
Note: If this box is cleared, users will not see the Pay Details button on the Load Details page.
-
Click Save.
A message indicates that your changes were saved successfully.If you are making changes for a specific role and this is the first time the setting has been changed for any role, the text label style changes to bold and italic.
If you do not want to save, click Revert instead. The application cancels any unsaved changes and reverts to the last saved settings.
Allowing carriers to approve pay details
If you want, you can give carriers the ability to approve pay details for loads with a Completed status. Carriers' approval of pay does not affect the settlement process in TMWSuite. By default, even if pay is not approved, you will be able to finalize it in Settlements.
However, you can set up TMWSuite to require the creation of an invoice before payment. If this setup is in place, you can institute a manual process that involves delaying billing for orders until carriers have submitted pay approval.
To delay billing, a dispatcher must set an order’s invoice status to Do Not Invoice. After a carrier uses CarrierHub to send an e-mail with pay approval for the order, a dispatcher can then use TMWSuite to set the order’s invoice status to Available.
To approve pay, carriers must go to Menu > Carrier > Invoice Review. They can approve pay in either of these places:
-
Directly from the Invoice Review grid
The Accept Pay button is enabled for pay approvals. To submit approval, the carrier selects an order in the Invoice Review list and clicks Accept Pay.
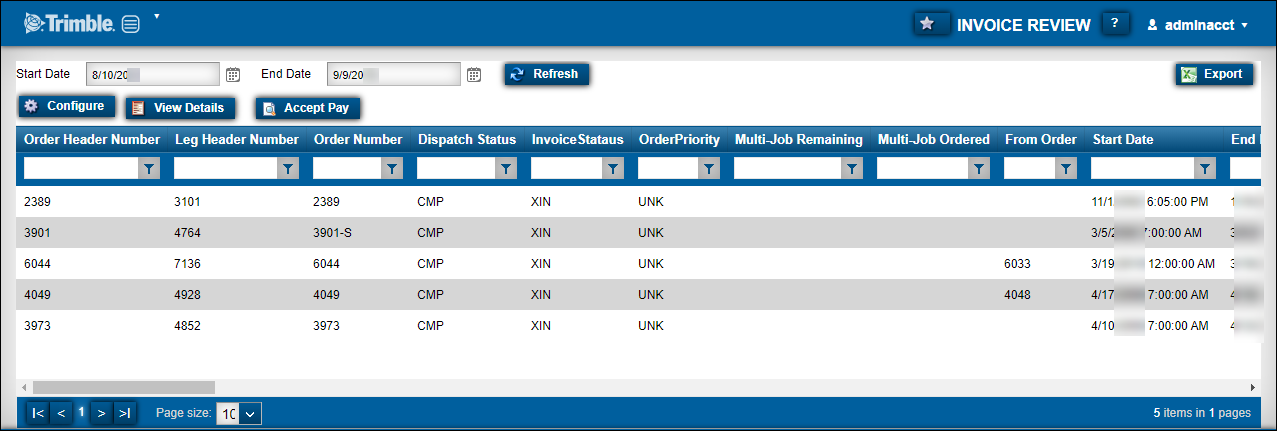
When carriers select an order on the Invoice Review page, the Pay Details button allows them to see the details for that order in the Load Details page.
-
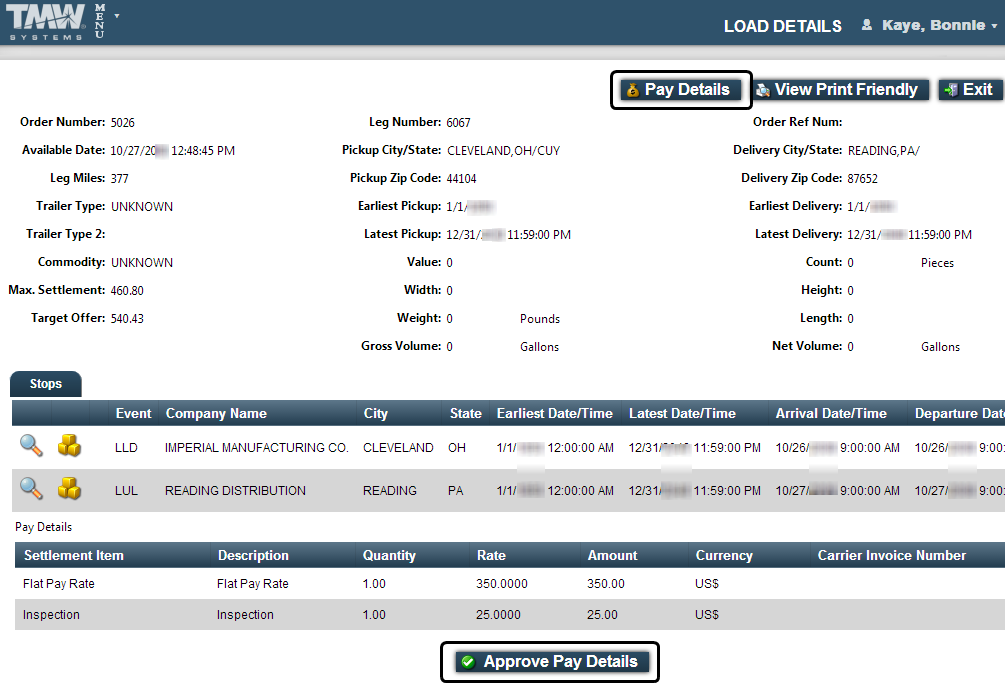
On the Load Details page
Available through Trimble Web Products:2019.2
When carriers open the Load Details page, the Pay Details button in the upper right of the page allows them to see pay detail(s) listed at the bottom. The Approve Pay Details button is shown at the bottom of the page. To submit approval, the carrier clicks Approve Pay Details.
To give carriers the ability to approve pay, follow these steps.
-
Go to Menu > Configuration > Settings Manager.
The Settings Manager page opens. -
Do one of the following:
-
If you want the setting change to apply to all roles, verify the Role field is set to [Global Settings].
-
If you want the setting change to apply to a specific role, select it in the Role field.
A message asks you to verify that you want to change the role. Click OK to continue.Note: If the setting has already been changed for at least one role, its text label is bold and italic.
-
-
On the Modules tab, in the Module Selection field, select Carrier.
-
Click these tabs: Application Settings > Load Details > General.
-
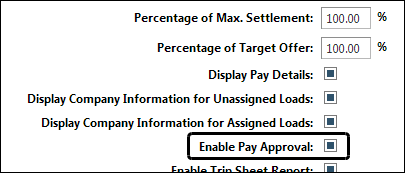
Select the Enable Pay Approval check box.
Notes:
-
Before you can select the Enable Pay Approval box, the Display Pay Details box (located above) must be selected first.
-
If the Enable Pay Approval box is cleared, users will not see the Approve Pay button on the Invoice Review page, or the Submit Pay Items button on the Load Details page.
-
-
Click Save.
A message indicates that your changes were saved successfully.If you are making changes for a specific role and this is the first time the setting has been changed for any role, the text label style changes to bold and italic.
If you do not want to save, click Revert instead. The application cancels any unsaved changes and reverts to the last saved settings.