Tracking a shipment
You can track available loads, tendered loads, and completed shipments. For the orders you are tracking, you can view the shipment details and check call information.
Locating a specific shipment
Depending on how the hosting company has set up the search, you can search for an order by:
-
Its order number
-
A reference number, such as a bill of lading
-
The ID of the driver assigned to the order
-
The ID of the tractor assigned to the order
-
The ID of the carrier assigned to the order
To go directly to the details page of a specific order, follow these steps:
-
Go to Menu > Customer > Quick Find Order.
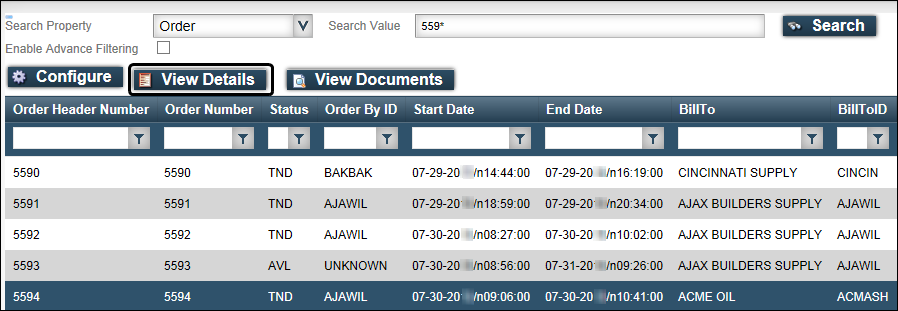
The Quick Find Order page opens.The company hosting this site can change the fields on this page. Your page may look different from this sample. For example, you may be locating shipments by order numbers only or reference numbers only.

-
In the Search Property field, select the information type on which you want to search.
-
If you select Reference in the Search Property field, the Ref Number Type list appears.
By default, All is selected, which means that all reference numbers will be included in your search. To search for an order with a specific reference number type, make another selection.

-
In the Search Value field, enter the ID or number appropriate to the search type you selected. When entering an order number or a reference number, you can:
-
Enter the entire number.
-
Enter part of the number, using the * wildcard to represent one or more characters. For example, entering 50* will retrieve all order or reference numbers that are three or more characters long and begin with 50.
-
Enter part of the number, using the ? wildcard to represent one character. For example, entering 523? will retrieve all orders or reference numbers that are four characters long and begin with 523.
-
-
Click Search.
-
If one shipment is found, that shipment’s detail information appears.
-
If multiple shipments are found matching your search criteria, a list of shipments appears.
Select the shipment you want to view, and then click View Details.
The shipment’s detail information appears.
-
-
If you want, you can expand the search criteria to include a date range or the order status of your shipment. Select the Enable Advanced Filtering check box.
The fields needed for the additional criteria appear.
-
If you want, change the date range from which orders will be retrieved.
-
If available, select a type of Order Status.
Note: If multiple records with the same reference number could exist, the administrator may have set up this page so that you can restrict your search by the status of the order.
-
To search for another order, do one of the following:
-
From the shipment details page, click Back.
-
From a list of shipments on the Quick Find Order page, click Modify Filter.
-
Viewing available loads
If you would like to see a listing of the orders you have submitted, you can do this on the View Available Loads page. This page contains:
-
Loads that are available for shipment
-
Loads on which the hosting company has tentatively assigned a driver, tractor, and trailer that will complete the load
-
Loads that are in transit
-
Maps of for available loads
To locate and view available loads, follow these steps:
-
Go to Menu > Customer > Tracking > View Available Loads.
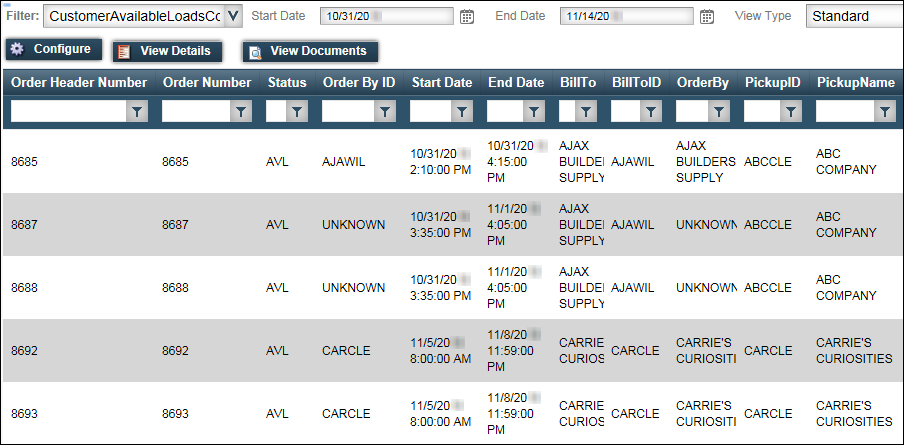
The View Available Loads page displays the available loads for the default date range.Note: The hosting company sets the default date range. You can change the date range, if needed.
Note: Availability, names, and the positions of the columns depend on how the application has been set up by the hosting company. Your grid may differ.
-
If multiple views are available to your application login, you can select a different view from the Filter drop-down list.
Note: A view is a set of filters that reduce the number of records listed on a load board. The hosting company can set up views for you that make it easier for you to track your orders.
-
If you want, change the date range from which orders will be retrieved.
-
Click Refresh.
The loads that match the selected filter and date range appear. -
If you want, change the way data is displayed.
-
If you want, view detail information about a shipment.
-
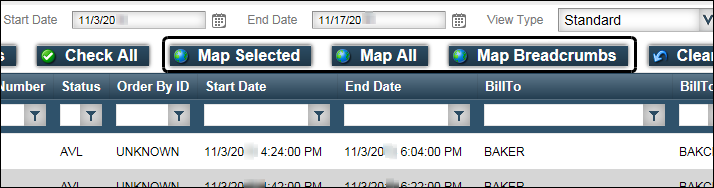
If you want, view a map of an order.
Note: If map-related buttons do not appear in the page header, the mapping feature may not be enabled for your role.
-
To view a map of a specific order, select the order and click Map Selected.
Note: You can select multiple orders.
-
To view a map of all orders, click Map All.
-
To view a map of check call breadcrumbs, click Map Breadcrumbs.
Note: You can view a map of check call breadcrumbs for only one order at a time.
-
Viewing tendered loads
To see a list of all orders you submitted that are awaiting approval by the hosting company, follow these steps:
-
Go to Menu > Customer > Tracking > View Tendered Loads.
The Tender Shipment page displays the tendered loads for the default date range. -
If multiple views are available to your application login, you can select a different view from the Filter drop-down list.
Note: A view is a set of filters that reduce the number of records listed on a load board. The hosting company can set up views that make it easier for you to track your orders.
-
If you want, change the date range from which orders will be retrieved.
-
Click Refresh.
The loads that match the selected filter and date range appear. -
If available, you can group data according to a column title.
-
If you want, change the order of the Assigned Loads columns or the number of records on the page.
-
If you want, view detail information about a shipment.
-
To return to the View Tendered Loads list, click Back.
Viewing completed orders
To locate and view orders that have been completed, follow these steps:
-
Go to Menu > Customer > Tracking > View Completed Orders.
The View Completed Orders page displays the completed loads for the default date range. The default is set by the hosting company.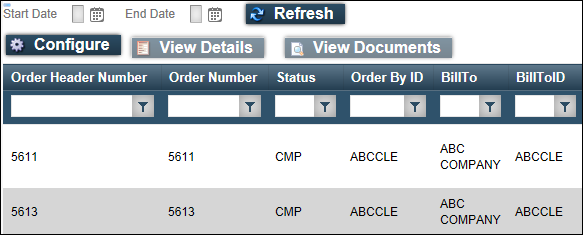
Note: Availability, dates, names, and the positions of the columns depend on how the application has been set up. Your grid may differ.
-
If multiple views are available to your application login, you can select a different view from the Filter drop-down list.
Note: A view is a set of filters that reduce the number of records listed on a load board. The hosting company can set up views for you that make it easier for you to track your orders. -
If you want, change the date range from which orders will be retrieved.
-
Click Refresh.
The loads that match the selected filter and date range appear. -
If available, you can group data according to one or more column titles.
-
If you want, change the order of the Assigned Loads columns or the number of records on the page.
-
If you want, view detail information about a shipment.
Viewing a shipment’s detail information
You can access the detail information from any of the boards. If you want to go directly to the detail of a shipment, see Locating a specific shipment.
To view information about a shipment, follow these steps:
-
View a list of orders from one of the following pages:
-
To view information about a shipment, select it and then click View Details.
The shipment information appears on:-
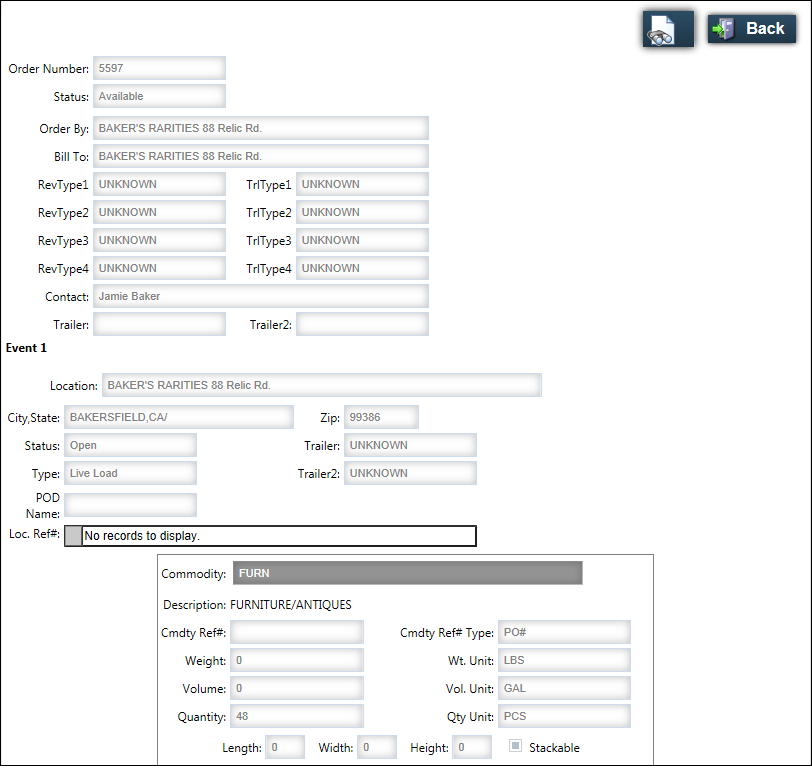
The standard shipment detail page
This example illustrates the standard shipment detail page.
-
-
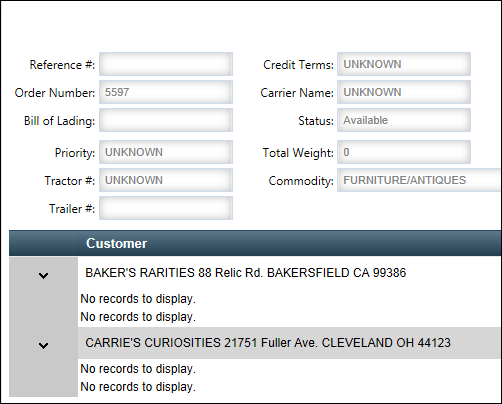
The alternate Shipment Detail Lite page
The hosting company may have replaced the standard page with the Shipment Detail Lite page.
The top of the page displays order header information.
The bottom of the page displays the stop and freight information in a horizontal grid with expandable rows.
Some hosting companies consolidate orders created from your tendered shipments with orders for other customers, allowing them to provide you better service and rates. A hosting company that consolidates orders may set up the application to allow you to see only stops located at your company. If so, when you retrieve an order in the shipment detail page that contains stops not located at your company, you will see no detailed information for the stop.
Header field definitions Field Definition Order Number
System-assigned numeric ID for an order
Status
Indicates how far the order has progressed in the dispatch process.
-
TND - Tendered
**The order has been submitted to the hosting company and is awaiting acceptance -
AVL - Available
The order is ready for dispatch -
PLN - Planned
A tentative assignment of resources has been made -
DSP - Dispatched
A tentative assignment of resources has been made; the driver has been informed of this assignment -
STD - Started
Resources have been assigned and the trip is in progress -
CMP - Completed
The order has been delivered
Order By
Name of the company that requested the shipment
Bill To
Name of the company to be billed for the shipment
RevType1-RevType4
Revenue classifications with which a record is associated
TrlType1-TrlType4
Trailer classifications with which a record is associated
Trailer
ID of the primary trailer assigned on the order
Trailer 2
ID of the secondary trailer assigned on the order
Event field definitions Field Definition Location
Company at which the stop will occur
Status
Stop status
Trailer
ID of the primary trailer assigned on the order
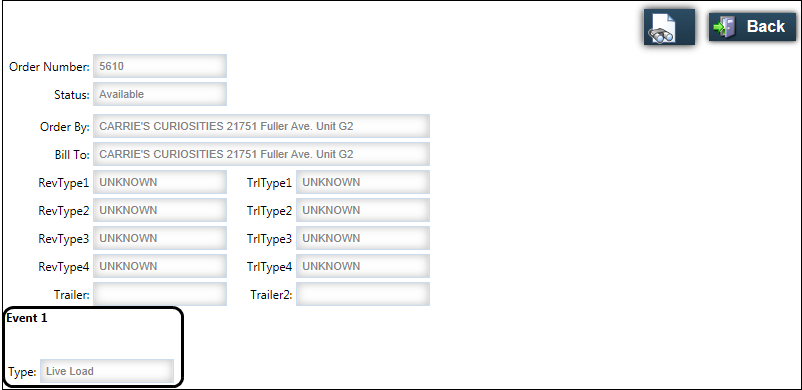
Type
Type of activity that occurs at a stop location
-
LLD - Live Load
Freight is to be loaded onto the trailer at the pickup location -
LUL - Live Unload
Freight is to be unloaded from the trailer at the delivery location -
HPL - Hook Preloaded Trailer
The driver is to hook to a trailer previously loaded at the pickup location -
DRL - Drop Loaded Trailer
The driver is to unhook to the trailer at the delivery location
Trailer 2
ID of the secondary trailer assigned on the order
POD Name
Name of the person who signed the bill of lading
Loc. Ref. #
Reference number associated with the pickup or delivery
Commodity
ID code of the commodity to be transported
Description
Name of the commodity
Commodity Ref#
Reference number associated with the commodity
Commodity Ref# Type
Type of commodity reference number, for example, PO#
Weight
Weight of the commodity delivered or picked up during the event, in the selected unit of measure, such as tons, pounds, or kilograms
Wt. Unit
Commodity’s weight unit of measure, such as tons, pounds, or kilograms
Volume
The volume of the commodity, in the selected volume unit of measure, such as gallons, cubic yards, liters
Vol. Unit
Commodity’s volume unit of measure, such as gallons, cubic yards, liters
Quantity
Commodity’s quantity, in the selected unit of measure; such as coils, pallets, cases
Qty. Unit
Commodity’s count unit of measure, such as coils, pallets, cases ////
Account Of
The identification code for the company that pays for the commodity that is being delivered
Note: Reserved for clients who are also using TMW’s Fuel Dispatch. The content of this field cannot be changed.
Supplier
ID of the company that provides the commodity
Note: Reserved for clients who are also using TMW’s Fuel Dispatch. The content of this field cannot be changed.
Container #
Number of containers holding the commodity ////
-
-
If available, view check call information related to the shipment.
-
To return to the list, click Back.
Viewing a shipment’s paperwork
If the hosting company has set up the application to allow it, you can view the paperwork attached to a shipment.
To view paperwork from the shipment details page, follow these steps:
-
View a list of orders from the View Completed Orders page.
-
To view the paperwork available for your shipment, click the shipment’s listing and then click View Documents.
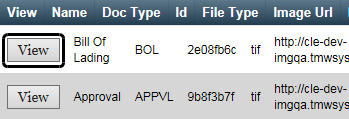
The paperwork image opens in the Document Manager window.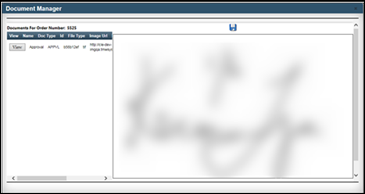
If more than one document is associated with the order, the others are shown in a list on the left side of the page.
-
To view other documents, click View next to each document listing.
-
To save a document as a PDF, click
 Save located at the top of the Document Manager window.
Viewing a shipment’s check call history
If the hosting company has set up the application to allow it, you can view the check call history for your shipment while viewing the shipment details.
To view check calls from the shipment details page, follow these steps:
-
View a list of orders from one of the following pages:
-
To view information about a shipment, click the shipment’s View Details.
-
Scroll to the bottom of the shipment details page.
How you view check call information depends on how the hosting company has set up the check call feature.
-
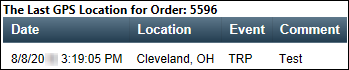
If the hosting company has set up the application to show check call data on the shipment details page, information about the most recent check call associated with your shipment displays at the bottom of the page.
-
If you have permission to view the Check Calls page, the bottom of the shipment detail page displays the
 Check Calls icon. Clicking the icon opens the Check Calls page, where you can see all check calls associated with your shipment.
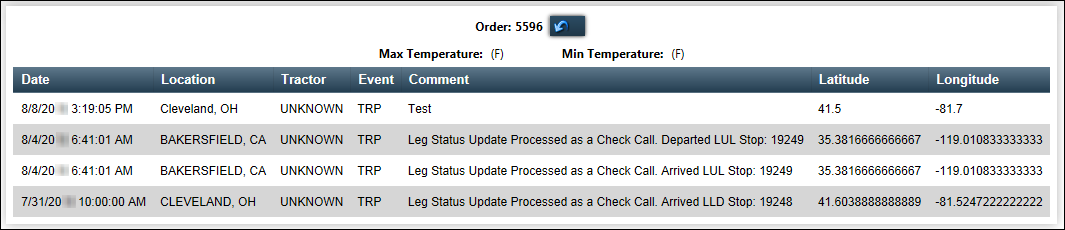
The hosting company’s setup determines how check call information appears.
Standard check call data:
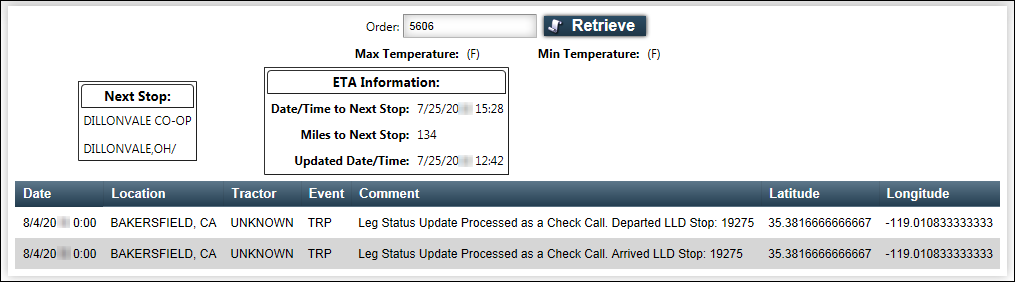
Next stop information included in check call data:
To return to the shipment details, click Back.
-
Check call information includes the order number assigned to your shipment by the hosting company. Additional information is shown in the following fields:
| Field | Definition |
|---|---|
Date |
Date/time the check call was entered into the hosting company’s dispatch system |
Location |
City/state location of the tractor at the time the check call was entered |
Tractor |
ID the hosting company has assigned to the tractor assigned to your shipment Note: This field appears only on the Check Calls page. It does not appear when viewing check call information on the shipment details page. |
Event |
Type of check call the hosting company identified when recording the check call |
Comment |
Free-form text entry used by the hosting company to further define the check call |
Latitude |
If the hosting company receives check calls from its resources using a mobile communications system, this is the latitude reading for the resource’s GPS location when the check call was transmitted. If the hosting company’s dispatcher manually entered the check call, it is the latitude for the city and state/province the dispatcher recorded for the check call. Note: This field appears only on the Check Calls page. It does not appear when viewing check call information on the shipment details page. |
Longitude |
If the hosting company receives check calls from its resources using a mobile communications system, this is the longitude reading for the resource’s GPS location when the check call was transmitted. If the hosting company’s dispatcher manually entered the check call, it is the longitude for the city and state/province the dispatcher recorded for the check call. Note: This field appears only on the Check Calls page. It does not appear when viewing check call information on the shipment details page. |
If next stop information is included, you will see data in these fields:
| Field | Definition |
|---|---|
Next Stop |
Name and address of the company where the next stop will occur |
ETA Information |
|
If no check calls exist, this message appears:
![]()
Locating check call history for a specific shipment
If the hosting company has set up the application to allow it, you can view the check call history for a specific shipment on the Check Calls page.
To go directly to the Check Calls page and retrieve data for a specific order, follow these steps:
-
Go to Menu > Customer > Tracking > Check Calls.
The Check Calls page opens.
-
In the Order field, enter the order ID assigned to your shipment by the hosting company.
-
Click Retrieve.
The Check Calls page reappears, showing the information on all check calls associated with the specified order. The hosting company’s setup determines how check call information appears.Standard check call data:
Next stop and ETA information included in check call data:
-
To view check calls for a different order, repeat steps 2 and 3.