Managing dashboards
Dashboards allow you to deliver content-driven data to your managers/directors, or customers/potential customers. Dashboards retrieve information from multiple sources (such as Data Warehouse or your SSRS server) and display the results on a single page.
To manage dashboards, you use the Export & Import page.
Deleting dashboards
When you save a dashboard, the system adds it to the list of available dashboards. When you open a dashboard, you choose from this list. If you no longer want a dashboard to show in the list, you can delete it.
|
To delete a dashboard, follow these steps:
-
Go to Menu > Dashboards > Dashboard Admin > Export & Import.
The Export & Import page opens. -
Select the dashboard you want to delete.
-
Click Delete.
The Deleted field value changes from N to Y.
A message appears at the top of the page. It identifies the dashboard by name and ID, and states that it was deleted successfully.
Note: The Dashboards grid displays all reports. If you want deleted dashboards hidden, click Hide Deleted Dashboards. Note the button name changes to Show Deleted Dashboards. This allows you to toggle between showing deleted dashboards and hiding them.
Restoring dashboards
When you click Load on the Dashboard Builder page, all available dashboards are shown. If you delete a dashboard, it does not appear on this list. If you need a deleted dashboard to be available again, you can restore it. It will display in the available dashboards list.
To restore a dashboard, follow these steps:
-
Go to Menu > Dashboards > Dashboard Admin > Export & Import.
The Export & Import page opens. -
If needed, select the Show Deleted Dashboards check box so you can see deleted dashboards in the list.
-
In the Dashboards grid, click the Deleted column header to sort the dashboards. If needed, click the header a second time to have the deleted dashboards appear at the top of the list.
-
In the list, select the dashboard you want to restore.
-
Click Restore.
The Deleted field value changes from Y to N.A message appears at the top of the page. It identifies the dashboard by name and ID, and states that it was successfully restored.
Changing saved dashboard properties
When you save a dashboard, you enter a name, description, and select which roles have access to it. If needed, you can make changes to these properties.
To change dashboard properties, follow these steps:
-
Go to Menu > Dashboards > Dashboard Admin > Export & Import.
The Export & Import page opens. -
If needed, select the Show Deleted Dashboards check box so you can see deleted dashboards in the list.
-
In the Dashboards grid, select the dashboard you want to change.
-
Click Edit Properties.
The Edit Dashboard Properties pop-up window opens.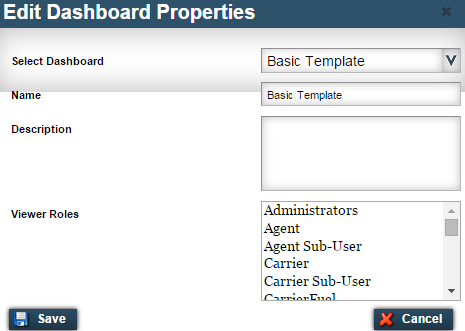
-
Make entries or changes in the following fields:
Field Definition Name
Dashboard name
Description
Dashboard description
Viewer Roles
Determines which roles can access the dashboard
Do one of the following:
-
Grant roles access to the dashboard.
-
Remove role access from the dashboard.
-
-
Click Save.
Note: Click Cancel to close the window without saving your changes.
Exporting dashboards to other environments
You can use the export feature to copy dashboards. When you copy dashboards, you copy the dashboard layout along with any data the dashboard displays. The system adds the dashboard files to a .ZIP file. Then, you import the dashboards into a different environment. For more details on importing dashboards, see Importing dashboards from other environments.
To export a dashboard, follow these steps:
-
Go to Menu > Dashboards > Dashboard Admin > Export & Import.
The Export & Import page opens. -
If needed, select the Show Deleted Dashboards check box.
-
In the Dashboards grid, select the dashboard(s) you want to export.
-
Click Export.
The system creates a .ZIP file. This ZIP file contains the dashboard(s) you selected. -
Save the file as you normally would using your browser.
Importing dashboards from other environments
You can use the import feature to load dashboards from one environment to another. When you load dashboards, you load the dashboard layout along with any data the dashboard displays.
|
To load a dashboard from a different environment, follow these steps:
-
Go to Menu > Dashboards > Dashboard Admin > Export & Import.
The Export & Import page opens. -
In the Upload Dashboard(s) section, click Select.
The system opens a browse window. -
Go to the .ZIP file folder location.
-
Select the .ZIP file you want to import and click Open.
The system displays the .ZIP folder(s) under the Upload Dashboards(s) section.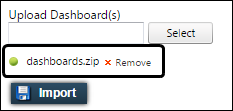
Note: If you click Remove, the system removes that ZIP folder from the import list.
-
In the Shared Roles section, select the roles that will have access to these dashboards.
-
Click Import.
The system imports the dashboards and assigns them new ID numbers.