Working with orders
An order is a record of the pickups and deliveries a customer wants made at particular locations, on specific dates and times. You can create, review, and edit orders on the Freight Agent Order Entry page.
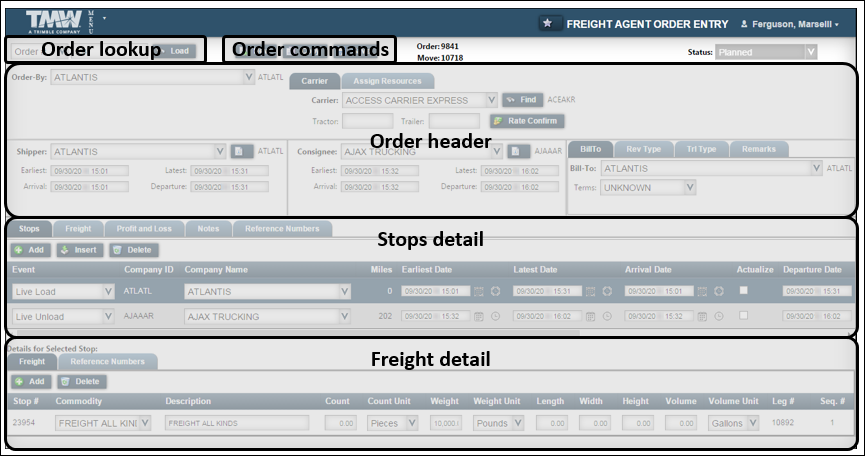
The top of the page contains commands to:
-
Lookup and Load an existing order
-
Create a New order
-
Copy an order
-
Save an order
You use the Order Header to enter basic information, such as:
-
Who requested the order (the Order By)
-
Where the freight will be picked up (the shipper)
-
Where it will be delivered (the consignee)
-
Who is paying for the delivery (the Bill To)
You use the Stops detail section to view, record, and edit stop and order information. You can also rate the order in the Profit and Loss tab. If your site is set up for it, you can record pay details on the Pay tab.
You use the Freight detail section to view, record, and edit commodity information for each stop.
| You can also retrieve a list of orders in the Planning Worksheet. |
Creating an order
Be sure you have all required information ready before you create an order:
-
Bill To
-
Shipper
-
Consignee
-
Type and quantity of freight
-
Pickup and delivery dates and times
| If your browser page closes before you save the order, you will lose unsaved information. Save your work periodically. Refer to Step 8. |
Use this procedure to create an order.
-
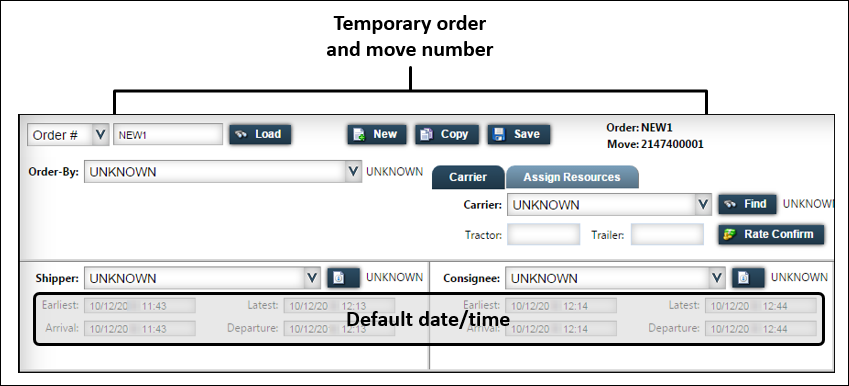
Click New.
The fields and commands become available for you to create the order. A message notifies you that a Bill To needs to be selected.
The system assigns a temporary order and move number to the record. The date/time fields default to the current date/time.
-
Record the companies that are on the order.
Type the first few letters of the company name. If it has been associated with your login by the hosting company, it will appear in the drop-down list.
Field Definition Order By
The company placing the order
Bill To
The company paying for the order
Shipper
The company where the first pickup occurs
Consignee
The company where the last drop occurs
The system will provide the company name, address, and contact information.
Note: If a company you need to record is not available in the search, you can add it. However, you will not be able to record it for the order until the hosting company reviews and approves it for your use.
-
Enter the appropriate dates/times for the initial pickup and final drop.

Click in the appropriate field and change the default date/time to the requested date/time.
Field Definition Earliest
In the Shipper section, enter the earliest date and time the initial pickup should occur.
In the Consignee section, enter the earliest date and time the last drop should occur.
Latest
In the Shipper section, enter the latest date and time the initial pickup should occur.
In the Consignee section, enter the latest date and time the last drop should occur.
Note: Do not change the Arrival and Departure fields. The field values will update when the order is in progress.
-
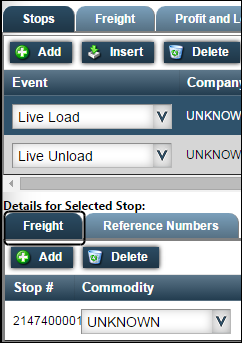
In the Stops detail section, click the Stops tab, and then click the drop stop.
-
Record the freight information.
-
Select the Freight sub tab.
-
Make entries in the following fields.
Field Definition Stop #
This read-only field shows the stop number associated with the commodity.
Commodity
From the drop-down list, select the commodity name.
Description
The system supplies the description assigned to the commodity name you selected. You can edit the description if needed.
Count
If the commodity is measured by count, enter the number of units on the order.
Count Unit
If the commodity is measured by count, select the type of unit used to measure it from the drop-down list.
Weight
If the commodity is measured by weight, enter the number of units on the order.
Weight Unit
If the commodity is measured by weight, select the type of unit used to measure it from the drop-down list.
Volume
If the commodity is measured by volume, enter the number of units on the order.
Volume Unit
If the commodity is measured by volume, select the type of unit used to measure it from the drop-down list.
Leg #
This read-only field shows the system ID assigned to the freight record.
Seq. #
This read-only field shows the sequence in which the commodity was added to the order.
-
To enter more than one commodity, click Add.
-
-
If you want, you can record any of the following information:
-
Reference numbers for the order and for individual stops
-
Save the order.
If the information is entered correctly, a message appears stating the order was saved successfully.
The temporary order and move numbers are replaced with the actual order and move numbers. Click the Freight tab in the middle of the page to view read-only freight data.
Profit and loss information
-
In the Stops detail section, select the Profit and Loss tab.
-
Click Add.
-
Make entries in the following fields.
Field Definition Charge Item
Select the item for which the Bill To will be charged.
The charge items available to you are determined by the hosting company.
Description
This read-only field provides a description of the charge item.
Quantity
Enter the number of charges for this charge item.
Rate
Enter the per unit rate for the charge item.
Charge
This read-only field displays the total amount of charges for the charge item.
Currency
This read-only field displays the currency defined for the charge type in the hosting company’s system.
Tariff
This read-only field displays the tariff used to calculate charges in the hosting company’s system. It is blank until the order is rated.
-
Repeat Steps b and c for each charge item.
Pay information
If your login allows it, you can record pay details for the order.
-
In the Stops detail section, select the Pay tab.
The Order Information section contains information entered in the Profit and Loss tab.
-
In the Settlement Information section, make entries in the following fields.
Field Definition Pay Method
Select the item for which the resource will be paid.
The pay methods available to you are determined by the hosting company.
Rate
Enter the per unit rate for the pay item.
Linehaul Cost
Enter the portion of the line haul revenue that will be paid to the resource.
Fuel Cost
Enter the amount of fuel surcharge to be paid to the resource.
Acc Cost
Enter the amount of accessorial revenue to be paid to the resource.
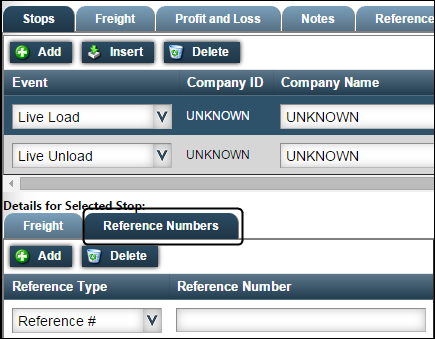
Reference numbers for the order
When you enter an order, you may need to record ID number(s) assigned to the order by your customer or the hosting company. These reference numbers may include bill of lading or purchase order numbers.

-
In the Stops detail section, select the Reference Numbers tab.
-
Click Add.
-
Make entries in the following fields.
Field Definition Reference Type
From the drop-down list of reference number types, select the type you want to use.
Reference Number
Enter an appropriate reference number for the type selected.
-
If you need to record another reference number, repeat Steps b - c.
Reference numbers for individual stops
You may need to record ID number(s) assigned to the stop by your customer or by the hosting company, for example, a customer stop ID.
-
In the Freight detail section, select the Stops tab.
-
Select the Reference Numbers sub tab.
-
Click Add.
-
Make entries in the following fields.
Field Definition Reference Type
From the drop-down list of reference number types, select the type you want to use.
Reference Number
Enter an appropriate reference number for the type selected.
Revenue types
The hosting company creates revenue types to track revenue brought in by different types of orders. An order can have up to four revenue types assigned to it.

-
In the order header, select the Rev Type tab.
-
In the RevType1 - 4 fields, select the revenue types from the drop-down list.
Note: The hosting company may have set up the Freight Agent Order Entry page to prevent you from entering a value in the RevType1 field, or to prevent changes to the entered value once the order has been saved.
Trailer types

The hosting company creates trailer types to track revenue and work according to trailer types. In addition, dispatchers may need to know the trailer type to assign resources to the order.
-
In the order header, select the Trl Type tab.
-
In the TrlType1 - 4 fields, select the trailer types from the drop-down list.
Remarks
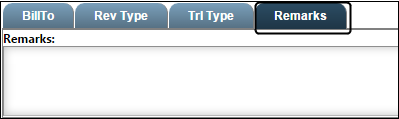
Use the Remarks field to enter additional information about the order.
-
In the order header, select the Remarks tab.
-
Enter information in the field provided.
Notes

Notes can be added to communicate any additional information.
-
Select the Notes tab.
-
Click Add.
-
Make entries in the following fields.
Field Definition Reference Type
The hosting company may use filters to limit the notes its employees see when viewing the notes for an order. From the drop-down list, select the filter to be applied to the note.
Note
Enter the note text in this free-form field.
View Level
From the drop-down list, select who can see and read the note.
Sent Date/Time
Enter the date/time the note becomes effective.
Exp. Date/Time
Enter the date/time the note expires.
Retrieving an existing order
If you need to check order progress or update information, you can retrieve the order on any of the following pages:
-
Freight Agent Order Entry
-
Planning Worksheet
-
Freight Agent Find Order
|
Retrieving an order in the Freight Agent Order Entry page
To retrieve an existing order in the Freight Agent Order Entry page, follow these steps.
-
Go to Menu > Agent > Freight Agent Order Entry.
-
Enter the order number in the field to the right of the Order# field.

-
Click Load.
The order opens. The Status field shows the order status. The Arrival and Departure fields will contain updated dates and times. If needed, make changes or add information.
-
Click Save before closing the browser window or starting another task.
Retrieving a list of orders in the Planning Worksheet
To view the status and progress of orders, you can retrieve a list for a specified date range. Follow these steps.
| The Planning Worksheet does not list completed orders. |
-
Go to Menu > Agent > Planning Worksheet.
-
Set the date range of the orders you want to view.
Note: Orders must start and end within the specified date range.
-
Click Retrieve Loads.
The Orders grid shows loads for the defined period.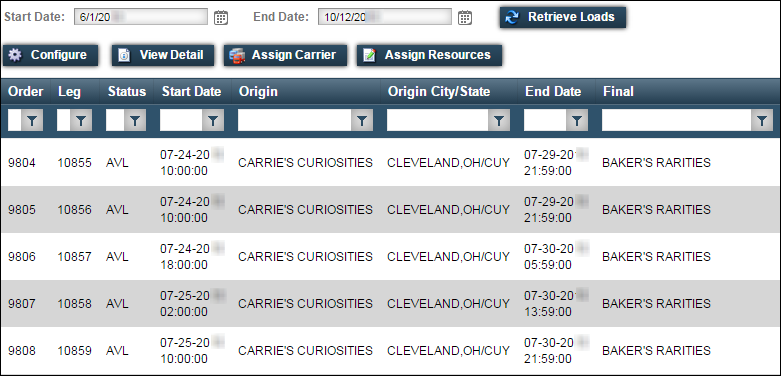
Field Definition Order
ID assigned to the customer’s request for movement of goods or materials
Leg
Unique, system-assigned ID number used to identify the portion of a trip completed by the same resources
Status
Dispatch status of the trip
Options are:
-
AVL (Available)
-
PLN (Planned)
-
DSP (Dispatched)
-
STD (Started)
Start Date
Date and time that the first event on the trip segment is scheduled to occur
Origin
Company name for the first stop scheduled for the order
Origin City/State
City and state where the trip originates
End Date
The date and time the trip is scheduled to end
Final
Name of the company where the last drop occurs
Final City/State
City and state location of the last drop
Mileage
Total number of miles completed for the trip
Weight
Total weight of the cargo
Revenue
Total amount billed for the order
Bill To
The name of the company to be billed for the shipment
Stop Count
The total number of stops scheduled for the trip
Driver
The driver assigned to the order
Tractor
The tractor assigned to the order
Trailer
The trailer assigned to the order
Carrier
The carrier assigned to the order
Commodity
Description of the cargo loaded at the first stop of the trip
Rev Type 1-4
The hosting company’s revenue classifications for the trip
Order Status
Current order status
Options are:
-
AVL (Available)
-
PLN (Planned)
-
DSP (Dispatched)
-
STD (Started)
Move Number
Unique, system-assigned ID number used as a blanket ID for all activities performed by the resources assigned to execute the trip
If you want, you can change the data display.
-
-
To open a single order, select it in the grid and click View Detail. The order opens in the Freight Agent Order Entry page.
Retrieving orders in the Freight Agent Find Order page
If the hosting company allows it, you can use the Freight Agent Find Order page to search for orders by data that you specify.
-
Go to Menu > Agent > Freight Agent Find Order.
The Freight Agent Find Order page opens. -
In the Search Property field, choose the data type with which to search. Your hosting company determines which options are available in this field.
-
If you selected Reference in the Search Property field, select the type of reference number to search on in the Ref Number Type field. Your hosting company determines which options are available in this field.
-
If you want to search by date and/or status group, do the following:
-
Select the Enable Advance Filtering check box.
-
Make changes in the fields that appear.
-
Start Date
Order start date -
End Date
Order end date -
Order Status Group
If your hosting company has created status groups, select the status group. Your search will be restricted to orders with the status indicated.
-
-
-
In the Search Value field, enter the value to search. If you want to search for multiple orders, enter each value, separated by a comma. Do not put spaces between the entries.
-
Click Search.
If a single order exists that matches the specified criteria, it opens in the Freight Agent Order Entry page.
If multiple orders exist that match the specified criteria, they appear in the grid. To view one of these orders, select it in the grid and click View Details. The order opens in the Freight Agent Order Entry page.
Copying an order
If you make frequent runs between the same locations, or you have orders with similar information, you can copy an order to save data entry time.
Follow this procedure to copy an order.
-
Retrieve the order you want to copy.
-
Click Copy.
The system assigns a new order and move number to the copied order. A message stating the copy was successful appears at the top of the page. -
Make any needed changes.
-
Click Save.