Managing communications
Administrative procedures enable you to manage the features that allow users to:
-
Access the site
-
Keep up with company and industry news
-
Express their opinions
-
They also help you monitor the site.
The News management features enable to you compose articles, create news categories, and provide hyperlinks to articles on the Internet. This will allow users to keep up-to-date with the latest company and industry news. The Surveys feature allows you to create surveys and post them on the website to generate user feedback about the site, your company, or the industry.
Managing news items
Use the news management feature to keep users up-to-date on the latest company or industry news. It allows you to:
-
Display categorized news articles based on the role of the currently logged in user
-
Compose and format your own articles
-
Provide a news summary with a link to the complete article elsewhere on the Internet
-
Allow readers to comment on news postings
-
Manage the expiration date for an article so that it is removed from users' view automatically when it becomes outdated
Determining contributor’s display name on news articles
When posting news articles, the contributor’s name appears.
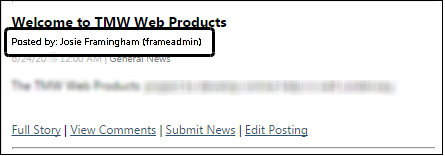
You can set up the system to display the contributor’s name in any of these formats:
-
The contributor’s username
-
The contributor’s first and last name
-
The contributor’s first and last name with the username in parentheses
This setting affects all new and existing news items.
To identify how you want the name of the contributor of news articles to display on the Read the News page, follow these steps:
-
Go to Menu > Configuration > Settings Manager.
The Settings Manager page opens. -
Verify [Global Settings] is the value in the Role field.
You must be in Global Settings mode to edit these settings. -
Click these tabs: General > Core > Misc Info.
-
In the Misc Info 2 section, from the News Posted By Name field, select the format you want to display for the contributor’s identification.
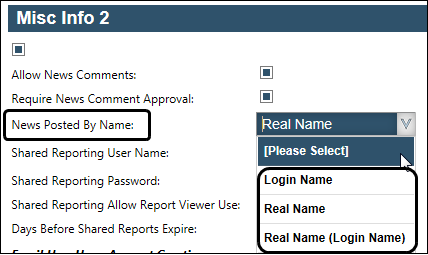
-
Login Name
The contributor’s Trimble Web Products username -
Real Name
The contributor’s first and last name from their user profile -
Real Name (Login Name)
The contributor’s first and last name from their user profile followed by their Trimble Web Products username
-
-
Click Save.
A message displays stating that your settings were saved successfully.
Managing news types
Organizing news articles into types (or categories) allows you to restrict the display of news articles based on user roles. For example, you might have a news type called Industry News, which is visible to all users. You might also have a news type called Company News, which is visible to administrators and employees, but not to sub users.
Adding a news type
To add a news type, follow these steps.
-
Go to Menu > Admin > News > Manage News Types.
-
In the text box, enter the name of the news type.
-
Click Add.
A message box opens. It states, "Successfully Activated News Type". The news type appears in the Active News Types list on the left.
Assigning roles to news types
By default, a news type is viewable by anyone accessing the login page, as indicated by the Everyone role. To restrict the viewing rights of news postings by assigning roles to selected news types, follow these steps.
-
Go to Menu > Admin > News > Manage News Types.
-
In the Active News Types list, select the news type that you want to restrict.
-
Click Assign.
The page expands to show the Select roles assigned to this News Type list. -
Hold CTRL and click on each role for which the news type will be available.
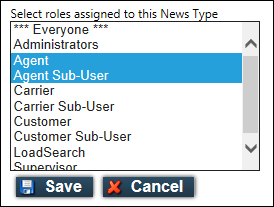
-
Click Save.
If you decide not to make the assignment change after all, click Cancel instead.
Deactivating a news type
When you deactivate a news type, any news postings associated to that type are no longer accessible by the roles assigned to the type. To associate the posting to another news type, see Managing news articles.
Only deactivated and unassociated news types can be deleted.
-
Go to Menu > Admin > News > Manage News Types.
-
In the Active News Types list, select the news type that you want to deactivate.
-
Click Deactivate.
A message box opens. It states, "Successfully Deactivated". The news type is moved to the Deactivated News Types list.
Reactivating a news type
-
Go to Menu > Admin > News > Manage News Types.
-
In the Deactivated News Types list, select the news type that you want to reactivate.
-
Click Activate.
A message box opens. It states, "Successfully Activated". The news type is moved to the Active News Types list.
Deleting a news type
If you create a news type, deactivate it, and then decide you no longer need it at all, you can delete the news type.
| You cannot delete a currently active news type or one with news postings associated with it. |
To delete a news type, follow these steps.
-
Go to Menu > Admin > News > Manage News Types.
-
In the Deactivated News Types list, select the news type that you want to delete.
-
Click Delete.
A message box opens. It indicates that the news type was "Successfully Deleted." However, if the "Unable to Delete Used News Types" message appears, the news type has news postings associated with it and cannot be deleted.
Posting news articles
You can use any of the following methods to post news that may be of interest to users:
-
Write and format your own article.
-
Attach a file as an article.
-
Provide a link to an article elsewhere on the Internet.
Users can view all news articles by selecting Menu > Home > Read the News.
| Administrators can also post news articles from the News List page by clicking the Submit News or Edit Posting link on an article. |
To post news articles, follow these steps:
-
Go to Menu > Admin > News > Post News Items.
-
Complete the top of the form.

News Type
From the dropdown list, select the news category to which the article belongs.
To create a news type, see Adding a news type.
Publish
Enter or select the first date on which the article can be viewed. The field defaults to the current date. For information about selecting dates from the calendar, see Selecting a date and time.
This date also determines the order in which articles appear in the website. When users select the Read the News link, articles appear in reverse chronological order, with the most recent article appearing first.
Expires
Select the date on which the article will no longer be viewable. The field defaults to 90 days after the current system date.
Note: If you want to save an article before it is finished, you may want to set the expiration date to a date in the past. This will save the article for later completion, but it will remain unavailable to any users. When the article is complete, you can change the expiration date. See Changing a publish or expiration date for an article.
Headline *
Enter a headline for the article.
News Image
To tag the article with a thumbnail-size graphic, click Select to go to the location of the file. Later, when a user views the news list, the graphic will be visible to the left of the article’s title and short description.
To insert an image within the article, see Inserting images within an article.
Note: Because of a function of Windows, the page will refresh after you select the full-story type (Step 4) and the contents of the News Image field will be cleared. You may want to complete this field after you select the Full Story Type.
Image Size
The default Image Size is Small because the image selected in the News Image field appears as a tagline with the Short Description of the article.
From the list, select another size if appropriate.
-
On the Summary tab, write a short description of the article’s content.
-
In the Design mode, use the inline editing tools to write and format the text.
-
Create the article in another editor, and then copy/paste the text into the description section.
-
In HTML mode, use the appropriate HTML tags.
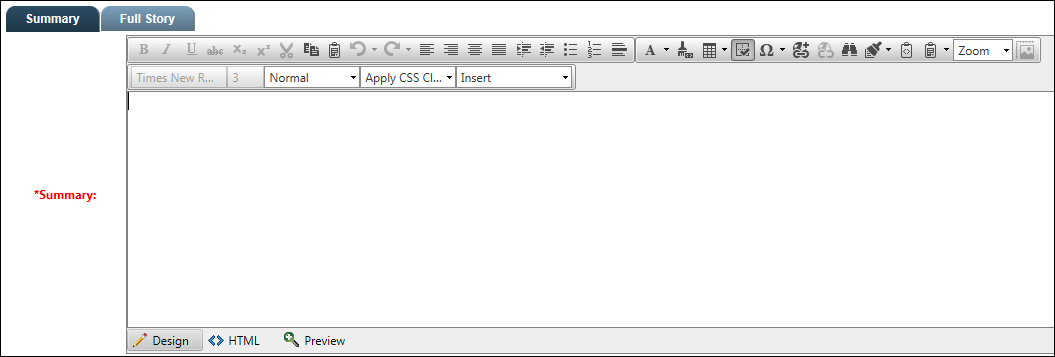
Note: The short description appears on the News List page.
-
-
Select the Full Story tab.
The Full Story Type options show to the left of the form.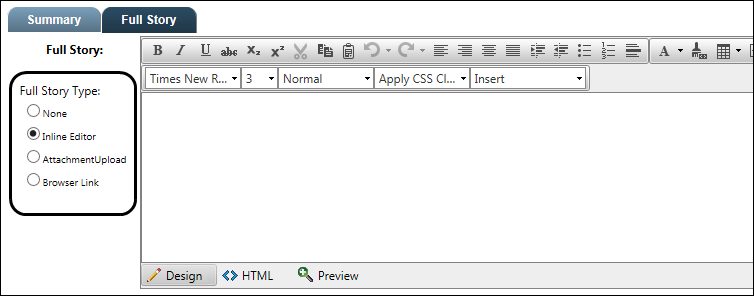
-
Select a Full Story Type.
-
None
The short description contents appear as the entire article, for example, as for a flash bulletin. When you create and post a new survey, you may want to add a flash bulletin indicating that the survey is ready to take. -
Inline Editor
The default selection enables you to write and format the entire article in Design Mode or HTML Mode.
-
-
Browser Link
You can provide a link to a specific website address that contains the complete article.Enter the URL address in the Full Story field.
-
Do one of the following.
Write your own article
When writing your own article, Full Story Type must be Inline Editor.
Do any of the following:
-
Use the inline editing tools to write and format the article.
-
Create the article in another text editor, and then copy/paste it into the Full Story text box.
-
In the HTML mode, use the appropriate HTML tags.
To insert an image within the article, see Inserting images within an article.
When finished, click Save News Posting.
Provide a link to an Internet article or site
When providing a link to an Internet article or site, Full Story Type must be Browser Link.
In the Full Story text box, do one of the following:
-
Type the website address that contains the full story.
-
Open the website in another window, click in the website’s URL and press CTRL+C to copy the URL. In the Full Story text box, highlight the existing text and press CTRL+V.
| Make sure that the address contains only one occurrence of http:// or https://. |
When finished, click Save News Posting.
Inserting images within an article
You can show images, such as pictures from the company picnic, within the full-story section of the article. When inserting images, keep the following in mind:
-
Trimble Web Products is designed for optimal display at a screen resolution of 1024x768 or greater, which includes the width of the left navigation bar. The news article is viewed in the remaining width.
-
Image files, reduced and full-sized, must be located on the company’s file server in a folder (or directory) created for this purpose.
-
Any graphics editor can be used to reduce the size of the image while maintaining its original proportions.
-
Full-size image files can be opened in a separate window when the smaller or thumbnail image is clicked.
To insert images into an article, follow these steps:
-
Prepare the graphic image(s).
-
Using a graphics editor, resize the images.
-
Copy the reduced files to the specified folder on the company’s file server.
-
If you want, also copy the full-size files to the specified folder on the company’s file server.
-
-
Go to Menu > Admin > News > Post News Items.
-
Complete the top of the form.
-
Select the Full Story tab.
The Full Story Type options show to the left of the page. -
Under the Full Story Type, select Inline Editor.
-
In the Full Story text box, add text for the article.
Do one of the following:
-
Use the inline editing tools to write and format the text for your article.
-
Create the article in another editor, and then copy/paste it into the Full Story text box.
-
-
Select HTML.
-
Add the image source tag.
For example, with your cursor at the location for the image, add the following image source tag:
<img src="../images/<dir name>/<shrunken image name>"where:
<dir name>= directory (folder) name containing the images
<shrunken image name>= the resized image filename and extension -
If you want, enhance the article’s format and provide more viewing options to the reader.
In the following example, HTML tags are used to insert two images, side-by-side, into a centered table. When a shrunken image is double-clicked, the full-size image appears in a separate window. The reader can right-click on the image to save or print it.
<dir name>= directory (folder) name containing the images
<shrunken image name>= the resized imaged used as the thumbnail
<full size image name>= the original image that can be viewed when double-clicking
target="_blank"= directs the image to open in a separate window<table align="center">
<tr>
<td>
<a href="../images/<dir name>/<full size image name>" target="_blank">
<img src="../images/<dir name>/<shrunken image name>" width="300"/>
</a>
</td>
<td>
<a href="../images/<dir name>/<full size image name>" target="_blank">
<img src="../images/<dir name>/<shrunken image name>" width="300"/>
</a>
</td>
</tr>
</table> -
To preview the results, click the Design button.
-
Click Save News Posting.
Managing news articles
From the Manage News Items page, you can change the expiration date, modify, or delete the article.
| Administrators can also manage news articles from the home page by clicking the Submit News or Edit Posting link on an article. |
Locating an article to manage
To display a list of articles to manage, follow these steps. Note that the more filter criteria you specify, the shorter the list of articles will be.
-
Go to Menu > Admin > News > Manage News Items.
The Manage News Items page opens. -
If you want to restrict the list to include specific news items, use the filters.
-
Basic

Use any of the filters to limit the display of news items. The more criteria you specify, the shorter the list will become.
Status
Use the Status filter if you want to include articles with a particular status.
-
Click the Status radio button.
-
From the dropdown list, select the status of articles that you want to display.
Options are:-
All - Display both active and expired articles.
-
Active News - Display only articles that have not reached their expiration date.
-
Expired News - Display only articles that have reached their expiration date.
-
Expiration Date
Use the Expiration Date filter to include articles from a specific date or range of dates.
-
Click the Expiration Date radio button.
-
Identify a date range to view.
For more information about selecting dates from a calendar, see Selecting a date and time.
-
-
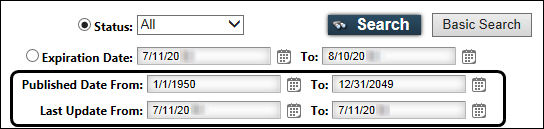
Advanced
-
Click Advanced Search to show more search criteria.
-
Use any of the advanced filters to limit the display of news items. The more criteria you specify, the shorter the list will become.
-
Published Date From and To
From the dropdown calendars, select the range during which the article was posted. -
Last Update From and To
From the dropdown calendars, select the range of dates when the article was last updated.For more information about selecting dates, see Selecting a date and time.
-
-
-
-
Click Search.
A list of articles matching your criteria is shown.If the list is too long, use the paging bar or modify your search criteria.
| If you switch from Advanced Search to Basic Search, the system applies any criteria you specified in the Advanced Search fields to the Basic Search. |
Changing a publish or expiration date for an article
You can determine the length of time an article will be available to users.
| When an article is posted, the expiration (or delete) date is set to 90 days after the posted date automatically. This functionality automatically removes the article from view when it becomes outdated. |
To change an article’s publish or expiration date, follow these steps:
-
On the same line as the news item, click
 Edit.
Edit.
Active date fields show for the line.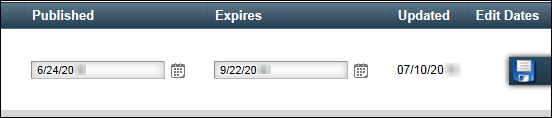
-
Do the following:
-
In the Published field, enter or select the new published date.
-
In the Expires field, enter or select the new expiration date.
-
-
Click, in the Edit Dates column,
 Update.
You are returned to the list of news items. The date of the change appears in the Updated column.
Modifying an article
To make changes to an article you wrote, to links to other articles, or to the news type, follow these steps:
-
On the same line as the news item, in the Modify column, click
Edit.
The Post News Items page displays the current article. -
Make the required changes to the article’s text and formatting.
Note: If you want, use the inline editing tools. For more help, see Posting news articles.
-
Click Update.
A message indicates that the news posting has been successfully updated.
Allowing readers to comment on news items
You can allow users to submit comments on any news postings. You can also require that the comment be approved before it is made visible to all readers of the posting. You would be able to view, edit, or delete a comment before it is seen by other readers.
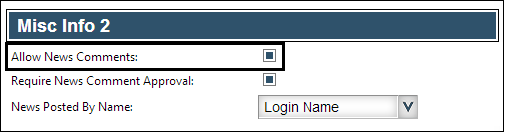
To configure comment settings, follow these steps:
-
Go to Menu > Configuration > Settings Manager.
The Settings Manager page opens. -
Verify [Global Settings] is the value in the Role field.
You must be in Global Settings mode to edit these settings. -
Click these tabs: General > Core > Misc Info.
-
In the Misc Info 2 section, select the Allow News Comments checkbox.
-
If you want to view and approve the comments before they are posted, select the Require News Comment Approval checkbox.
-
Click Save.
A message appears at the top of the page, stating your settings were saved successfully.
Reviewing reader comments before posting
You can read, edit, approve, decline, or delete all comments submitted by readers for posting. In addition, you can decline a posting you had previously approved. You can also approve a posting you had previously declined.
| You must have already allowed readers to comment on news items and required that comments be approved before they are made visible to all readers of the posting. |
To review reader comments before posting, follow these steps:
-
Go to Menu > Admin > News > Approve News Comments.
The Approve News Comments page opens.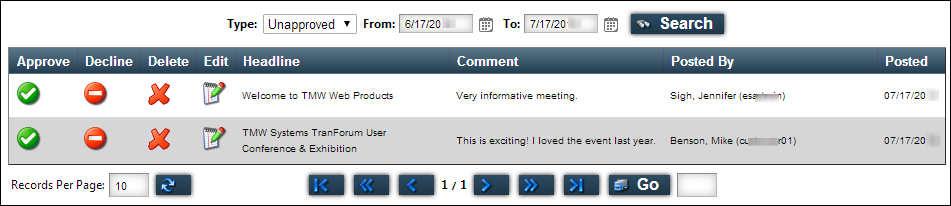
-
If you want to restrict the list to include specific comments, use the filters.
The more criteria you specify, the shorter the list will become.
-
From the Type list, select one of the following:
-
Unapproved
Comments that have been submitted, but have had no action taken on them. -
Approved
Comments that have been reviewed, possibly edited, and then approved for posting. -
Declined
Comments that have been reviewed, but not accepted for posting.
-
-
Identify a date range to view.
Note: For more information about selecting dates from a calendar, see Selecting a date and time.
-
Click Search.
A list of comments meeting your criteria is shown.
Note: If the list is too long, you can use the paging bar to view the pages.
-
-
If you want to act on a comment, do one of the following:
-
Approve
On the same line as the comment, click Approve.
A message appears stating the comment is approved. It is now posted for others to read. You can view it by searching for comments of Type = Approved.
-
Decline
On the same line as the comment, click Decline.
A message appears stating the comment is declined. The comment is saved, but not posted for others to read. You can view it by searching for comments of Type = Declined.
-
Delete
On the same line as the comment, click Delete.
A message appears asking if you want to delete the comment.Click OK.
A message appears stating that the comment is removed from the database.
-
-
If you want to edit or enhance the text, before you approve or decline the comment, do the following:
-
On the same line as the comment, click
 View.
View. -
Review the text.
-
If you want, edit or enhance the text with the inline text editing tools.
-
Do one of the following:
-
Save any changes
If you edited the text, but are not yet ready to act on the comment, click Update. -
Approve
Click Approve to both save any changes you made and approve the comment.The comment is posted for others to read. Once approved, you can later view it by searching for comments of Type = Approved, and then decline or delete it.
-
Decline
Click Decline.The comment is saved, but not posted for others to read. Once declined, you can later view it by searching for comments of Type = Declined, and then edit, approve, or delete it.
-
Delete
Click Delete.The comment is removed from the database.
-
Return to the list
Click Exit.
-
-