Adding carriers and companies
All companies and carriers that you use on orders must have a detailed profile in the hosting company’s database. If a company or carrier you are working with is not in the database, you can add it. You begin this process by submitting a preliminary profile to the hosting company.
| You cannot assign a newly added company or carrier to an order. The hosting company must approve your request and complete the profile to make the company or carrier available. If you add a company or carrier while entering an order, your entries for the order are discarded. |
You can check the status of the approval process on the Pending Entries page. Available carriers and companies appear on the Assigned Carriers and Assigned Companies pages respectively.
Adding a carrier
All carriers that you use on orders must have a detailed profile in the hosting company’s database. Follow these steps to add a new carrier.
-
Go to Menu > Agent > Carrier Entry.
The Carrier Entry page opens.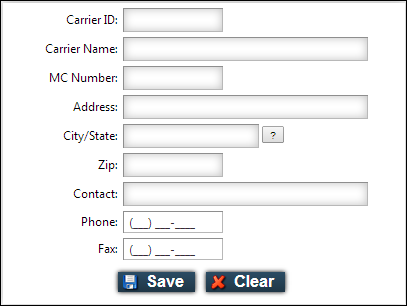
-
Make entries in the following fields.
Required: *
Field Definition Carrier ID *
The carrier’s unique identification code
Carrier Name *
The carrier’s name
MC Number
The carrier’s MC number
Address
The carrier’s address
City/State
The carrier’s city and state
To look up the city and state, click
 to open the City Detail pop-up window.
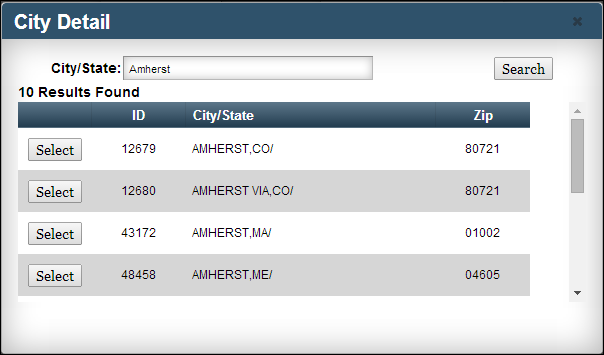
When you select from this list, the City/State and Zip fields will be populated.
Zip
The carrier’s five-digit ZIP Code
Contact
The name of the contact person
Phone
The carrier’s phone number
Fax
The carrier’s fax number
-
Click Save.
A message appears informing you that the carrier has been successfully entered.
Once the hosting company has reviewed and accepted the information, you can include the carrier in your orders.
Adding a company
All companies that you use on orders must have a detailed profile in the hosting company’s database. Follow these steps to add a new company.
-
Go to Menu > Agent > Company Entry.
The Company Entry page opens.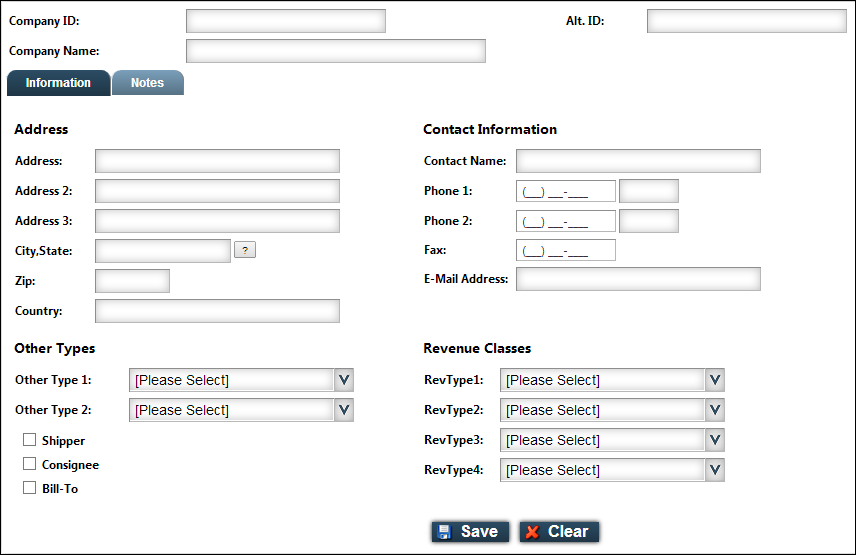
-
Make entries in the following fields.
Required: *
Field Definition Company ID *
A unique identification code for the company
Alt. ID
Leave blank. The hosting company will provide the alternate ID when they complete the company’s profile.
Company Name *
The company’s name
Address
The company’s street address
City/State and Zip *
The company’s city, state, and five-digit ZIP code
To look up the city and state, click
 to open the City Detail pop-up window.
When you select from this list, the system populates the City/State and Zip fields with information.
Country
The company’s country
Contact Information
In these fields, enter contact information for the company.
Other Types Other Type 1-2
Your hosting company may have created specific labels or definitions for different companies. Select them from the drop-down lists as needed.
Shipper/Consignee/ Bill-To
Select the appropriate check boxes to indicate whether the company is a shipper, a consignee, a Bill To company, or some combination.
Revenue Classes
RevType1-4
Each RevType drop-down list contains a set of revenue classifications defined by your hosting company. Select them as needed.
-
Click Save.
A message appears informing you that the company has been successfully entered.
|
Viewing pending entries
All carriers and companies entered using the Carrier Entry and Company Entry pages must be reviewed by the hosting company before you can use them on orders. To view a list of entries waiting for approval, follow these steps.
-
Go to Menu > Agent > Pending Entries.
The Pending Entries page lists both companies ("customers") and carriers. -
To view details about a particular entry, select it and click View Detail.
The Carrier Entry or Company Entry page opens.It shows the information that was recorded when the carrier or company was added.
Viewing available carriers
The Assigned Carriers page lists all the carriers that the hosting company has approved for your use. To view it, follow these steps.
-
Go to Menu > Agent > Assigned Carriers.
The Assigned Carriers page opens. -
To view details about a particular entry, select it and click View Detail.
The Carrier Entry page opens.It shows information from the carrier’s profile in the hosting company’s database.
Viewing available companies
The Assigned Companies page lists all the companies that the hosting company has approved for your use. To view it, follow these steps.
-
Go to Menu > Agent > Assigned Companies.
The Assigned Companies page opens. -
To view details about a particular entry, select it and click View Detail.
The Company Entry page opens.It shows information from the company’s profile in the hosting company’s database.