Creating a sub user account
Administrators and authorized primary users can set up sub user accounts. Sub user accounts allow access to a limited number of features. Sub user accounts are attached to the primary user account that creates them or for which they are created. A sub user account automatically inherits information from the primary user account to which it is added and has access only to the same features and pages of that primary user.
| Currently, only users with the Administrators role can create sub users for primary DriverSeat users. |
To create a new sub user, you must be prepared to enter the existing user name to which to add the new sub user account. If you are unsure of the user name, you can look up and select a user name from the list of existing users.
To create a sub user account, follow these steps:
-
Access the Create Users page based on how you want to add the new sub user:
-
If you know the user name to which you want to add the new sub user account, go to Menu > Security > Work with Users > Create Users.
The Create Users page opens. -
If you want to look up and select a user name from a list of existing users:
-
Go to Menu > Security > Work with Users > Review Users.
The Review Users page opens. -
Locate the account for which you want to add a sub user.
-
On the same line as the user name, click Modify.
The user’s detail appears in the Create Users page.
-
-
-
In the Create User section, determine if you need to enter a user name into the User Name field:
-
If this field is blank, enter a name for the new sub user.
-
If you selected a user name from the list of existing users, that user name appears in this field. Do not enter a name for the new sub user.
-
-
Click Sub User.
A second User Name field appears. The Create User button becomes available. -
Complete the User Name fields as appropriate:
-
If you entered a new sub user name into the first User Name field, it now appears in the second field. Enter a valid existing user name in the first field.
-
If you selected a user name from a list of existing users, that user name still appears in the first User Name field. Enter a name for the new sub user in the second field.
Note: To create and save a sub user account, a valid existing user name must be in the first field. A valid existing user name is a required part of the new sub user’s login ID.
For example, if the new sub user name is jdoe and you are adding it to the user name jsmith, the new sub user’s complete user name will be jsmith-jdoe. The sub user must use this hyphenated user name to log in.
-
-
In the Password and Confirm Password fields, enter the sub user’s password.
A password is a secret code that the sub user must enter when they sign into the application. By default, a password must be at least seven (7) letters or numbers, including at least one non-alphanumeric character (such as @ or $). You can change these defaults in Settings Manager.
The sub user will use this password for initial access to the application. During their initial login, each user will be prompted to change their password, according to how the administrator has set up the system.
Notes:
-
The password is case-sensitive: each letter that is uppercase or lowercase must always be entered that way when a sub user enters their password.
-
Passwords are not displayed. If a sub user forgets their password, you can assign a new password.
-
For security reasons, when you enter a password, it appears as a series of dots.
-
-
In the remaining sections of the Create Users page, enter or select the appropriate information for the new sub user.
Tab/section name Applies to All applications
All applications
FreightAgent
CarrierHub
DriverSeat
DriverSeat
eStat
eStat
Data Warehouse Explorer
-
If you want, after assigning a role or roles, select a role-specific landing page.
-
In the Optional - Profile Details section, click Update Pages.
-
Select a landing page.
-
-
Continue with specific settings for:
-
Click Create User in the upper right section of the page.
A message indicates that the new sub user account was created successfully.Note: If not saved correctly, a message regarding incomplete or missing field information appears. Correct the error and click Create User again.
-
Give each sub user their user name and password.
After you have created sub users and assigned them roles, you must give each sub user their user name and password.They must also know the following:
-
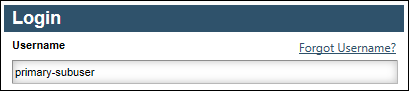
In the Username field of the Login box, they must enter the primary user name, followed by a hyphen, and then followed by their assigned sub user name.
They can enter either uppercase or lowercase letters, but not spaces between characters.
-
In the Password field, they must enter the password as initially assigned to them.
The password is case-sensitive: each letter that is uppercase or lowercase must always be entered that way when a user enters their password. For security reasons, when they enter a password, it appears as a series of dots.
-
To avoid having to enter a user name the next time they log in, they can enable the Remember My Username check box by clicking in the box.
Note: To use this feature, the user must have cookies enabled in their browser.
-
After logging in, they must complete User Registration by entering their mailing address and telephone number, reading and accepting the Terms and Conditions, changing their password, and setting up security questions that will be used to verify their identity if they forget their user name.
-
Optional - Profile Details section
The optional profile fields can be completed or changed by new users after they have logged in successfully.
| Field | Definition |
|---|---|
First Name |
Enter the sub user’s actual first name. |
Last Name |
Enter the sub user’s actual last name. |
E-mail Address |
Enter the e-mail address you can use to contact the user. |
Culture Override |
Not functional |
Landing Page Override |
A landing page is the page a user sees immediately after logging in or selecting Landing from the user menu. To select a global landing page, click Update Pages and choose one of the following options:
You can also choose a role-specific landing page after you assign one or more roles to the user. |
Role Assignments section
In this section, you can assign one or more roles to each sub user that you create, change an assigned role, or remove an assigned role. Each role is authorized and set up to access specific features. When assigning a role to a sub user, you are authorizing that user to access those features. Because each role provides access only to limited features, you may need to assign multiple roles to a sub user. Sub users can be assigned only to the roles to which the sub user’s primary user has been assigned.
For more information about assigning pages to roles, see Setting up role and page security.
This section contains two lists:
| Field | Definition |
|---|---|
Available Roles |
Lists the roles for which you have authorization to assign, but that have not been assigned to the sub user |
Assigned Roles |
Lists the roles that have been assigned to the sub user |
-
In the Available Roles list, hold CTRL and click on each role that you want to assign.
-
Click the
 button.
The selected roles move to the Assigned Roles list.
Agent tab
| Field | Definition |
|---|---|
User Type |
A read-only field displaying the type inherited from the existing user. |
Dispatch User ID |
A read-only field displaying the dispatch User ID inherited from the existing user. |
Carrier tab
| Field | Definition |
|---|---|
TMWSuite ID |
The TMWSuite user ID, used to associate the accounts to the same set of views designed for your load boards. The ID automatically defaults to your own for you. |
Default Carrier ID |
Your default Carrier ID automatically appears for you. |
Carrier List |
Hosting companies sometimes associate multiple Carrier IDs with a CarrierHub user. If this is the case for you, the name of each of the carrier IDs associated with your login appears in this field. |
CSA Settings tab
If your company’s DOT number is registered through ClientCenter, and you want this sub user to be able to view their CSA safety scoring information, this tab is available after you create the sub user account.
Pay and Trip Details tab
As an administrator, you can enter new or change the inherited selections on this tab.
-
If you opened the Create User page after selecting a primary user account from the Review User page, the new sub user inherits the Assignment Type and TMWSuite ID from the primary user.
-
If you opened the Create User page from the menu, the Assignment Type and TMWSuite ID fields are blank.
| Field | Definition |
|---|---|
Assignment Type |
Select an entry form the Assignment Type list. Three options are available:
|
Driver |
Use the lookup function to find the driver’s TMWSuite ID. The driver is a direct employee of a trucking company who receives pay for hauling freight. The Driver File Maintenance accounting type is Payroll. |
Tractor |
Use the lookup function to find the tractor’s TMWSuite ID. A tractor is an asset belonging to an owner/operator. The owner/operator receives pay from a trucking company for the use of his tractor to haul freight. The Tractor File Maintenance accounting type is Accounts Payable. |
Pay |
Use the lookup function to find the Pay To’s TMWSuite ID. Some owner/operators own multiple pieces of equipment (tractors/trailers) and employ a small number of drivers. The Pay To owner/operator receives pay from a trucking company for the trips his drivers complete. He then pays his drivers for hauling the freight. The Pay To File Maintenance accounting type for the owner/operator is Accounts Payable. Notes:
|
Customer tab
| Field | Definition |
|---|---|
TMWSuite ID |
Your Board User ID, i.e., an identifier that associates your user login with one or more eStat boards (views). This ID is completed automatically and displayed for you. |
User Description |
The description, if any, that was entered for the user account under which the sub user account was created This field is completed automatically and displayed for you. |
Commodity Prefix |
Not applicable to sub users |
Process Tendered Shipments |
Not applicable to sub users |
Allow user to change the Order-By Company |
Not applicable to sub users |
| The sub users you create inherit customer companies set up by the hosting company. |
Customer Companies tab
The sub users you create inherit your profile companies and associate companies.
Data Warehouse tab
You assign new users to groups when you want to limit access to specific data columns and saved reports in Data Warehouse Explorer.
| Field | Definition |
|---|---|
Available Groups |
Displays the list available of user groups Select the group or groups you want to assign to the new user and click the Right arrow. |
Assigned Groups |
Displays any group or groups assigned to the new user To remove a user from a group, select the group or groups and click the Left arrow. |
You assign row filters to new users when you want to limit access to specific data in Data Warehouse Explorer.
| Field | Definition |
|---|---|
Available Filters |
Displays a list of available row filters Select the filter or filters you want to assign to the new user and click the Right arrow. Note: You create new row filters by creating a table-value-function in SQL. Contact your Support team for more information on these filters. |
Assigned Filters |
Displays any filters assigned to the new user To remove a filter from a user, select the filter or filter and click the Left arrow. |