Monitoring website usage
In Trimble Web Products, administrative procedures enable you to manage and monitor how users access and use the site.
Everyone who logs into Trimble Web Products for the first time must agree to the website’s terms and conditions of use. If your company changes the terms and conditions and you upload a new terms and conditions document, each user must accept the new terms and conditions the next time they log in. Usage reports will help you monitor which Trimble Web Products site pages are being visited and any unauthorized access.
Tracking the Terms and Conditions of Use
Everyone who logs into Trimble Web Products for the first time must read and agree to the terms and conditions of use. A company can use the terms and conditions document provided with Trimble Web Products or upload their own document.
If a company changes the terms and conditions document, each user is automatically required to accept the new terms and conditions the next time they log in.
An administrator can, at will, reset any user to accept again the terms and conditions. This option can be useful when an individual is suspected of violating the terms and conditions of use.
Uploading a terms and conditions document
Use this procedure to replace the existing terms and conditions of use document with another version when the terms change. All users are automatically required to accept the new terms the next time they log into Trimble Web Products.
-
Go to Menu > Security > Work With Users > Upload T&C Document.
The Upload T&C Document page opens. -
Complete the form.

Field Definition Title
Type the title of the document. This title will appear for the user on the View Terms & Conditions page.
Description
Type a brief description of the document. This description will appear for the user on the View Terms & Conditions page.
File Name
Click Browse to locate and select the file containing the terms and conditions you want to use.
-
Click Upload.
If you decide not to upload the document after all, click Cancel instead.
Reviewing terms and conditions acceptance
When users first log into Trimble Web Products, they should review and accept the terms and conditions agreement. This acceptance signifies that they understand and will abide by the requirements detailed in the agreement.
To review user acceptances or acknowledgements, follow these steps.
-
Go to Menu > Security > Work With Users > Review T&C Acceptance.
The Review T&C Acceptance page opens.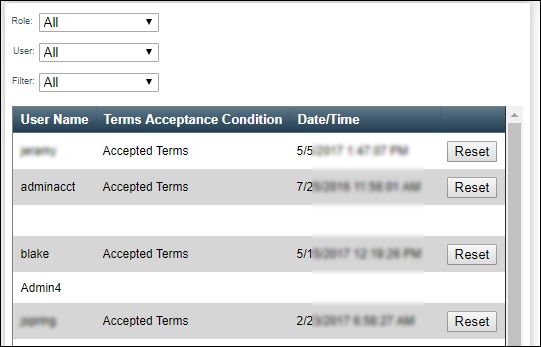
Field Definition User Name
The user’s login name
Terms Acceptance Condition
Identifies whether the terms were accepted. If blank, the user has not yet logged into Trimble Web Products.
Date/Time
Identifies the date and time the user last accepted the terms and conditions.
-
Use the filters to limit the number of user accounts shown.
-
Enter any restrictions according to the following:
-
Role
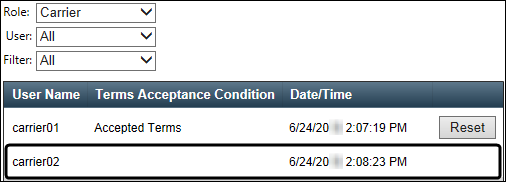
From the Role list, select a specific role to view only users assigned to that role. -
User
From the User list, select to view only a specific user name. -
Filter
From the Filter list, select to view users by terms and conditions acceptance status.
Options are Accepted, Declined, and Not Prompted.
-
-
To return to a complete list of users, select All from each of the lists.

-
Forcing a user to accept the terms and conditions again
Use this procedure to force a user to accept again the terms and conditions of use of Trimble Web Products the next time they log in. The data collected can be used, for example, as evidence of why you deactivated their user name.
-
Go to Menu > Security > Work With Users > Review T&C Acceptance.
The Review T&C Acceptance page opens. -
Use the filters to limit the number of user accounts shown.
-
Enter any restrictions according to the following:
-
Role
From the Role list, select a specific role to view only users assigned to that role. -
User
From the User list, select to view only a specific user name. -
Filter
From the Filter list, select to view users by terms and conditions acceptance status.
Options are Accepted, Declined, and Not Prompted.
-
-
To return to a complete list of users, select All from each of the lists.
-
-
On the same line as the user you want to force to reaccept the terms and conditions of use, click Reset.
The system does the following:
-
Hides the Reset button
-
Clears the Terms Acceptance Condition column (field is blank).
-
Viewing website usage reports
Tracking Trimble Web Products usage can assist administrators in determining which of its many features are being used and which are not. The report information is shown in table and chart format. Administrators also can use this information to research any unauthorized access of the system.
Monitoring all usage
Use this report to see a list of all Trimble Web Products pages accessed. You can filter the list to view a particular user’s information or a specific date range.
-
Go to Menu > Admin > Usage Reports > Monitor All Usage.
The Monitor All Usage report opens.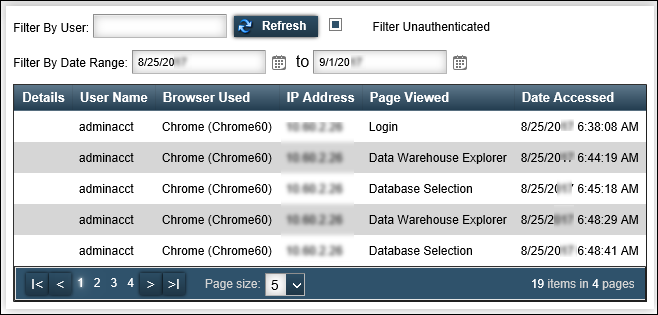
Field Definition User Name
The Trimble Web Products user name
Browser Used
The name and version of the Internet browser that was used to access the page
IP Address
The Internet address of the computer that connected to Trimble Web Products
Page Viewed
The name of the page as it appears on the title bar of that page
Date Accessed
The date and time that the page was viewed by the user, sorted chronologically
Page Size
From the list, select the number of items per page that you would like to display. You can select from 5 to All. The system defaults to 5 rows per page.
-
Use the filters to limit the information shown.
-
Filter By User
Type the first few characters of the user name or the entire user name. Users include any sub accounts that were created by that user. -
Filter Unauthenticated
Select the checkbox if you do not want to include unauthenticated users. Unauthenticated users include anyone accessing the initial login page, whether a user or hacker. -
Filter By Date Range
From the calendars, select the date range within which you want to search. The system defaults to seven days prior to the current date. For more information about selecting dates, see Date/time selection.
-
-
Click Refresh.
The system updates the results.
Tracking usage by page
Use this graph to view all Trimble Web Products pages that have been accessed by users.
-
Go to Menu > Admin > Usage Reports > View Graph by Page.
The View Graph by Page report opens.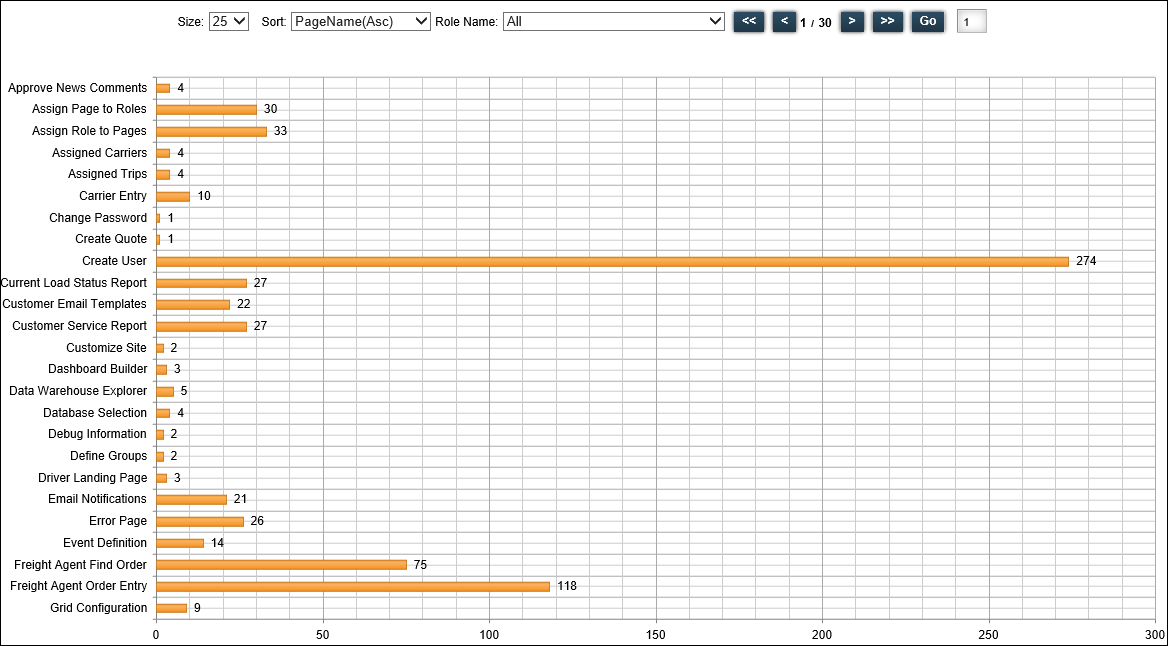
Field Definition Page Name
Trimble Web Products pages listed based on the value in the Sort field
Bar Graph
Shows the number of times each page was accessed
Roll Name
Restricts the chart based on a role
-
In the Size field, select the number of items that appear on each page of the report.
-
In the Sort field, select how to sort the items in the report:
-
PageName(Asc)
In alphabetical order by page name -
Count(Ascending)
In order of pages accessed the lowest number of times -
Count(Descending)
In order of pages accessed the highest number of times
-
Tracking usage by role
Use this graph to view all Trimble Web Products pages that have been accessed by the users belonging to each user role.
-
Go to Menu > Admin > Usage Reports > View Graph by Role.
The View Graph by Role report opens.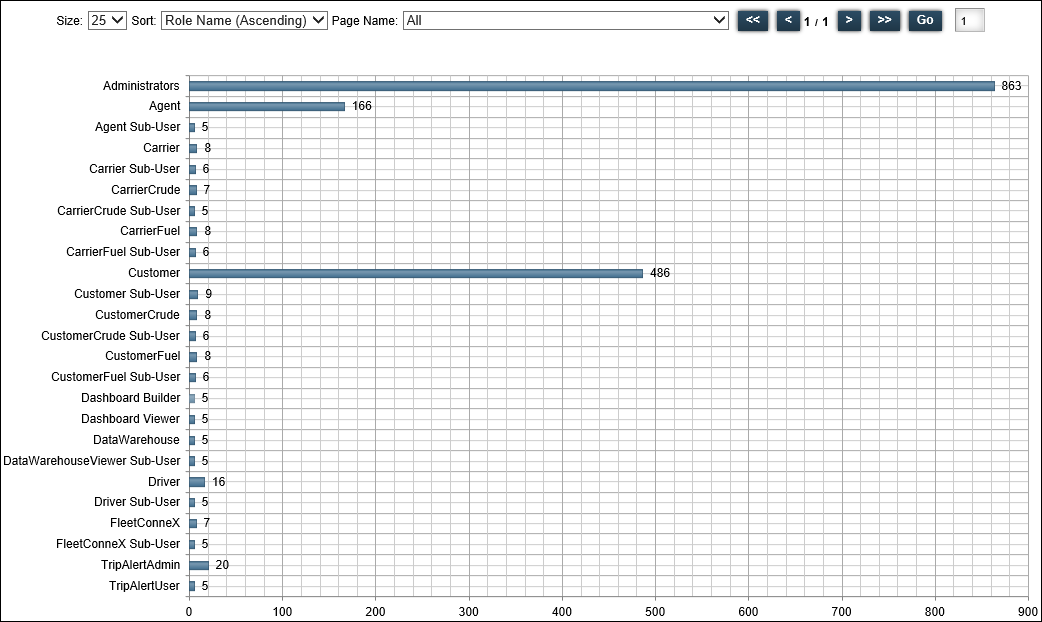
Role Heading Pages are grouped according the role of each user accessing the pages Bar Graph
Shows the number of times each page was accessed
Roll Name
Restricts the chart based on a page name
-
In the Size field, select the number of items that appear on each page of the report.
-
In the Sort field, select how to sort the items in the report:
-
Role Name (Ascending)
In alphabetical order by role -
Count (Ascending)
In order of pages accessed the lowest number of times -
Count (Descending)
In order of pages accessed the highest number of times
-