Allowing carriers to enter and approve pay for crude orders
In CarrierHub Crude, pay details can be added for crude loads with the Completed status. If you want, you can allow carriers to add, remove, and submit pay details. You can also permit them to approve pay details.
Allowing carriers to enter pay details for crude orders
If you want, you can add buttons to the Load Pay Details page that allow carriers to add, edit, and remove pay.
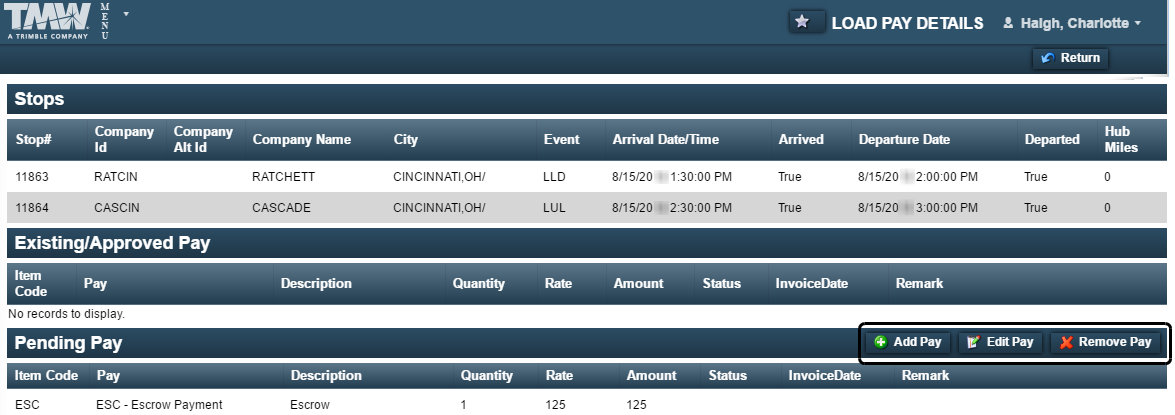
When these buttons are enabled, carriers click the Add Pay button to enter pay details in the Request Pay window.
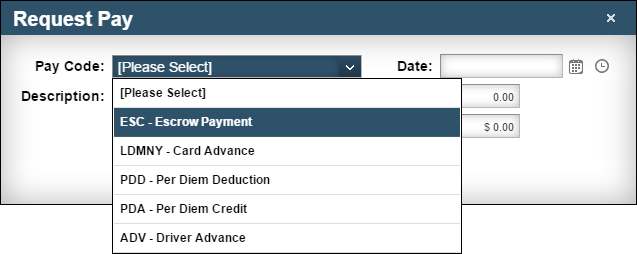
You can also specify which pay types are available in the Request Pay window’s Description field.
To set up CarrierHub Crude for entering pay details:
-
Go to Menu > Configuration > Settings Manager.
The Settings Manager page opens. -
Do one of the following:
-
To apply the setting change to all roles, verify the Role field is set to [Global Settings].
-
To apply the setting change to a specific role, select it in the Role field.
A message asks you to verify that you want to change the role. Click OK to continue.If the setting has already been changed for at least one role, its text label is bold and italic.
-
-
On the Modules tab, in the Module Selection field, select CarrierCrude.
-
Click these tabs: Core > Pay.
Note: The settings in the Pay tab can be changed only when you have selected the Override Carrier Module Settings setting. For details, see Overriding the Carrier module settings.
-
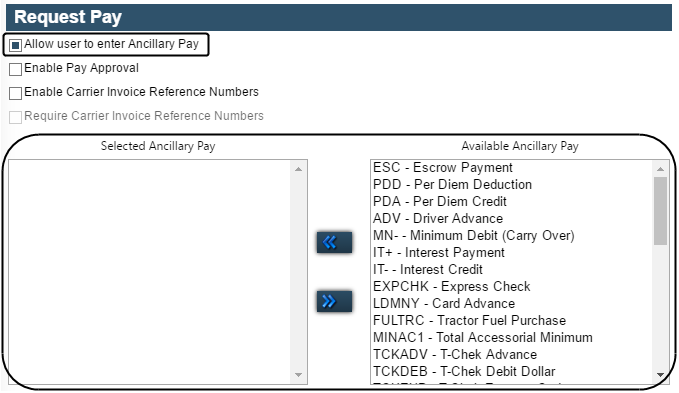
In the Request Pay section, select the Allow user to enter Ancillary Pay check box.
-
Use the Available Ancillary Pay and Selected Ancillary Pay lists to identify which pay types carriers can use:
-
Select each pay type you want in the Available Ancillary Pay list.
Notes:
-
To select and move multiple pay types, use the CTRL or SHIFT key when clicking items.
-
You set up pay types in the Pay Types Maintenance window in TMW Back Office, or in the Pay Types window in the TMWSuite Rate Schedules application.
-
-
Click
 to move your selections to the Selected Ancillary Pay list.
-
-
To save your changes, click
 Save.
Save.
A message indicates that your changes were saved successfully.If you are making changes for a specific role, and this is the first time the setting has been changed for any role, the text label style changes to bold and italic.
Allowing carriers to approve pay details for crude orders
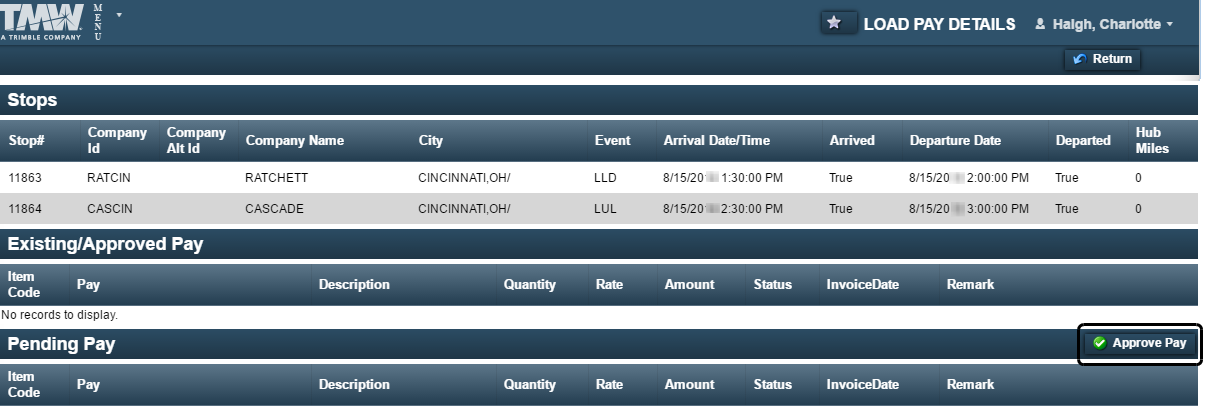
If you want, you can give carriers the ability to approve pay details for loads with a Completed status. Carriers' approval of pay does not affect the settlement process in TMWSuite. By default, even if pay is not approved, you will be able to finalize it in Settlements.
Crude carriers approve pay on the Load Pay Details page by clicking the Approve Pay button.
To allow crude carriers to approve pay details, follow these steps.
-
Go to Menu > Configuration > Settings Manager.
The Settings Manager page opens. -
Do one of the following:
-
To apply the setting change to all roles, verify the Role field is set to [Global Settings].
-
To apply the setting change to a specific role, select it in the Role field.
A message asks you to verify that you want to change the role. Click OK to continue.If the setting has already been changed for at least one role, its text label is bold and italic.
-
-
On the Modules tab, in the Module Selection field, select CarrierCrude.
-
Click these tabs: Core > Pay.
Note: The settings in the Pay tab can be changed only when you have selected the Override Carrier Module Settings setting. For details, see Overriding the Carrier module settings.
-
In the Request Pay section, select the Enable Pay Approval check box.

-
To save your changes, click
Save.
A message indicates that your changes were saved successfully.If you are making changes for a specific role, and this is the first time the setting has been changed for any role, the text label style changes to bold and italic.
Allowing carriers to record reference numbers on pay details
When carriers approve pay on the Load Pay Details page, they may want to assign their own reference numbers to pay details. These reference numbers are referred to as carrier invoice numbers. They are entered for an order in the Request Pay window. You access the window from the Crude Load Details page.
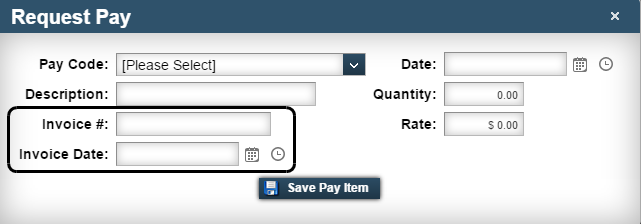
You can also make entry of these numbers a requirement. For example, if a carrier invoice number is not entered in the Request Pay window, the user cannot save the pay detail.
|
To enable users to record carrier invoice numbers for pay details, follow these steps.
-
Go to Menu > Configuration > Settings Manager.
The Settings Manager page opens. -
Do one of the following:
-
To apply the setting change to all roles, verify the Role field is set to [Global Settings].
-
To apply the setting change to a specific role, select it in the Role field.
A message asks you to verify that you want to change the role. Click OK to continue.If the setting has already been changed for at least one role, its text label is bold and italic.
-
-
On the Modules tab, in the Module Selection field, select CarrierCrude.
-
Click these tabs: Core > Pay.
Note: The settings in the Pay tab can be changed only when you have selected the Override Carrier Module Settings setting. For details, see Overriding the Carrier module settings.
-
Select the Enable Carrier Invoice Reference Numbers check box.
-
If you want to require a carrier invoice number on pay details, select the Require Carrier Reference Numbers check box.

Notes:
-
If a carrier invoice number is missing, approval of the pay details will fail and the carrier will be prompted to enter the invoice number.
-
The Enable Carrier Invoice Reference Numbers check box must be selected to use this option.
-
-
To save your changes, click
Save.
A message indicates that your changes were saved successfully.If you are making changes for a specific role, and this is the first time the setting has been changed for any role, the text label style changes to bold and italic.