Providing access to load searches for outside carriers
Your company may want to allow outside carriers, or the drivers employed by your carriers, to search for loads on your website. You can set up the application to provide access to load searches for these unauthenticated users.
Follow the steps below to allow access to load searches.
Creating a role that will associate the theme with the user account
A unique role is necessary to connect the load search theme and the load search user account. For more information, see Setting up role and page security.
To create the role, follow these steps:
-
Select Menu > Security > Work With Users > Manage Roles.
The Manage Roles page opens. -
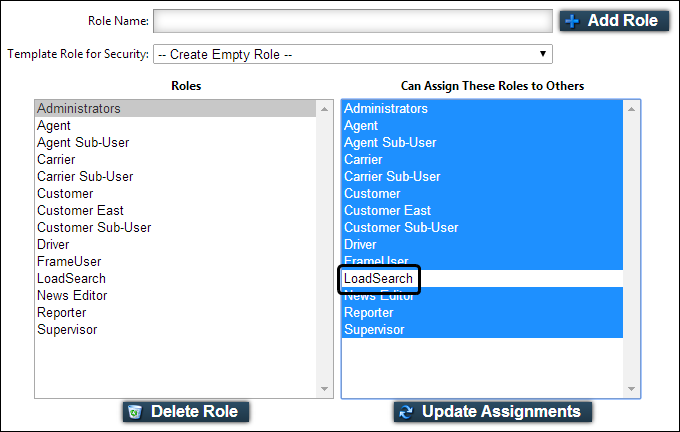
In the Role Name text box, enter the name of the new user role.
Note: Enter a name such as LoadSearch. -
Click Add Role.
A message appears at the top of the page, stating the role was created successfully. -
With the Administrators role selected in the left pane, CTRL-click on the new load search role in the Can Assign These Roles to Others list.
-
Click Update Assignments.
A message appears at the top of the page, stating the role assignment was saved successfully.Note: This addition to the list allows the administrator to assign the new role when creating the user account.
-
Go to Menu > Security > Page Security > Assign Page ⇒ Roles.
-
From the list of pages, select Available Loads (CarrierAvailableLoads.aspx).

-
From the Roles Available list, select the new load search role and click the
 Add Role to Page button.
 -
Repeat Steps 7 and 8 to add these pages:
-
Direct Load Updates (LoadDetails.aspx)
-
MapSearch.aspx
-
StateSearch.aspx
Note: If you use the Assign Role ⇒ Pages option in Step 6, you can add all four pages to the role at the same time.
-
-
Continue with "Creating a load search theme," below.
Creating a load search theme
When allowing outside carriers to search for loads, you must create a theme with the proper settings that will restrict access to other application functionality.
To create the theme, follow these steps:
-
Go to Menu > Admin > Theme > Manage Themes.
The Manage Themes page opens. -
Enter the Name of the new theme.
Note: Enter a name such as LoadSearch. -
If you want, enter a brief Description of the theme.
-
From the Copy Customization from Theme list, select your default theme.
Note: The user doing the load search will actually be seeing two themes. Your company’s default theme appears on your home page where the load searcher will access the link to the search pages. When the user clicks the link, the authentication process is launched and the viewer will see the load search theme that you are now creating. It might cause some confusion for the users if the themes are too different.
-
Click Add.
-
Under Active Themes, select the new load search theme, and click Assign Role(s).
-
Under Select roles assigned to this Theme, select the new load search role and click Save Role Assignment.
-
Continue with "Setting up the load search theme," below.
Setting up the load search theme
You can restrict access to other application functionality for users that can only search for available loads. You should have already created the role associated with this user account.
To set up the theme, follow these steps:
-
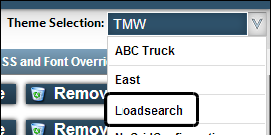
Go to Menu > Admin > Theme > Customize Site.
The Customize Site page opens. -
From the Theme Selection list, select the new load search theme.
-
Click Save Theme.
-
Go to Menu > Configuration > Settings Manager.
The Settings Manger page opens. -
Do one of the following:
-
If you want the setting change to apply to all roles, verify the Role field is set to [Global Settings].
-
If you want the setting change to apply to a specific role, select it in the Role field. A message asks you to verify that you want to change the role. Click OK to continue.
If the setting has already been changed for at least one role, its text label is bold and italic.
-
-
On the Modules tab, in the Module Selection field, select Carrier.
-
Click these tabs: Application Settings > Load Boards > Available Loads.
-
In the General section, clear the Allow Load Self-Assignment check box.

-
Click Save.
A message appears at the top of the page, stating your settings were saved successfully.If you are making changes for a specific role and this is the first time the setting has been changed for any role, the text label style changes to bold and italic.
If you do not want to save, click Revert. The application cancels any unsaved changes and reverts to the last saved settings.
Setting up a role to allow load searching
You can set up a role that is allowed to perform load searches. You will enter the load search user name and password to activate the functionality.
To set up the role, follow these steps:
-
Log into the application with your administrator account.
-
Go to Menu > Configuration > Settings Manager.
The Settings Manger page opens. -
Do one of the following:
-
If you want the setting change to apply to all roles, verify the Role field is set to [Global Settings].
-
If you want the setting change to apply to a specific role, select it in the Role field. A message asks you to verify that you want to change the role. Click OK to continue.
If the setting has already been changed for at least one role, its text label is bold and italic.
-
-
On the Modules tab, in the Module Selection field, select Carrier.
-
Click these tabs: Application Settings > Load Boards > Available Loads.
-
In the Advanced Search section, make these entries:
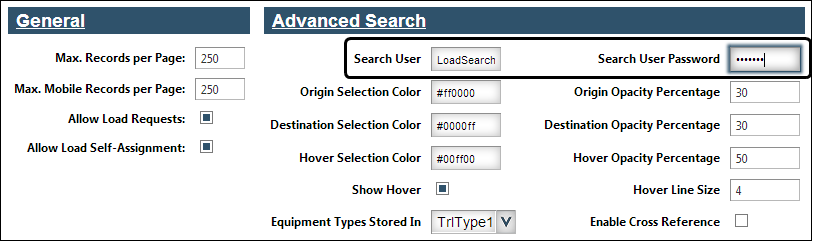
Field Definition Search User
Enter the exact name of the user account that you created for this purpose, such as LoadSearch.
Note: The username is not case-sensitive.
Search User Password
Enter the exact password that you entered when you created the user account or what you changed the password to when you logged in as the load search user while setting up the user account.
Note: The password is case-sensitive.
-
Click Save.
A message appears at the top of the page, stating your settings were saved successfully.If you are making changes for a specific role and this is the first time the setting has been changed for any role, the text label style changes to bold and italic.
If you do not want to save, click Revert. The application cancels any unsaved changes and reverts to the last saved settings.
-
Continue with "Adding load search pages to your web.config file," below.
Adding the load search pages to your web.config file
To allow outside carriers access to the load search pages, you must identify them in your web.config file. Doing so will allow the pages to be exposed outside of the normal application security.
Using the Notepad text editor, add access to the pages by making entries like these to your configuration file:
<location path="CarrierHub/MapSearch.aspx">
             <system.web>
                   <authorization>
                         <allow users="?"/>
                   </authorization>
             </system.web>
      </location>
<location path="CarrierHub/RadiusSearch.aspx">
             <system.web>
                   <authorization>
                         <allow users="?"/>
                   </authorization>
             </system.web>
      </location>
<location path="CarrierHub/StateSearch.aspx">
             <system.web>
                   <authorization>
                         <allow users="?"/>
                   </authorization>
             </system.web>
      </location>