Specifying how Bill To companies are selected
When creating an order, users select the Bill To from a list of companies. You can control which companies appear in the Bill To field, found in the Fuel Order Entry page’s Enter New Order Information section.

To specify how Bill To companies are selected, follow these steps:
-
Go to Menu > Configuration > Settings Manager.
The Settings Manager page opens. -
Do one of the following:
-
If you want the setting change to apply to all roles, verify the Role field is set to [Global Settings].
-
If you want the setting change to apply to a specific role, select it in the Role field.
Note: The default roles for fuel users are CustomerFuel and CustomerFuel Sub-User. Your company may have created other roles for fuel users.
A message asks you to verify that you want to change the role. Click OK.
-
-
On the Modules tab, in the Module Selection field, select Customer.
-
Click these tabs: Application Settings > Fuel Order Entry.
-
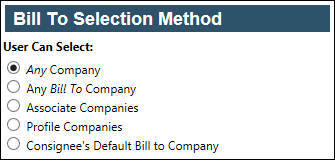
In the Bill To Selection Method section, select the appropriate radio button.
-
Any Company
All active companies in your database are available for selection. -
Any Bill To Company
Only companies flagged as Bill To are available for selection. -
Associate Companies
Only companies recorded as associate companies in the user’s Trimble Web Products profile are available for selection. -
Profile Companies
Only companies recorded as profile companies in the user’s Trimble Web Products profile are available for selection. -
Consignee’s Default Bill To Company
The Bill To recorded in the customer (consignee) company’s profile automatically appears in the Bill To field.Warning: If the consignee has no default Bill To specified, the Bill To field will be set to UNKNOWN and the order will be saved. However, since Fuel Dispatch requires Bill To’s on orders, you must record a Bill To when editing and saving an order in Fuel Dispatch.
-
-
Click Save.
A message appears at the top of the page, stating your settings were saved successfully.
If you do not want to save, click Revert instead. The application cancels any unsaved changes and reverts to the last saved settings.