Configuring the Planning Worksheet
The Planning Worksheet page gives agents the ability to review orders and see the availability of resources. You can configure the page settings for each role and control the display of data.
You can specify which resource tabs agents will be able to view. If you do not select at least one resource type, the resource grid will not appear on the Planning Worksheet page.
To enable the display of resource tabs, follow these steps.
-
Go to Menu > Configuration > Settings Manager.
The Settings Manager page opens. -
Do one of the following:
-
If you want the setting change to apply to all roles, verify the Role field is set to [Global Settings].
-
If you want the setting change to apply to a specific role, select it in the Role field.
A message asks you to verify that you want to change the role. Click OK to continue.Note: If a setting has already been changed for at least one role, its text label is bold and italic.
-
-
On the Modules tab, in the Module Selection field, select Agent.
-
Click the Grids tab.
-
In the Planning section, use the check boxes to enable or disable the resource tabs.
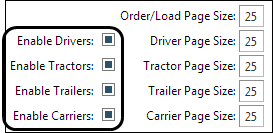
-
Change the default number of records that will appear, if desired.
Note: Each Page Size field must contain a number, even if you disable the corresponding resource tab. You cannot save your changes to this page if any of these fields are blank.
-
Click Save.
A message appears at the top of the page, stating your settings were saved successfully. If you are making changes for a specific role and this is the first time a setting has been changed for any role, the text label style changes to bold and italic.If you do not want to save, click Revert instead. The application cancels any unsaved changes and reverts to the last saved settings.