Setting up eStat for entering crude orders
If you are licensed for Trimble Transportation’s FuelTMS modules and the eStat fuel features, you can give your users access to the following pages:
-
Crude Order Entry
-
Crude Order Import
-
Crude Mass Order Entry
Each of these pages allows users to enter crude orders.
In Settings Manager, you set up how information appears on these pages, as well as which information they can add or change.
Overriding the Customer module settings
You set up the Customer Crude module in Settings Manager. By default, some settings cannot be changed. These read-only settings are determined by the options set for corresponding Customer settings.
The Override Customer Module Settings option allows you to replace those Customer settings with settings specific to the Customer Crude module.
To override the Customer module settings, follow these steps.
-
Go to Menu > Configuration > Settings Manager.
The Settings Manager page opens. -
Do one of the following:
-
To apply the setting change to all roles, verify the Role field is set to [Global Settings].
-
To apply the setting change to a specific role, select it in the Role field.
A message asks you to verify that you want to change the role. Click OK to continue.
If the setting has already been changed for at least one role, its text label is bold and italic.
-
-
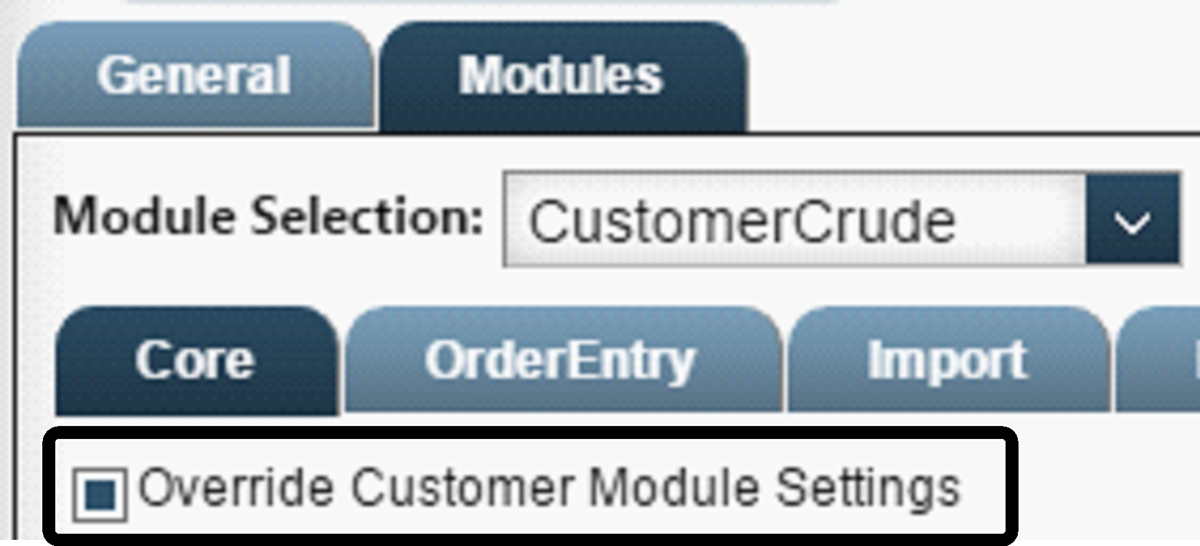
On the Modules tab, in the Module Selection field, select CustomerCrude.
-
If it is not selected already, click the Core tab.
-
Select the Override Customer Module Settings check box.
-
To save your changes, click Save.
A message indicates that your changes were saved successfully.If you are making changes for a specific role, and this is the first time the setting has been changed for any role, the text style label changes to bold and italic.
Configuring how companies are displayed and selected in pages
By default, when users search for a shipper in eStat Crude, they use the shipper’s company ID. If you want, you can set up your system to allow users to search by the shipper’s ALT ID instead.
Other company settings allow you to specify which company information appears for shippers in eStat Crude pages. For example, you can display just the company name or ID, or you can include the address, city, and state.
Other options in Settings Manager allow you to set up how companies are selected in eStat Crude pages. You can:
-
Specify the Bill To company for all crude orders
-
Specify which Shipper companies users can select
-
Determine the maximum number of results in a shipper search
Specifying how companies are displayed
By default, a company’s name and address are displayed in the following places:
-
Crude Order Entry page:
-
Shipper Search, Equipment, Order History, and Shipper Information labels
-
Consignee field
-
-
Crude Mass Order Entry page: Shipper and Consignee fields
If you want, you can display company information in a different format on these pages.
To specify how companies are displayed, follow these steps.
-
Go to Menu > Configuration > Settings Manager.
The Settings Manager page opens. -
Do one of the following:
-
To apply the setting change to all roles, verify the Role field is set to [Global Settings].
-
To apply the setting change to a specific role, select it in the Role field.
A message asks you to verify that you want to change the role. Click OK to continue.If the setting has already been changed for at least one role, its text label is bold and italic.
-
-
On the Modules tab, in the Module Selection field, select CustomerCrude.
-
Click these tabs: Core > Misc.
-
Click in the Display Companies As field. A drop-down list displays the available options.
Note: You can change this setting only when the Override Customer Module Settings setting has been selected. For details, see Overriding the Customer module settings.
-
Select one of the following options.
-
Company Name and Address

-
Name, City, and State

-
Company ID, Name, and Address

-
Name Only

-
Company ID Only

-
Company ID and Name

-
Company ALT ID and Name

-
-
To save your changes, click
 Save.
Save.
A message indicates that your changes were saved successfully.If you are making changes for a specific role, and this is the first time the setting has been changed for any role, the text label style changes to bold and italic.
Searching for companies by ALT ID
On some eStat Crude pages, users can search for a shipper company. By default, users must search by a shipper’s company ID. If you want, you can allow users to search by the shipper’s ALT ID instead.
To allow users to search by the ALT ID, follow these steps.
-
Go to Menu > Configuration > Settings Manager.
The Settings Manager page opens. -
Do one of the following:
-
To apply the setting change to all roles, verify the Role field is set to [Global Settings].
-
To apply the setting change to a specific role, select it in the Role field.
A message asks you to verify that you want to change the role. Click OK to continue.If the setting has already been changed for at least one role, its text label is bold and italic.
-
-
On the Modules tab, in the Module Selection field, select CustomerCrude.
-
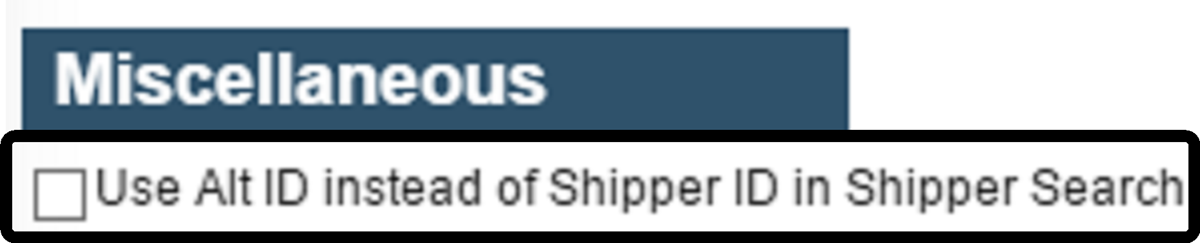
Click these tabs: OrderEntry > Misc.
-
To search for shippers by ALT ID, select the Use Alt ID instead of Shipper ID in Shipper Search check box.
Note: If you do not select the check box, users must search for shippers by company ID.
-
To save your changes, click
Save.
A message indicates that your changes were saved successfully.If you are making changes for a specific role, and this is the first time the setting has been changed for any role, the text label style changes to bold and italic.
Specifying the Bill To company for crude orders
You can specify a default Bill To company to be used for all eStat Crude orders. Alternately, you can force the system to use the default Bill To company specified in the shipper’s company profile.
To specify the Bill To company, follow these steps.
-
Go to Menu > Configuration > Settings Manager.
The Settings Manager page opens. -
Do one of the following:
-
To apply the setting change to all roles, verify the Role field is set to [Global Settings].
-
To apply the setting change to a specific role, select it in the Role field.
A message asks you to verify that you want to change the role. Click OK to continue.If the setting has already been changed for at least one role, its text label is bold and italic.
-
-
On the Modules tab, in the Module Selection field, select CustomerCrude.
-
Click these tabs: OrderEntry > Companies.
-
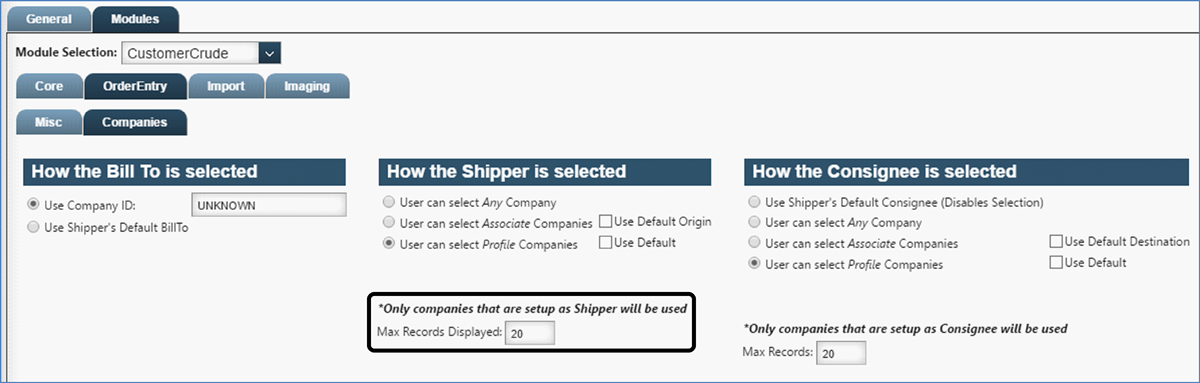
In the How the Bill To is selected section, do one of the following:
-
To specify a default Bill To company, enter the company ID in the Use Company ID field.
-
To force the system to use the default Bill To company specified for the shipper in its company profile, select Use Shipper’s Default BillTo.

-
-
To save your changes, click
Save.
A message indicates that your changes were saved successfully.If you are making changes for a specific role, and this is the first time the setting has been changed for any role, the text label style changes to bold and italic.
Specifying which shipper and consignee companies users can select
When a user creates an order in the Crude Order Entry and Crude Mass Order Entry pages, they select shippers and consignees in the Shipper Search and Order Details sections. By default, all companies in the database that are marked as shippers and/or consignees are available to users. Options in Settings Manager allow you to restrict which companies they can select.
To specify which companies are included in a company search, follow these steps.
-
Go to Menu > Configuration > Settings Manager.
The Settings Manager page opens. -
Do one of the following:
-
To apply the setting change to all roles, verify the Role field is set to [Global Settings].
-
To apply the setting change to a specific role, select it in the Role field.
A message asks you to verify that you want to change the role. Click OK to continue.
If the setting has already been changed for at least one role, its text label is bold and italic.
-
-
On the Modules tab, in the Module Selection field, select CustomerCrude.
-
Click these tabs: OrderEntry > Companies.

-
In the How the Shipper is selected section, select one of the following options:
-
User can select Any Company
Users can select any company that is designated as a shipper in its Trimble Transportation company profile. -
User can select Associate Companies
Users can select any company that is designated as a shipper in its Trimble Transportation company profile and is associated with a company in the user’s profile.Note: The Use Default Origin check box is not functional.
-
User can select Profile Companies
Users can select any company that is designated as a shipper in its Trimble Transportation company profile and is assigned to the user’s profile.Note: The Use Default check box is not functional.
-
-
In the How the Consignee is selected section, select one of the following options:
-
Use Shipper’s Default Consignee (Disables Selection)
The value in the Crude Order Entry and Crude Mass Order Entry page’s Consignee field defaults to the shipper’s default consignee as defined in their company profile. The user cannot change this value. -
User can select Any Company
Users can select any company that is designated as a consignee in its Trimble Transportation company profile. -
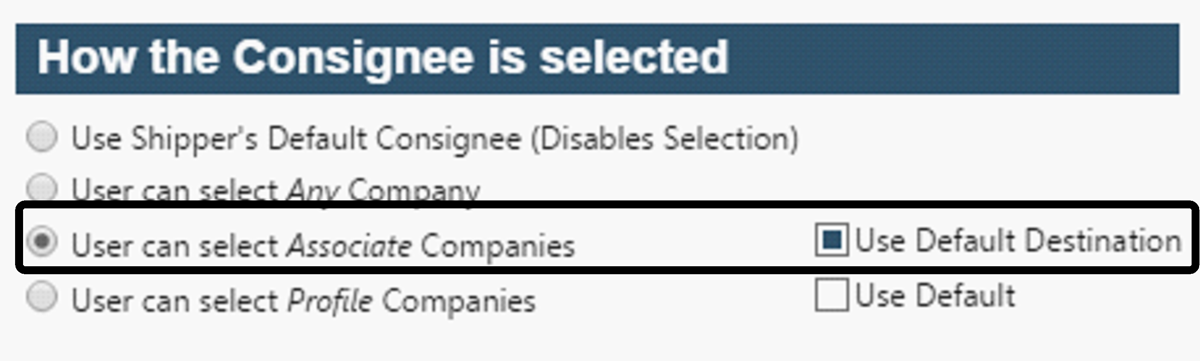
User can select Associate Companies
Users can select any company that is designated as a consignee in its Trimble Transportation company profile and is associated with a company in the user’s profile.Note: If you want to force the user to use the company defined as the default consignee in their user profile, select the Use Default Destination check box. The user cannot change this value.
-
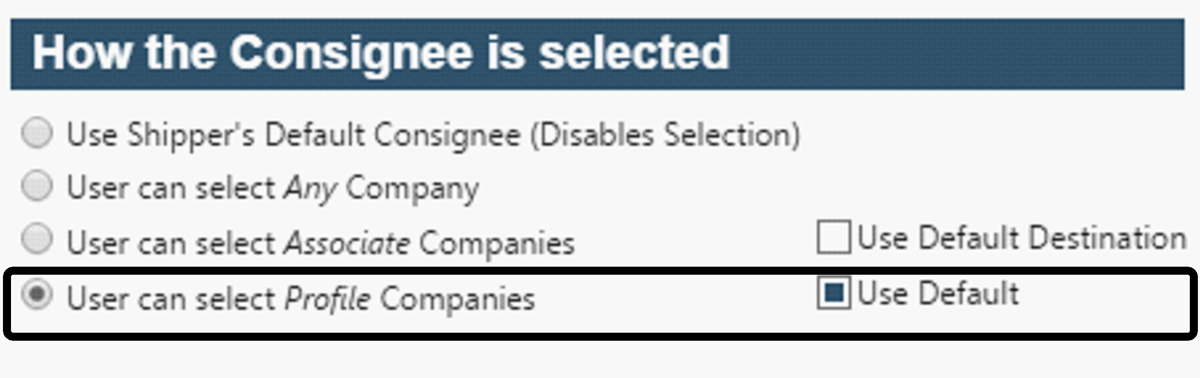
User can select Profile Companies
Users can select any company that is designated as a consignee in its company profile and is assigned to the user’s profile.Note: If you want to force the user to select the company defined as the default company in their user profile, select the Use Default check box.
-
-
To save your changes, click
Save.
A message indicates that your changes were saved successfully.If you are making changes for a specific role, and this is the first time the setting has been changed for any role, the text label style changes to bold and italic.
Defining the maximum number of company search results
Users search for companies in the following locations:
-
Crude Order Entry page: Search Results and Consignee fields
-
Crude Mass Order Entry page: Shipper and Consignee fields
If you want, you can specify the maximum number of results that can appear in the fields. To do so, follow these steps.
-
Go to Menu > Configuration > Settings Manager.
The Settings Manager page opens. -
Do one of the following:
-
To apply the setting change to all roles, verify the Role field is set to [Global Settings].
-
To apply the setting change to a specific role, select it in the Role field.
A message asks you to verify that you want to change the role. Click OK to continue.If the setting has already been changed for at least one role, its text label is bold and italic.
-
-
On the Modules tab, in the Module Selection field, select CustomerCrude.
-
Click these tabs: OrderEntry > Companies.
-
In the Max Records Displayed field, enter the maximum number of results that can appear in a shipper search.
-
In the Max Records field, enter the maximum numbers of results that can appear in a consignee search.

-
To save your changes, click
Save.
A message indicates that your changes were saved successfully.If you are making changes for a specific role, and this is the first time the setting has been changed for any role, the text label style changes to bold and italic.
Configuring order functionality on the Crude Order Entry page
You can determine the way in which users view and create orders on the Crude Order Entry page.
Defining the number of orders in the Order History section
When a user selects a shipper on the Crude Order Entry page, the Order History section displays recent orders involving the shipper.
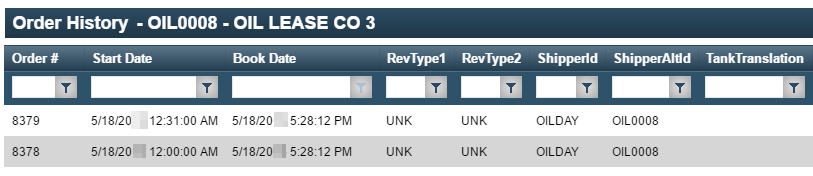
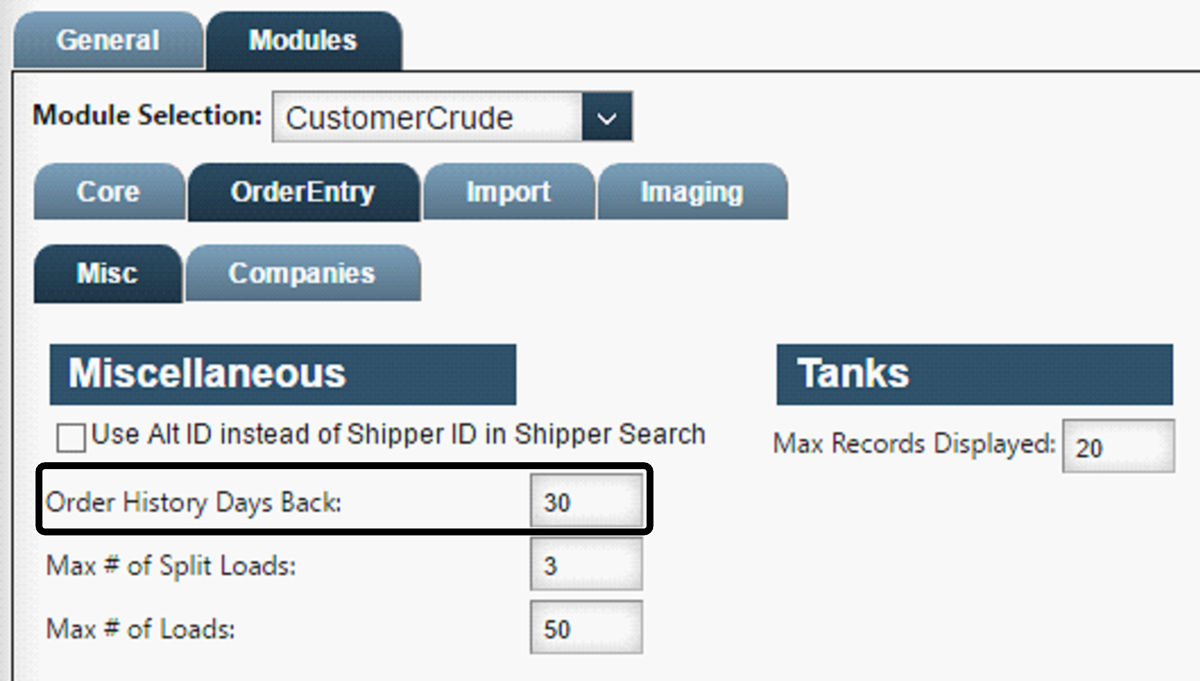
By default, the Order History section displays the previous 30 days' worth of orders. To change the number of days' worth of orders displayed, follow these steps.
-
Go to Menu > Configuration > Settings Manager.
The Settings Manager page opens. -
Do one of the following:
-
To apply the setting change to all roles, verify the Role field is set to [Global Settings].
-
To apply the setting change to a specific role, select it in the Role field.
A message asks you to verify that you want to change the role. Click OK to continue.If the setting has already been changed for at least one role, its text label is bold and italic.
-
-
On the Modules tab, in the Module Selection field, select CustomerCrude.
-
Click these tabs: Order Entry > Misc.
-
In the Order History Days Back field, enter the number of days.
-
To save your changes, click
Save.
A message indicates that your changes were saved successfully.If you are making changes for a specific role, and this is the first time the setting has been changed for any role, the text label style changes to bold and italic.
Defining the maximum number of split orders
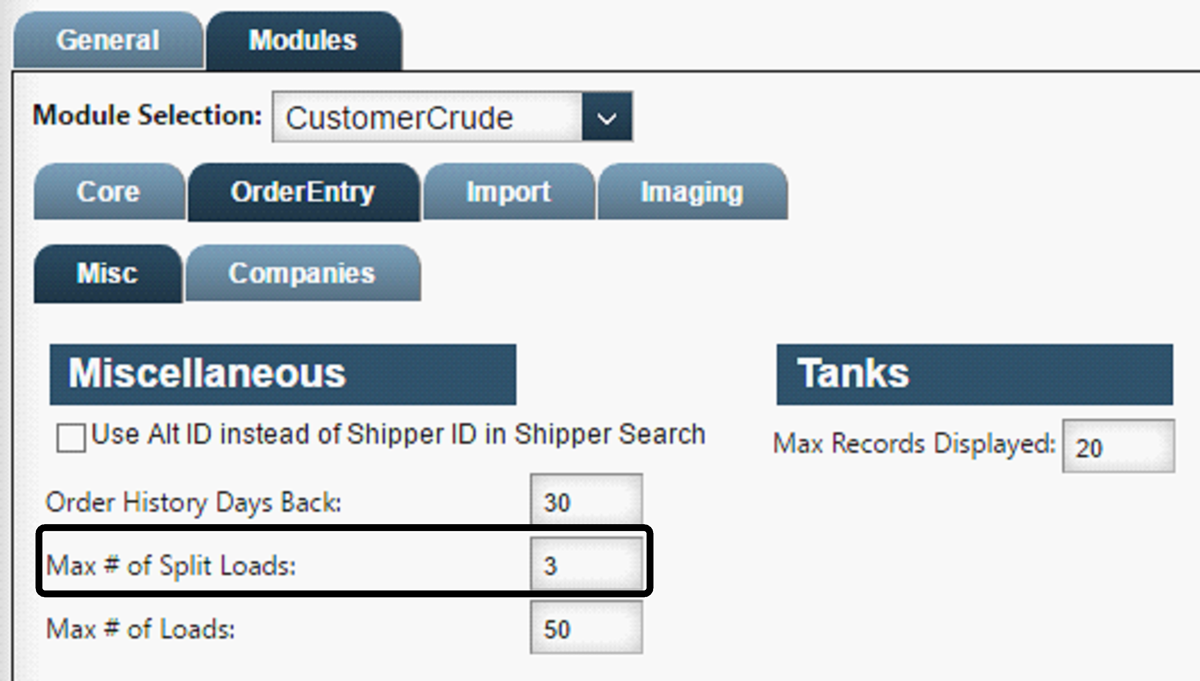
Users can create split orders on the Crude Order Entry page. By default, the maximum number of split orders they can create is three. The system disables the Create Split button when this maximum is reached.
To change the maximum number of splits that users can create on the page, follow these steps.
-
Go to Menu > Configuration > Settings Manager.
The Settings Manager page opens. -
Do one of the following:
-
To apply the setting change to all roles, verify the Role field is set to [Global Settings].
-
To apply the setting change to a specific role, select it in the Role field.
A message asks you to verify that you want to change the role. Click OK to continue.If the setting has already been changed for at least one role, its text label is bold and italic.
-
-
On the Modules tab, in the Module Selection field, select CustomerCrude.
-
Click these tabs: Order Entry > Misc.
-
In the Max # of Split Loads field, enter the maximum number of splits.
-
To save your changes, click
Save.
A message indicates that your changes were saved successfully.If you are making changes for a specific role, and this is the first time the setting has been changed for any role, the text label style changes to bold and italic.
Configuring how equipment is displayed and selected in pages
On the Crude Order Entry and Crude Mass Order Entry pages, users select commodities from one or more shipper tanks. You can control the number of available tanks as well as the number of loads users can select from each tank.
Defining the maximum number of available tanks
Available tanks for a particular shipper appear in the following fields:
-
Crude Order Entry page: Available field
-
Crude Mass Order Entry page: Available Equipment field
By default, the maximum number of tanks displayed in these fields is 20. To change this amount, follow these steps.
-
Go to Menu > Configuration > Settings Manager.
The Settings Manager page opens. -
Do one of the following:
-
To apply the setting change to all roles, verify the Role field is set to [Global Settings].
-
To apply the setting change to a specific role, select it in the Role field.
A message asks you to verify that you want to change the role. Click OK to continue.
If the setting has already been changed for at least one role, its text label is bold and italic.
-
-
On the Modules tab, in the Module Selection field, select CustomerCrude.
-
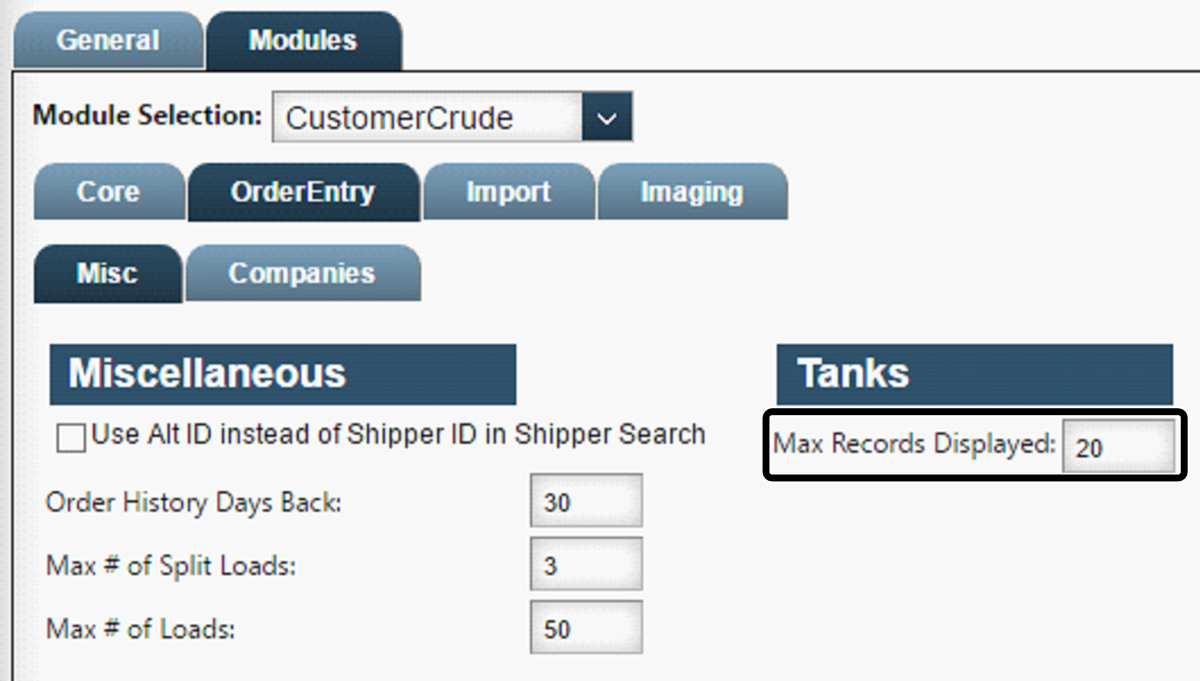
Click these tabs: Order Entry > Misc.
-
In the Max Records Displayed field, enter the maximum number of available tanks.
-
To save your changes, click
Save.
A message indicates that your changes were saved successfully.If you are making changes for a specific role, and this is the first time the setting has been changed for any role, the text label style changes to bold and italic.
Defining the maximum number of loads for a single tank
On the Crude Mass Order Entry page, users can enter multiple loads per tank selected.

On the Crude Order Entry page, users can enter multiple loads per tank selected when they are working in multi-load mode.

By default, the maximum number of loads users can enter per tank is 50. To change this amount, follow these steps.
-
Go to Menu > Configuration > Settings Manager.
The Settings Manager page opens. -
Do one of the following:
-
To apply the setting change to all roles, verify the Role field is set to [Global Settings].
-
To apply the setting change to a specific role, select it in the Role field.
A message asks you to verify that you want to change the role. Click OK to continue.
If the setting has already been changed for at least one role, its text label is bold and italic.
-
-
On the Modules tab, in the Module Selection field, select CustomerCrude.
-
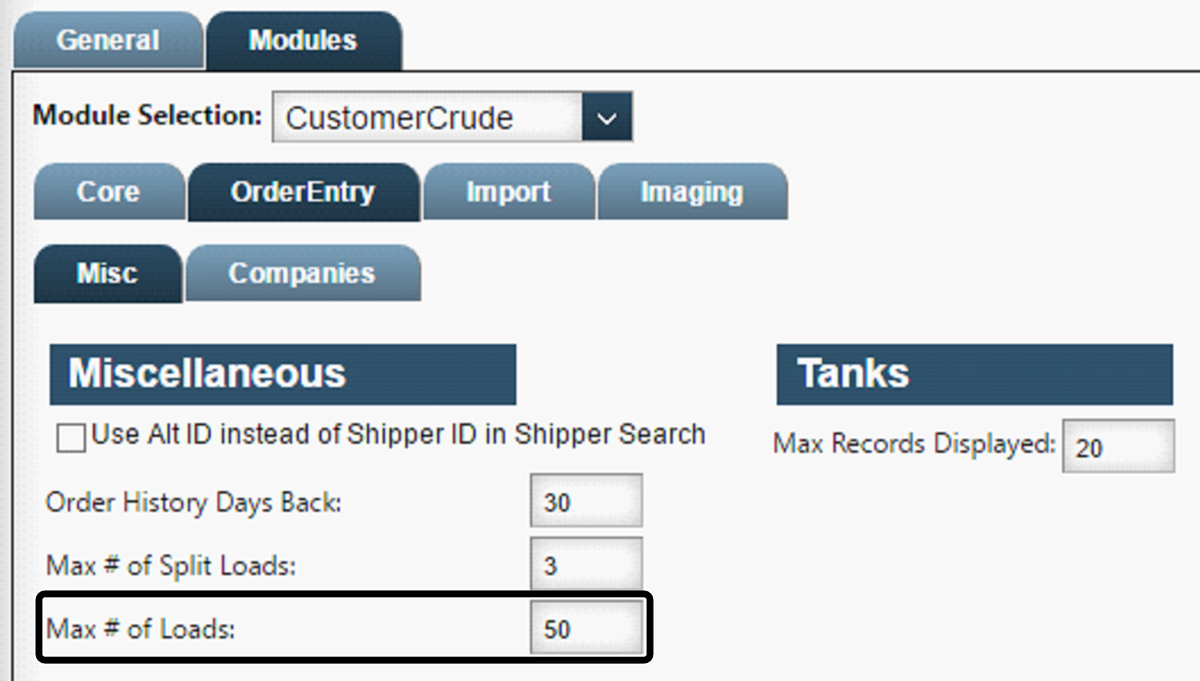
Click these tabs: Order Entry > Misc.
-
In the Max # of Loads field, enter the maximum number of loads allowed per tank.
-
To save your changes, click
Save.
A message indicates that your changes were saved successfully.If you are making changes for a specific role, and this is the first time the setting has been changed for any role, the text label style changes to bold and italic.
Selecting the crude order import file
The Crude Order Import page displays the batch order files that have been imported into eStat Crude. Settings Manager allows you to specify the crude order import file used by your company.
To select a crude order import file, follow these steps.
-
Go to Menu > Configuration > Settings Manager.
The Settings Manager page opens. -
Do one of the following:
-
To apply the setting change to all roles, verify the Role field is set to [Global Settings].
-
To apply the setting change to a specific role, select it in the Role field.
A message asks you to verify that you want to change the role. Click OK to continue.If the setting has already been changed for at least one role, its text label is bold and italic.
-
-
On the Modules tab, in the Module Selection field, select CustomerCrude.
-
Click the Import tab.
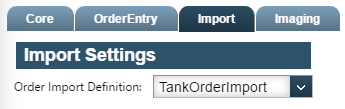
-
In the Order Import Definition field, select a file name.
-
To save your changes, click
Save.
A message indicates that your changes were saved successfully.If you are making changes for a specific role, and this is the first time the setting has been changed for any role, the text label style changes to bold and italic.