Tendering shipments
In eStat, you can tender a new shipment.
When you tender a shipment, you identify one or more commodities and their locations and submit a request to have them transported to another location.
|
The hosting company may allow you to enter unique shipments or it may require you to base your shipments on order templates, also known as master orders. Additionally, it may allow you to use either of these methods.
If the hosting company requires you to base your shipments on master orders, when you access the Tender Shipment page, you will see a message telling you that you must use a template.

Tendering a shipment
To tender a shipment, follow these steps.
-
Go to Menu > Customer > Tender Shipment.
The Tender Shipment page opens.Note: Some fields may be filled in automatically with default values.
-
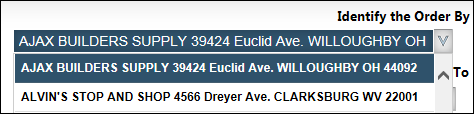
In the Identify the Order By field, select the company placing the order.
Depending on how the application has been set up, the Order By company may be designated by:-
A default value from your user profile or the selected shipper or consignee
When a default value is applied, no entry is required and the default Order By company does not appear on the page.
-
A drop-down list from which you can select the Order By company, using its company ID or company name and address
-
-
In the Identify the Bill To field, select the Bill To company.
Depending on how the application has been set up, the Bill To company may be designated by:-
A default value that cannot be changed
When a default value is applied, no entry is required and the Bill To company does not appear on the page.
-
A series of radio buttons you use to specify the Bill To company by role (shipper, consignee, etc.)

Field Definition Me
Bill the company previously assigned as the default (Order By) company in your user profile.
Shipper
Bill the shipping company, that is, the company where the first pickup occurs.
Consignee
Bill the consignee company, that is, the company where the last delivery occurs.
Unknown
Company to be billed is unknown.
-
A drop-down list from which you can select the Bill To company
Note: The hosting company determines how companies appear in the list. You may see the company name, address, ID, or some combination of these identifiers.

-
-
In the Enter Order Details section, complete fields as needed.
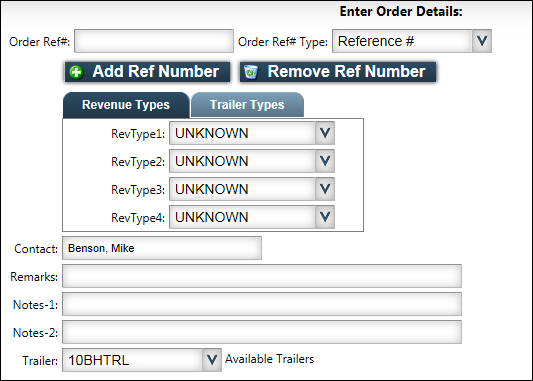
Note: The hosting company may not be using all these fields or may have renamed them.
Field Definition Order Ref#
Enter a reference number.
Notes:
-
If needed, you can enter multiple reference numbers for the order by clicking Add Ref Number. A second line with the two order reference number fields is added.
-
If you incorrectly add more reference numbers than you need, you can delete the last row only. If you have multiple reference numbers and need to remove one in the middle, you must remove all of the reference numbers that follow it before you can delete the one you do not want. Select either field in any reference number row and click Remove Ref Number. The last row is deleted.
Order Ref# Type
Select the reference number type.
Note: Depending on how the hosting company has set up the Tender Shipment page, a default reference number type may already be selected.
Revenue Types
RevType1-4
Each field provides a drop-down list of revenue classifications with which a record is associated.
Note: The names, options, and default values for these fields can vary. Some of these fields might not be accessible.
Trailer Types
TrlType1-4
Each field provides a drop-down list of trailer classifications with which a record is associated.
Note: The names, options, and default values for these fields can vary. Some of these fields might not be accessible.
Contact
Enter the name, phone number, etc., of someone who can be contacted about the shipment.
This field may accept a free-form entry or be filled automatically with a default value that you can edit.
Remarks
Enter a comment of up to 250 characters about the order.
Notes1-2
Enter additional information about the order in these free-form text fields.
Trailer
Select a trailer for the load.
Note: Depending on how the hosting company has set up the Tender Shipment page, a default trailer ID may already be selected.
-
-
In the Event 1 and Event 2 sections, complete fields as needed to create at least one pickup event and one delivery event.
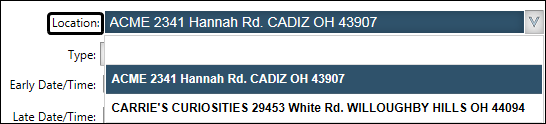
Field Definition Location
Depending on how the application has been set up, the location may be designated by:
-
Selecting the name and address of the company where the event is to occur from the Location drop-down list.
-
Entering the city, state, and ZIP Code of the company where the event is to occur in the City, State, and Zip fields.

-
Entering the ZIP Code of the company where the event is to occur in the Zip field.
Type
Select the type of pickup or delivery for the event
-
Pickup Trailer (HPL)
The driver is to hook to a trailer at the pickup location that was previously loaded. -
Pickup Load (LLD)
Freight is to be loaded onto the trailer at the pickup location. -
Drop Trailer (DRL)
The driver is to unhook to the trailer at the delivery location. -
Drop Load (LUL)
Freight is to be unloaded from the trailer at the delivery location.
Note: Depending on how the hosting company has set up the Tender Shipment page, the Event 1 Type field may have a default value. In this case, the Event 2 Type field will have an appropriate value. For example, if the Event 1 is set to Pickup Trailer (HPL), Event 2 will be set to Drop Trailer (DRL).
Early Date/Time
Use the drop-down calendar and clock to select the earliest date and time the event can occur.
Note: This field defaults to the current date and time. If you wish, select another date and time.
Late Date/Time
Use the drop-down calendar and clock to select the latest date and time the event can occur.
This field defaults to one hour later than the current date and time. If you wish, select another date and time.
Note: The hosting company may have set up this field to appear differently.
Loc. Ref#
Enter a reference number to be associated with the pickup or delivery.
Notes:
-
Enter multiple reference numbers for the stop by clicking Add Loc. Ref Number. A second line with the two reference number fields is added.
-
If you incorrectly add more reference numbers than you need, you can delete only the last row. If you record multiple reference numbers and need to remove one in the middle, you must remove all of the reference numbers that follow it before you can delete the one you do not want. Select either field in any reference number row and click Remove Loc. Ref Number. The last row is deleted.
Ref# Type
Select the reference number type.
Del. Instr.
Enter instructions about delivery of the order.
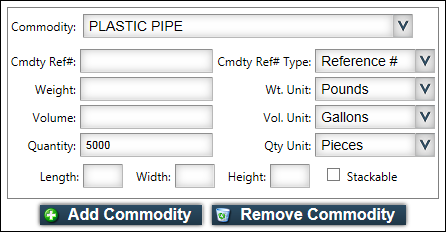
Commodity
Use the drop-down list to select the ID of the commodity to be transported.
Note: If the hosting company set up the page to copy the commodity, some commodity information will be copied for the delivery event. Depending on the number of commodities and number of stops, you may need to include additional information:
-
If you enter more than one commodity for the pickup, the second commodity is not automatically shown for the delivery. You must click Add Commodity for the delivery to copy the second commodity to the delivery.
-
If you record multiple commodities for the pickup and they are to be delivered to different stop locations, you must manually select the commodity for each additional delivery.
-
The quantities recorded for the commodity on the pickup are not copied to the delivery.
-
Events added to the page after you specify a commodity must have commodities added to them manually.
Cmdty Ref#
Enter a reference number to be associated with the commodity.
Cmdty Ref# Type
Select the commodity reference number type.
Weight
Enter a number representing the commodity’s weight.
Wt. Unit
Select the commodity’s weight unit of measure, such as tons, pounds, or kilograms.
Note: The hosting company may have set a default unit of measure. If needed, select a different unit.
Volume
Enter a number representing the commodity’s volume.
Note: Weight, volume, and count may all be recorded for the commodity.
Vol. Unit
Select the commodity’s volume unit of measure, such as gallons, cubic yards, or liters.
Note: The hosting company may have set a default unit of measure. If needed, select a different unit.
Quantity
Enter a number representing the commodity’s quantity.
Qty Unit
Select the commodity’s quantity unit of measure, such as coils, pallets, or cases.
Note: The hosting company may have set a default unit of measure. If needed, select a different unit.
Length
If applicable, enter the length of a commodity unit.
Width
If applicable, enter the width of a commodity unit.
Height
If applicable, enter the height of a commodity unit.
Stackable
Select the check box to indicate the commodity is stackable.
-
-
If needed, add or delete commodities for the pickup and delivery events.
Note: You can remove only the last commodity. If you recorded multiple commodities and need to remove one in the middle, you must remove all of the commodities that follow it before you can delete the one you do not want.
-
To add a commodity, click Add Commodity and complete the fields as needed.
-
To delete the last commodity from the commodity list, click Remove Commodity.
-
-
If needed, add or remove an event.
Notes:
-
A shipment must have at least one pickup and one delivery event.
-
You can remove only the last event. If you have added multiple stops and need to remove one in the middle, you must remove all of the events that follow it before you can delete the one you do not want.
-
To add a stop to the end of the Event list, click Add Event and complete fields as needed. You can make this event a pickup or a delivery.
-
To delete the last event from the event list, click Remove Event.
-
-
-
Review the order to make sure it is correct.
-
Click Submit Shipment to tender the order.
A message at the top of the page states that the order was tendered and is ready for review. If you want, you can view the tendered shipment on the Available Loads board.Note: If you provided your e-mail address when you logged in for the first time, you will receive e-mail confirmation that your order has been successfully submitted to the hosting company.
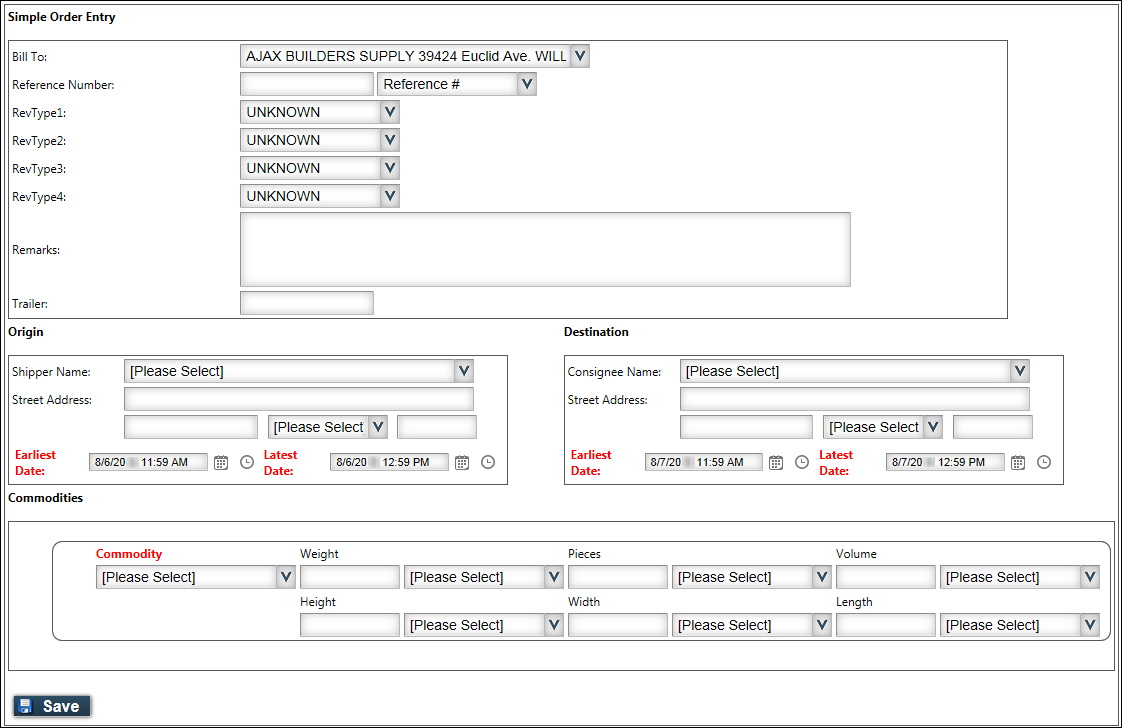
Tendering a simple order
You use the Simple Order Entry page to create an order when a load has:
-
One pickup location
-
One drop location
-
One commodity
Orders entered on this page are available immediately in the hosting company’s dispatch system.
| You can use Simple Order Entry only if the order has one pickup location, one drop off location, and one commodity. To enter a simple order with multiple commodities, see Tendering a simple order with multiple commodities. |
Use this procedure to tender a simple order with one commodity.
-
Go to Menu > Customer > Simple Order Entry.
The Simple Order Entry page opens.Note: Some fields may be filled in automatically with default values.
-
In the Simple Order Entry section, complete the following fields as needed.
Field Definition Bill To
Select the Bill To company.
Reference Number
Two fields are used to record the reference number associated with the order.
-
In the first field, enter a reference number.
-
In the second field, use the drop-down list to specify the reference number type.
Note: Depending on how the hosting company has set up the Simple Order Entry page, a default reference number type may already be selected.
RevType1-4
Each field provides a drop-down list of revenue classifications with which a record is associated.
Note: The names, options, and default values for these fields can vary. Some of these fields might not be accessible.
Remarks
Enter a comment of up to 250 characters about the order.
Trailer
Enter a trailer ID.
-
-
In the Origin section, complete the following fields as needed.
Field Definition Shipper Name
Select the shipper from the drop-down list. The system will automatically populate the Street Address, City, State, and ZIP Code fields.
Earliest Date
Use the drop-down calendar and clock to select the earliest date and time the event can occur.
Note: This field defaults to the current date and time. If you wish, select another date and time.
Latest Date
Use the drop-down calendar and clock to select the latest date and time the event can occur.
Note: This field defaults to the current date and time plus one hour. If you wish, select another date and time.
-
In the Destination section, complete the following fields as needed.
Field Definition Consignee Name
Select the consignee’s name from the drop-down list. The system will automatically populate the Street Address, City, State, and ZIP Code fields.
Earliest Date
Use the drop-down calendar and clock to select the earliest date and time the event can occur.
Note: This field defaults to the current time on the following day. If you wish, select another date and time.
Latest Date
Use the drop-down calendar and clock to select the latest date and time the event can occur.
Note: This field defaults to the current time plus one hour on the following day. If you wish, select another date and time.
-
In the Commodities section, complete the following fields as needed.
Field Definition Commodity
Use the drop-down list to select the ID of the commodity to be transported.
Weight
Two fields are used to record the weight of the commodity:
-
In the first field, enter a number representing the commodity’s weight.
-
In the second field, use the drop-down list to select the commodity’s weight unit of measure, such as tons, pounds, or kilograms
Note: The hosting company may have set a default unit of measure. If needed, you can select a different one.
Pieces
Two fields are used to record the quantity of the commodity:
-
In the first field, enter a number representing the commodity’s quantity.
-
In the second field, use the drop-down list to select the commodity’s count unit of measure, such as coils, pallets, or cases.
Note: The hosting company may have set a default unit of measure. If needed, you can select a different one.
Volume
Two fields are used to record the volume of the commodity:
-
In the first field, enter a number representing the commodity’s volume.
-
In the second field, use the drop-down list to select the commodity’s volume unit of measure, such as gallons, cubic yards, or liters.
Note: The hosting company may have set a default unit of measure. If needed, you can select a different one.
Height
Two fields are used to record the height of the commodity:
-
In the first field, enter the commodity’s height (per quantity unit).
-
In the second field, use the drop-down list to select the unit of measure, such as feet, meters, or yards.
Note: The hosting company may have set a default unit of measure. If needed, you can select a different one.
Width
Two fields are used to record the width of the commodity:
-
In the first field, enter the commodity’s width (per quantity unit).
-
In the second field, use the drop-down list to select the unit of measure, such as feet, meters, or yards.
Note: The hosting company may have set a default unit of measure. If needed, you can select a different one.
Length
Two fields are used to record the length of the commodity:
-
In the first field, enter the commodity’s length (per quantity unit).
-
In the second field, use the drop-down list to select the unit of measure, such as feet, meters, or yards.
Note: The hosting company may have set a default unit of measure. If needed, you can select a different one.
-
-
Click Save.
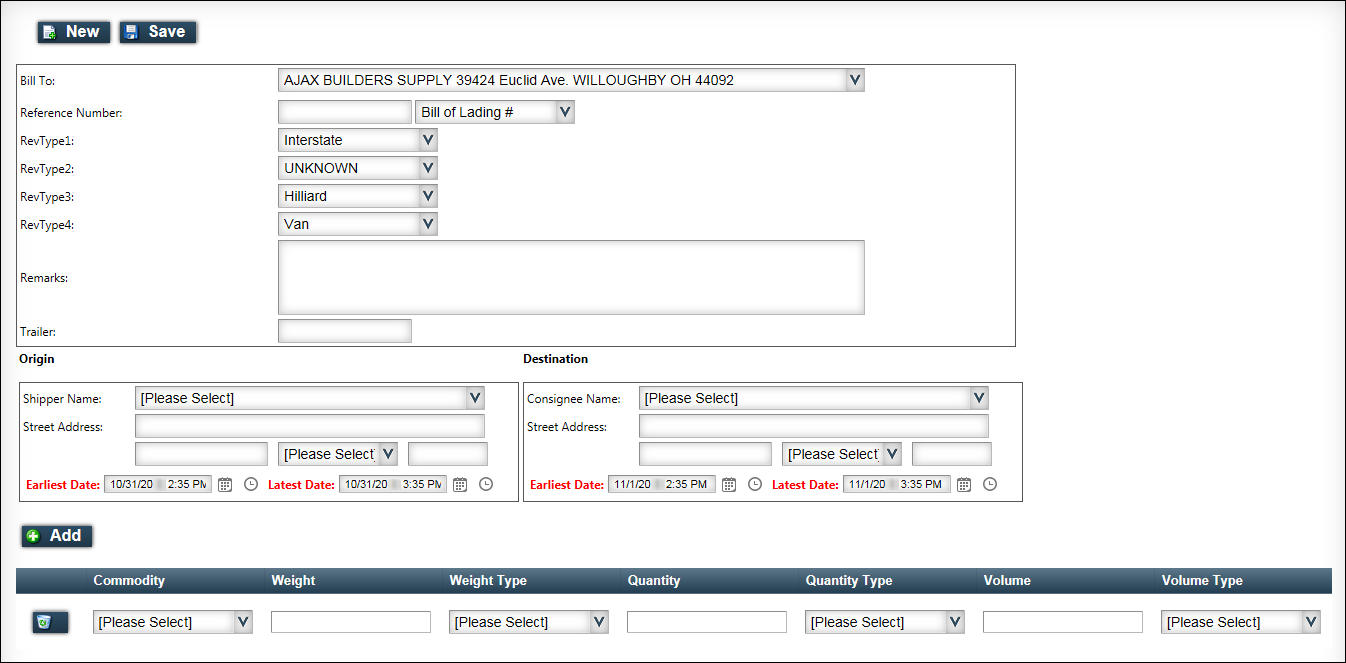
Tendering a simple order with multiple commodities
You can use the Simple Order Entry with Multiple Commodities page to create an order when a load has:
-
One pickup location
-
One drop location
-
Multiple commodities
Orders entered on this page are available immediately in the hosting company’s dispatch system.
| You can use Simple Order Entry with Multiple Commodities only if the order has one pickup location and one drop off location. If you want to enter a simple order with only one commodity, see Tendering a simple order. |
Use this procedure to tender a simple order with multiple commodities.
-
Go to Menu > Customer > Simple Order Entry with Multiple Commodities.
The Simple Order Entry with Multiple Commodities page opens.Note: Some fields may be filled in automatically with default values.
-
In the first section, complete the following fields as needed.
Field Definition Bill To
Select the Bill To company.
Reference Number
Two fields are used to record the reference number associated with the order.
-
In the first field, enter a reference number.
-
In the second field, use the drop-down list to specify the reference number type.
Note: Depending on how the hosting company has set up the Simple Order Entry page, a default reference number type may already be selected.
RevType1-4
Each field provides a drop-down list of revenue classifications with which a record is associated.
Note: The names, options, and default values for these fields can vary. Some of these fields might not be accessible.
Remarks
Enter a comment of up to 250 characters about the order.
Trailer
Enter a trailer ID.
-
-
In the Origin section, complete the following fields as needed.
Field Definition Shipper Name
Select the shipper from the drop-down list. The system will automatically populate the Street Address, City, State and ZIP Code fields.
Earliest Date
Use the drop-down calendar and clock to select the earliest date and time the event can occur.
Note: This field defaults to the current date and time. If you wish, select another date and time.
Latest Date
Use the drop-down calendar and clock to select the latest date and time the event can occur.
Note: This field defaults to the current date and time plus one hour. If you wish, select another date and time.
-
In the Destination section, complete the following fields as needed.
Field Definition Consignee Name
Select the consignee’s name from the drop-down list. The system will automatically populate the Street Address, City, State and ZIP Code fields.
Earliest Date
Use the drop-down calendar and clock to select the earliest date and time the event can occur.
Note: This field defaults to the current time on the following day. If you wish, select another date and time.
Latest Date
Use the drop-down calendar and clock to select the latest date and time the event can occur.
Note: This field defaults to the current time plus one hour on the following day. If you wish, select another date and time.
-
In the bottom section of the page, complete the following fields as needed.
Field Definition Commodity
Use the drop-down list to select the ID of the commodity to be transported.
Weight
Enter a number representing the commodity’s weight.
Weight Type
Use the drop-down list to select the commodity’s weight unit of measure, such as tons, pounds, or kilograms
Note: The hosting company may have set a default unit of measure. If needed, you can select a different one.
Quantity
* Enter a number representing the commodity’s quantity.
Quantity Type
Use the drop-down list to select the commodity’s count unit of measure, such as coils, pallets, or cases.
Note: The hosting company may have set a default unit of measure. If needed, you can select a different one.
Volume
Enter a number representing the commodity’s volume.
Volume Type
Use the drop-down list to select the commodity’s volume unit of measure, such as gallons, cubic yards, or liters.
Note: The hosting company may have set a default unit of measure. If needed, you can select a different one.
-
Click Add.
The Add Freight pop-up window opens. -
Enter another commodity and complete the fields as needed. Click Save to close the pop-up window.
-
Click Save to save your order.