Working with simple quote requests
When you create a simple quote request, you provide the same information as you would for an order. When you save your request, the system assigns an order ID to it. This allows you and the hosting company to track it.
You use the Simple Quote Request page to create a quote when a load has:
-
One pickup location
-
One drop location
-
One commodity
Quote requests entered on this page are available immediately in the hosting company’s dispatch system.
| You can use Simple Quote Requests only if the load has one pickup location, one drop off location, and one commodity. |
Requesting a quote
To request a simple quote with one commodity, follow these steps.
-
Go to Menu > Customer > Quoting > Simple Quote Request.
The Simple Quote Request page opens.Note: Some fields may be filled in automatically with default values.
-
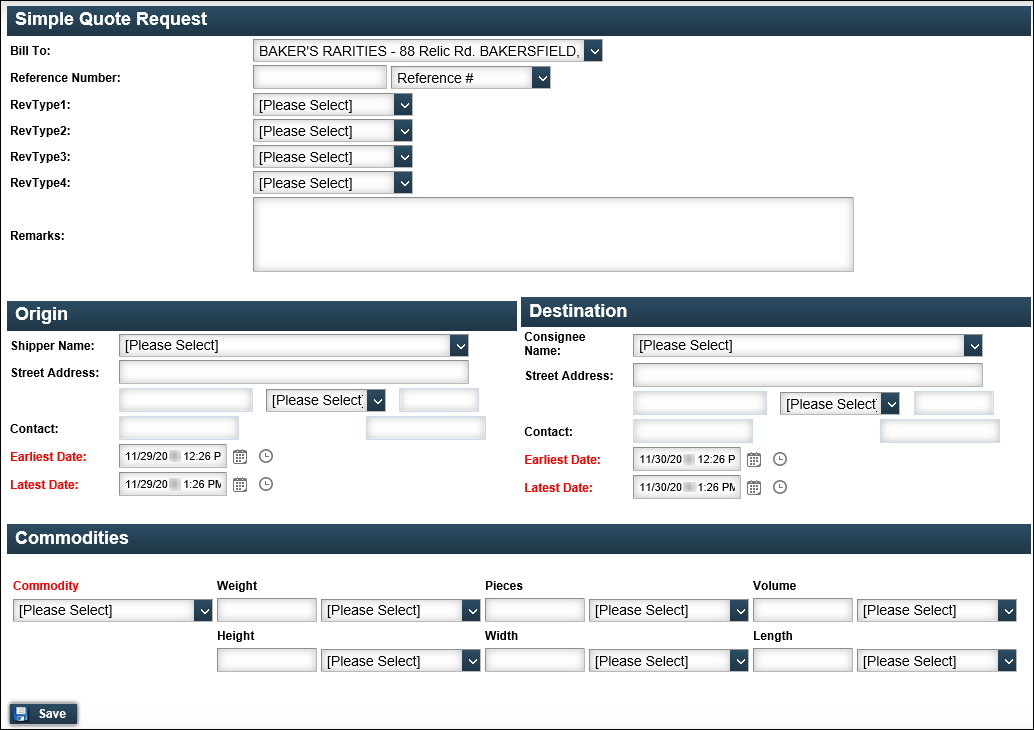
In the Simple Quote Request section, complete the following fields as needed.
Field Definition Bill To
Select the Bill To company.
Reference Number
Two fields are used to record the reference number associated with the quote.
-
In the first field, enter a reference number.
-
In the second field, use the drop-down list to specify the reference number type.
Note: Depending on how the hosting company has set up the Simple Quote Request page, a default reference number type may be selected.
RevType1-4
Each field provides a drop-down list of revenue classifications with which a record is associated.
Note: The names, options, and default values for these fields can vary. Some of these fields might not be accessible.
Remarks
Enter a comment of up to 250 characters about the quote.
-
-
In the Origin section, complete the following fields as needed.
Field Definition Shipper Name
Select the shipper from the drop-down list. The system will automatically populate the Street Address, City, State, and ZIP Code fields.
Earliest Date
Use the drop-down calendar and clock to select the earliest date and time the event can occur.
Note: This field defaults to the current date and time. If you wish, select another date and time.
Latest Date
Use the drop-down calendar and clock to select the latest date and time the event can occur.
Note: This field defaults to the current date and time plus one hour. If you want, select another date and time.
-
In the Destination section, complete the following fields as needed.
Field Definition Consignee Name
Select the consignee’s name from the drop-down list. The system will automatically populate the Street Address, City, State, and ZIP Code fields.
Earliest Date
Use the drop-down calendar and clock to select the earliest date and time the event can occur.
Note: This field defaults to the current time on the following day. If you wish, select another date and time.
Latest Date
Use the drop-down calendar and clock to select the latest date and time the event can occur.
Note: This field defaults to the current time plus one hour on the following day. If you wish, select another date and time.
-
In the Commodities section, complete the following fields as needed.
Field Definition Commodity
Use the drop-down list to select the ID of the commodity to be transported.
Weight
Two fields are used to record the weight of the commodity:
-
In the first field, enter a number representing the commodity’s weight.
-
In the second field, use the drop-down list to select the commodity’s weight unit of measure, such as tons, pounds, or kilograms
Note: The hosting company may have set a default unit of measure. If needed, you can select a different one.
Pieces
Two fields are used to record the quantity of the commodity:
-
In the first field, enter a number representing the commodity’s quantity.
-
In the second field, use the drop-down list to select the commodity’s count unit of measure, such as coils, pallets, or cases.
Note: The hosting company may have set a default unit of measure. If needed, you can select a different one.
Volume
Two fields are used to record the volume of the commodity:
-
In the first field, enter a number representing the commodity’s volume.
-
In the second field, use the drop-down list to select the commodity’s volume unit of measure, such as gallons, cubic yards, or liters.
Note: The hosting company may have set a default unit of measure. If needed, you can select a different one.
Height
Two fields are used to record the height of the commodity:
-
In the first field, enter the commodity’s height (per quantity unit).
-
In the second field, use the drop-down list to select the unit of measure, such as feet, meters, or yards.
Note: The hosting company may have set a default unit of measure. If needed, you can select a different one.
Width
Two fields are used to record the width of the commodity:
-
In the first field, enter the commodity’s width (per quantity unit).
-
In the second field, use the drop-down list to select the unit of measure, such as feet, meters, or yards.
Note: The hosting company may have set a default unit of measure. If needed, you can select a different one.
Length
Two fields are used to record the length of the commodity:
-
In the first field, enter the commodity’s length (per quantity unit).
-
In the second field, use the drop-down list to select the unit of measure, such as feet, meters, or yards.
Note: The hosting company may have set a default unit of measure. If needed, you can select a different one.
-
-
Click Save.
A message appears at the top of the page. It states that your order has been created and provides a system-assigned order number.
Accepting or rejecting a quote
The hosting company will review your quote request. When a quote is prepared and returned, you can choose to accept or reject it.
-
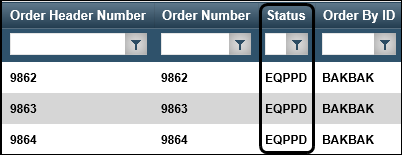
Go to Menu > Customer > Quoting > Quote Board.
The Quote Board page opens. Any quotes available for review will show EQPPD in the Status column.Note: If necessary, you can adjust the date range listed in the Start Date and End Date fields to view quotes listed outside of the default date range.
-
Click on a quote that is ready for review.
-
Click View Details.
The quote opens in the Quote Entry page. -
Review the prepared quote information.
-
Do one of the following:
-
To accept the offer, click Accept Quote.
A message at the top of the page states that the quote has been accepted. The message gives the quote the number assigned to the order you created on the Simple Quote Request page.When you accept the quote, the hosting company will receive an e-mail message advising of your acceptance. Your quote becomes an available order.
-
To reject the offer, click Refuse Quote.
A message at the top of the page states that the quote has been refused. The message gives the quote the number assigned to the order you created on the Simple Quote Request page.
When you refuse the quote, the hosting company will receive an e-mail message advising of your refusal.
-
-
Click Back to return to the Quote Board page.