Setting up e-mail groups
You can create groups to control the information available to e-mail recipients. You define a group using RevType1-4 values or state/provinces. Your company defines the revenue types it uses to classify orders.
E-mail addresses assigned to a group receive notifications regarding loads or shipments that match any filters specified for the group.
Setting up e-mail groups for eStat
You can create groups to control the information available to e-mail recipients. You define a group using RevType1-4 values or state/provinces. Your company defines the revenue types it uses to classify orders.
E-mail addresses assigned to a group receive notifications regarding orders that match any filters specified for the group.
Defining groups
You can create and manage an unlimited number of unique e-mail groups. You set up groups according to revenue types, and start and end locations. Once the groups are set up, you assign e-mail addresses to them. When an order is processed, e-mails are sent to a group’s members if the order matches at least one option among the criteria set up for the group.
| If you want, you can associate groups with customers. This allows you to identify internal staff that work with one or more customers and ensure that notifications for shipments tendered by a company are sent to the staff that works with that company. |
Follow these steps to set up groups.
-
Go to Menu > Configuration > Customer Configuration > Group Definition.
The Group Definition page opens.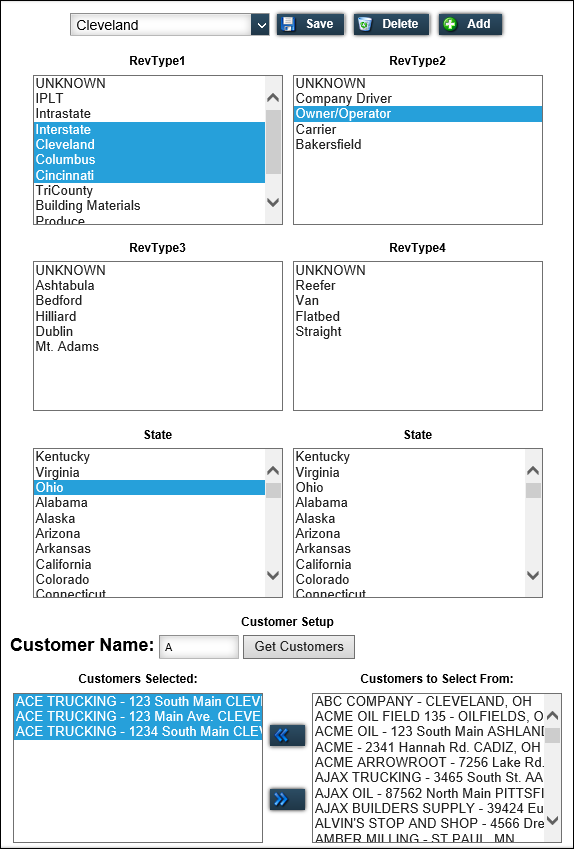
-
Click Add.
-
In the field at the top of the page, enter the name of the new group.
-
Select the criteria for the group.
Notifications for loads that match any criteria are sent to the e-mail addresses assigned to that group.-
In the RevType1 through RevType4 lists, hold CTRL and click on each revenue type to which the group is restricted.
-
In the first State list, hold CTRL and click on the states/provinces where the trip starts.
-
In the second State list, hold CTRL and click on the states/provinces where the trip ends.
-
-
If you want, use the Customer Setup section to associate customers with a group.
-
In the Customer Name field, enter one or more letters of a customer name.
-
Click Get Customers.
The matching customer names appear in the Customers to Select From list. -
In the Customers to Select From list, hold CTRL and click on each customer that you want to associate with the group.
-
Click the
 arrow button to add them to the Customers Selected list.
-
-
Click Add.
Modifying a group
To change the RevTypes associated with a group, follow these steps.
-
Go to Menu > Configuration > Customer Configuration > Group Definition.
The Define Groups page opens. -
In the drop-down list at the top of the page, select the group that you want to modify.
-
In the RevType1 through RevType4 lists, change the revenue types as needed.
-
In either of the State lists, change the state/province selections as needed.
-
In the Customer Setup section, add customers to or remove customers from the group.
-
To remove customers from the group, hold CTRL and click on each customer In the Customers Selected list that you want to remove and click the
 arrow button.
 -
To add customers to the group, hold CTRL and click on each customer in the Customers to Select From list that you want to add and click the
arrow button.
-
-
Click Save.
Setting up e-mail groups for CarrierHub
You can create groups to control the information available to e-mail recipients. You define a group using RevType1-4 values or state/provinces. Your company defines the revenue types it uses to classify orders.
E-mail addresses assigned to a group receive notifications regarding loads or shipments that match any filters specified for the group.
Defining groups
You can create and manage an unlimited number of unique e-mail groups. You set up groups according to revenue types, and start and end locations. Once the groups are set up, you assign e-mail addresses to them. When an order is processed, e-mails are sent to a group’s members if the order matches at least one option among the criteria set up for the group.
Follow these steps to set up groups.
-
Go to Menu > Configuration > Carrier Configuration > Define Groups.
The Define Groups page opens.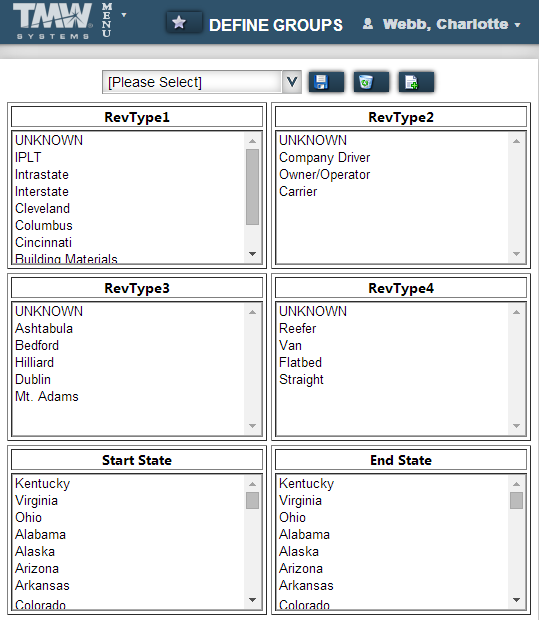
-
Click
 Add New Group.
 -
In the field at the top of the page, enter the name of the new group.
-
Select the criteria for the group.
Notifications for loads that match any criteria are sent to the e-mail addresses assigned to that group.-
In the RevType1 through RevType4 lists, hold CTRL and click on each revenue type to which the group is restricted.
-
In the Start State list, hold CTRL and click on the states/provinces where the trip starts.
-
In the End State list, hold CTRL and click on the states/provinces where the trip ends.
-
-
Click
 Add Group.
A message appears at the top of the page, stating the group was added successfully.
Modifying a group
To change the RevTypes associated with a group, follow these steps.
-
Go to Menu > Configuration > Carrier Configuration > Define Groups.
The Define Groups page opens. -
In the drop-down list at the top of the page, select the group that you want to modify.
-
In the RevType1 through RevType4 lists, change the revenue types as needed.
-
In either of the State lists, change the state/province selections as needed.
-
Click
 Update Group.
A message appears at the top of the page, stating your changes were saved successfully.
Deleting a group
To delete a group, follow these steps.
-
Go to Menu > Configuration > Carrier Configuration > Define Groups.
The Define Groups page opens. -
In the drop-down list at the top of the page, select the group that you want to delete.
-
Click
 Delete Group.
A message appears at the top of the page, stating your changes were saved successfully.