Assigning custom SQL views to data grids
A data grid is based on a SQL view. A SQL view is a stored query of one or more database tables that results in a virtual table. The data retrieved by a view is not stored in the database. Instead, the SELECT statement is stored. The virtual table is made up of the result set retrieved by the SELECT statement. In effect, every view is a filter of the table data referenced in it, and this filter determines both the columns and the rows of the referenced table.
You customize a SQL view for a data grid by modifying a default view. A custom view retrieves the columns for the default view as well as any columns you want to add.
|
Creating a custom SQL view
A default view for a data grid contains a predefined list of columns. You can use standard grid configuration options to remove these columns and re-add them later. However, you cannot use these options to add any columns to a grid that are not part of the default view. To include columns not included in the default view, you can create a custom SQL view. You customize a SQL view for a data grid by modifying the default view.
|
|
Use this procedure to create a custom SQL view.
-
Open Microsoft SQL Server Management Studio.
-
Connect to the database.
-
Create the view’s query from an existing view.
-
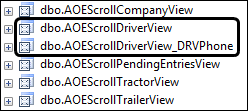
Locate the name of the view you want to customize.
-
Right-click the view name and select Script View as > CREATE To > New Query Editor Window.
The view’s query is copied to a new window and is available to be edited.
-
-
At the top of the query, replace the name of the existing view with the name of the custom view.
Note: It is recommended that you append the existing default view name with your own custom identification. Using this naming convention, all related view names will be listed together in Microsoft SQL Server Management Studio.
This example shows the
AOEScrollDriverViewrenamed asAOEScrollDriverView_DRVPhone.
-
Revise the existing SELECT script.
This example shows the addition of two columns to the default view
AOEScrollDriverView.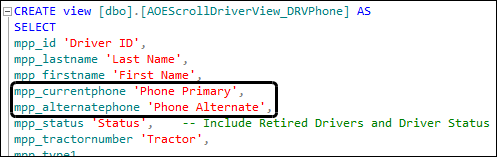
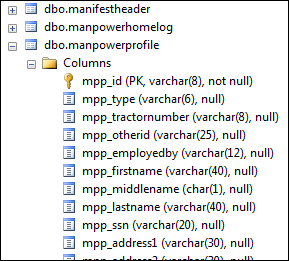
Note: To see a list of columns available for addition to the view, open the Columns folder under the appropriate table.
-
Test the SELECT statement.
Note: Select and execute only the
SELECT/FROMcommand to verify the correct data is retrieved. -
Click Execute.
The new view is created.
-
Allow others to use the view.
-
Enter
grant select on [View_Name] to public.
-
Highlight the
grant selectcommand. -
Click Execute.
-
The new custom view will be available for you to access from within Trimble Web Products to add as a grid configuration.
To modify a custom SQL view, make the necessary changes in Microsoft SQL Server Management Studio, using the SQL Alter view command.
Adding a custom SQL view
You can customize a SQL view for a data grid. Customizing a view allows you to add data that does not appear by default in a data grid. After you create a custom SQL view, you must:
-
Add it to the page for which it was customized
-
Name and save it as a configuration for the data grid
Use this procedure to add a custom SQL view to a data grid.
-
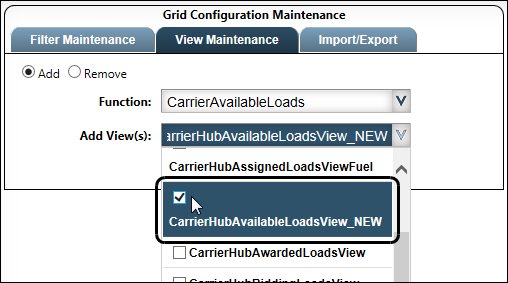
Go to Menu > Configuration > Grid Configuration Maintenance.
The Grid Configuration Maintenance window opens. -
Add the custom SQL to the page for which it was created:
-
Click the View Maintenance tab.
-
Click the Add radio button.
-
From the Function list, select the page containing the data grid for which you created the custom view.
-
From the Add View(s) list, select the custom SQL view.
-
-
Click Save.
-
Name and save the custom SQL view as a configuration for the data grid:
-
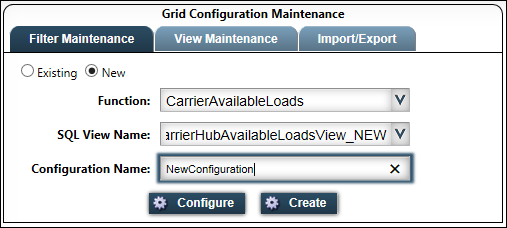
Click the Filter Maintenance tab.
-
Click the New radio button.
-
From the Function list, select the page containing the data grid for which you created the custom view.
-
From the SQL View Name field, select the custom SQL view you added in Step 2.
-
In the Configuration Name field, enter a name for the new data grid configuration.
-
To create the new grid configuration, do one of the following:
-
Click Configure to proceed with setting up the data grid for this configuration.
-
Click Create to save the configuration and continue with setting up the data grid later.
-
-
Removing a custom SQL view
You can remove a custom SQL view that has been added to a page.
Use this procedure to remove a custom SQL view.
-
Go to Menu > Configuration > Grid Configuration Maintenance.
The Grid Configuration Maintenance window opens. -
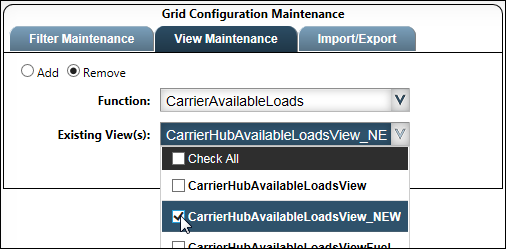
Click the View Maintenance tab.
-
Click the Remove radio button.
-
From the Function list, select the page to which you added the custom view.
-
From the Existing View(s) list, select the custom view you want to remove.
-
Click Save.
Exporting a custom SQL view
You may want to export a custom SQL view for a data grid. If you created a custom SQL view in a test environment or previous version of Trimble Web Products, you can export this custom view for use in your current version of the application.
Use this procedure to export a custom SQL view.
-
Go to Menu > Configuration > Grid Configuration Maintenance.
The Grid Configuration Maintenance window opens. -
Click the Import/Export tab.
-
Click the Export radio button.
-
From the Function list, select the page to which you added the custom view.
-
From the Configuration Name list, select the custom view you want to export.

-
Click Export.
-
Save the file by following the browser prompts, making note of the file name and location.
Importing a custom SQL view
You may want to import a custom SQL view for a data grid. You can import a custom SQL view that may have been created in a test environment or previous version of Trimble Web Products. You can import this custom view for use in your current version of the application.
Use this procedure to import a custom SQL view.
-
Go to Menu > Configuration > Grid Configuration Maintenance.
The Grid Configuration Maintenance window opens. -
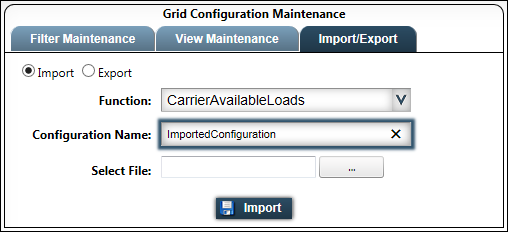
Click the Import/Export tab.
-
Click the Import radio button.
-
From the Function list, select the page to which to add the custom view.
-
In the Configuration Name field, enter a name for the custom view to be imported.
-
Next to the Select File field, click the
 Browse button.
The Choose File to Upload window opens. -
Navigate to and select the custom view you want to import.
-
Click Open.
The Choose File to Upload window closes. In the Select File field, the name of the file your selected appears. If you do not want to import the selected file or you want to select a different one, click Remove and select a different file. -
Click Import.
A message confirms the custom view was imported successfully.