Automatically e-mailing users new account information
When you create a new user account, you can set up the system to automatically send an e-mail message to the new user with their username and initial password. The process includes enabling the feature and, optionally, modifying the default e-mail message.
| When creating the new user account, you must enter the new user’s valid e-mail address on the Create User page. |
Enabling the automatic e-mail feature
To enable the automatic e-mail feature that sends a message to a new user, follow these steps. The message identifies the user login name and the initial password.
-
Go to Menu > Configuration > Settings Manager.
The Settings Manager page opens. -
Do one of the following:
-
If you want the setting change to apply to all roles, verify the Role field is set to [Global Settings].
-
If you want the setting change to apply to a specific role, select it in the Role field.
A message window opens that states, "Are you sure you wish to change the Role? Any unsaved changes will be lost." Click OK to continue.Note: If the setting has already been changed for at least one role, its text label is bold and italic.
-
-
Click these tabs: General > Core > Misc Info.
-
In the Misc Info 3 section, select the Email User Upon Account Creation checkbox.
-
Click Save.
A message appears at the top of the page, stating your settings were saved successfully. If you are making changes for a specific role and this is the first time the setting has been changed for any role, the text label style changes to bold and italic.
Modifying the e-mail message for new user accounts
You can modify the default e-mail message that is sent to a new user when you create an account for them.
-
Go to Menu > Security > Work With Users > Manage Password Email.
The Manage Password Email page opens. -
From the Events field, select User Created.
The default message is shown. -
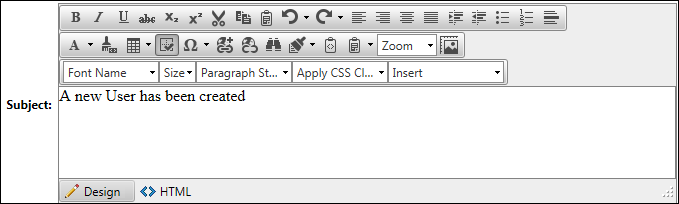
Enter or revise the subject of the e-mail message.
-
In the Subject text box, change the default title of the e-mail message.
-
Use the inline editing tools to format the subject line.
-
-
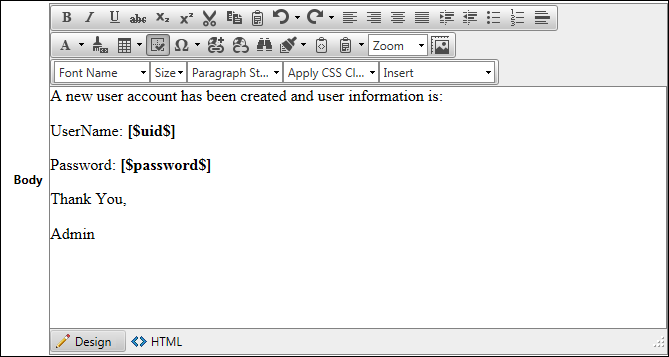
Enter or revise the body text of the e-mail message.
-
In the Body text box, enter or revise the default text.
-
Insert variables as appropriate.
Type the entire code, including the brackets and dollar signs. Be sure to add any necessary spaces before or after the bracketed code.
[$uid$]
Inserts the user’s Trimble Web Productsuser name as you entered it on the Create User page
[$password$]
Inserts the user’s password as you entered it on the Create User page
-
Use the inline editing tools to format what you typed into the text box.
-
-
Click Save.