Setting default field values on the Tender Shipment page
To make data entry easier for your users, you can set default values for fields on the Tender Shipment page.
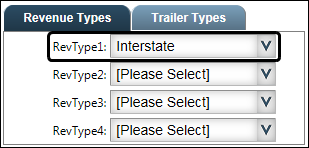
For example, you can specify which RevType1 value will appear on the page when a user starts a new shipment tender.
Setting default reference number types for new orders
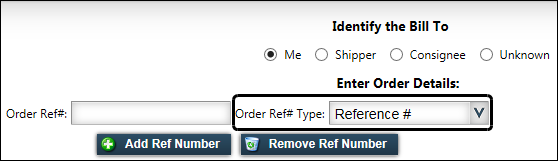
Users can record a reference number for:
-
The order header, in the page’s Enter Order Details section
-
Each stop and/or each commodity in the Event sections

If you want, you can specify which reference number type will default for these reference numbers.
|
To specify default reference number types for new orders, follow these steps.
-
Go to Menu > Configuration > Settings Manager.
The Settings Manager page opens. -
Do one of the following:
-
If you want the setting change to apply to all roles, verify the Role field is set to [Global Settings].
-
If you want the setting change to apply to a specific role, select it in the Role field.
A message asks you to verify that you want to change the role. Click OK to continue.Note: If the setting has already been changed for at least one role, its text label is bold and italic.
-
-
On the Modules tab, in the Module Selection field, select Customer.
-
Click these tabs: Application Settings > Shipment Tender > Defaults.
-
In the Default Reference Number Types section, select the default reference number types.
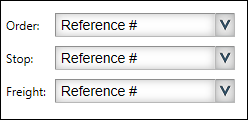
Field Definition Order
Select the reference number type attached to an order header.
Stop
Select the reference number type attached to a pickup or delivery.
Freight
Select the reference number type attached to a commodity.
-
Click Save.
A message appears at the top of the page, stating your settings were saved successfully.
If you are making changes for a specific role and this is the first time the setting has been changed for any role, the text label style changes to bold and italic.If you do not want to save, click Revert instead. The application cancels any unsaved changes and reverts to the last saved settings.
Setting default revenue types for new orders
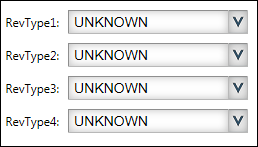
If you will be using revenue types on the Tender Shipment page, the default values for the RevType1 - 4 fields on new orders come from the company profile of the Bill To on the order. You can specify default values to be used on new orders when there are no values recorded in the Bill To company profile.
|
To set default revenue types for new orders, follow these steps.
-
Go to Menu > Configuration > Settings Manager.
The Settings Manager page opens. -
Do one of the following:
-
If you want the setting change to apply to all roles, verify the Role field is set to [Global Settings].
-
If you want the setting change to apply to a specific role, select it in the Role field.
A message asks you to verify that you want to change the role. Click OK to continue.Note: If the setting has already been changed for at least one role, its text label is bold and italic.
-
-
On the Modules tab, in the Module Selection field, select Customer.
-
Click these tabs: Application Settings > Shipment Tender > Defaults.
-
In the Default Revenue Types section, select the default revenue types.
-
Click Save.
A message appears at the top of the page, stating your settings were saved successfully.
If you are making changes for a specific role and this is the first time the setting has been changed for any role, the text label style changes to bold and italic.If you do not want to save, click Revert instead. The application cancels any unsaved changes and reverts to the last saved settings.
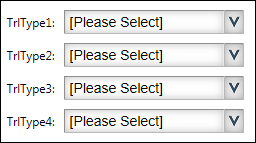
Setting default trailer types for new orders
If you will be using trailer types on the Tender Shipment page, you can specify default values to be used in the TrlType1 - 4 fields on new orders.
|
To set default trailer types for new orders, follow these steps.
-
Go to Menu > Configuration > Settings Manager.
The Settings Manager page opens. -
Do one of the following:
-
If you want the setting change to apply to all roles, verify the Role field is set to [Global Settings].
-
If you want the setting change to apply to a specific role, select it in the Role field.
A message asks you to verify that you want to change the role. Click OK to continue.
Note: If the setting has already been changed for at least one role, its text label is bold and italic.
-
-
On the Modules tab, in the Module Selection field, select Customer.
-
Click these tabs: Application Settings > Shipment Tender > Defaults.
-
In the Default Trailer Types section, select the default trailer types.
-
Click Save.
A message appears at the top of the page, stating your settings were saved successfully.
If you are making changes for a specific role and this is the first time the setting has been changed for any role, the text label style changes to bold and italic.If you do not want to save, click Revert instead. The application cancels any unsaved changes and reverts to the last saved settings.
Setting the Contact field default for new orders
The Enter Order Details section of the Tender Shipment page provides a field for the user to enter the name of the contact person for the shipment.
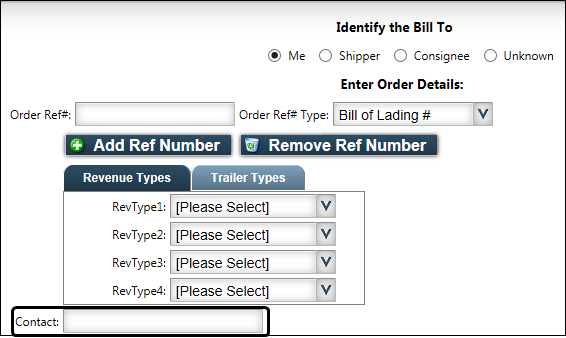
By default, the field is blank. If you want, you can have it automatically display the user’s name or Trimble Web Products login ID.
| Users can modify the default value when entering an order on the Tender Shipment page. |
To set the contact default for new orders, follow these steps.
-
Go to Menu > Configuration > Settings Manager.
The Settings Manager page opens. -
Do one of the following:
-
If you want the setting change to apply to all roles, verify the Role field is set to [Global Settings].
-
If you want the setting change to apply to a specific role, select it in the Role field.
A message asks you to verify that you want to change the role. Click OK to continue.
-
-
On the Modules tab, in the Module Selection field, select Customer.
-
Click these tabs: Application Settings > Shipment Tender > Defaults.
-
In the Default Contact section, select the radio button for the option you want to use.

Field Definition Blank
The user must enter the contact name.

User’s name
Use the name recorded in the user’s Trimble Web Products profile.
Note: The name will appear as last name, first name.

User’s login
Use the user’s Trimble Web Products login ID.

-
Click Save.
A message appears at the top of the page, stating your settings were saved successfully.If you do not want to save, click Revert instead. The application cancels any unsaved changes and reverts to the last saved settings.
Specifying the default unit of measure for new orders
When recording commodity information, users enter the quantity of each commodity.
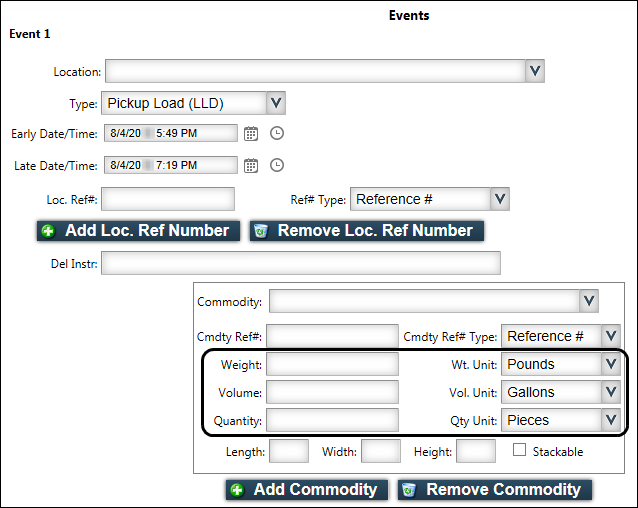
You can specify the default unit of measure used on a new shipment tender.
| Users can modify the default values when entering an order on the Tender Shipment page. |
To specify default units of measure for new orders, follow these steps.
-
Go to Menu > Configuration > Settings Manager.
The Settings Manager page opens. -
Do one of the following:
-
If you want the setting change to apply to all roles, verify the Role field is set to [Global Settings].
-
If you want the setting change to apply to a specific role, select it in the Role field.
A message asks you to verify that you want to change the role. Click OK to continue.Note: If the setting has already been changed for at least one role, its text label is bold and italic.
-
-
On the Modules tab, in the Module Selection field, select Customer.
-
Click these tabs: Application Settings > Shipment Tender > Defaults.
-
In the Default Unit Types section, select the default unit of measure for each of the three categories.
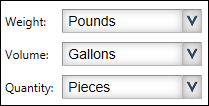
Field Definition Weight
Weight of the commodity recorded on the order
Note: The options come from the WeightUnits label.
Volume
Volume of the commodity recorded on the order
Note: The options come from the VolumeUnits label.
Quantity
Count of the commodity recorded on the order
Note: The options come from the CountUnits label.
-
Click Save.
A message appears at the top of the page, stating your settings were saved successfully.
If you are making changes for a specific role and this is the first time the setting has been changed for any role, the text label style changes to bold and italic.If you do not want to save, click Revert instead. The application cancels any unsaved changes and reverts to the last saved settings.
Identifying the default initial pickup type for new orders
Each order you create on the Tender Shipment page must have at least two events: a pickup and a delivery.
You can specify a default pickup type for the first event on the Tender Shipment page. The default delivery type for the page’s Event 2 field is determined by the Event 1 field pickup type. For example, if you set the Event 1 field to Pickup Load (LLD), the Event 2 field will automatically default to Drop Load (LUL).
| Users can modify the default values when entering an order on the Tender Shipment page. |
To set a default pickup type, follow these steps:
-
Go to Menu > Configuration > Settings Manager.
The Settings Manager page opens. -
Do one of the following:
-
If you want the setting change to apply to all roles, verify the Role field is set to [Global Settings].
-
If you want the setting change to apply to a specific role, select it in the Role field.
A message asks you to verify that you want to change the role. Click OK to continue.Note: If the setting has already been changed for at least one role, its text label is bold and italic.
-
-
On the Modules tab, in the Module Selection field, select Customer.
-
Click these tabs: Application Settings > Shipment Tender > Defaults.
-
In the Default Event Types section, select the default event type.

Field Definition Pickup Trailer (HPL)
When this option is selected, the default Event 2 type will be Drop Trailer (DRL).
Pickup Load (LLD)
When this option is selected, the default Event 2 type will be Drop Load (LUL).
-
Click Save.
A message appears at the top of the page, stating your settings were saved successfully.
If you are making changes for a specific role and this is the first time the setting has been changed for any role, the text label style changes to bold and italic.If you do not want to save, click Revert instead. The application cancels any unsaved changes and reverts to the last saved settings.
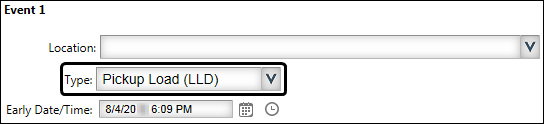
Setting default dates and times for new orders
When users enter orders on the Tender Shipment page, they can record the earliest and latest date and time that an event should occur.
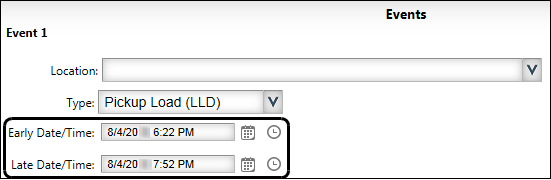
By default, the Early Date/Time and Late Date/Time fields in the Event sections of the Tender Shipment page default to the current date. The time in the Early Date/Time field defaults to the current time. The time in the Late Date/Time field is set to one hour later.
If you want, you can have both the Early Date/Time and Late Date/Time fields default to the current time. When you do this, you can specify the default hours between the early and late times for a stop and the hours between the pickup and delivery events.
| Users can modify the default values when entering an order on the Tender Shipment page. |
To set default event dates and times for new orders, follow these steps.
-
Go to Menu > Configuration > Settings Manager.
The Settings Manager page opens. -
Do one of the following:
-
If you want the setting change to apply to all roles, verify the Role field is set to [Global Settings].
-
If you want the setting change to apply to a specific role, select it in the Role field.
A message asks you to verify that you want to change the role. Click OK to continue.
Note: If the setting has already been changed for at least one role, its text label is bold and italic.
-
-
On the Modules tab, in the Module Selection field, select Customer.
-
Click these tabs: Application Settings > Shipment Tender > Defaults.
-
In the Default Event Date/Time section, make the following entries:
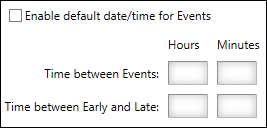
Field Definition Enable default date/time for Events
If you want to set a default time between the early and late times for a stop and between pickup and delivery events, you must select this check box.
Time between Events
In the Hours and Minutes fields, enter the default time offset between successive events.
Notes:
-
This field affects events only if the Enable default date/time for Events check box is selected.
-
The system includes an automatic five-minute interval between events. If you want to set a specific time frame between events, enter a time that allows for the automatic five-minute interval. For example, if you want a default time frame of 3 hours between events, enter 2 hours and 55 minutes in the Time between Events fields.
Time between Early and Late
In the Hours and Minutes fields, enter the default time offset between the event’s earliest and latest times.
Note: This field affects events only if the Enable default date/time for Events check box is selected.
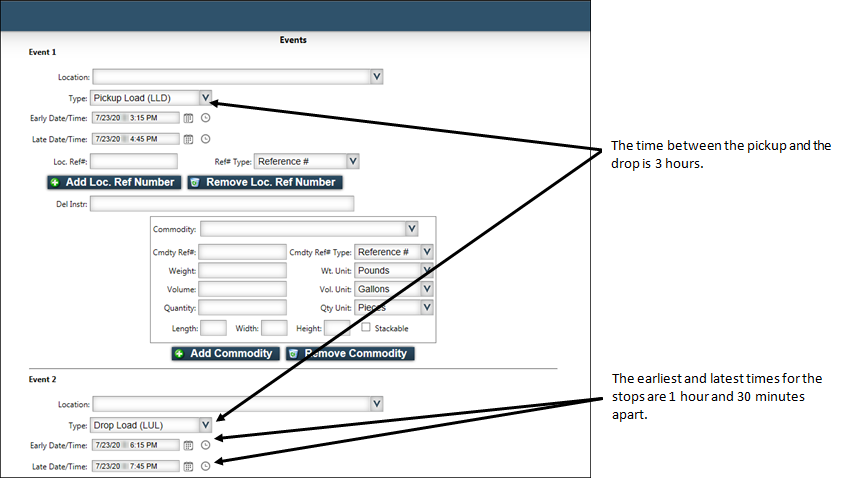
In this example, when the Enable default date/time for Events check box is selected, the entries in the Hours and Minutes fields are applied.
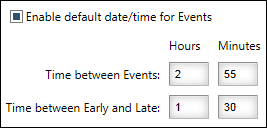
With the entries shown above, the dates and times on the Tender Shipment page default accordingly.
-
-
Click Save.
A message appears at the top of the page, stating your settings were saved successfully.
If you are making changes for a specific role and this is the first time the setting has been changed for any role, the text label style changes to bold and italic.If you do not want to save, click Revert instead. The application cancels any unsaved changes and reverts to the last saved settings.