Customizing and updating website pages
Trimble Web Products include the necessary tools to customize the application’s web pages according to your company’s needs. You can add predefined pages and sub-pages, as well as edit and delete pages and sub-pages. You can customize the fields on the pages to reflect your company’s own terminology and control which fields appear on the form, which text appears for field and button labels, and how that text is formatted.
All the menus shown in the application can be customized to fit your company’s needs. You can rename any menu, reorder the display of menus and items, move an item from one menu to another, or group items under a sub menu. You can also add a new page definition, enable pages, or disable pages.
Global Quick Links allow you to create shortcuts to frequently visited pages. You can customize global Quick Links to provide quick access to select pages for all users.
Manage page definitions
Use the page definition procedures to manage the application’s page security framework. You can add new pages received from TMW Systems, add predefined sub-pages to new or existing pages, and modify or delete existing defined pages.
Pages are listed alphabetically by URL path and then by page name. A green-highlighted row indicates a sub-page, which the user can access only from the parent page listed immediately above it. A red-highlighted row indicates a broken link.
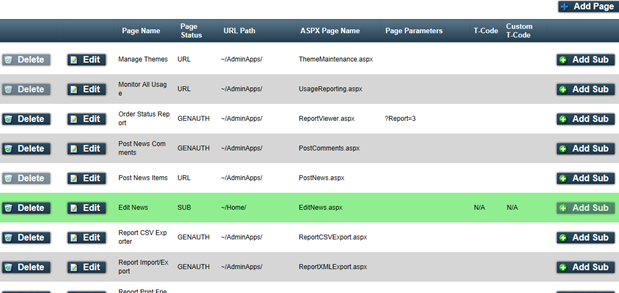
Column definitions
| Column | Definition |
|---|---|
Page Name |
The name that appears on the title bar of the page |
Page Status |
When adding a page, the page status can be any of the following:
|
URL Path |
The pathname of the file on the server where the ASPX file is located TMW Systems will provide this information. |
ASPX Page Name |
The file name of the ASPX page in the URL path |
Page Parameters |
Additional parameters used to pass special values to the page, to further define its functionality
Example: ?Action=DISPLAY&Type=ASSIGNED |
T-Code |
Not functional |
Custom T-Code |
Not functional |
Command buttons
| Button | Definition |
|---|---|
Add Page |
Enables you to add new pages received from TMW Systems |
Delete |
Enables you to remove pages that have a page status of NEW, GEN, GENAUTH, OLD, or SUB The button is not available for pages with a URL page status. Pages with a URL status cannot be deleted until they have been removed from the application’s menu structure. Use the options on the menu customization page to remove a page from a menu. |
Edit |
Enables you to modify a page, regardless of page status |
Add Sub |
Enables you to add a sub-page to a new or an existing page A sub-page can be accessed only from its parent page. It will not appear in the menu. |
Add a page
To add a predefined page to the application’s security framework, follow these steps.
-
Go to Menu > Security > Page Security > Manage Page Definitions.
The Manage Page Definitions page opens.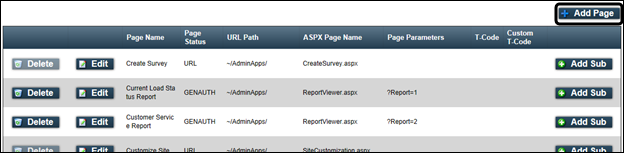
-
Click Add Page.
The blank form appears on the Manage Page Definitions page. -
Complete the form.
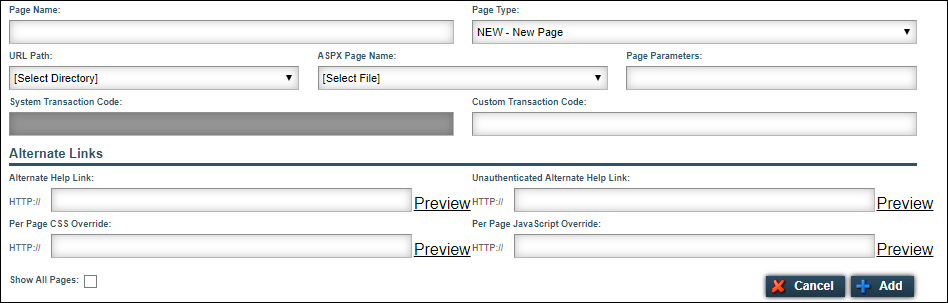
Field Definition Page Name
Enter the name that will appear in the menu and in the title bar of the new page.
Page Type
Select one of the following:
-
NEW - New Page
Pages are added to the site menu by an administrator from the Manage Pages page. -
GEN - General Access
Pages can be accessed by both authenticated and non-authenticated users. -
GENAUTH - General Access Authenticated
Pages can be accessed only by authenticated users.
URL Path
Select the pathname for the ASPX page that you want to add. The ASPX Page Name list displays the page files stored in that location.
ASPX Page Name
Select the predefined ASPX file for the new page.
Page Parameters
If you want, enter any parameters that will define the functionality of the page.
-
Parameters are case-sensitive.
-
A question mark (?) must be the first character.
-
If using multiple parameters, an ampersand (&) must separate each parameter.
-
Adding a page with parameters does not remove the page from those listed in the ASPX Page Name field.
Example: ?Action=DISPLAY&Type=ASSIGNED
System Transaction Code
Not functional
Custom Transaction Code
Not functional
Alternate Help Link
If you want, enter a URL that provides a link to customized documentation for the web page that only authenticated users can access. This link will override and replace the application’s online help.
Note: For information and instructions, see Provide customized help topics.
Unauthenticated Alternate Help Link
Enter a URL to customized documentation for the web page that both unauthenticated and authenticated users can access.
Note: For information and instructions, see Provide customized help topics.
Show All Pages
Most pages, once they are added, no longer appear in the list of available pages. However, some pages can be used multiple times when assigned unique parameters.
Select this checkbox to make all URL paths and ASPX page names available.
Note: Though all pages are listed, not all pages use parameters.
-
-
Click Add.
The new page is added to the list of pages. Pages are listed alphabetically by URL Path and then by Page Name.
You can now add it to a menu and assign the new page to one or more roles.
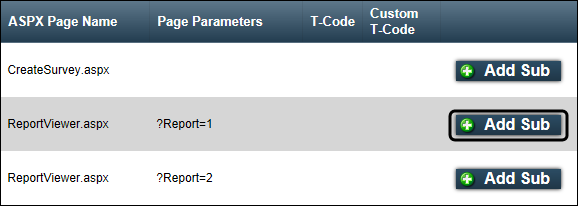
Add a sub-page
Use this procedure to add a sub-page to an existing (parent) page in the application’s security framework. A sub-page is not listed in the application’s menu structure and can be accessed only from its parent page. Each sub-page inherits all the role and security rights of its parent page.
-
Go to Menu > Security > Page Security > Manage Page Definitions.
The Manage Page Definitions page opens. -
Scroll down the list to locate the page to which you want to add a sub-page.
-
On the same row as the page, click Add Sub.
-
Complete the fields in the Manage Page Definitions page.
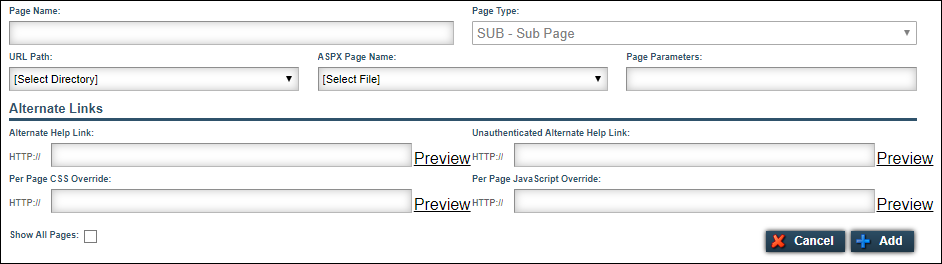
Field Definition Page Name
Enter the name that will appear in the title bar of the new sub-page.
Page Type
This list defaults to SUB - Sub Page and cannot be changed.
URL Path
Select the pathname of the ASPX page that you want to add. The ASPX Page Name list displays the page files stored in that location.
ASPX Page Name
Select the predefined ASPX file for the new sub-page.
Page Parameters
If you want, enter any parameters that will define the functionality of the sub-page.
-
Parameters are case-sensitive.
-
A question mark (?) must be the first character.
-
If using multiple parameters, the ampersand (&) must separate each parameter.
-
Adding a page with parameters does not remove the page from those listed in the ASPX Page Name field.
Example: ?Action=DISPLAY&Type=ASSIGNED
Alternate Help Link
If you want, enter a URL that provides a link to customized documentation for the web page that only authenticated users can access. This link will override and replace the applicaton’s online help.
Note: For information and instructions, see Provide customized help topics.
Unauthenticated Alternate Help Link
Enter a URL to customized documentation for the web page that both unauthenticated and authenticated users can access.
Note: For information and instructions, see Provide customized help topics.
-
-
Click Add.
In the list of pages, the new sub-page is added below its parent page, highlighted in green.
Edit a page
To modify a page or sub-page within the application’s security framework, follow these steps.
-
Go to Menu > Security > Page Security > Manage Page Definitions.
The Manage Page Definitions page opens. -
Scroll down the list to locate the page that you want to modify.
-
In the same row as the page you want to modify, click Edit.
The Manage Page Definitions page opens.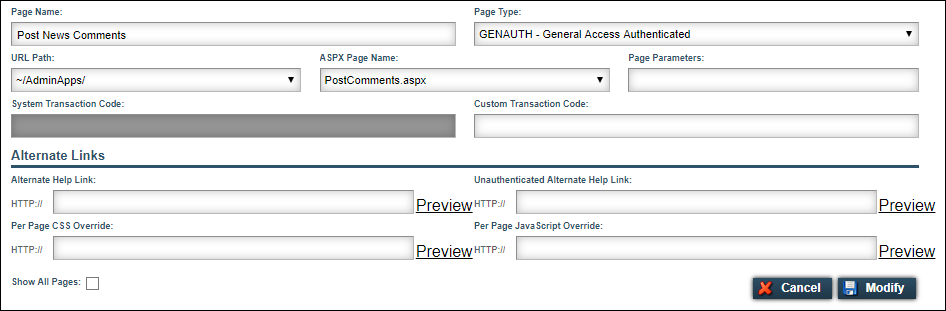
-
Make changes as appropriate.
Field Definition Page Name
The name that appears on the title bar of the page
Page Type
When modifying a page, you can change the page type only for pages with a NEW, GEN, GENAUTH, or OLD status. You can change them to any of the following page types:
-
NEW
A new page that will be added to the site menu -
SUB
A sub-page that is accessed through a parent page
Sub-pages do not appear in the application’s menu structure. Each sub-page inherits all the role and security rights of its parent page.In the page list, each sub-page appears below its parent page.
-
URL
An active page that currently appears in the site menu -
GEN
A General Access page that does not appear in a menu, but can be accessed by both authenticated and non-authenticated users typing its URL in their browser -
GENAUTH
A General Access Authenticated page that does not appear in a menu, but can be accessed only by authenticated users typing its URL in their browser -
OLD
A page that has been removed from the site menu
URL Path
The pathname of the file on the server where the ASPX file is located
TMW Systems will provide this information to the client.
ASPX Page Name
The file name of the predefined ASPX page in the URL Path
Page Parameters
Additional parameters used to pass special values to the page to further define its functionality
Parameters are case-sensitive.
System Transaction Code
Not functional
Custom Transaction Code
Not functional
Alternate Help Link
If you want, enter a URL that provides a link to customized documentation for the web page that only authenticated users can access. This link will override and replace the application’s online help.
Note: For information and instructions, see Provide customized help topics.
Unauthenticated Alternate Help Link
Enter a URL to customized documentation for the web page that both unauthenticated and authenticated users can access.
Note: For information and instructions, see Provide customized help topics.
-
-
Click Modify.
The Manage Page Definitions page opens with an updated list of pages.
Delete a page
To remove a page from the list of defined pages, follow these steps.
| You cannot delete a page with a URL status until access to that page has been removed from the application’s menu structure. For more information about removing access to a page from a menu, see Turn menus and items on and off. Removing access to a page from a menu also removes that page from any roles to which it has been assigned. |
-
Go to Menu > Security > Page Security > Manage Page Definitions.
The Manage Page Definitions page opens. -
Scroll down the list to locate the page that you want to delete.
-
On the same row as the page, click Delete.
-
In the confirmation prompt, click OK.
Provide customized help topics
If you want, you can provide a link to your company’s customized documentation for a page or sub-page. This customized documentation will override and replace the application’s context-sensitive online help.
To provide customized help for a page or sub-page, follow these steps.
-
Go to Menu > Security > Page Security > Manage Page Definitions.
The Manage Page Definitions page opens. -
Scroll down the list to locate the page for which you want to provide a customized help topic.
-
In the same row as the page, click Edit.
The Manage Page Definitions page opens.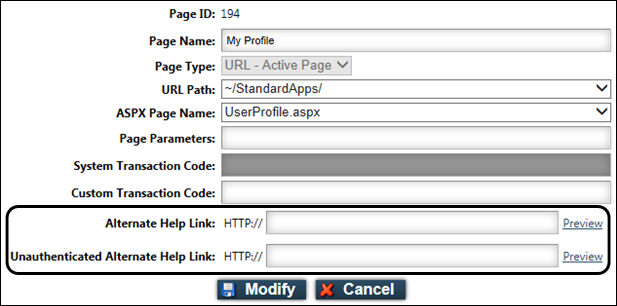
-
In the Alternate Help Link field, enter the URL for the customized documentation that will replace the page’s online help.
Only users who are logged into the application and authorized to access this URL can view the documentation.
Notes:
-
The URL you enter in the Alternate Help Link field must be secured through Internet Information Services (IIS). The file will be secure if it is in HTML format, has the ASPX file extension, and is located inside the application’s virtual directory. If the file is a different document type, it must be secured by another method.
-
Because all URLs will be prefaced automatically with \https://, do not use \HTTPS:// to preface the URL.
-
To use just one URL for both authenticated and unauthenticated users, enter the same URL in both the Alternate Help Link and Unauthenticated Alternate Help Link fields.
-
Documents can be in PDF format or any other document format that site visitors currently use.
-
If documents are in HTML format, they can have the ASPX file extension, which is the standard format for the online help.
-
-
If you want, enter a URL that both unauthenticated and authenticated users can access in the Unauthenticated Alternate Help Link field.
-
Click Preview to display the web page(s) for the customized documentation in a new window.
When finished, close the window. -
To save your changes, click Modify.
Customize menus
All the application menus can be customized for your company’s needs. You can rename any menu, reorder the appearance of menus and items, move an item from one menu to another, or group items in a sub menu.
Each change that you make becomes effective immediately for all users.
Individual users see only those menus and items that are permitted by the roles to which they have been assigned.
| Online help topics provide instructions using the application’s default menu names and locations. |
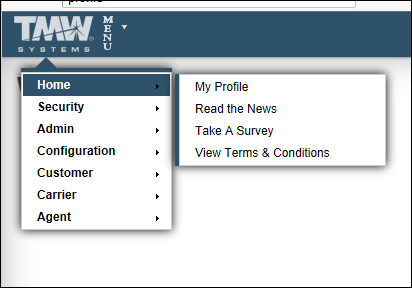
Menu terminology
Menus consist of:
-
Core menus:
The core menus are available from the main menu, which appears in the upper left of each page. The main menu typically contains sub menus, but also can have items.
-
Sub menus:
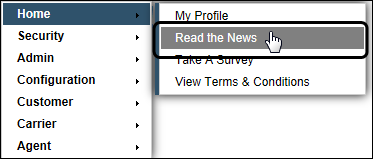
Sub menus are available from the core menus listed on the main menu. A sub menu has an arrow after its name.

-
Items:
Items are listed on sub menus and can appear on the main menu. They are sometimes referred to as functionality pages.
Menu customization page
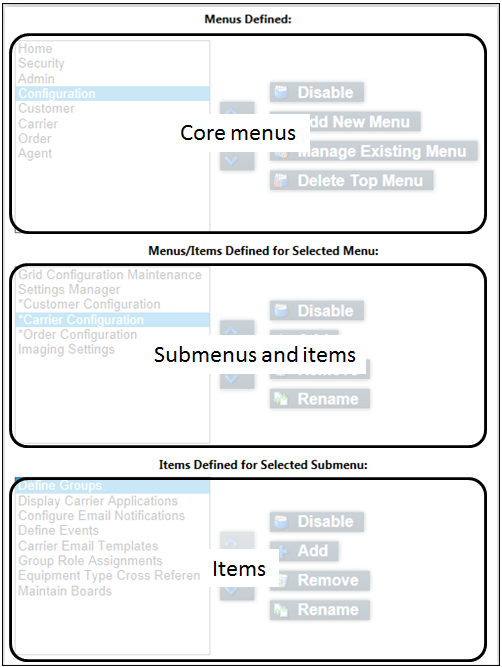
To customize the application menus, go to Menu > Security > Page Security > Manage Pages. The Manage Pages page opens. It consists of three main sections.
-
Core menus
The top section of the page lists the core menus available from the main menu. The core menus are listed in the order that they appear in the menu structure.
-
Sub menus and items
The center section of the page lists the sub menus and items contained within the core menu selected in the top box. These sub menus and items are listed in the order that they appear in the menu structure. An asterisk (*) identifies a sub menu.
-
Items
The bottom section of the page lists the items that are contained within the selected sub menu. These items are listed in the order that they appear in the menu structure.
Actions that can be performed
The following options describe actions that can be performed on the core menus, sub menus, and items within the sections on the Manage Pages page.
|
Move up |
Select the core menu, sub menu, or item and click this button to move the item up in the list. |
|
Move down |
Select the core menu, sub menu, or item and click this button to move the item down in the list. |
Disable |
Select an enabled core menu, sub menu, or item and click this button to remove it from the menu structure. If this button is not available, the core menu, sub menu, or item is already disabled. |
|
Enable |
Select a disabled core menu, sub menu, or item and click this button to display it in the menu structure. If this button is not available, the core menu, sub menu, or item already appears in the menu structure. |
|
Add New Menu |
In the core menu section, click this button to add a new core menu. |
|
Manage Existing Menu |
In the core menu section, click this button to rename, import, or export a core menu. |
|
Delete Top Menu |
In the core menu section, click this button to delete a core menu. |
|
Add |
Within the appropriate section, click this button to add a sub menu or an item. Notes:
|
|
Remove |
Select the sub menu or item and click this button to remove it. Notes:
|
|
Rename |
Select the sub menu or item that you want to rename and click this button. Note: Renaming an item also renames the page name that appears in the title bar when the item is selected. |
Turn menus and items on and off
Use this procedure to enable or disable menus and items for all Trimble Web Products users in your company. If you want to enable or disable a menu or item only for a specific group of users, see Assigning one page to multiple roles.
-
Go to Menu > Security > Page Security > Manage Pages.
The Manage Pages page opens. -
Locate the menu or item that you want to enable or disable.
To locate: Do the following: A core menu
Find the core menu in the top section of the page.
A sub menu
Select the core menu in which the sub menu resides, then find the sub menu in the center section of the page. An asterisk (*) identifies a sub menu.
An item in a core menu
Select the core menu in which the item resides, then find the item in the center section of the page.
An item in a sub menu
Select the core menu in which the item resides, select the sub menu in which the item resides, then find the item in the bottom section of the page.
-
Select the menu or item that you want to enable or disable.
-
Within the same page section as the menu or item you selected, do one of the following:
-
To enable the menu or item, click Enable.
-
To disable the menu or item, click Disable.
-
Add core menus
You can add a core menu in one of two ways. You can:
-
Create a new core menu to which you can add sub menus and items.
-
Import an existing menu structure that was exported from another location, such as from a previous version or test environment. For more information about exporting menus, see Exporting menus.
To add a core menu, follow these steps.
-
Go to Menu > Security > Page Security > Manage Pages.
The Manage Pages page opens. -
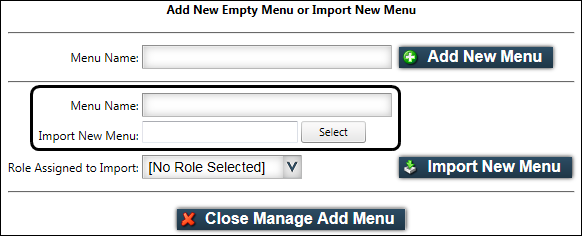
Within the top section, click Add New Menu.
The Add New Empty Menu or Import New Menu section appears. -
Depending on how you want to add a core menu, do one of the following.
Add a new core menu
-
In the Menu Name field, type the name of the new core menu.
-
Click Add New Menu.
The new core menu appears in the top section. -
Add sub menus or add items to the new core menu.
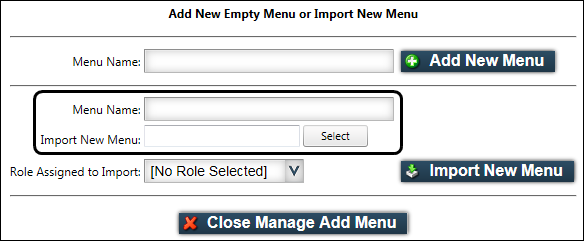
Import an existing core menu
-
In the Menu Name field, type the name for the menu to be imported.
-
Next to the Import New Menu field, click Select.
The Choose File to Upload window opens. -
Select the XML file containing the menu you want to import.
-
Click Open.
The Choose File to Upload window closes. -
Do one of the following:
-
To import the menu, click Import New Menu.
The name of the new core menu appears in the top section. All sub menus and items part of the menu you imported appear in the other sections of the page. -
To select a different file to import, next to the file name in the Import New Menu field, click Remove. Then click Select to select a different file. Then click Import New Menu.
Note: The Role Assigned to Import field is not functional.
-
Add sub menus to a core menu
To group similar menu items into sub menus below one of the core menus, follow these steps.
-
Go to Menu > Security > Page Security > Manage Pages.
The Manage Pages page opens. -
Select the core menu to which you want to add a sub menu.
-
Within the center section, click Add.
The Add Item/Menu section appears. -
Verify that Add Type is Menu.
-
In the Menu Name field, enter the name of the new sub menu.
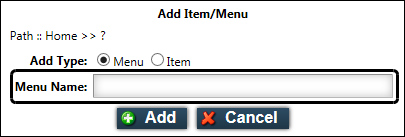
-
Click Add.
The new sub menu appears in the center section preceded by an asterisk (*), which identifies a sub menu.
Add items to menus
To add available items to a core menu or sub menu, follow these steps.
| You first must make the item available for addition to a core menu or sub menu by removing it from an existing menu or adding a new page. |
-
Go to Menu > Security > Page Security > Manage Pages.
The Manage Pages page opens. -
Locate the core menu or sub menu that will contain the item.
To locate: Do the following: A core menu
Find the core menu in the top section of the page.
A sub menu
Select the core menu in which the sub menu resides, then find the sub menu in the center section of the page. An asterisk (*) identifies a sub menu.
-
Select the core menu or sub menu to which you want to add the item.
-
Within the page section to which you want to add the item, click Add.
-
The Add Item/Menu section appears.
-
Next to Add Type, click Item.
The page refreshes to show a list of available items.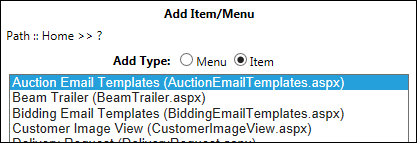
Note: If all available items already are assigned to a core menu or sub menu, the list box will be empty. You first must remove the item you want to assign from its current menu or add a new page.
-
From the list of available items, hold CTRL and click on each item that you want to add.
-
Click Add.
Rename menus and items
To rename a menu or an item that currently appears in the menu structure, follow these steps. Renaming an item also renames the page name that appears in the title bar when the item is selected.
| Online help topics provide instructions using the application’s default menu and item names. |
-
Go to Menu > Security > Page Security > Manage Pages.
The Manage Pages page opens. -
Locate the menu or item that you want to rename.
To locate: Do the following: A core menu
Find the core menu in the top section of the page.
A sub menu
Select the core menu in which the sub menu resides, then find the sub menu in the center section of the page. An asterisk (*) identifies a sub menu.
An item in a core menu
Select the core menu in which the item resides, then find the item in the center section of the page.
An item in a sub menu
Select the core menu in which the item resides, select the sub menu in which the item resides, then find the item in the bottom section of the page.
-
Select the menu or item to rename.
-
Depending on the type of menu or item you selected, do one of the following.
Rename a core menu
-
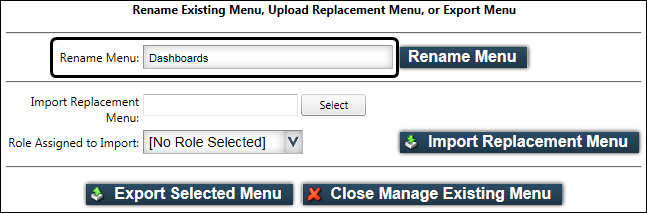
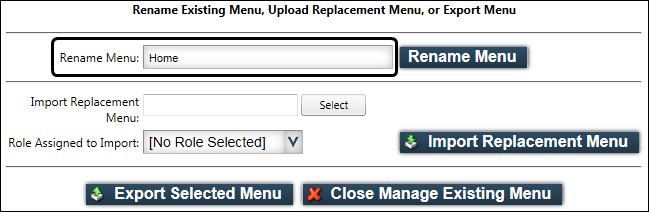
Within the same page section as the core menu you selected, click Manage Existing Menu.
The Rename Existing Menu, Upload Replacement Menu, or Export Menu section appears. -
In the Rename Menu field, type the new name for the core menu.
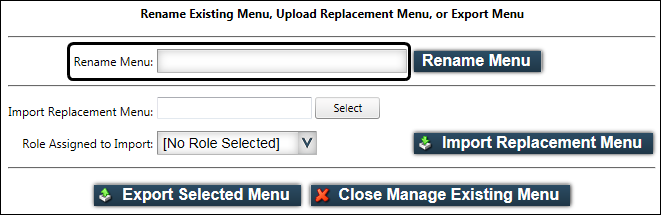
Note: Renaming a menu also renames the page name that appears in the title bar when the item is selected. You cannot rename a menu with a page name already in use.
-
Click Rename Menu.
A message confirms you successfully renamed the menu.
Rename a sub menu or item
-
Within the same page section as the menu or item you selected, click Rename.
The Rename Entry section appears. -
In the New Name field, type the new name for the menu or item.

Note: Renaming a menu also renames the page name that appears in the title bar when the item is selected. You cannot rename a menu or an item with a page name already in use.
-
Click Rename.
A message confirms you successfully renamed the menu or item.
Reorder menus and items
To change the order in which menus and items appear, follow these steps. To move an item from one core menu or sub menu to another, you must remove the item and then add it to the other location.
-
Go to Menu > Security > Page Security > Manage Pages.
The Manage Pages page opens. -
Locate the menu or item that you want to reorder.
To locate: Do the following: A core menu
Find the menu in the top section of the page.
A sub menu
-
Select the core menu in which the sub menu resides.
-
Locate the sub menu in the center section of the page.
Note: An asterisk (*) identifies a sub menu.
An item in a core menu
-
Select the core menu in which the item resides.
-
Locate the item in the center section of the page.
An item in a sub menu
-
Select the core menu in which the item resides.
-
Select the sub menu in which the item resides.
-
Locate the item in the bottom section of the page.
-
-
Select the menu or item to reorder.
-
Within the same page section as the menu or item you selected, click
 or
or  until the menu or item is in the desired position.
 -
Refresh the page, and the item you selected to reorder is in its new location.
Remove menus and items
To remove a menu or item from the menu structure, so that it is either unavailable to your users or available to add to another location, follow these steps.
| Removing a menu or item removes that page from any roles to which it has been assigned. If a removed item is added back to a menu or sub menu, you must reassign the page to the roles. |
-
Go to Menu > Security > Page Security > Manage Pages.
The Manage Pages page opens. -
Locate the menu or item that you want to remove.
To locate: Do the following: A core menu
Find the menu in the top section of the page.
A sub menu
-
Select the core menu in which the sub menu resides.
-
Locate the sub menu in the center section of the page.
Note: An asterisk (*) identifies a sub menu.
An item in a core menu
-
Select the core menu in which the item resides.
-
Locate the item in the center section of the page.
An item in a sub menu
-
Select the core menu in which the item resides.
-
Select the sub menu in which the item resides.
-
Locate the item in the bottom section of the page.
-
-
Select the menu or item that you want to remove.
Notes:
-
You cannot remove a sub menu that contains items. First, you must remove all the items in the sub menu, and then remove the sub menu itself.
-
Before deleting a core menu, you may want to export it. Exporting a menu makes it available for import if you want to restore it without having to rebuild it.
-
-
Depending on the type of menu or item you selected, do one of the following.
Remove a core menu
-
Within the same page section as the core menu you selected, click Delete Top Menu.
A message box opens, asking you to confirm that you want to delete the core menu. -
Click OK.
-
Log out and log back in.
The core menu is no longer listed.
Remove a sub menu or item
Within the same page section as the sub menu or item you selected, click Remove.
The removed item becomes available to add to another menu or sub menu.
When you refresh the page, the item you selected to remove is no longer in the list.
Export menus
You can export menu structures you have customized so that you do not have to rebuild them again later. You may want to export customized menus before installing a new version of the application or moving from a test to production environment. Exported menus then can be imported into the latest version of the application you are using.
| Only a core menu can be exported. Exporting a core menu exports the entire menu structure, including any sub menus and items. |
To export a core menu, follow these steps.
-
Go to Menu > Security > Page Security > Manage Pages.
The Manage Pages page opens. -
Select the core menu you want to export.
-
Click Manage Existing Menu.
The Rename Existing Menu, Upload Replacement Menu, or Export Menu section appears. -
Verify that the name of the menu you want to export appears in the Rename Menu field.
-
Click Export Selected Menu.
-
Save the file by following the browser prompts, making note of the file name and location.
Note: The file is saved as an XML file.
Import menus
You can import an existing menu structure that was exported, as from a previous version or test environment, so you do not have to rebuild it. Importing a core menu imports the entire menu structure, including any sub menus and items. You can import a menu to add to the core menu list or to replace an existing core menu.
| Only a core menu can be imported. Importing a core menu imports the entire menu structure, including any sub menus and items. |
You must have an exported XML menu file available for import. For more information about exporting menus, see Exporting menus.
To import a core menu, follow these steps.
-
Go to Menu > Security > Page Security > Manage Pages.
The Manage Pages page opens. -
Depending on if you want to add or replace a core menu, do one of the following.
Add a new core menu
-
Click Add New Menu.
The Add New Empty Menu or Import New Menu section appears. -
In the Menu Name field, type the name for the menu to be imported.
-
Next to the Import Menu Name field, click Select.
The Choose File to Upload window opens. -
Select the menu you want to import.
-
Click Open.
The Choose File to Upload window closes. In the Import New Menu field, the name of the file you selected appears. If you do not want to import the selected file, or you want to select a different one, click Remove. -
Do one of the following:
-
To import the menu, click Import New Menu.
The name of the new core menu appears in the top section. All sub menus and items part of the menu you imported appear in the other sections of the page. -
To select a different menu to import, next to the file name in the Import New Menu field, click Remove. Then click Select to select a different menu. Then click Import New Menu.
Note: The Role Assigned to Import field is not functional.
-
Replace a core menu
-
Click Manage Existing Menu.
The Rename Existing Menu, Upload Replacement Menu, or Export Menu section appears. -
Verify that the name of the core menu you want to replace appears in the Rename Menu field.
-
Next to the Import Replacement Menu field, click Select.
The Choose File to Upload window opens. -
Select the menu you want to import.
-
Click Open.
The Choose File to Upload window closes. In the Import Replacement Menu field, the name of the file you selected appears. If you do not want to import the selected file, or you want to select a different one, click Remove. -
Do one of the following:
-
To import and replace the selected core menu, click Import Replacement Menu, then click OK to confirm you want to replace the menu.
The core menu name remains the same, but the contents have been replaced. All sub menus and items part of the menu you imported appear in the other sections of the page. -
To select a different file to import, next to the file name in the Import Replacement Menu field, click Remove. Then click Select to select a different file. Then click Import Replacement Menu.
Note: The Role Assigned to Import field is not functional.
-