Managing event notifications and logs
You can set up CarrierHub and eStat to generate an e-mail notification or a log file automatically, each time a specific event occurs.
Notification e-mails
The notification e-mail is sent to the recipients whose addresses have been recorded in the application. The e-mail templates for each event can be customized for your specific requirements.
To direct the event e-mails to the appropriate recipients, you use groups (based on revenue types and state/province) as filters. When you add an e-mail address, you assign it to a group. A recipient whose e-mail address is assigned to a specific group will be able to see notifications only for the orders that match all revenue types or states/provinces specified for the group.
Log files
The log records are stored in the UsageActions table in the SQL Server database. You can view log records on the Monitor All Usage page. A record that has an action will display a button next to it. Clicking the button shows the log record. Data for each log file includes the name, date, and time of each event sent to the log file.
Identifying the return address for all e-mail replies
Event e-mail notifications are generated directly by Trimble Web Products. When a recipient replies to a message, the address from which the e-mail came automatically populates the To field.
By default, replies are sent to the address recorded in the web.config file, which is set up when Trimble Web Products is installed. This address is designed primarily to track send failures due to a missing or invalid e-mail address. It is recommended that you set up the system to populate the To line with the requesting user’s e-mail address instead of the address in the web.config file.
|
To identify the type of return address the system will use, follow these steps:
-
Go to Menu > Configuration > Settings Manager.
The Settings Manager page opens. -
Do one of the following:
-
If you want the setting change to apply to all roles, verify the Role field is set to [Global Settings].
-
If you want the setting change to apply to a specific role, select it in the Role field.
A message asks you to verify that you want to change the role. Click OK to continue.
Note: If the setting has already been changed for at least one role, its text label is bold and italic.
-
-
On the Modules tab, in the Module Selection field, select Carrier or Customer.
-
Click these tabs:
-
eStat
Application Settings > Global -
CarrierHub
Application Settings > General
-
-
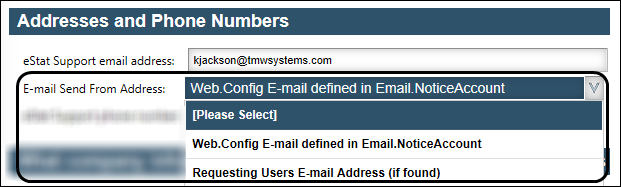
In the eStat Support email address field in eStat and the Carrier Application E-mail To Address in CarrierHub, enter the e-mail address that should appear in the To field of sent messages.
-
In the E-mail Send From Address field in eStat and the E-mail Send Address field in CarrierHub, select the source of the e-mail address that should appear in the return address field of sent messages.
-
eStat
-
CarrierHub
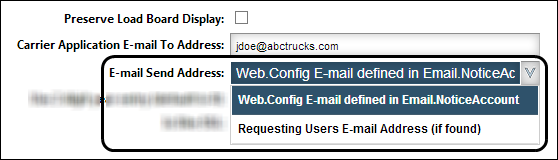
Field Definition Web Config E-Mail defined in Email.NoticeAccount
Use the e-mail address recorded in the application’s Release web.config file.
Requesting Users E-mail Address (if found)
If the user who generated the event e-mail has an e-mail address recorded in his/her profile, use that address in the To line. If no address is on file, use the address recorded in the web.config file.
-
-
Click
 Save.
Save.
A message appears at the top of the page, stating your settings were saved successfully. If you are making changes for a specific role and this is the first time the setting has been changed for any role, the text label style changes to bold and italic.If you do not want to save, click Revert instead. The application cancels any unsaved changes and reverts to the last saved settings.
Selecting events for e-mail notification and log records
To set up Trimble Web Products to generate an e-mail notification or a log record automatically when a specific event occurs, follow these steps:
-
Go to one of the following:
-
CarrierHub
Menu > Configuration > Carrier Configuration > Define Events
The Define Events page opens.Note: Each e-mail identifies the load, carrier, and any comments the carrier recorded for the load request.
-
eStat
Menu > Configuration > Customer Configuration > Event Definition
The Event Definition page opens.
-
-
Select the check box for each event that should generate an e-mail or log file.
-
To generate an e-mail notification for an event, select a check box where Event Type is EMAIL.
CarrierHub: To generate an e-mail notification message for a bidding event, select a check box where Event Type is BIDDING EMAIL.
The system will send the e-mail to employees whose addresses have been recorded in the Configure Notifications page.
-
To generate a log file for an event, select a check box where Event Type is LOG.
-
If an event is selected and you do not want to generate a confirmation e-mail or log file, clear the check box.
-
-
Do one of the following:
-
CarrierHub: Click Save.
-
eStat: Click Save Events.
A message indicates that your changes were successfully saved.
-