Setting up driver trip and pay information
Trimble Web Products allows drivers to view information for available and assigned trips and pay by a pay period or by trip.
Use driver setup options to:
-
Enable drivers to generate trip and pay reports and view trip notes
-
Direct driver accept/reject comments to a specific dispatcher’s e-mail
-
Exclude specific stop events from appearing in the assigned trip details panes
-
Allow drivers to download imaged documents
Driver setup options appear in tabs on the Settings Manager page.
| Field | Definition |
|---|---|
Misc |
Use this tab to:
|
Assigned Trips |
Use this tab to exclude event types from appearing in the detail pane on the Assigned Trips page. |
Imaging |
Use this tab to select document types available to view and download through the company hosting Trimble Web Products. |
Setting up trip and pay miscellaneous information
Use driver setup options to allow drivers to:
-
Access a printout of trip or pay information
-
Send Accept or Reject notifications for assigned trips to a specified dispatcher’s e-mail
-
View trip notes
Selecting trip and pay reports
To allow drivers to access printouts of trip and pay information from driver pages, you must identify an SSRS report to use for each printout. The system generates the printout when a driver selects the Print icon located on the toolbar of the trip and pay pages.
|
To allow drivers to view printouts of trip and pay information, follow these steps.
-
Go to Menu > Configuration > Settings Manager.
The Settings Manager window opens. -
Do one of the following:
-
If you want the setting change to apply to all roles, verify the Role field is set to [Global Settings].
-
If you want the setting change to apply to a specific role, select it in the Role field.
A message asks you to verify that you want to change the role. Click OK to continue.
Note: If the setting has already been changed for at least one role, its text label is bold and italic.
-
-
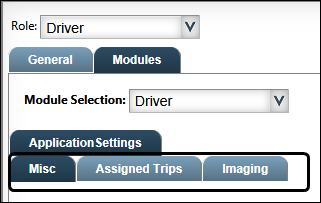
On the Modules tab, in the Module Selection field, select Driver.
-
Click the Misc tab, if not already selected.
-
Select a report type from any one of the following fields:
-
SSRS Trip Sheet
Links to the Available Trips and Assigned Trips pages -
SSRS Pay Period Settlement
Links to the Pay Review and Period Pay pages -
SSRS Trip Pay Settlement
Links to the Pay Review and Trip Pay pages
-
-
Click Save.
A message appears at the top of the page confirming that you saved the setting.
Note: If you are making changes for a specific role and this is the first time the setting has been changed for any role, the text label style changes to bold and italic.
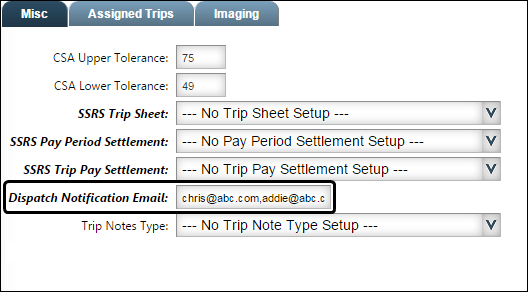
Adding a dispatcher e-mail address for accept or reject notifications
To record the e-mail address of the dispatcher to receive driver Accept or Reject notifications for assigned trips, follow these steps.
-
Go to Menu > Configuration > Settings Manager.
The Settings Manager window opens. -
Do one of the following:
-
If you want the setting change to apply to all roles, verify the Role field is set to [Global Settings].
-
If you want the setting change to apply to a specific role, select it in the Role field.
A message asks you to verify that you want to change the role. Click OK to continue.
Note: If the setting has already been changed for at least one role, its text label is bold and italic.
-
-
On the Modules tab, in the Module Selection field, select Driver.
-
Click the Misc tab, if not already selected.
-
In the Dispatch Notification Email field, enter the e-mail address for the dispatcher who should receive driver Accept or Reject notifications for assigned trips. To include more than one address in this field, separate each address by a comma.
-
Click Save.
A message appears at the top of the page confirming that you saved the setting.Note: If you are making changes for a specific role and this is the first time the setting has been changed for any role, the text label style changes to bold and italic.
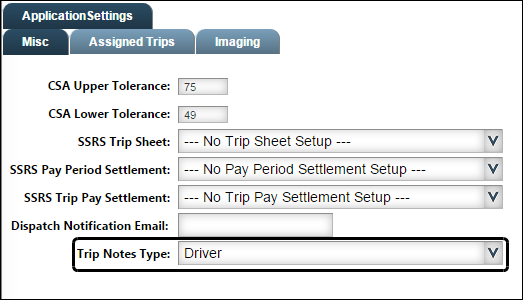
Determining a trip note type
To allow drivers to view TMWSuite notes that may be attached to available and assigned trips, follow these steps.
-
Go to *Menu > Configuration > Settings Manager.*
The Settings Manager window opens. -
Do one of the following:
-
If you want the setting change to apply to all roles, verify the Role field is set to [Global Settings].
-
If you want the setting change to apply to a specific role, select it in the Role field.
A message asks you to verify that you want to change the role. Click OK to continue.
Note: If the setting has already been changed for at least one role, its text label is bold and italic.
-
-
On the Modules tab, in the Module Selection field, select Driver.
-
Click the Misc tab, if not already selected.
-
In the Trip Notes Type field, select the note type that you want drivers to view from the Available and Assigned Trips pages.
For example, if you select:
-
Driver, a driver may view a note similar to this one

-
Delivery Instructions, a driver may view a note similar to this one

Notes:
-
Notes created in TMW Operations or Dispatch must meet the following conditions to show in DriverSeat:
-
Note type is Movement
-
Note category is identified, such as Driver, Delivery Instructions, etc.
-
Level is OK for External or Unknown
-
-
Drivers can access notes from the View Notes button on both the Assigned Trips and Available Trips pages.
-
-
Click Save.
A message appears at the top of the page confirming that you saved the setting.Note: If you are making changes for a specific role and this is the first time the setting has been changed for any role, the text label style changes to bold and italic.
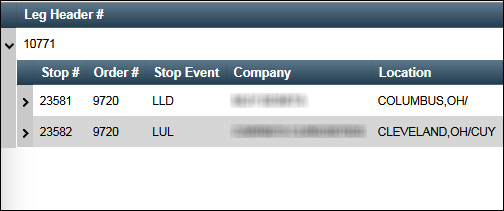
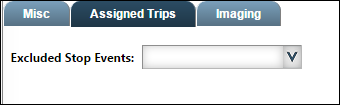
Excluding stop event types from assigned trip details
By default, the system shows all stop events in the trip detail pane on the Available and Assigned Trips pages. However, when a trip has both loaded and unloaded events, you may want to exclude the unloaded events from showing in the detail pane.
These illustrations show the trip detail pane before and after an administrator excluded the Trailer Wash (WSH) stop event type.
-
Before excluding the event
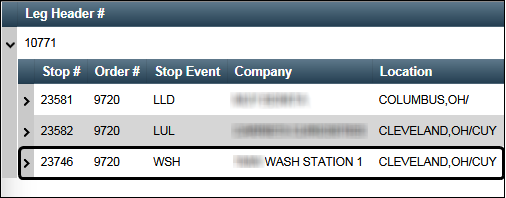
-
After excluding the event
To exclude specific stop events from showing in the detail pane for assigned trips, follow these steps.
-
Go to Menu > Configuration > Settings Manager.
The Settings Manager window opens. -
Do one of the following:
-
If you want the setting change to apply to all roles, verify the Role field is set to [Global Settings].
-
If you want the setting change to apply to a specific role, select it in the Role field.
A message asks you to verify that you want to change the role. Click OK to continue.Note: If the setting has already been changed for at least one role, its text label is bold and italic.
-
-
On the Modules tab, in the Module Selection field, select Driver.
-
Click the Assigned Trips tab.
-
In the Excluded Stop Events field, select the check box for each event type that you do not want to appear in the trip detail pane.
-
Click Save.
A message appears at the top of the page confirming that you saved the setting.Note: If you are making changes for a specific role and this is the first time the setting has been changed for any role, the text label style changes to bold and italic.
Setting up the imaging feature
DriverSeat imaging integration allows the system to import various types of imaged documents for drivers to view. DriverSeat currently supports the Microdea imaging service.
You must determine how your company wants drivers to use DriverSeat imaging and set up the features to best suit your needs.
The general process you will follow when setting up driver imaging is as follows:
Selecting imaged documents for the driver role to view
Of all the imaged document types available, you can select specific types for drivers to view.
To select document types, follow these steps:
-
Go to Menu > Configuration > Settings Manager.
The Settings Manager window opens. -
Do one of the following:
-
If you want the setting change to apply to all roles, verify the Role field is set to [Global Settings].
-
If you want the setting change to apply to a specific role, select it in the Role field.
A message asks you to verify that you want to change the role. Click OK to continue.
Note: If the setting has already been changed for at least one role, its text label is bold and italic.
-
-
On the Modules tab, in the Module Selection field, select Driver.
-
Click the Imaging tab.
The driver imaging panels appear.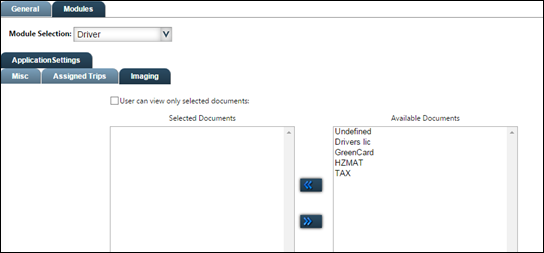
-
Make specific documents available to drivers.
-
Click
 Left Arrow to move a file to the Selected Documents panel.
 -
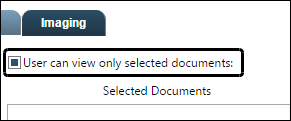
Select the User can view only selected documents check box.
When you check this box, a driver can only view documents that match the list showing in the Selected Documents panel.
Note: To remove a file from the Selected Documents panel, select it and click
 Right Arrow.
 -
-
Click Save.
-
A message appears at the top of the page confirming that you saved the setting.
Note: If you are making changes for a specific role and this is the first time the setting has been changed for any role, the text label style changes to bold and italic.
-
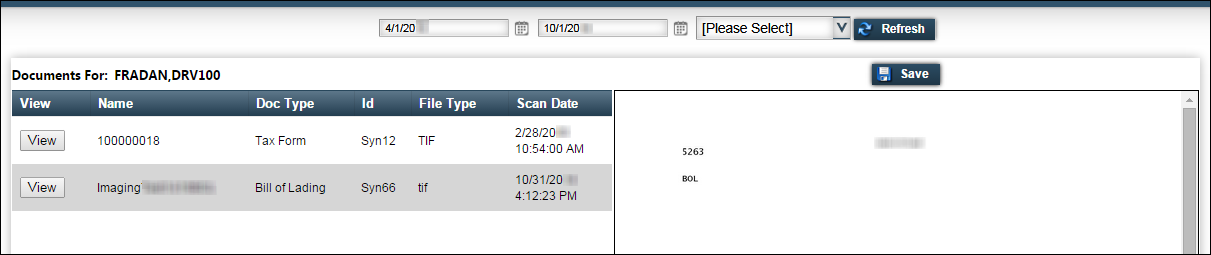
When your DriverSeat imaging setup is complete, drivers can view documents from the imaged documents page.
-
Making the documents page visible to drivers
Drivers are able to see the documents on the Driver Documents page. By default, this page is available in the installed system but must be added to DriverSeat. This process includes these steps:
-
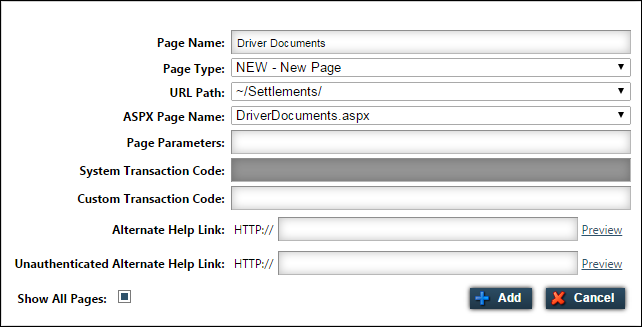
Follow the instructions for adding a new page to DriverSeat, entering or selecting the following:
Field Definition Page Name
Enter the name that will appear in the menu and in the title bar of the new page.
Example: Driver Documents
Page Type
Select NEW - New Page
URL Path
Select ~/Settlements/
ASPX Page Name
Select DriverDocuments.aspx
-
Add the imaged documents menu item.
Follow the instructions for adding a new menu item to DriverSeat.
Select the menu location of your choice.
-
Assign the imaged document page to a role.
Follow the instructions for assigning this new page to your driver role or roles.