Setting up CarrierHub for updating fuel orders
If you are licensed for FuelTMS modules and the CarrierHub fuel features, you can allow your users to update fuel orders in the Available Loads and Assigned Loads pages.
In the Settings Manager, you set up what users can update on these pages. Controls specific to fuel orders can be applied to the Load Details page in CarrierHub.
| In addition to the CARRIERHUB license, the FUELDISPATCH license must be applied to your TMWSuite database. |
Specifying how companies are displayed
By default, a company’s name and address are displayed in Company Name, Shipper, Supplier, and Account Of fields. If you want, you can display company information in a different format in the Load Details and Direct Load Updates pages.
To specify how companies are displayed, follow these steps.
-
Go to Menu > Configuration > Settings Manager.
The Settings Manager page opens. -
Do one of the following:
-
If you want the setting change to apply to all roles, verify the Role field is set to [Global Settings].
-
If you want the setting change to apply to a specific role, select it in the Role field.
A message asks you to verify that you want to change the role. Click OK to continue. -
If the setting has already been changed for at least one role, its text label is bold and italic.
-
-
On the Modules tab, in the Module Selection field, select Carrier.
-
Click these tabs: Application Settings > Load Details > Fuel.
-
Click in the Display Companies As field. A drop-down list displays the available options.
-
Select one of the following options.
-
Company ID, Name, and Address

-
Company Name and Address

-
Name, City, and State

-
Name Only

-
Company ID Only

-
-
To save your changes, click
 Save.
Save.
A message indicates that your changes were saved successfully.If you are making changes for a specific role and this is the first time the setting has been changed for any role, the text label style changes to bold and italic.
Identifying where fuel orders were created
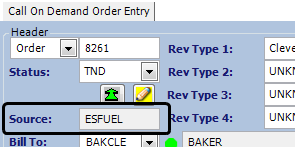
Some fuel orders that appear in CarrierHub are created on the Fuel Order Entry page in eStat. In the Fuel Dispatch application’s Call On Demand Order Entry window, fuel orders created in eStat are identified as having a source of ESFUEL. Fuel orders created in Fuel Dispatch’s Call On Demand Order Entry window have a source of COD OE.
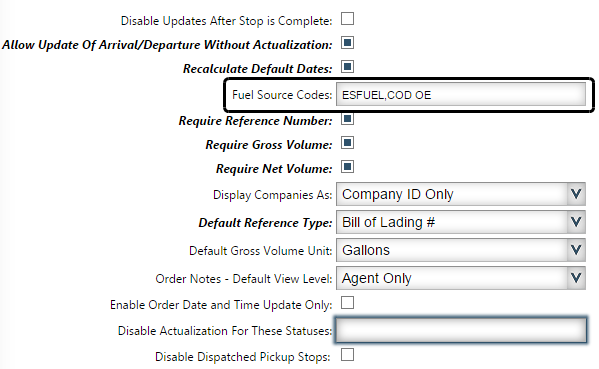
An option in the Settings Manager allows you to specify which of these identifiers will appear in the Call On Demand Order Entry window’s Source field. If your company imports or enters orders by means other than eStat and the Call On Demand Order Entry window, you may want to include them as other fuel order sources.
To specify which identifiers are used, follow these steps.
-
Go to Menu > Configuration > Settings Manager.
The Settings Manager page opens. -
Do one of the following:
-
If you want the setting change to apply to all roles, verify the Role field is set to [Global Settings].
-
If you want the setting change to apply to a specific role, select it in the Role field.
A message asks you to verify that you want to change the role. Click OK to continue.If the setting has already been changed for at least one role, its text label is bold and italic.
-
-
On the Modules tab, in the Module Selection field, select Carrier.
-
Click these tabs: Application Settings > Load Details > Fuel.
-
In the Fuel Source Codes field, enter the identifiers as a comma-delimited list (for example, COD OE, ESFUEL).
-
COD OE
Call On Demand Order Entry window in Fuel Dispatch -
ESFUEL
eStat Fuel application -
FRCST
FuelTMS Forecaster module -
OFOE
Oil Field Order Entry window in Fuel Dispatch
Note: Talk with your Support representative to determine which code(s) you should enter.
-
-
To save your changes, click
Save.
A message indicates that your changes were saved successfully.If you are making changes for a specific role and this is the first time the setting has been changed for any role, the text label style changes to bold and italic.
Controlling how carriers update stops
By default, carriers who are assigned to a load can actualize the stops on those trips. They can also change the following information for an assigned load:
-
Date/time for unactualized stops
-
Consignee, shipper, supplier, and Account Of companies
-
Commodity type and quantity
-
Reference numbers
-
Notes
If you want, you can specify how stops can be actualized and which information carriers can change.
Preventing updates to actualized stops
By default, carriers can update the date/time for a stop after both the arrival and departure have been actualized. The carrier can also add a commodity to the trip. If you want, you can prevent these updates when both the arrival and departure for a stop have been actualized.
To prevent updates to completed stops, follow these steps.
-
Go to Menu > Configuration > Settings Manager.
The Settings Manager page opens. -
Do one of the following:
-
If you want the setting change to apply to all roles, verify the Role field is set to [Global Settings].
-
If you want the setting change to apply to a specific role, select it in the Role field.
A message asks you to verify that you want to change the role. Click OK to continue.
If the setting has already been changed for at least one role, its text label is bold and italic.
-
-
On the Modules tab, in the Module Selection field, select Carrier.
-
Click these tabs: Application Settings > Load Details > Fuel.
-
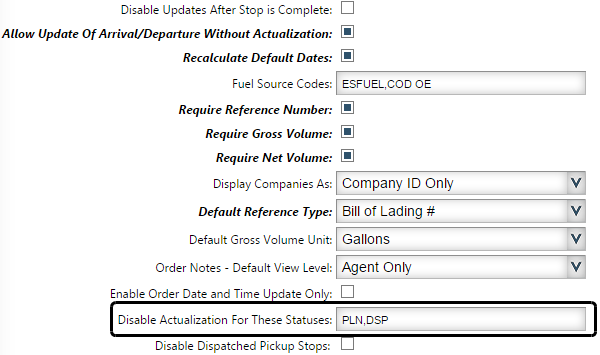
Select the Disable Updates After Stop is Complete check box.
When it is selected, if the carrier completes both the arrival and departure for a stop, all of the stop’s fields become read-only. The carrier cannot undo the changes.

When it is cleared, if the carrier completes both the arrival and departure for a stop, the Departed check box is not grayed out. The carrier can undo changes by clearing first the Departed check box, and then the Arrived check box.

Note: If the carrier realizes that some entries are incorrect before saving them, they can be canceled. Closing the page without saving removes the entries. If the entries have been saved, they cannot be changed in CarrierHub. The carrier must notify the dispatcher about the mistake. The dispatcher can make the needed change in the dispatch system.
-
To save your changes, click
Save.
A message indicates that your changes were saved successfully.If you are making changes for a specific role and this is the first time the setting has been changed for any role, the text label style changes to bold and italic.
Allowing carriers to update only the date/time for assigned loads
By default, carriers can change the following information on an assigned load:
-
Date/time for unactualized stops
-
Consignee, Shipper, Supplier, and Account Of companies
-
Commodity type and quantity
-
Reference numbers
-
Notes
To allow carriers to change only the dates/times for unactualized stops, follow these steps.
-
Go to Menu > Configuration > Settings Manager.
The Settings Manager page opens. -
Do one of the following:
-
If you want the setting change to apply to all roles, verify the Role field is set to [Global Settings].
-
If you want the setting change to apply to a specific role, select it in the Role field.
A message asks you to verify that you want to change the role. Click OK to continue.If the setting has already been changed for at least one role, its text label is bold and italic.
-
-
On the Modules tab, in the Module Selection field, select Carrier.
-
Click these tabs: Application Settings > Load Details > Fuel.
-
Select the Enable Order Date and Time Update Only check box.
-
To save your changes, click
Save.
A message indicates that your changes were saved successfully.If you are making changes for a specific role and this is the first time the setting has been changed for any role, the text label style changes to bold and italic.
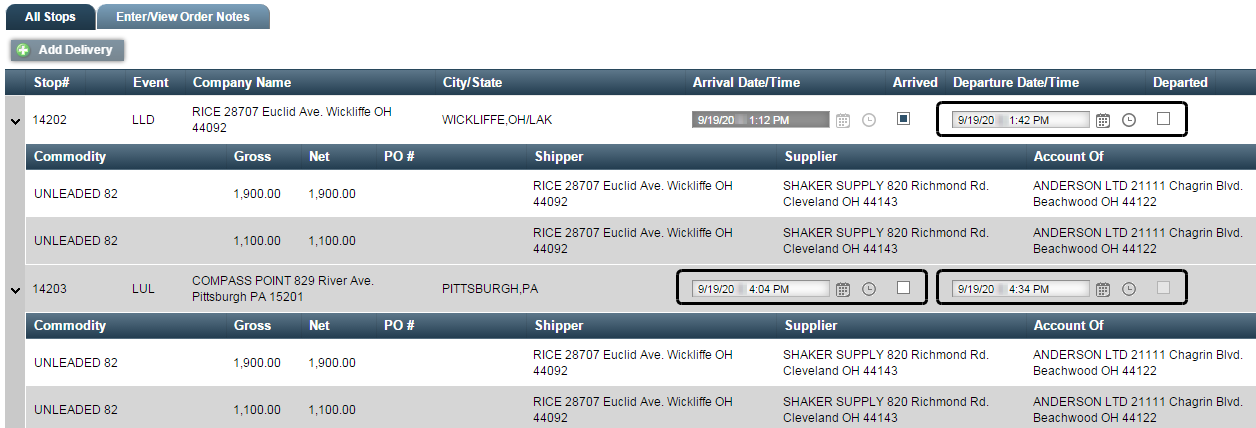
In this example of an assigned load, the user can update only the date/time for the three remaining unactualized stops.
Preventing carriers from actualizing departures on trips with a specific status
By default, carriers who are assigned to a load can actualize the stops on those trips. If you want, you can prevent carriers from actualizing the departure for a stop when a trip has a particular status (for example, Planned, Started).
To prevent carriers from actualizing stops for trips with a particular status, follow these steps.
-
Go to Menu > Configuration > Settings Manager.
The Settings Manager page opens. -
Do one of the following:
-
If you want the setting change to apply to all roles, verify the Role field is set to [Global Settings].
-
If you want the setting change to apply to a specific role, select it in the Role field.
A message asks you to verify that you want to change the role. Click OK to continue.If the setting has already been changed for at least one role, its text label is bold and italic.
-
-
On the Modules tab, in the Module Selection field, select Carrier.
-
Click these tabs: Application Settings > Load Details > Fuel.
-
In the Disable Actualization For These Statuses field, enter each status in a comma-separated list, using the abbreviation from the DispStatus label in TMWSuite System Administration.
-
To save your changes, click
Save.
A message indicates that your changes were saved successfully.If you are making changes for a specific role and this is the first time the setting has been changed for any role, the text label style changes to bold and italic.
In this assigned load, the departure dates/times for trips with a status of Planned cannot be actualized. Because the Departed check boxes are grayed out, the carrier cannot actualize the departure date/time for each stop.
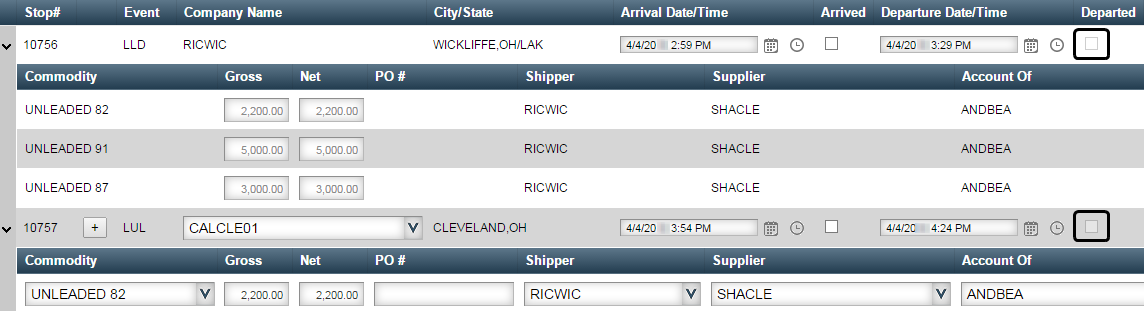
Note: The carrier can actualize the arrival events and update the date/time for all unactualized stops.
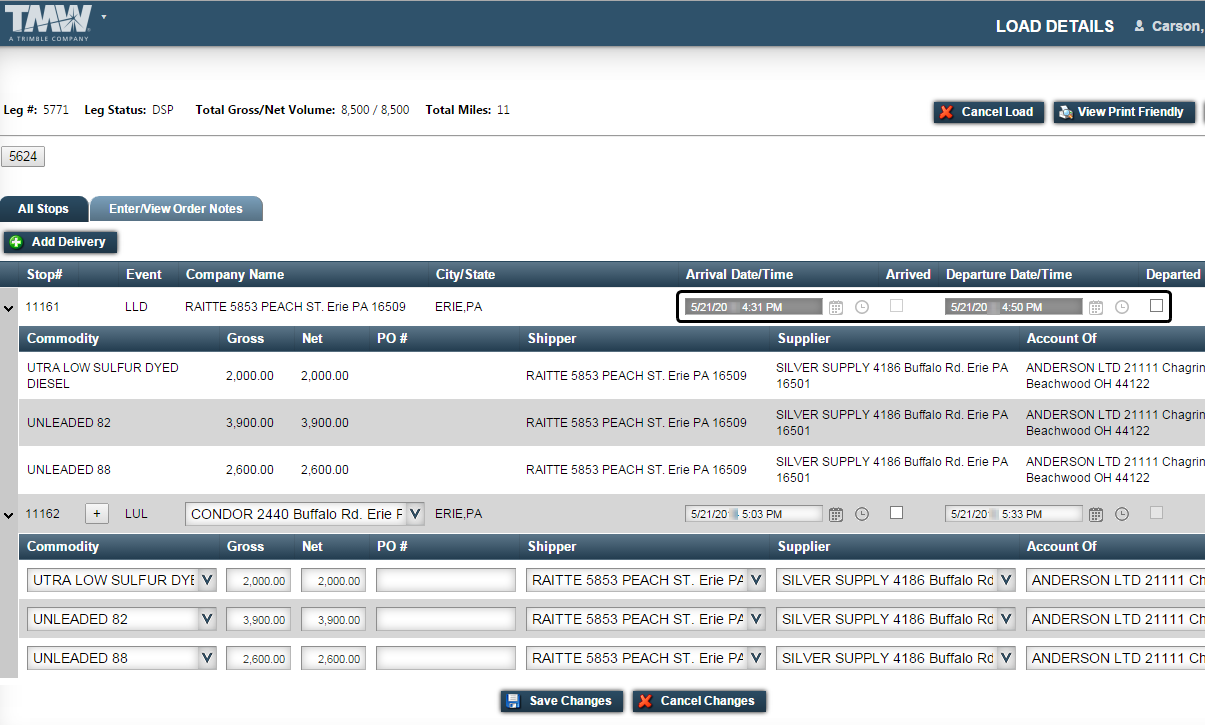
Preventing carriers from updating a Live Load’s date/time
By default, carriers who are assigned to a load can change the date/time for unactualized Live Load events. If you want, you can prevent carriers from changing the date/time for these events when the trip has a status of Dispatched (DSP).
To prevent carriers from changing the date/time for unactualized Live Load events, follow these steps.
-
Go to Menu > Configuration > Settings Manager.
The Settings Manager page opens. -
Do one of the following:
-
If you want the setting change to apply to all roles, verify the Role field is set to [Global Settings].
-
If you want the setting change to apply to a specific role, select it in the Role field.
A message asks you to verify that you want to change the role. Click OK to continue.
If the setting has already been changed for at least one role, its text label is bold and italic.
-
-
On the Modules tab, in the Module Selection field, select Carrier.
-
Click these tabs: Application Settings > Load Details > Fuel.
-
Select the Disable Dispatched Pickup Stops check box.
-
To save your changes, click
Save.
A message indicates that your changes were saved successfully.If you are making changes for a specific role and this is the first time the setting has been changed for any role, the text label style changes to bold and italic.
In this example of an assigned load, the leg status is DSP. The arrival and departure for this event have not been actualized. Date/time and departure date/time for the Live Load event have not been actualized. The carrier cannot update the date/time for the arrival or the departure because both are grayed out.