Setting up eStat for Simple Quote Requests
Users can create simple quote requests for shipments on the Simple Quote Request page. They review the details of their processed quotes on the Quote Entry page.
You can customize the appearance and functionality of these pages to meet the needs of your company.
|
When the user submits a quote request, you must process it in your dispatch system. The processing involves:
When you save the quote, it appears in the user’s Quote Board page. |
The Settings Manager page contains most of the options for setting up the Simple Quote Request page. The options are found on the Shipment Tender tab.
Setting default field values on the Simple Quote Request page
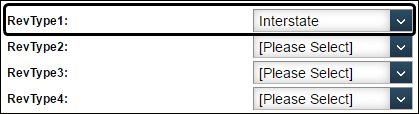
To make data entry easier for your users, you can set default values for fields on the Simple Quote Request page.
For example, you can specify which RevType1 value will appear on the page when a user starts a new simple quote request.
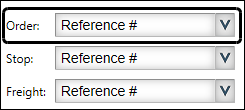
Setting default reference number types for simple quote requests
Users can record a reference number for the quote header in the page’s Simple Quote Request section.

If you want, you can specify which reference number type will default for these reference numbers.
|
To specify default reference number types for new orders, follow these steps.
-
Go to Menu > Configuration > Settings Manager.
The Settings Manager page opens. -
Do one of the following:
-
If you want the setting change to apply to all roles, verify the Role field is set to [Global Settings].
-
If you want the setting change to apply to a specific role, select it in the Role field.
A message asks you to verify that you want to change the role. Click OK to continue.Note: If the setting has already been changed for at least one role, its text label is bold and italic.
-
-
On the Modules tab, in the Module Selection field, select Customer.
-
Click these tabs: Application Settings > Shipment Tender > Defaults.
-
In the Default Reference Number Types section, select the reference number type to attach to a quote header.
-
Click Save.
A message appears at the top of the page, stating your settings were saved successfully.
If you are making changes for a specific role and this is the first time the setting has been changed for any role, the text label style changes to bold and italic.If you do not want to save, click Revert instead. The application cancels any unsaved changes and reverts to the last saved settings.
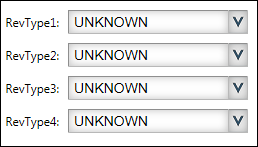
Setting default revenue types for simple quote requests
To assist with data entry, you can set default revenue types on the Simple Quote Request page.
|
To set default revenue types for new orders, follow these steps.
-
Go to Menu > Configuration > Settings Manager.
The Settings Manager page opens. -
Do one of the following:
-
If you want the setting change to apply to all roles, verify the Role field is set to [Global Settings].
-
If you want the setting change to apply to a specific role, select it in the Role field.
A message asks you to verify that you want to change the role. Click OK to continue.Note: If the setting has already been changed for at least one role, its text label is bold and italic.
-
-
On the Modules tab, in the Module Selection field, select Customer.
-
Click these tabs: Application Settings > Shipment Tender > Defaults.
-
In the Default Revenue Types section, select the default revenue types.
-
Click Save.
A message appears at the top of the page, stating your settings were saved successfully.
If you are making changes for a specific role and this is the first time the setting has been changed for any role, the text label style changes to bold and italic.If you do not want to save, click Revert instead. The application cancels any unsaved changes and reverts to the last saved settings.
Specifying how users can select Bill To companies on the Simple Quote Request page
When entering a quote on the Simple Quote Request page, a user will identify the order’s Bill To, origin, and destination.
For simple quote requests, you can determine how the Bill To company is identified. The shipper and consignee lists will include all Bill To companies that are flagged as shippers or consignees.
|
When users enter a new order on the Simple Quote Request page, they identify the Bill To (the company that will pay the shipment cost). While the system initially identifies the Bill To as the default company listed in the user’s profile, you can allow the user to select the Bill To from a list of companies.

The list can include:
-
All companies in your database that are flagged as Bill To companies
-
Only Bill To companies from the user’s associate companies list
-
Only Bill To companies from the user’s profile companies list
To indicate which Bill To companies a user can include on a quote, follow the steps.
-
Go to Menu > Configuration > Settings Manager.
The Settings Manager page opens. -
Do one of the following:
-
If you want the setting change to apply to all roles, verify the Role field is set to [Global Settings].
-
If you want the setting change to apply to a specific role, select it in the Role field.
A message asks you to verify that you want to change the role. Click OK to continue.
-
-
On the Modules tab, in the Module Selection field, select Customer.
-
Click these tabs: Application Settings > Shipment Tender > Controls - 1.
-
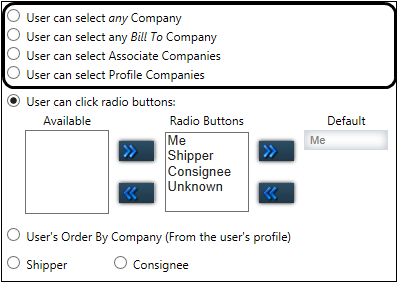
In the How the Bill To is selected section, select the radio button for the selection method you want to use.
-
User can select any Company
This option does not apply. -
User can select any Bill To Company
The application will provide a drop-down list of all Bill To companies. -
User can select Associate Companies
The application will provide a drop-down list limited to companies identified as associate companies in the user’s Trimble Web Products profile.Note: For more information on building a user’s associate companies list, see Creating primary users - eStat settings.
-
User can select Profile Companies
The application will provide a drop-down list limited to companies identified as profile companies in the user’s Trimble Web Products profile.Note: For more information on building a user’s profile companies list, see Creating primary users - eStat settings.
-
-
Click Save.
A message appears at the top of the page, stating your settings were saved successfully.If you do not want to save, click Revert instead. The application cancels any unsaved changes and reverts to the last saved settings.
Controlling the behavior of the Simple Quoting module
You can determine how the Simple Quoting module:
Specifying how company information appears in lists
When users create orders on the Simple Quote Request page, they specify where a stop takes place using the Shipper Name and Consignee Name fields in the Origin and Destination sections of the page.

The field provides a drop-down list of all the active Bill To companies in your TMWSuite database flagged as shippers or consignees.
By default, the drop-down lists display the company’s name and address. If you want, you can change what company information appears.
To specify how company information appears in lists, follow these steps:
-
Go to Menu > Configuration > Settings Manager.
The Settings Manager page opens. -
Do one of the following:
-
If you want the setting change to apply to all roles, verify the Role field is set to [Global Settings].
-
If you want the setting change to apply to a specific role, select it in the Role field.
A message asks you to verify that you want to change the role. Click OK to continue.
-
-
On the Modules tab, in the Module Selection field, select Customer.
-
Click these tabs: Application Settings > Global.
-
In the What company information is displayed in fields and drop-down lists section, select the radio button for the option you want to use.
-
Company name and address

-
Company ID, name and address

-
Company name only

-
Company ID only

-
-
Click Save.
A message appears at the top of the page, stating your settings were saved successfully.If you do not want to save, click Revert instead. The application cancels any unsaved changes and reverts to the last saved settings.
Hiding event numbers on the Quote Entry page
By default, the Quote Entry page shows event numbers in the Events section.

If you want, you can hide the event numbers.
To hide event numbers, complete the following steps:
-
Go to Menu > Configuration > Settings Manager.
The Settings Manager page opens. -
Do one of the following:
-
If you want the setting change to apply to all roles, verify the Role field is set to [Global Settings].
-
If you want the setting change to apply to a specific role, select it in the Role field.
A message asks you to verify that you want to change the role. Click OK to continue.Note: If the setting has already been changed for at least one role, its text label is bold and italic.
-
-
On the Modules tab, in the Module Selection field, select Customer.
-
Click these tabs: Application Settings > Shipment Tender > Misc.
-
In the Miscellaneous section, select the Hide Event Numbers check box.
-
Click Save.
A message appears at the top of the page, stating your settings were saved successfully.
If you are making changes for a specific role and this is the first time the setting has been changed for any role, the text label style changes to bold and italic.If you do not want to save, click Revert instead. The application cancels any unsaved changes and reverts to the last saved settings.
Preparing the Simple Quoting module
Before your users can start creating and sending quote requests in the Simple Quoting module, you must:
-
Grant users access to the quoting request pages within the Simple Quoting module.
-
Verify that e-mail notifications are set up correctly.
Assigning the Customer role to pages in the Simple Quoting module
To assign the Customer role to quoting request pages within the Simple Quoting module, follow these steps.
-
Go to Menu > Security > Page Security > Assign Role to Pages.
The Assign Role to Pages page opens. -
In the Available Roles field, select the Customer role.
-
In the Pages Available to Assign list, hold CTRL and click on each of the following pages:
-
Quote Board [QuoteLoads.aspx]
-
Quote Entry [SH_TenderShipment.aspx]
-
Simple Quote Request [SimpleQuoteRequest.aspx]
-
-
Drag the page(s) to the Pages Assigned to Role list.
Any pages you selected move to the Pages Assigned to Role list.
Setting up Simple Quoting e-mail notifications
To set up Simple Quoting e-mail notifications, follow these steps.
-
Create simple quoting e-mail group(s).
Ensure all options in both State lists are selected for each group.
Note: Do not select any other criteria.
-
Check that the following notification e-mail templates are configured properly:
-
QuoteAccepted
-
QuoteRefused
-
-
Verify that the following events are set to automatically generate e-mail messages:
-
QuoteAccepted
-
QuoteRefused
-
-
Associate e-mail addresses for event notification.