Where loads are assigned
TMW Operations has these windows that you can use to plan trips:
-
Non-shift based
-
Trip Folder
The Trip Folder is designed for non-shift based dispatch. It is used primarily by dispatchers who communicate regularly with drivers and/or carriers about their trip assignments. It is used to assign resources to an individual trip, and to enter updates as the trip progresses to completion.
-
Planning Worksheet
The Planning Worksheet is a load planning and resource management tool for non-shift based dispatch. It is used to review outbound and inbound trips, and to match resources to outbound trips that are ready for dispatch.
-
-
Shift based
Trip Planner
The Trip Planner is designed primarily for operations personnel who assign trips to drivers operating on regular shifts. It displays assigned trips in a graphical timeline of the driver’s shift. This allows you to easily sequence trips to reduce driver downtime.
| Do not use non-shift based windows to manage shift-based trips and resources. For example, you should not assign drivers with shift schedules to trips using the Trip Folder or Planning Worksheet. |
Trip Folder
The Trip Folder is designed for non-shift based dispatch. It is used primarily by dispatchers who communicate regularly with drivers and/or carriers about their trip assignments. It is used to assign resources to an individual trip, and to enter updates as the trip progresses to completion. Primary information in this folder includes:
-
Dates, times and locations of all stops
-
Commodity-related data
-
Events that occur at individual stops
-
Resources (driver, tractor, trailer, and/or carrier) assigned to the trip
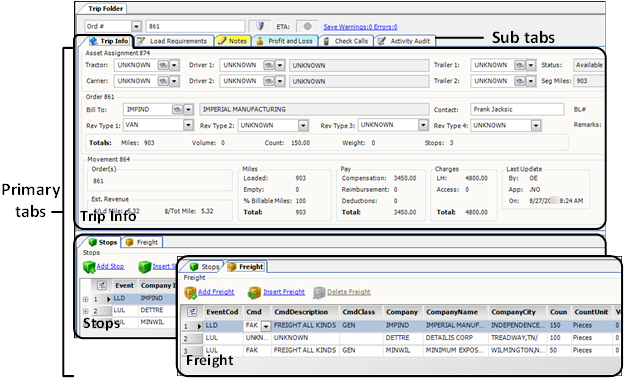
Primary tabs |
The Trip Folder consists of three primary tabs:
|
Sub tabs |
To the right of the Trip Info tab are multiple tabs, which provide supplemental information about the trip. The default sub tabs are: Load Requirements, Notes, Profit and Loss, Check Calls, Activity Audit, and Paperwork. Some TMW Operations features that are enabled with configuration settings also display additional sub tabs in the Trip Folder. |
Primary tabs
On the Trip Folder, primary trip information is shown on the Trip Info, Stops, and Freight tabs.
Trip Info tab
The Trip Info tab is the first tab in the top half of the window. The information it displays applies to the trip as a whole.

A |
Use this section to assign a tractor, drivers, trailers, and/or a carrier to the trip. |
B |
In this area, you can:
|
C |
This section provides read-only information regarding the number of loaded and empty miles, total pay, the total line haul and accessorial dollar amount, and estimated revenue. |
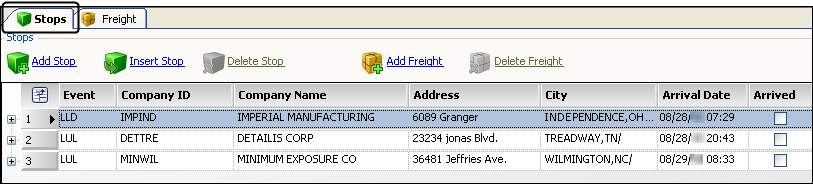
Stops tab
The Stops tab is located under the Trip Info tab. Information is shown in a spreadsheet-style grid. The grid allows you to add, modify, and delete billable and non-billable stops.
In the Stops grid, each row represents a billable or non-billable stop.
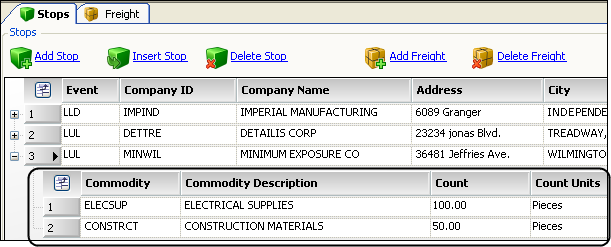
By default, commodity information is not shown in the Stops grid. However, you can use the ![]() Expand button to the left of each billable stop to toggle a nested freight grid into view. You can use that grid to enter, update, and view commodity details. In this illustration, two freight details are displayed for the third stop.
Expand button to the left of each billable stop to toggle a nested freight grid into view. You can use that grid to enter, update, and view commodity details. In this illustration, two freight details are displayed for the third stop.
When you click on the Expand button to the left of a billable stop, the system displays the commodities recorded for that stop.
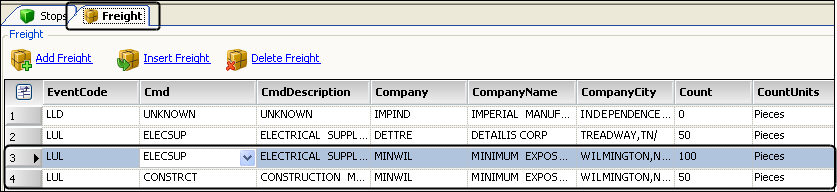
Freight tab
The Freight tab is located to the right of the Stops tab. When you first access the Trip Folder, it is not visible. You must click on it to toggle it into view.
Like the Stops tab, it shows data in a spreadsheet-style grid. Each row represents a freight detail; at least one freight detail exists for every stop. You can use the grid to add, edit, or delete commodity information for each billable stop. Non-billable stops are not listed.
In this example of the Freight tab, note that the final consignee is listed twice because two commodities are to be dropped at that stop.
In the Freight grid, each row represents a commodity.
Sub tabs
On the Trip Folder, multiple tabs are shown to the right of the Trip Info tab. They provide information such as the equipment accessories or driver certifications needed for the trip, free-form notes, billing and pay details, a record of contact made with the driver, and a history of changes made to the trip.
Load Requirements tab
The Load Requirements tab allows you to record special criteria that resources must/must not or should/should not have in order to be assigned to the order. If a resource does not meet a must/must not have requirement, the system will prevent dispatch. The tab turns blue to signal that at least one load requirement exists.

Notes tab
The Notes tab allows you to enter, view, and delete free-form notes about the order, the entire movement, companies listed on the trip, commodities, and resources.

The color of the Notes tab signifies the status of the note(s) attached.
-
Gray
No active notes are attached. Expired notes may be attached. -
Yellow
At least one active note is attached, and none of the active notes has an Alert/Note status of Alert. However, expired notes with an Alert status may be attached. -
Red
At least one active note with a status of Alert is attached.
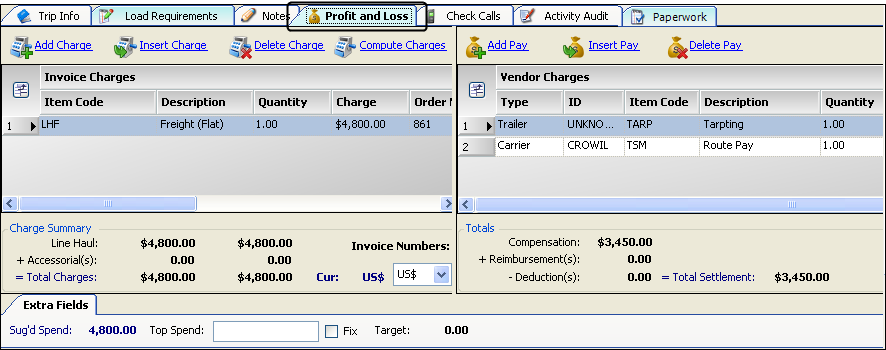
Profit and Loss tab
On the Profit and Loss tab, you can enter invoice details and pay details in one place, which enables you to see at a glance how profitable the trip is. The tab turns blue if at least one invoice detail or pay detail has been entered.
Check Calls tab
The Check Calls tab allows you to enter or look up records regarding a check call that is associated with an order.

For more information, see Recording and reviewing check calls.
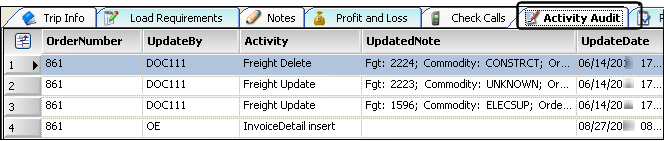
Activity Audit tab
The Activity Audit tab allows you to view a list of the changes made to an order. Each entry identifies the action taken, the ID of the user who made the change, and the date/time of the change.
For more information, see Tracking changes to orders or trips.
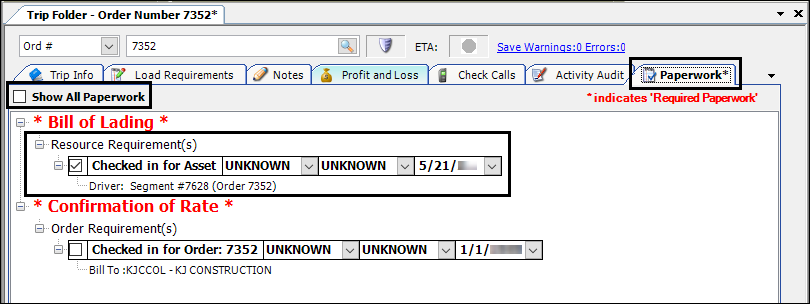
Paperwork tab
The Paperwork tab displays a list of required and optional paperwork. To check in paperwork, select its checkbox. Select the Show All Paperwork checkbox to show all items.
For more information, see Checking in paperwork.
Planning Worksheet
The Planning Worksheet is a load planning and resource management tool for non-shift based dispatch. It is used to review outbound and inbound trips, and to match resources to outbound trips that are ready for dispatch.
To access the Planning Worksheet, go to Operations > Planning Worksheet.
The Planning Worksheet Grid consists of two grids: the Available Trips grid on the top and the Available Resources grid(s) at the bottom.
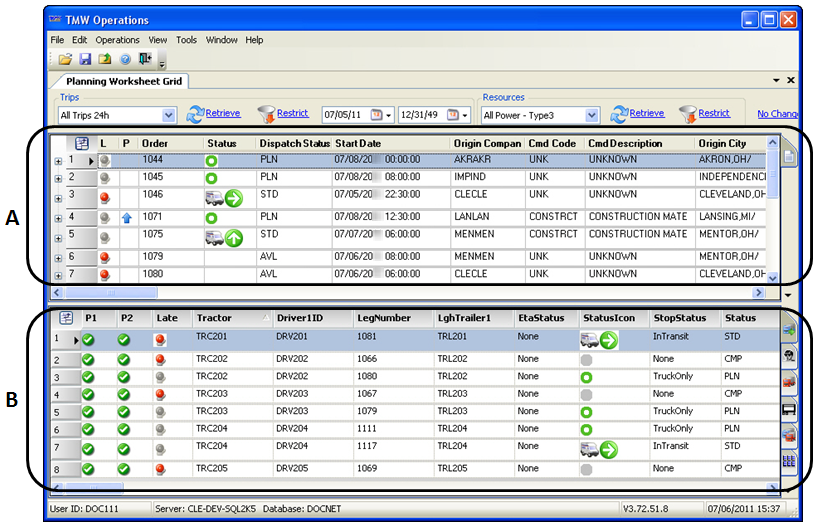
A |
The Available Trips grid lists outbound trip segments that are ready for dispatch. This window can be considered a to do list. Usually, it displays the trips that have not yet begun. Trips are listed according to their origin points. |
B |
By default, the Available Resources grid lists resources according to tractor ID and the inbound trip segments to which they were assigned most recently. Trips are listed according to their destinations so you can see where and when resources are (or will be) available. |
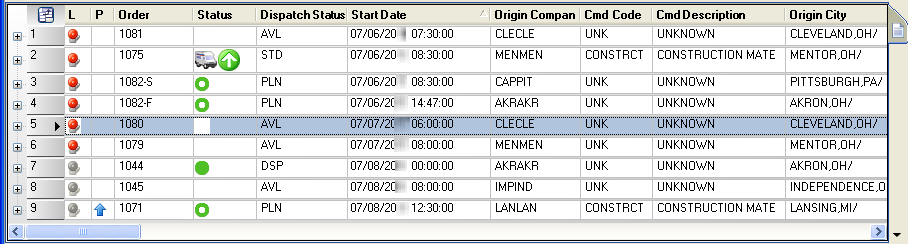
Available Trips grid
The Available Trips grid is located in the upper portion of the Planning Worksheet. It allows you to view a list of outbound trip segments that are ready for dispatch. These trip segments are listed according to origin. Usually, the window is configured to list trips that have any of these dispatch statuses:
-
Available
Trip is ready for dispatch, but resources have not yet been assigned -
Planned
Tentative resource assignment has been made, but the driver has not yet been informed of the assignment -
Dispatched
Solid resource assignment has been made and the driver has been informed of the assignment; however, the trip has not yet begun -
Started
The trip is in progress
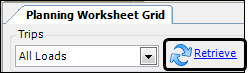
To display data in the Available Trips grid, do one of the following:
-
Go to File > Retrieve Trips.
-
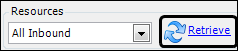
Click the Retrieve icon on the Available Trips grid.
A line of data is displayed for each trip segment listed. The Available Trips grid is shown here with sample data:
Available Resources grids
On the Planning Worksheet, the Available Resources grids, also known as the Available Power grids, are used to determine which resources are (or will be) available for dispatch in particular locations. All of the grids except for the Carrier grid display information from the resource’s profile and information from the trip(s) to which the resource is assigned. The Carrier grid displays only profile information.
Depending on the view currently in use, the displayed trips may have any of these dispatch statuses:
-
Available
Trip is ready for dispatch, but resources have not yet been assigned -
Planned
Tentative resource assignments have been made, but the driver has not yet been informed of the assignment -
Dispatched
Solid resource assignment has been made and the driver has been informed of the assignment; however, the trip has not yet begun -
Started
The trip is in progress -
Completed
Assigned resources have reached the final destination
In this window, resource information can be displayed in different configurations:
Inbound tab
In the default configuration for the Available Resources grid, resources are listed with the trip segments to which they are currently (or most recently) assigned. The trip segments are sorted according to destination. Data arranged in this way is particularly useful if your company handles long hauls and each driver generally operates the same tractor and trailer on each trip.
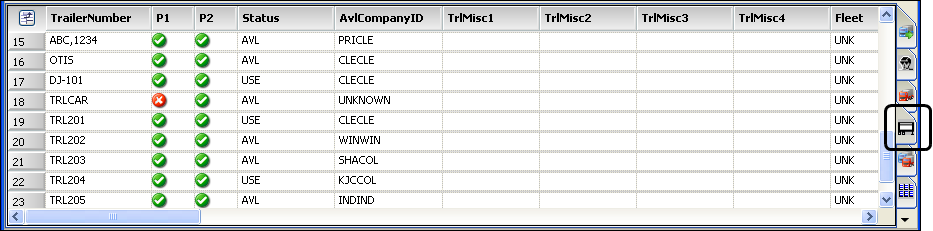
Clicking the Inbound tab causes the Available Resources grid to list resources by resource and trip segment. The Inbound grid is shown here with sample data.

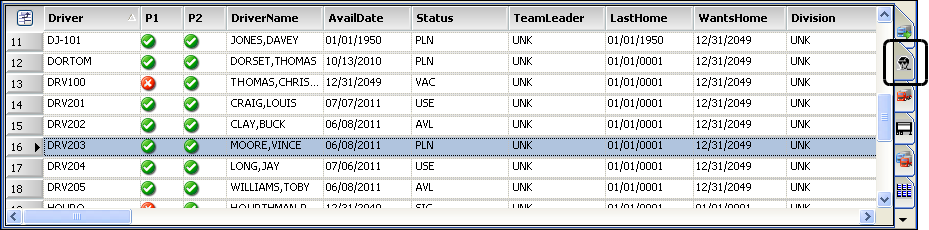
Driver tab
When the Driver tab is selected for the Available Resources grid, the system displays a list of drivers. Each driver record shows data recorded in the driver’s profile.
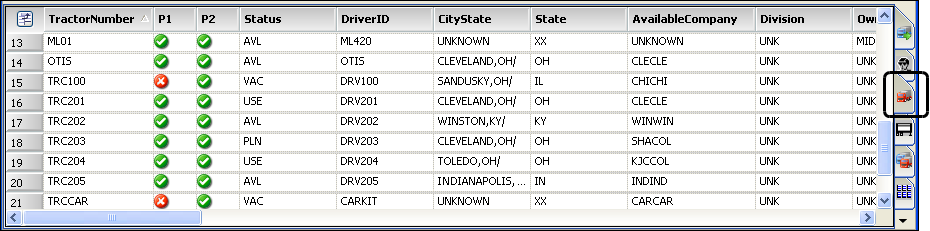
Tractor tab
When the Tractor tab is selected for the Available Resources grid, the system displays a list of tractors. Each tractor record shows data recorded in the tractor’s profile.
Trailer tab
When the Trailer tab is selected for the Available Resources grid, the system displays a list of trailers. Each trailer record shows data recorded in the trailer’s profile.
Carrier tab
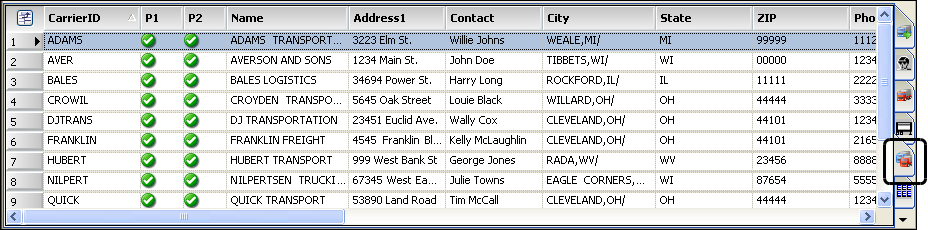
When the Carrier tab is selected for the Available Resources grid, the system displays a list of carriers. Each tractor record shows data recorded in the carrier’s profile.
All tabs
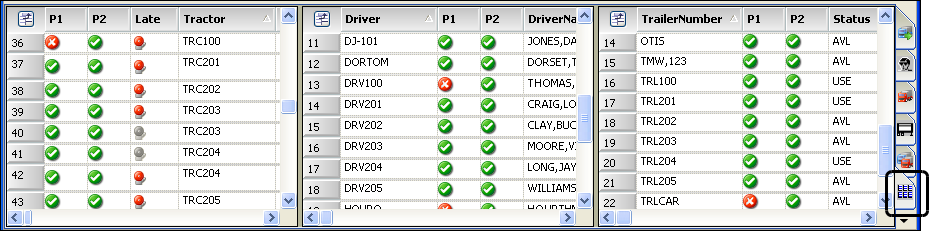
When the All tab is selected for the Available Resources grid, records are listed in a three-column grid. The Inbound grid is listed in the first column, the Driver grid is listed in the second column, and the Trailer grid is listed in the third column. This configuration is shown in this illustration:
To display data in the Available Resources grids, do one of the following:
-
Go to File > Retrieve Resources.
-
Click the Retrieve icon on the Available Resources grid.
-
Go to File > Retrieve All, or press CTRL+R.
NOTE: This causes the system to retrieve records in both the Available Trips and Available Resources grids.
Trip Planner
The Trip Planner is designed primarily for operations personnel who assign trips to drivers operating on regular shifts. It displays assigned trips in a graphical timeline of the driver’s shift. This allows you to easily sequence trips to reduce driver downtime.
To access the Trip Planner, go to Operations > Trip Planner.
The Trip Planner has four main sections:
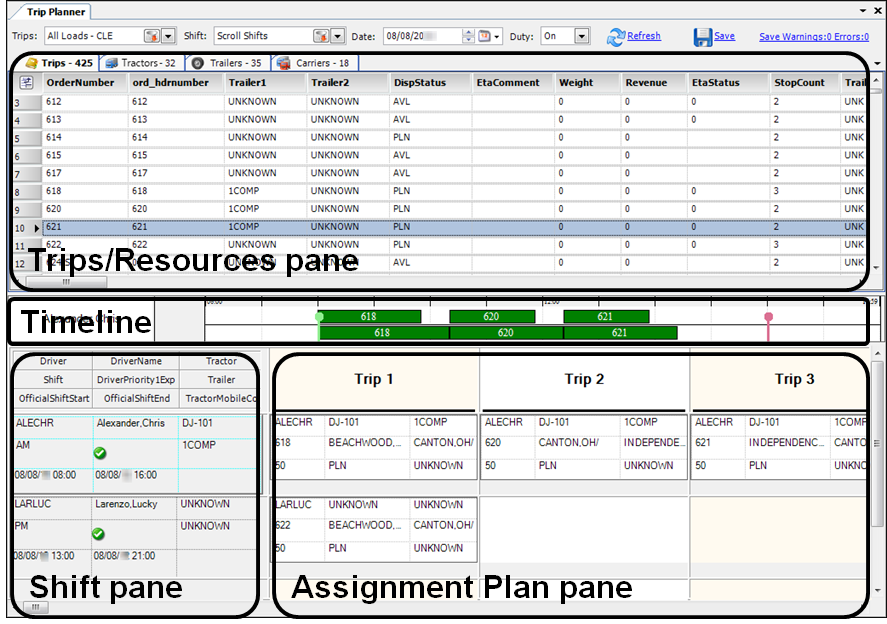
Trips/Resources pane |
The Trips/Resources pane lists trip segments and equipment available for assignment to a driver. |
Timeline |
The Timeline, also called the Gantt bar, shows the trip status and duration for all trips assigned to a driver. It also shows the start and end of the driver’s shift. |
Shift pane |
The Shift pane lists the drivers that are on duty for the selected date. It also lists any tractor or trailer associated with each driver. |
Assignment Plan pane |
The Assignment Plan pane allows you to plan the trips a driver will complete during his/her shift. You can assign trips to drivers by dragging them from the Trips/Resources pane. You also can rearrange assigned trips or assign them to a different driver. |
Trips/Resources pane
The Trips/Resources pane is located in the upper portion of the Trip Planner. This pane allows you to view the trips and resources available for assignment to a driver.
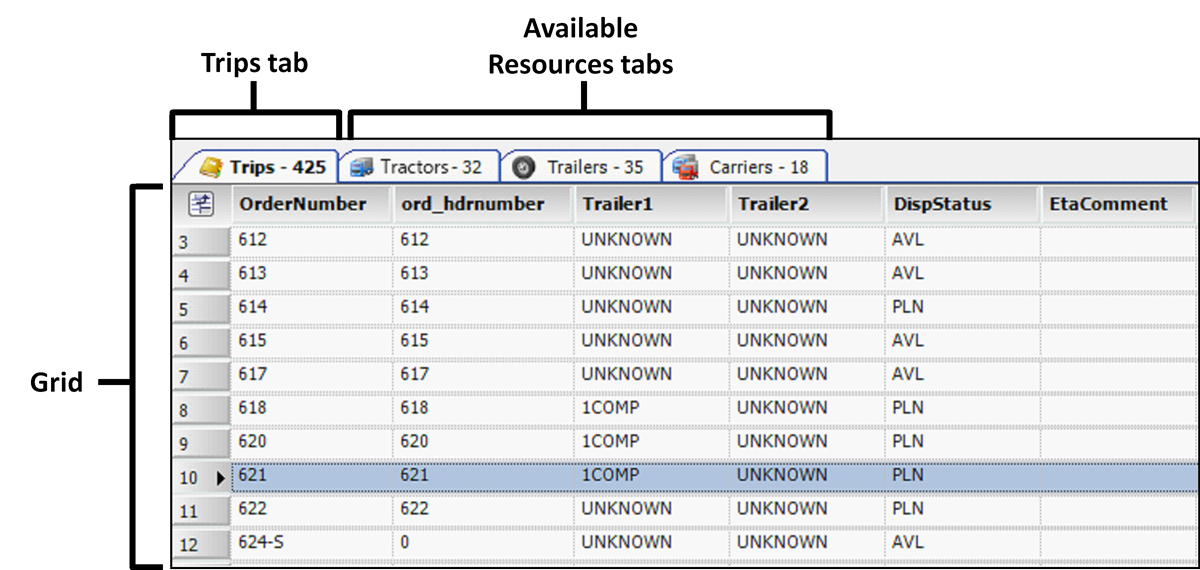
The Trips/Resources pane has four grids.
Trips grid |
Lists outbound trip segments that are ready for dispatch. This grid can be considered a to-do list. It displays a line of data for each trip segment listed. |
Available Resources grids |
List which resources are (or will be) available for dispatch in particular locations. There is a grid for each resource type:
The data shown reflects information that is stored in each resource’s profile. |
Timeline
The Timeline, also called the Gantt bar, is below the Trips/Resources pane.
![]()
The Timeline shows the status and duration of every trip assigned to a driver during his/her shift. The example above shows a driver with two trips assigned. The first trip is light blue, indicating that the trip is in progress. The second trip is green, indicating that the trip is planned but has not yet started.
Shift pane
The Shift pane is located in the lower left corner of the Trip Planner.
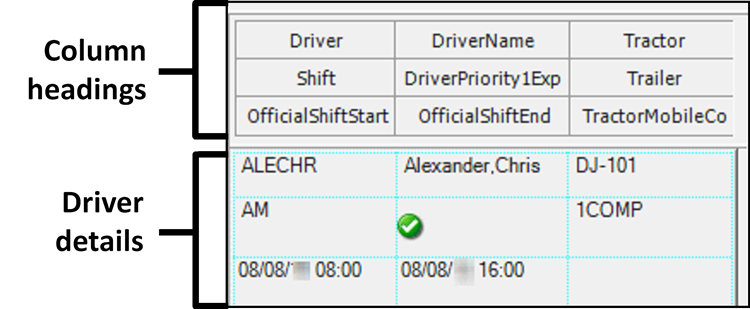
This pane lists available drivers and their details. By default, the pane only shows drivers that are on duty for the selected date. Dragging a resource from the Trips/Resources pane to a driver’s entry in the Shift pane will assign that resource to that driver.
Assignment Plan pane
The Assignment Plan pane is located in the lower right corner of the Trip Planner.
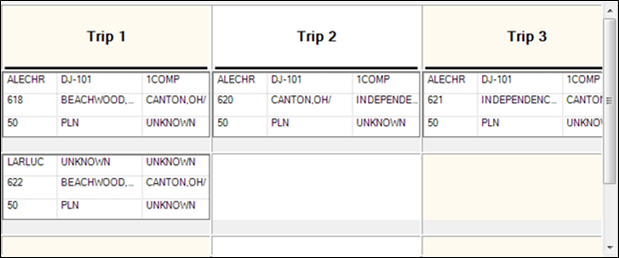
This pane shows trips currently assigned to drivers. Trips are shown in blocks of time, making it easy to sequence trips and determine the length of a time that a driver will work continuously. The trip time blocks can be thought of as electronic versions of index cards on your desktop. There is one card for each trip. You can move trips around and line up several for a driver so that one trip ends near where the next begins.