Recording service exceptions
You can manually enter service exceptions for a move that were caused by:
-
A driver
-
A carrier
-
Equipment
-
A shipper
-
A consignee
-
A user, which could be a customer service representative or a dispatcher
For each service exception, you can record the corrective action taken. For those that are driver-specific, you can indicate whether the exception should affect pay.
|
Any service exception for a move associated with an order applies to both the move and the order. |
Setting up service exception label files
The service exception label options that appear in the Service Exceptions window come from these labels:
-
ReasonLate
Identifies the reason a service exception occurred.Sample options include:
-
Accident
-
Breakdown
-
Road Construction
-
Detour
-
Data Entry Error
-
Dock Closed
-
-
ActionCode
Identifies the corrective actions that may be taken to handle a service exception.Sample options include:
-
Driver Counseled
-
Tractor Repaired
-
Customer Called
-
User Counseled
-
-
ServiceExceptionLate
Identifies the event affected by the service exception.Sample options include:
-
Pickup
-
Delivery
-
Relay
-
Your company defines the options in the Edit User Definable Fields window. For details, see Using the label file to customize fields.
Adding service exceptions
The Service Exceptions window includes fields to report service exception details.
|
The grid at the top of the window is read-only. |
-
Go to Operations > Trip Folder.
The Trip Folder opens. -
Retrieve the order or move associated with the service exception.
-
Go to Edit > Service Exceptions.
The Service Exceptions window opens. -
Click Add.
A new row appears on the data grid.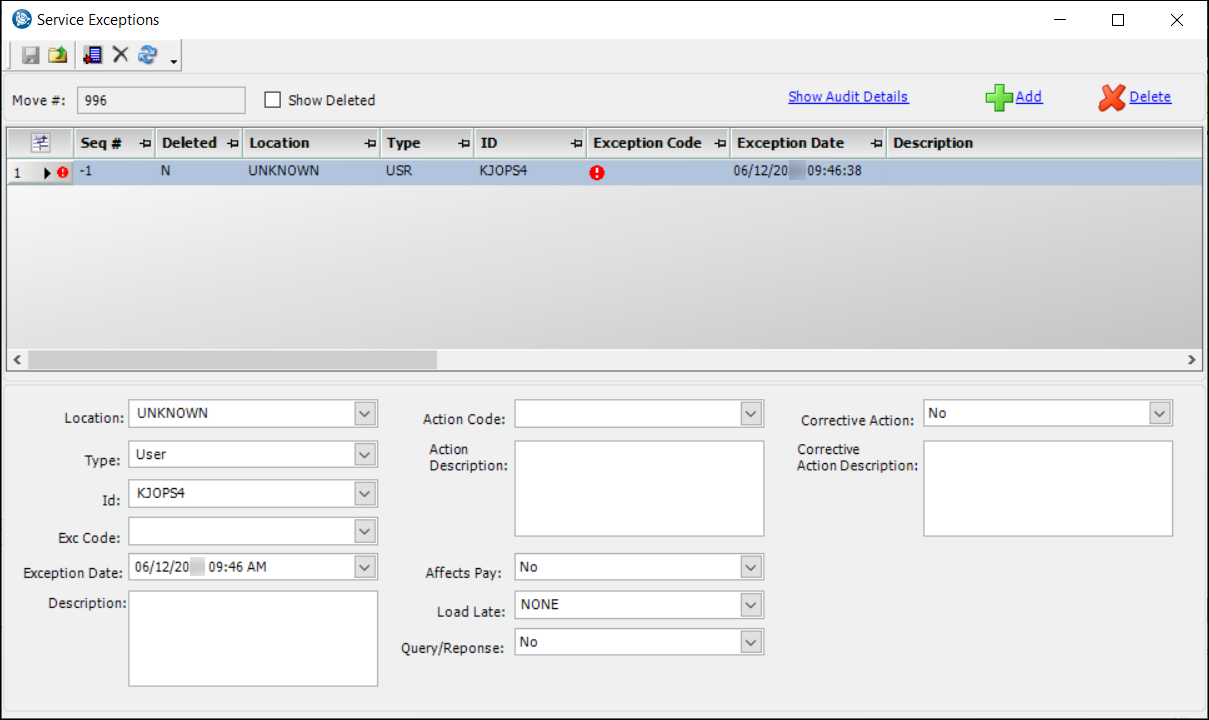
-
Make entries in the appropriate fields at the bottom of the window:
Required field: *
Read-only field: §Field Definition Location
If the exception took place at a company, select its ID.
Type*
Select the category of the party responsible for the service exception. Options are:
-
User
-
Driver
-
Tractor
-
Trailer
-
Carrier
-
Company
Id*
Enter the ID of the responsible party.
Note: The field automatically displays the primary ID of the selected Type associated with the move. If necessary, you can override this entry. For example, if there are two drivers on the move and you select Driver in the Type field, the system populates the field with the ID of the primary driver. You may manually enter the second driver’s ID.
Exc Code*
Select the reason for the exception.
Note: The options are set up in the ReasonLate label.
Exception Date
Enter the date and time that the exception was recorded.
Note: This field defaults to the current system date/time.
Description
Describe the reason for the exception.
The field allows up to 2000 characters.Action Code
Select the action taken in response to the exception.
Note: The options are set up in the ActionCode label.
Action Description
Describe the action taken.
Affects Pay
Select Yes if the exception will affect how the resource is paid.
Notes:
-
This field is applicable for resource-specific exceptions.
-
This entry is informational only. Actual changes to pay must be performed manually.
Load Late
Select the option that defines the part of the load that was late.
Note: The options are set up in the ServiceExceptionLate label.
Query/Response
Select Yes if the customer must be notified of the service exception.
Corrective Action
Select Yes if corrective action was applied.
Corrective Action Description
Describe the corrective action.
Misc1
First available in V.2022.3
Extra string field to record additional information.Misc2
First available in V.2022.3
Extra string field to record additional information.Misc3
First available in V.2022.3
Extra string field to record additional information.Misc4
First available in V.2022.3
Extra string field to record additional information.Notes:
-
The four Misc fields let you add additional input methods such as Textbox, Labelfile dropdown, and Instant Best Match. The fields are available through QuickDesigner and can be screen designed onto the window.
-
These fields are limited to 100 characters.
For details, see Adding Misc Fields.
-
These read-only fields appear in the data grid.
Created By§ |
ID of the user who created the exception record |
Created Date§ |
Date/time the exception was first saved |
Action User ID§ |
ID of the user who last edited the Action Code field. If no option is selected in the Action Code field, this field is blank. |
Action Date§ |
Date/time the Action Code field option was last updated. If no option is selected in the Action Code field, this field is blank. |
-
Repeat steps 4 and 5 for each additional exception.
-
Click Save.
-
Click Close.
Deleting service exceptions
If you want to remove a service exception from a move, you can delete it.
|
-
Go to Operations > Trip Folder.
The Trip Folder opens. -
Retrieve the order or move associated with the service exception.
-
Go to Edit > Service Exceptions.
The Service Exceptions window opens. -
Click on the service exception you want to delete from the move.
-
Click Delete.
-
When the Confirm Delete message appears, click Yes.
-
Click Save.
The deleted service exception is no longer shown. To view it, select the Show Deleted checkbox.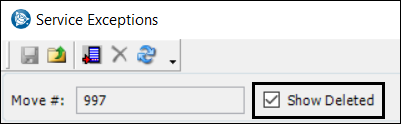
-
Click Close.
Viewing deleted service exceptions
-
Go to Operations > Trip Folder.
The Trip Folder opens. -
Retrieve the order or move associated with the service exception.
-
Go to Edit > Service Exceptions.
The Service Exceptions window opens. -
Select the Show Deleted checkbox.
Deleted service exceptions appear with a gray background. You cannot edit a deleted service exception. When you select one, the editable fields at the bottom of the window are locked.
-
Click Close.
Reviewing Service Exception Audit Details
When you delete or change any of these fields, the system creates audit details:
-
Type
-
Id
-
Exc Code
-
Affects Pay
To view service exception audit details for a move:
-
Go to Operations > Trip Folder.
The Trip Folder opens. -
Retrieve the order or move associated with the service exception.
-
Go to Edit > Service Exceptions.
The Service Exceptions window opens. -
Click the Show Audit Details link. The Service Exception Audit Details window opens. It provides a list of all tracked field changes made after the record was first saved.
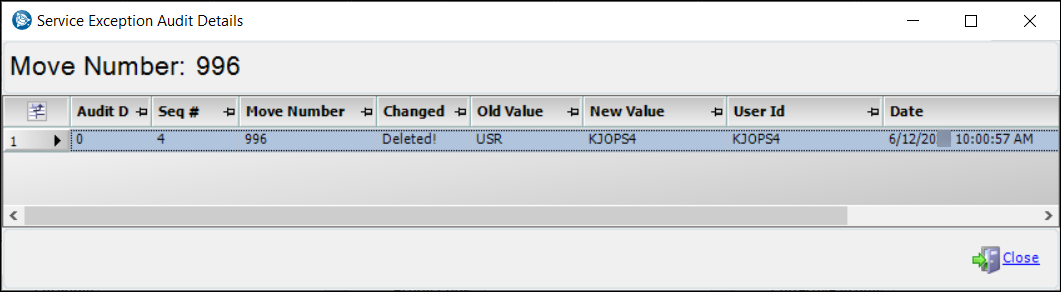
Audit details appear in these fields:
Audit Detail Seq #
Lists the order of the audits included on the Service Exceptions window
Note: If this field is set to 0, the record was deleted.Seq #
Corresponds to the Seq # field in the Service Exceptions window
Move Number
System-assigned numeric ID for the trip
Changed
Name of the column in which a different value was recorded
Note: If an exception was deleted, Deleted! appears in this column.
Old Value
Original entry
New Value
Value that was saved in place of the original entry
User Id
User ID of the person who made the change
Date
Date and time that the change was made
-
Click Close.
Adding Misc Fields
First available in V.2022.3
In the Service Exceptions window you can use additional Misc fields for recording purposes. Some of the notable Control Type options you can use are Textbox, LabelFileDropDown and UseInstantBestMatch.
For example, with these options you can enter additional text with the Textbox, link to a RevType or other label with the LabelFileDropdown and link to a Company or other option with UseInstantBestMatch.
To add the fields:
-
Go to Operations > Trip Folder.
The Trip Folder opens. -
Retrieve the order or move associated with the service exception.
-
Go to Edit > Service Exceptions.
The Service Exceptions window opens. -
In the window, right-click, select Toggle QuickDesigner and select Add New Item.
-
Select a Control Type for the additional field.
-
In the Field Group section, select _CurrentServiceExceptionBindingSource
-
In the Field section, select one of the Misc fields.
-
Click OK.
-
When finished, right-click and select Toggle QuickDesigner.
For details on linking and other configuration options, see Adding links, reports, and custom grids to a window.
Note: When you use these fields, the details are recorded in the Service Exception Audit Details table. This is located at the top of the Service Exception window, with the hyperlink labeled Show Audit Details.