Defining the security for a table
To set up security for a table, you identify which of its fields will be used to enforce the security. To perform the Row Level Security (RLS) setup, you must be a System Administrator in TMWSuite.
Row Level Security Setup window overview
To set up security, you decide which fields in a table will be used to enforce it. You use the Row Level Security Setup window to identify those fields. It is a sub window of the Row Level Security Assignment window.
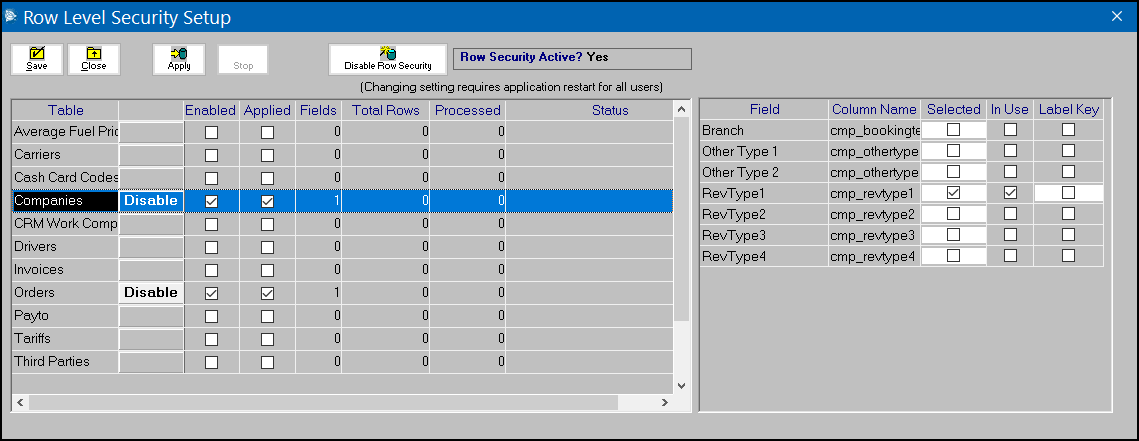
It has three sections:
-
Header
-
Tables grid
-
Fields grid
The window header
The top of the window contains five command buttons that control the window functions.
-
Save
If you are making changes to multiple tables and do not want to update the database for each table individually, you can save the settings you have recorded for the current table, and then make changes to additional tables before applying them.
-
Close
Exits the window
-
Apply
Updates the database with the changes you have made to all tables.
-
Stop
Available only while the system is updating the database, allows you to abort the update process.
-
Enable Row Security/Disable Row Security
The button name shows whether security has been applied. You click it to toggle security for all tables and fields on or off.
The window header also shows two messages:
-
Row Security Active?
Shows whether the
RowSecurityGeneral Info Table setting’s String1 field has a value ofYorN. To have RLS applied throughout the system, the message must be "Row Security Active? Yes." -
"Changing setting requires application restart for all users"
You see this message if the value in the
RowSecurityGeneral Info Table setting has been changed fromNtoY.
Tables grid
The grid on the left side of the window lists the tables that you can apply restrictions to.
It shows which tables have security setup. When you make security changes and apply them, this section also shows the status of the applied changes.
This table provides more information about the table you see on the left side of the window.
| Column | Description |
|---|---|
Table |
The database table name. There are many tables used in the TMWSuite database. However, only those listed here can have user-level record security applied to one of their fields.
|
Unnamed column |
This unnamed column contains the button used to toggle the security setup for the table.
|
Enabled |
This checkbox identifies tables that have their security setting enforced.
|
Applied |
|
Fields |
The number of fields in the table that have security set up. |
Total Rows |
By default, the value in this column is zero. When you change the security setup for tables and click Apply, you see the number of rows (records) the setup for the field affects. |
Processed |
By default, the value in this column is zero. When you change the security setup for tables and click Apply, this field shows the number of rows (records) that were affected by your change. Note: While the database is being updated with your changes, the value in this field will increment by the number of records processed until the update is completed. |
Status |
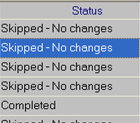
By default, this column is blank. When you change the security setup for tables and click Apply, this field shows whether this table is affected by your change. When the database update is finished, affected tables show a value of Completed. Tables not affected show a value of Skipped - No changes.
|
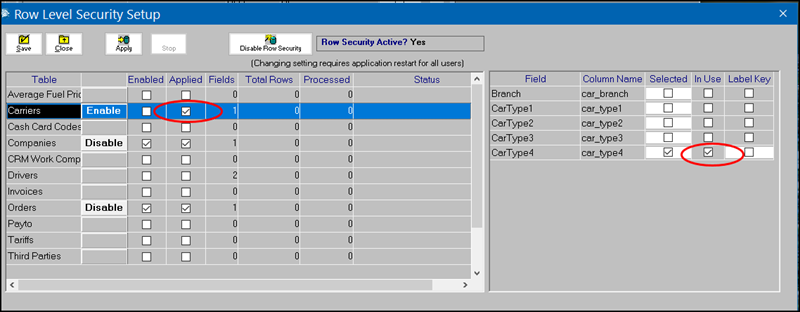
Fields grid
The grid on the right side of the window lists the fields in the tables that you can apply security to.
It shows whether the security for a field has been applied.
| Column | Description |
|---|---|
Field |
Identifies the fields that are available for security assignment. |
Column Name |
Identifies the database column name associated with the field. |
Selected |
The checkbox is selected when the field has a security setting specified. However, it will not go into effect until you click Apply. |
In Use |
The checkbox is selected when the field’s security setting has been applied. |
Identifying the tables and fields that have security settings
Some tables have only one field that can be used for setting security. Others have multiple fields you can use. For tables having multiple fields available, you can identify up to four fields to have security applied to them.
To identify the tables and their fields as having security applied:
-
In System Administration, go to Edit > Row Level Security. The Row Level Security Assignment window opens.
-
Click Setup to open the Row Level Security Setup window.
-
By default, the first time you access the Row Level Security Setup window in a session, the Administrator Login pop-up window opens. Enter the User ID and Password for the database, and then click OK.
Note: The pop-up window can be turned off. To turn it off, you must have
[Misc]UserSysAdminAutoLogin=Yin your TTS50. -
In the Tables grid, click in the row for the table you want to use.
The Fields grid shows which fields support applying security.
-
In the Fields grid, click the Selected checkbox for each field you want to use as part of the record security.
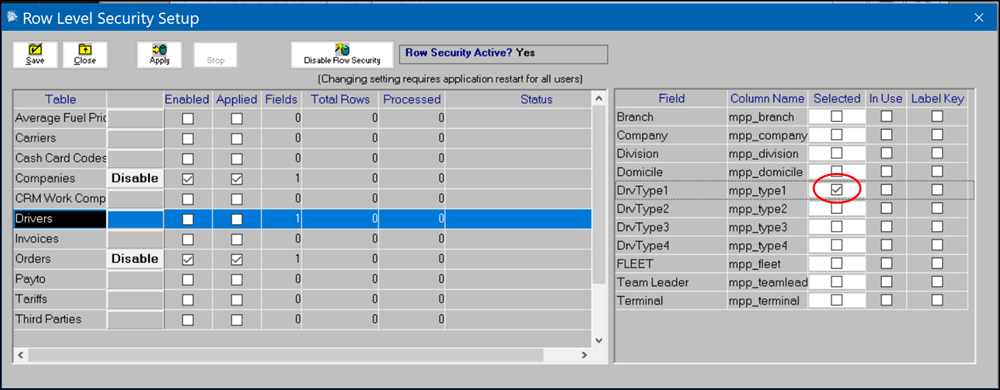
You can select up to four fields for a table.
-
Click Save.
The Tables grid refreshes. It shows the number of fields you selected.
Note: If you selected more than four fields, an error message appears. It states, "Too many fields have been selected. The most that can be used is 4." When you click OK to close the message, all unsaved selections for the table are cleared.
-
Repeat Steps 4 - 6 for each table for which you are setting security.
Note: If you do not save your entries for one table before selecting another table, the system displays a message. It states, "Changes not Saved. Do you wish to save your changes?"
-
Do one of the following:
-
Click Yes to save your changes to the first table.
-
Click No to abandon your changes to the first table.
-
Click Cancel to abandon your second table selection.
-
When you are done, you can apply your changes to the database.
Applying the security settings for a table
Once you have identified the table(s) and fields to which RLS will apply, you can update the database with all of your changes at one time.
-
In the Row Level Security Setup window, click Apply.
The system displays a message. It warns, "This will save setup changes and apply security to all affected tables. During update, row security will be turned off for affected tables. All users should exit applications at this time. Proceed?" -
Click Yes to continue.
Note: During the update process, the Stop button at the top of the window is selectable. If you need to abort the update, click it. The system displays a confirmation message. It asks, "Stop updating tables? You will want to turn off row security if changes are not applied." message.
-
Do one of the following:
-
To continue updating, click No.
-
To abort the update, click Yes.
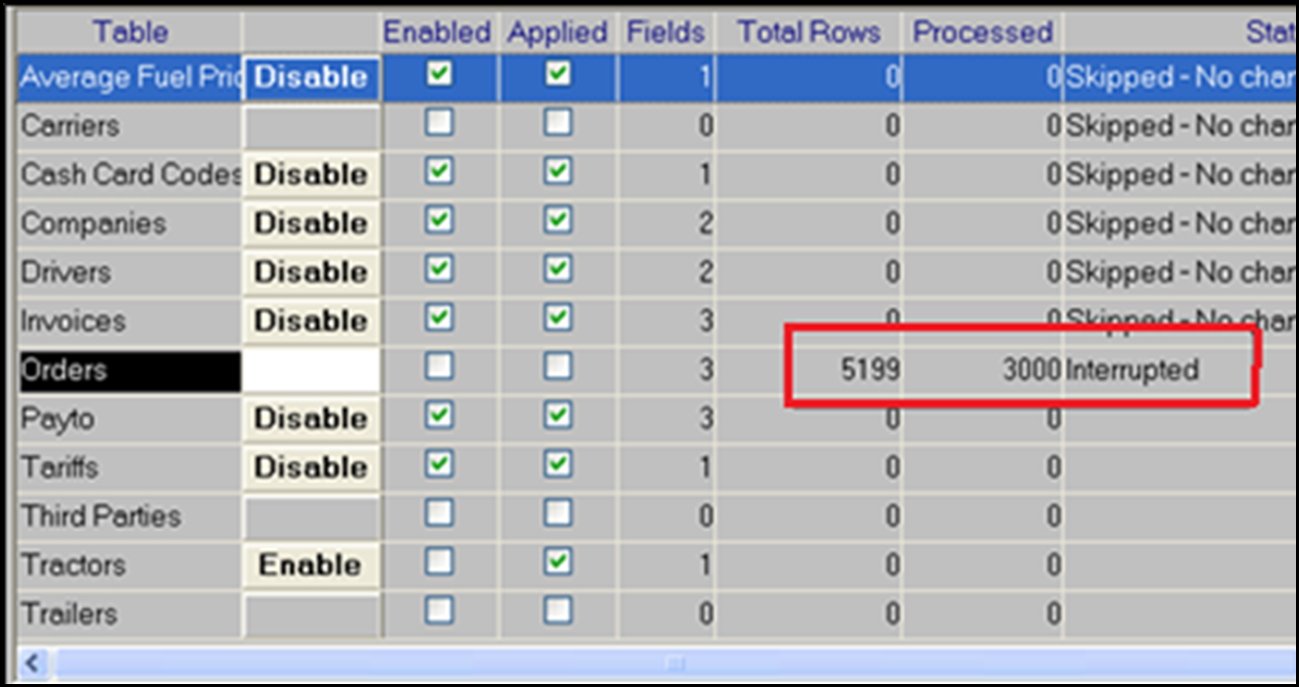
The system displays a message stating, "Check status in table list. Row Security should be turned off until processing completes."
-
-
Click OK to close the message.
The Table grid shows the status of the update as Interrupted. The Total Rows field shows how many records should have been updated. The Processed field shows the number of records that were updated.
When the processing is completed, the Applied and the In Use checkboxes for the field you updated are selected.
Disabling a table’s security settings
Once a table’s fields have been identified as being used for security and you have applied your changes to the database, the Tables grid shows the Disable button next to the table name.
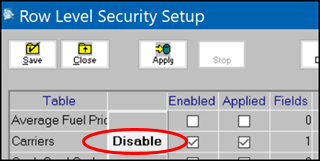
There may be times you want to suspend a table’s security setup temporarily. Using its Disable button lets you do that. There is no need to clear all entries in the fields list for the table.
-
In the row for the needed table, click Disable. The system displays a confirmation message. It identifies the selected table.
-
To continue, click Yes.
Note: If you are using the extended functionality that lets you restrict access to field options, you may see an additional confirmation message. It asks, "You currently have labelfile security set for revtype1. If you change this, any security set up for this label definition will be deleted. Are you sure you want to do this?"
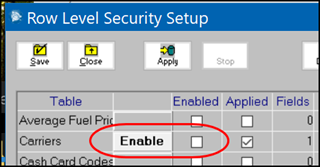
The button text changes to Enable. The Enabled checkbox is cleared.
-
To turn the security for the table on again, click the Enable button. The Enabled checkbox is selected.