Entering order header information
The order header is located at the top of the Order Maintenance window. It consists of fields that apply to all stops and freight.
You use this part of the window to enter key billing information, such as:
-
Bill To company
-
Revenue classifications
-
Reference numbers, such as a bill of lading number
Information is entered in these fields.
Required: *
| Field | Definition |
|---|---|
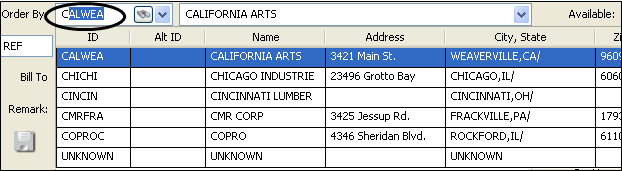
The ID of the company that placed the order. Note: You can use these features when entering a company ID:
|
|
Bill To |
The ID of the company that is to be billed for the shipment. Notes:
|
Ref |
Recording reference number information involves the use of two fields and a button:
|
Contact |
The name of the contact at the company that ordered the shipment and/or will be billed for it. |
Remarks |
Free-form text that applies to the order. |
Status * |
Specifies an order’s type and status.
Note: These statuses are relevant for a new order, but during the order’s life cycle other statuses may apply, such as Planned, Dispatched, Started, or Completed. |
Available |
The date/time the order is available for dispatch. Note: By default, this is the date/time you initiated the new order. |
RevType1 - 4 |
The revenue classification(s) that are appropriate for the order. Notes:
|
Bk: RevType1 |
By default, this field displays RevType1 options. Typically, this field is used to associate the order with the terminal that booked it. |
Inv Status |
The current invoice status. This status indicates how far the order has progressed in the billing process. The options are:
This status is automatically assigned to an available order when it is first saved.
|
Accessory Tra |
Custom field. |
TrlType1 |
Identifies the TrlType1 classification for the trailer that is to be assigned to the order. Notes:
|
Priority |
The dispatch priority to be given to the order. The system code options available from the drop-down list are:
Notes:
|
EquipmConfig |
Custom feature. |
These fields are all read-only.
| Field | Definition |
|---|---|
Miles |
Total billable miles. This number is for miles for all stops on the order. |
Miles OD |
Miles between the origin and destination. This number does not include miles for intermediate stops. |
Booked |
The date/time the order was taken. Note: By default, this is the date/time the order is first saved. |
Booked By |
The user ID of the person who entered the order into the system. |
Stops |
Total number of stops recorded for the order. |
Scroll ![]() buttons are shown to the right of three fields in the order header. Each button allows you to access a scroll window to do a search for records identified by the field name.
buttons are shown to the right of three fields in the order header. Each button allows you to access a scroll window to do a search for records identified by the field name.
-
Order: Button opens the Scroll Orders window.
-
Order By: Button opens the Scroll Companies window.
-
Bill To: Button opens the Scroll Companies window.
The advantage of the buttons is that you:
-
Do not have to go to the Tools menu.
-
Can double-click on the record you want. The system then inserts the record ID in the field for which you performed a search.
|
Gray |
No changes have been made to the order. |
|
Yellow |
Changes have been made and a save is needed to retain them. No potential errors exist at this time. |
|
Red with a yellow exclamation mark |
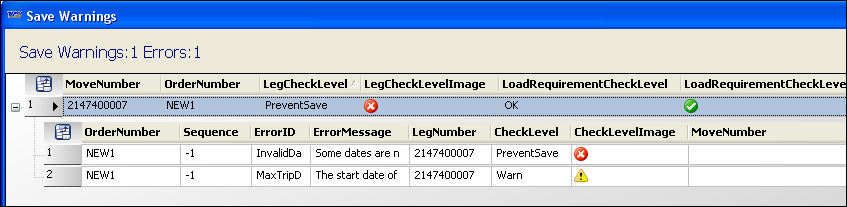
Changes have been made and problem(s) exist. Correction is needed before the order can be saved. You can hover over the button for a brief explanation of the problem. If you attempt to save anyway, the system will display the Save Warnings window, which lists the issues.
|