Creating multi-order jobs
The multi-order job feature simplifies the process of creating and dispatching orders for repetitive loads. A job serves as a planning record, or template, from which orders are created.
TMW Operations enables you to create two different kinds of jobs:
-
An order-based job
You define the job by the number of orders that you can create from it. The system automatically cancels the job after you create the specified number of orders.
Note: You can enter freight information that will appear on each order created from the job. However, it is not required.
-
A freight-based job
You define the job by the total quantity of freight (count, weight, or volume) that can be recorded on the orders created from the job. For example, you may create a job with a total weight of 100,000 pounds. As you create orders, you specify how many pounds of freight are transported on each order. When the entire 100,000 pounds has been transported, the system automatically cancels the job.
Note: Freight-based jobs require you to enter freight information.
You use the Order Maintenance window to create a job. Then, you create order copies from the job in Order Maintenance, the Trip Folder, or the Trip Planner.
How a job is like a master order:
-
It is a template from which order copies are made.
-
It cannot be dispatched.
How a job differs from a master order:
-
Although it cannot be dispatched, it is shown as a planning record on the Trips tab on the Planning Worksheet or Trip Planner.
-
A job’s lifespan can be limited to the number of order copies you specify when you create it. By default, a job drops off the Trips tab when its remaining orders reach 0 (zero).
-
Dragging a job from the Trips tab in the Trip Planner creates an order copy and sets its status to Planned automatically. The number of available orders remaining in the job decreases.
Note: Jobs cannot be planned in the Planning Worksheet.
-
If you create an order from a job and then decide it was planned in error, you do not need to cancel it. You can drag it from the Assignment Plan pane in the Trip Planner back to the Trips tab. The system automatically cancels the order and increases the number of available orders remaining in the job.
Setting up the multi-order job feature
To create multi-order jobs and job orders in TMW Operations, you must do the following:
-
Add the Additional Order Header Information command to a menu or toolbar.
-
Verify that the Multi-Order Job option is available in the DispStatus label.
-
Optionally, you can add job-related fields to the Order Maintenance window layout.
Adding the Additional Order Header Information command
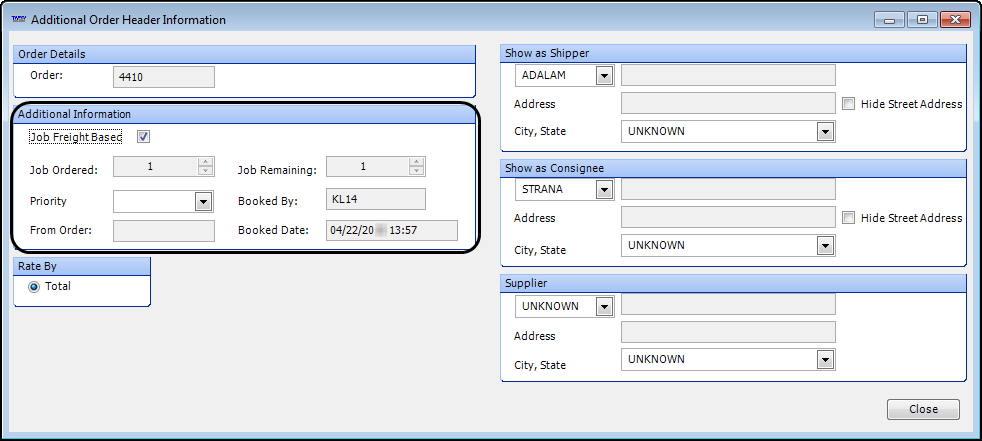
You use the Additional Order Header Information window to:
-
Specify whether the multi-order job is freight-based
-
Specify the total number of orders to be created from an order-based job
-
View the number of orders that remain to be created from an order-based job
-
View the order number of the job from which an order was created
The window is not available by default. To access it, add the Additional Order Header Information command to an Order Maintenance window menu or its toolbar.
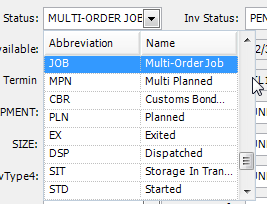
Verifying the Multi-Order Job option is available
Multi-order jobs have a status of Multi-Order Job. This status is a system code option in the DispStatus label. If it does not appear in the Status field in Order Maintenance, do the following:
-
Look up the DispStatus label.
-
Verify that the Multi-Order Job option’s Retired checkbox is cleared.
Adding job-related fields to Order Maintenance
Instead of using the Additional Order Header Information window to specify job orders, you can add fields to the Order Maintenance window layout.
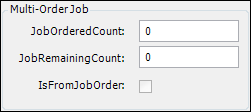
| Control Type | Field Group | Field | Description |
|---|---|---|---|
Textbox |
_BindingSource |
JobOrderedCount |
Use this field to enter the number of orders that will be created from the job. |
Textbox |
_BindingSource |
JobRemainingCount |
This field displays the number of orders remaining in the job. When you first create the job, you must enter the same value in this and the JobOrderedCount field. After job orders are created, the value in this field will update automatically. |
Checkbox |
_BindingSource |
IsFromJobOrder |
For orders that are created from a multi-order job, this checkbox value is True (selected). Note: Set this checkbox to read-only. |
After you have added the fields, be sure to save the layout.
Creating a multi-order job
To create a multi-order job, follow these steps:
-
Select Operations > Order Entry.
The Order Maintenance window opens. -
Create a new order as you would normally.
Notes:
-
If this will be a freight-based job, you must enter the total quantity of freight (count, weight, or volume) to be loaded or unloaded for each stop. When you create orders from the job, you will determine how much freight will be assigned to each order.
-
Refer to Basic order entry if needed.
-
-
Save the order.
-
In the Status field, select Multi-Order Job.
-
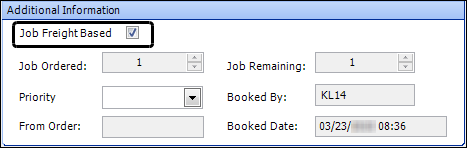
Open the Additional Order Header Information window.
-
In the Additional Information section, do one of the following:
-
If the job is order-based
Enter the number of orders in the Job Ordered field.
Your entry is copied to the Job Remaining field automatically.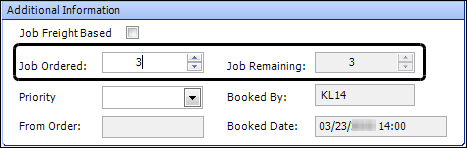
-
If the job is freight-based
Select the Job Freight Based checkbox.
-
-
If needed, select a priority status in the Priority field.
-
Click Close.
-
Save the order.